The thickness of the screed under a heated floor, water, is a parameter on which the safety and stability of the floor heating system depends. It should be such that the elements of the heating system are invisible, the surface is evenly heated and lasts for more than one year. We asked specialists from the Miralex company to tell us how to calculate the thickness of the screed, taking into account the type of soil, materials used, maximum permissible load with video and photo examples.
The efficiency of the heating system depends on the thickness of the screed Source i0.wp.com
Purpose
The thickness of the underfloor heating screed will affect the performance characteristics of the entire system, as well as its ability to operate effectively under external loads. It should be understood that the layer must be optimal and comply with the manufacturers’ recommendations if a ready-made construction dry mixture is used.
If a very thin concrete pour is placed on the base of the floor, it will not last long. In addition, there will be a very rapid heating of the surface and a rapid cooling process. She won't be able to bring any benefit. Taking this into account, especially if the room is constantly under load not only from movement, but also from the furniture located, then a minimal screed under a warm floor will very quickly crack and lose its appearance. This will also lead to damage to the flooring that will be laid on top.
A thick layer of poured concrete mortar will also not be able to demonstrate all the qualities of a warm water floor system. Warming up such a design will be very difficult and problematic. There is a high probability of pipeline failure in certain sections. All this will cause large financial investments to pay for heating. After all, a large amount of energy will be required for the heat to pass through the thick layer of screed and warm the base of the floor in the room.
It cannot be said that there are universal indicators for installing a concrete screed over a heated floor system. The fact is that here it is worth taking into account some factors, such as the type of base, the configuration and area of the room where the work is being carried out, as well as its purpose. After all, the load in residential premises will be significantly less than in industrial ones. Therefore, in the latter case, the filling layer should be slightly larger.
Types of finishing screeds
Dry
It consists of expanded clay, foamed vermiculite, expanded polystyrene or perlite. The granules are covered with sheets of moisture-resistant plasterboard or chipboard. All this is quite easy to install - anyone can do the job.
pros
- High laying speed. Even in a large room you can do it in a day.
- You can install the finished floor covering the very next day.
- The load on the floors is three times less than in the case of wet pouring.
- Easy installation.
- Excellent sound and thermal insulation.
Minuses
- If water gets inside the floor, mold will appear and the entire structure will have to be dismantled. Requires a waterproof finish.
- GKL and chipboard boards may not withstand additional heavy partitions.
- For some time after the repair is completed, rustling sounds will be heard when walking.
Instagram @stroypolrf
Instagram @alexpracapl
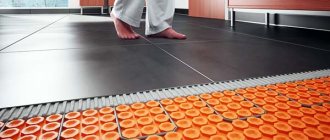
Wet
Usually this is a cement-sand mortar or concrete mixture. Doing everything yourself will be a little more difficult than in the case of dry backfill, but it is quite possible. Ideal for floors with ceramic and stone finishes.
pros
- Strength. Will withstand new, heavy partitions.
- The dried layer can be left as a final finish by simply painting it.
- Excellent sound and thermal insulation.
Minuses
- Labor-intensive process. The solutions are liquid, but pouring and leveling them without skills can be difficult.
- Heavy weight. If the floors are weak, this filling will not work.
- Long hardening time. It will take a few weeks before final finishing.
- You will need equipment for mixing - a construction mixer or a drill with an attachment.
Instagram @dnevnik_mastera_ru
Instagram @mastersanuzlov
Semi-dry
It is difficult to make such a coating with your own hands - it requires a pneumatic blower, a mixing machine, and a grinding machine. In a small area, you can try to do everything without equipment, but it will be more difficult. The material is not easy to level on your own, since it is a hard sand-cement mixture. Plasticizers and a small amount of water are added to it.
pros
- Tiling can begin after two to three days. For other coatings, the time frame is longer, since moisture will be released within a month.
- Light weight.
- Good sound and thermal insulation.
- Relatively clean working conditions.
- There is virtually no shrinkage.
- Moisture resistance.
Minus
- Need for equipment. It can be rented from a construction company, but this is an additional expense.
Instagram @stiazhkapola39
Instagram @stiazhkapola39
What is better to choose
It is difficult to answer unequivocally which screed is better for a water heated floor. Based on weight, the best option is dry mixtures. They are much lighter, the load on the floors is not so strong. In addition, they can be cheaper if renovations are being done in a small apartment. In terms of installation speed, they outperform the other two options. You can do everything in a couple of days. But such a floor is not recommended for use in the bathroom.
For large-scale work, when there is time before moving into a home and a large batch of material is needed, it makes sense to purchase wet concrete or cement-sand screed. This option is also suitable for those who need a durable coating that is not afraid of moisture.
A semi-dry mixture could be a compromise - it is durable and dries faster than wet. But it requires equipment or the workflow will be labor-intensive.
Difference from a regular screed
A regular screed is somewhat different from a screed for a warm water floor. The fact is that in its latter form, expansion joints must be installed. Even in rooms with a small area of up to 10 m2 they should be present. In addition, a depreciation strip should be installed, which is laid along the bottom of the wall. This is all necessary to compensate for the thermal expansion of the concrete screed during operation of the warm water floor system.
For larger rooms, additional seams are also made. Here, the compensation function is performed, in addition to the tape, by thermal insulation for the walls. In this case, the thermal insulation must have a heat-repellent foil.
Conditions for installing water floor heating
At the beginning of our story, we will warn the reader about the limitations in installing water floor heating. Those wishing to install water-based floors in an apartment building will be disappointed.
By-laws of the Housing Code prohibit the installation of additional heating systems in houses with central heating. Exceptions may include structures in which water-heated floors were provided for by the project.
Since the operation of such floors is associated with the circulation of hot water in the floors of buildings, it is advisable to install floor heating only on the 1st floors of buildings. This reduces the risk of significant losses in the event of damage to underfloor heating pipelines.
Number of screeds for heated floors
At first glance, it is a very strange question about how many screeds should be installed for a heated floor system. In addition to the rough screed, an optimal screed is made for underfloor heating on top of the pipes. The last layer will serve as the basis for finishing the floor in the room. An alternative to a rough screed is a floor slab. But in this case, it should be almost perfectly smooth and without defects. Otherwise, you will have to arrange a layer for leveling.
A warm water floor must be installed on the base without errors. It should be smooth. This is necessary so that the pipeline is subsequently evenly distributed in the concrete screed for finishing.
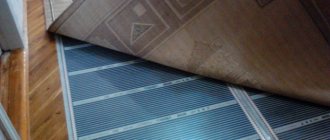
Is it possible to make a floor without screed?
They prefer to install warm floors without screed where filling cannot or is undesirable to be installed. For example, in rooms with low ceilings. There are two options for this floor:
- Made from polystyrene . The system consists of mats and a heating circuit. Installation of mats is possible on logs, wood and concrete floors.
- Made of wood . The floor is laid on a base made of wooden plates with channels for pipes.
Laying heated floors on a wooden base Source remont-samomy.ru
Components of a heated floor
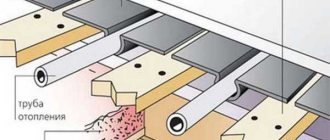
The entire underfloor heating system, together with the screed, has a certain thickness, which must have optimal parameters. In this case, you should first decide what is included in the subfloor heating system and how thick each layer can be.
- Initially, a layer of heat and waterproofing is placed on a flat base. Polystyrene is often chosen as insulation due to the qualities and characteristics it exhibits during operation. Typically, the thickness of the heated floor here is taken in the range of 80-100 mm. This layer will be enough to retain heat and send it in the right direction. Even if there is a basement without heating below. The overall thickness of the heated floor will not be affected by waterproofing, since it is made from a very thin polyethylene film.
- Insulation can be purchased with special recesses for placing the pipeline. If this is not available, you can arrange a layer of reinforcement or purchase a MAK mesh, to which it is very easy to attach pipes. For metal mesh reinforcement, the thickness is approximately the same as the mesh and is approximately 4-6 mm.
- The pipe itself, which is used for the water heated floor system. The diameter can be completely different. But it is recommended to take no more than 20-22 mm in diameter. It will be sufficient for the system to work fully.
- Screed over a heated floor with a finished coating. There are subtleties here in preparing the solution and choosing the appropriate material (cement, sand, additives, plasticizer, etc.). A layer for fastening (glue) is also added to the final coating, which applies to ceramic tiles.
Methods for laying finishing screed
There are two general rules for all material laying options. Before pouring or backfilling the top layer, builders recommend sketching the location of all elements of the system, as well as checking its performance. You can test it in two ways.
Testing of heated floor elements
- With operating temperature. Start bringing the system to operating temperature at 20°C. Raise to 5°C after three to four hours. Drain the coolant if leaks appear and repair them. Then start again. Leave for 2-3 days. If all is well, you can do the finishing touches by first cooling the system.
- With high blood pressure. Run the coolant into the system and create a pressure 2-3 times higher than the working one. Leave it for a day. If the pressure drop is no more than 1.5 Bar, proceed to filling.
When pouring the screed, the pipes must contain coolant heated to 25°C.
During pressure testing, it is recommended to additionally secure the pipes. After a successful trial run, you can proceed further. We will give step-by-step instructions for each installation method.
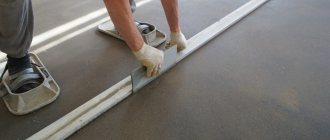
How to fill a wet screed
Filling in one room should be done in one day, and interruptions in work should be minimal. The exception is a surface divided by a damper tape. In this case, areas can be filled intermittently.
- Attach damper tape around the perimeter of the room. It is needed so that the frozen floor does not crack due to temperature changes.
- In a large room, fix it every 20 m2, between adjacent contours. The pipe passes through it and is enclosed in a corrugation at the passage point. You can use T-shaped strips instead of tape.
- Protect the installed hinges of the water floor from mechanical damage with boards.
- Insulate the pipes supplying water to the collector. If they are plastic, hide them in the grooves made in the floor insulation.
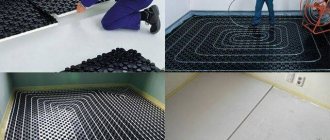
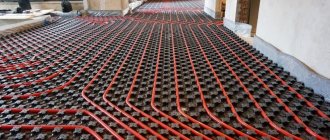
- Place a metal mesh with 10x10 cm cells on the heating system.
- Using a level, install metal beacons with a height equal to the thickness of the layer. Fix the first one at a distance of 20-30 cm from the wall. The next ones are in increments less than the length of the rule by 20 cm.
- Secure them with alabaster and wait until it sets.
- Prepare a sand-cement mortar in a 3:1 ratio or dilute the finished composition with water.
- Spread the material over the surface while tamping it down to remove air bubbles.
- Smooth out the mixture using the rule.
- Cover it with film the next day.
Instagram @rusteplopol1
Instagram @_alexey_denisov
Instagram @styazhka_pola__
Instagram @rusteplopol1
Instagram @rusteplopol1
Drying usually takes 20-28 days. During this period, no other finish can be laid on top.
The damper tape should not cross the thermal contours themselves. She is always located between them.
How to install a dry screed
All components of the composition and the surface on which they will be poured must be perfectly dry.
- Fix a damper tape around the perimeter of the room and between the heating circuits to compensate for the expansion of the material.
- Using a level, install the beacons. They should be equal to the thickness of the mixture.
- Lay two guide rails parallel to each other on top. The outermost one is at a distance of 25 cm from the walls. The gap between the slats should be less than the length of the rule.
- Place the rule on the guides and start aligning from the far wall towards the exit.
- The slats can be left or removed. In the second case, the furrows from them are leveled with a wide spatula.
- In the area where the work was completed, secure the first sheet of drywall or chipboard. The recommended gap between it and the wall is 10-15 mm.
- Apply glue to the edges of the sheet and carefully lay the next sheet.
- Fasten them with self-tapping screws. Sew the entire floor in this manner.
- Fill the gaps near the wall with foam.
The final finish can be installed the next day, when the glue has dried.
Instagram @gkpartiya
Instagram @stroypolrf
Instagram @sk_tehnologiya
Instagram @slavianskiiterem
How to lay a semi-dry screed
- Install damper tape around the perimeter of the room and between the thermal circuits.
- Lay a reinforcing mesh with 10x10cm cells on top of the thermal system.
- Mix cement and sand with a shovel in a ratio of 1:3. You can add fiberglass, plasticizer or PVA glue.
- Set some of the mixture aside and pour some water on it.
- Repeat this with the entire slide, leave it for half an hour.
- Then mix the material two or three times with a shovel.
- Check its readiness. The finished material easily sticks together into a lump, remains moist, but water does not flow out of it.
- Place the beacons and add the mixture in small parts.
- Lift the mesh so that the composition is evenly distributed inside the thermal contours.
- Compact the material and level the floor surface using the rule.
- Seal the furrows from the lighthouse the next day in the same way, but add a little more water.
- If you do not have time to fill the entire room in one day, cut the edge at a right angle.
- Cover the floor with film for two weeks to prevent water from evaporating. Air should not get under the film.
Watch the video for a visual presentation of these instructions.
Pouring composition
First, you need to decide on the brand of cement for the mortar. It should be M200-M300, depending on the purpose of the room itself. In addition, the composition may contain plasticizers to avoid the appearance of cracks on the surface after pouring, as well as for better distribution over the base. When installing a screed under a warm floor, the thickness must meet all requirements and recommendations. Usually it is 50-70 mm. The start of the fill level comes from the top of the system pipeline. Manufacturers of dry mixes for preparing concrete mortar can also advise on optimal parameters. This should also be followed during installation.
Instead of plasticizers, “folk” remedies in the form of PVA glue can also be used. Such methods were applicable 15-20 years ago, when technology was not so well developed. It is worth noting that the cost of various additives is currently not so significant and you can afford to purchase them. In addition, their consumption is not large per volume of concrete solution. In this case, the thickness of the screed above the heated floor pipes can even be slightly reduced due to improved strength characteristics.
HENCO recommendations
HENCO is also a German manufacturer. (No, the Germans are not monopolists. It just happened that way). This manufacturer recommends using a heated floor screed thickness of 45 mm. Information can be found in this document
Minimum parameters
Building codes and regulations provide minimum limits for pouring concrete screeds. This is stated in the relevant documents. But not everyone knows how thick a screed for a warm water floor can be.
The minimum thickness of the heated floor screed should be 20 mm if self-leveling mixtures without a reinforcement layer are used. If this is a classic concrete screed, then at least 40-60 mm along with the reinforcement layer. True, metal mesh is not always laid on top of pipes. This is done if there is a desire to strengthen the entire structure and create reliable protection for the pipeline.
A minimum screed for a water heated floor can be considered for execution with a rough layer installed, when the base is leveled and adjusted to the horizontal level. In any case, the pipeline must be laid on a flat surface without errors or defects. You can talk about the minimum thickness of the screed over a warm floor if you completely forget about reinforcement. This layer should be skipped so that the distance from the ceiling to the floor is not affected. Currently, there are alternative options for metal mesh - fiberglass. Adding a small amount of it to the prepared concrete solution will allow you to obtain the same characteristics without increasing the pouring layer.
The minimum layer of screed for a heated floor will not be suitable when loads occur during operation. This could be installed bulky furniture, household appliances, etc. All this can damage the surface and render the floor covering unusable. So you should know what thickness of screed for a heated floor will be optimal, and under what conditions it will be used.
Typically, a layer of underfloor heating screed of 60-70 mm will be sufficient along with any type of floor covering. This is where all the quality and efficiency in work will be evident. The floor will be heated in the required amount with minimal heating costs.
Total thickness of finished subfloor
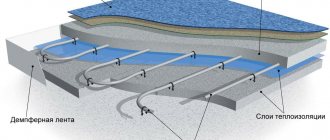
Recommended thickness of each of the layers that make up the warm water floor cake. The order of arrangement of each of the layers is shown in the diagram below:
The subfloor must be smooth and durable. The thickness of each layer placed on top of the subfloor, in order from bottom to top, will be as follows.
A layer of insulation 30-90 mm thick made of fibrous polystyrene rigid boards. They must be strong enough to withstand the high load of subsequent layers, and therefore the material density is chosen to be at least 35 kg/m³. The thickness varies depending on how cold the crawl space is. If there is a heated room below the floor, then a layer of 30 mm will be sufficient, and if the floor is laid on the basement floor of a private house, then it is better to place a layer of insulation with a thickness of at least 90 mm.
Multifoil 3 mm thick is laid on top of the thermal insulation. Its main function is to waterproof the next layers of the floor. If the waterproofing layer has already been laid on the rough concrete floor, laying multifoil is not required.
Reinforcing mesh 100x100x4 mm or 150x150x4 mm serves to increase the strength of the screed, which, when reinforced, becomes more resistant to tensile loads. For the convenience of laying pipes according to the diagram, they can be fixed at the desired points on this grid.
The pipe is laid according to one of the diagrams shown below. These circuits are called "coil" and "helix". The first is classic and suitable for any room, while the second is not recommended for use on wooden floors and is most effective for rooms that require particularly intense heating. The permissible distance between pipes is from 10 to 30 cm. The presence of joints inside the floor is unacceptable; the pipe is laid in one piece, the ends of which go into the collector. The average layer thickness is 20 mm.
Before moving on to the screed, we need to talk about the damper tape. It is pre-laid around the perimeter of the walls in order to avoid creating unnecessary stress on the walls. The fact is that the concrete screed, when heated from the heat of the pipe, will expand and create pressure on the walls, and to prevent this, it must be fenced around the perimeter with a special “spring” material. The minimum thickness of such a tape is 5 mm, the optimal is 10 mm.
As a result, taking into account all the described requirements for the arrangement of a water-heated floor screed, the thickness of all layers and a separate concrete screed will be as follows:
- The entire floor is 80-135 mm, taking into account the thermal insulation layer and the thickness of the concrete layer
- The thickness of the screed is 50-65 mm, depending on the selected layer height above the surface of the pipes.
Screed pouring limits
The thickness of the screed over a water-heated floor can reach a certain height as long as it performs its functions. Nothing is documented about this. No one advises choosing a screed thickness for a heated floor under tiles of no more than 15-17 cm. Otherwise, you will only waste money on purchasing the material, as well as time to complete the work.
The minimum thickness of the screed for a water-heated floor cannot be provided when a monolithic structure is created. That is, the screed above the heated floor pipes also serves as the foundation of the house. The situation is similar in specialized premises that are more of an industrial value (garage, warehouses, parking lots).
Since water heated floors are mainly installed in private buildings, this is where another problem arises - problematic soils in the base. If they are present, parameters such as the minimum thickness of the screed over a water-heated floor cannot be considered. The fact is that if a small fill level is created, over time it can collapse and affect all components of the structure, including the pipeline with the floor covering. The system is installed for years, therefore, care must be taken to create the necessary layer of screed over the heated floor.
If the surface is significantly uneven or has large differences in height, you should consider leveling it to the required limit. All protrusions are knocked down, and the remaining areas are covered with dry material. Such manipulations are carried out before installing the heated floor.
Using a backfill layer allows you to reduce the cost of preparing a solution for a concrete screed. After all, every centimeter of pouring level requires a certain amount of concrete solution. The higher this figure, the higher the costs. One cubic meter of concrete to fill a room area of 10 m2 and a screed thickness for a heated floor of only 10 cm.
If the minimum screed of the heated floor did not work out, but reached the maximum limits, then it is worth remembering the difficulties and problems that will have to be encountered during the operation of the system. The floor surface in the room will heat up for a very long period. Funds will be spent on all this in order to “sink” the entire “pie”. Consequently, the efficiency of the heated floor will be reduced to a minimum or there will be nothing at all. So, when screeding a heated floor, the optimal thickness should be selected whenever possible.
Semi-dry coating
Today, many people prefer dry mixture for laying screed. It is less problematic to pour than a cement-sand mixture. This installation method has its own characteristics. The semi-dry mixture is considered stronger than ordinary cement. After pouring, the drying period is much shorter, which makes it possible to finish laying heated floors faster.
Experts say that the material does not crumble or collapse under the influence of heat emanating from the pipes. It is easier and more convenient to work with this type of mixture.
Before laying the semi-dry mixture, you should carefully prepare the base. All debris is removed, the base is laid with a vapor barrier material. If there are deep cracks or depressions, it is recommended to fill them with a viscous cement solution. Rolled materials are laid with an overlap, and it must also overlap the walls. The seams are treated with special tape. The semi-dry mixture is poured onto the finished base.
The mixing proportions that should be used are indicated on the packages of the semi-dry mixture. The consistency of the material should not contain a lot of water. If you squeeze it in your hand, you get a dense lump. Moisture should not flow down your hand. In this way, they check that the ingredients of the mixture are mixed correctly. Very often, fiber fiber is added to the dry mixture to make the coating even more stable. The fiber is well distributed throughout the structure in all directions.
The minimum thickness of the screed will be 4 cm. Its height also depends on the method of laying the pipes themselves and what material they are laid on. The floor and its maximum height can reach 20 cm. If the base for pouring has significant unevenness, the height must be raised significantly. In general, the thickness will be at least 4 cm and no more than 20 cm.
The coating may be destroyed by improper drying methods. Just because you can walk on the floor does not mean the grout is truly dry. A liquid cement-sand mixture 4 cm high takes at least a month to dry. The mixture prepared from dry materials dries within several days, depending on the height of the coating. In order for the material to harden correctly and without cracking, the surface should be moistened with water and covered with film. As a result, the base will not sag, will dry well and will not crack.
The size of the water coating depends on the type of fill and the characteristics of the base. The more significant irregularities on the surface, the higher the structure will be. This happens due to the application of several layers - this is a necessity to achieve the zero level.
Based on experience, experts say that the relative total height of the warm water coating is 10-15 cm, taking into account absolutely all materials used, including the floor covering.
Nuances and secrets when styling
Craftsmen can share their experience gained over years of work and pouring screeds under water-heated floors. The following recommendations will help novice professionals or home owners:
- The presence of cracks or chips on the dried surface prohibits laying out the next layer. It is necessary to repair any defects that have arisen. This is done by pouring additional mixture.
- Waterproofing is always required in the bathroom and kitchen. The finishing layer is laid on top of the waterproofing layer.
- When using the dry variety, it is better to additionally use thermal insulation. It is also installed in a private home, which provides additional comfort for the family.
- The screed should dry under protection from sunlight. Therefore, you should hang thick curtains on the windows; it is better to use blinds.
- The surface must be clean and dry before pouring the mixture. This will prevent cracks from forming.
- It is recommended to coat the surface with a primer. It forms a film, therefore providing a water-repellent effect and making the mixture adhere to the surface more firmly.
Compliance with the presented nuances will help you avoid mistakes when working independently. It is recommended to take technology into account and use expert advice.
Determining the minimum
Other layers are also needed while filling:
- rough filling (a floor slab is often used instead);
- insulation;
- reinforced mesh (if necessary);
- layer of pipes (for water heated floors) or cables (for electric heated floors).
After this, the floor is poured and covered with the selected type of coating.
Minimum fill thickness
not regulated by building codes.
It is proposed to make the thickness at least 2 cm, and when using reinforced mesh, at least 4 cm, if pipes of standard diameter are used.
Even the minimum height screed copes well with its functions. Minimum – not acceptable in places with heavy load. Its use is not recommended in rooms where the load is increased (corridors, garage, technical rooms).
Consequently, with proper arrangement, you can save money and minimize the height of the ceilings.
Optimal floor thickness with water heating
are considered 7-10 cm. In this case, the most acceptable screed under pipes is considered 4.5-7 cm, and above pipes about 2.5-3 cm. If reinforced mesh is used, then a total height of 6-7 cm is sufficient.