Disputes regarding the need and possibility of installing a heated floor in a bathhouse have not subsided since the advent of this heating option. There are supporters and opponents of laying heated floors in such a specific room. There is still no unambiguous point of view, however, heated floors in bath rooms are becoming more and more common.
Users who have used this heating option note convenience, a high degree of comfort, the ability to keep building structures dry and extend their service life. Let's take a closer look at the features and capabilities of a heated floor in a bathhouse.
5/5 — (1 vote)
Advantages and disadvantages of the solution
Advantages of installing warm water floors in a bathhouse:
- creating more pleasant conditions in the steam room and washing room;
- maintaining a constant room temperature, dry conditions;
- system safety and reliability;
- Possibility of combination with any type of floor covering;
- economical energy consumption;
- long service life.
Disadvantages of the technique:
- labor-intensive and time-consuming installation;
- the need to purchase expensive materials.
What does a water heated floor in a bathhouse look like?
You also need to take into account that the implementation of the system entails additional costs for maintenance and maintaining the required temperature conditions.
To whom are floors good in Rus'?
Warm bath floors were invented a long time ago, by the ancient Greeks, and improved by the ancient Romans. However, keeping the Greek name for this invention is hypocaust.
From the point of view of convection and efficiency of the entire heating installation, the hypocaust can be called the optimal design. However, this design also has disadvantages, and significant ones.
Choice of flooring, coolant features
When arranging a traditional Russian bathhouse with your own hands, you usually assemble wooden flooring due to its aesthetics and authenticity, environmental friendliness and ease of installation. Less common is a floor laid with ceramic tiles using frost-resistant adhesive. The latter must contain at least 40% mineral additives, preferably uniformly white and uniform in consistency mixtures.
Since heating in the bathhouse is not regular, in winter there is a high risk of water freezing and damage to pipes. Antifreeze used in heated floors as a coolant consists of diluted glycol; if metal pipelines are installed, anti-corrosion additives are welcome. It is important to ensure complete sealing of the joint area to prevent contact of antifreeze with air.
The liquid can be heated from a stove with a water circuit or from a boiler. In the first case, it is assumed that a heat exchanger is installed from a metal tank. If you use a grate welded from pipes for this purpose, the floors will heat up faster and better. The circulation of coolant in the system is ensured by a pump.
Installation of a water floor from a sauna stove
Initially, water heated floors were not intended for installation in a bathhouse. Therefore, when laying such a “pie” in a bathhouse, it is required to equip it with additional elements.
The installation of a water heated floor from a sauna stove includes several components:
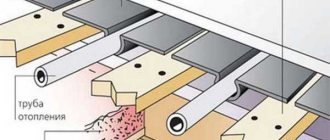
- The heated floor contour is the main working element, which is laid evenly across the entire floor of the room with a certain pitch, filled with a concrete-cement mixture screed. You should choose the right pipe model; in this situation, not every one will be suitable. It is best to use copper, metal-plastic or stainless steel corrugations. However, many people prefer cross-linked polyethylene pipes with increased heat resistance, with a service life of at least 30 years, or polypropylene pipes, with a warranty period of at least 50 years.
- The mixing unit is an important part of the system, since the stove is not capable of heating the coolant to the required level. It heats the water almost to the boiling stage; in this state it cannot be supplied to the circuit. Therefore, a mixing unit is needed, in which boiling water will be mixed with the waste coolant to the required 40 degrees, and in this form it will be sent into the pipeline. It is used to regulate, configure and automatically maintain the temperature level of the heated floor in the desired mode.
- Heat exchanger - a container, coil or register located above the firebox, where the liquid from the furnace is heated. When using antifreeze as a coolant, you will need to equip a separate heat exchanger, then the antifreeze will not be able to get into the washing water.
- A circulation pump is necessary to ensure that the coolant is evenly distributed and moves through the pipeline. Without it, a warm water floor cannot function, as it provides the circuit with additional pressure for fluid circulation. When selecting the pump power yourself, you need to take into account the area of the heated room; the larger it is, the higher its performance should be.
To reduce the load on the pump, it is recommended to divide the pipeline into several parts of equal length.
- Drainage is necessary to remove excess liquid from the steam room and washing room of the bathhouse. You can equip it with your own hands, taking into account the following two points: by constructing a water outlet - a drainage hole, through which the water will flow into the pipe and be discharged into the sewer pit; fill the screed with a slope in the direction of the drain hole - then all the water will flow towards the slope.
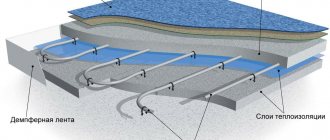
General principles for laying water heated floors in a bathhouse
Methods for assembling the structure depend on the materials used:
- a flexible pipe is placed directly under the finished floor, covering the entire area; the working fluid flows through it;
- the maximum possible length of such a pipe is 100 m; if it is laid in a spiral, a distance of less than 40 cm should be left between its turns. As a result, one product covers a floor area of 15 square meters. m;
- Several similar preparations are introduced into large premises. In particular, for a steam room with an area of about 30 square meters. m will need two segments of heated floors of 15 square meters each. m;
- in a scheme with two pipes, the ends are sent to the manifold cabinet, where they are combined. A coolant heated by a boiler or furnace is supplied to the bundle, resulting in heating of the room.
When choosing a location for a manifold cabinet, convenience is a priority, because the ends of the pipes serving the heated floor are placed in it. As a rule, a niche in the wall is prepared for it.
Electricity as it is
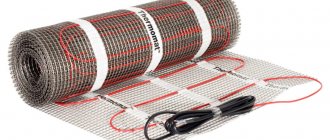
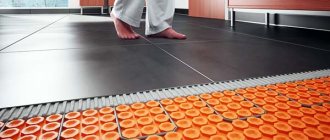
Electric heated floors come in several types. The heater can be in the form of a wire - double or single. The two-core one is more convenient to install, it does not need to be ringed, it is laid in one direction and a plug is simply placed at its end.
The single-core wire is laid with the expectation that both ends need to be connected to the controller. Don't forget about the temperature sensor. Its installation is also mandatory and is done on the floor between the turns of the cable.
A system with a single-core wire is easy to install, but has a significant drawback: it produces high electromagnetic radiation. When using a two-core wire, electromagnetic radiation is much less due to counter magnetic fluxes.
For floors made in the form of rolls or mats, electromagnetic radiation is significantly lower. But there are restrictions on their use.
The power of thermal mats ranges from 150 to 450 W per square meter of surface. For bath floors, 250 W per square meter is considered optimal.
Overview of tools and materials
You need to prepare:
- heat exchanger (aka coil), usually made from a section of an inch pipe with a length of 3 m, exactly adjusted to the parameters of the furnace;
- storage container - optimally this is a stainless steel barrel, the wall thickness of which exceeds 5 mm. A breather is installed into it, protecting the system from steam formation. The minimum total volume of the storage tank and pipes is 100 l;
- thermostat;
- bypass, optimizing the forward and reverse direction of movement of the working fluid;
- three-way valve to the bypass;
- the main working tool is a circular pump;
- pipes;
- a distribution manifold that ensures the movement of coolant in the circuits.
For a water heated floor in a bathhouse, you will need a distribution manifold.
You will need additional components such as insulation, vapor and waterproofing, fittings, fittings, substrate, and fasteners.
Advantages and disadvantages
When installing a heated floor, the air is heated evenly and this completely eliminates the appearance of a convective draft, which is observed with radiator heating.
An electric floor helps in cases where the bathhouse is located far from gas lines. It has a number of advantages over other types of heating:
- Thermal insulation provided when installing a heated floor prevents heat from passing through it. Thanks to it, up to 40% of heat is retained.
- The installation process, if organized correctly, takes little time.
- Reducing the cost of heating itself, because unlike its centralized counterpart, it is turned on only when using the bathhouse, and not every day.
- All installation work can be carried out independently.
The disadvantages of heated floors include:
- electromagnetic radiation;
- expensive electricity (but this is a relative minus, since the bathhouse is not constantly heated).
Preparatory work: design
To lay heated floors, 2 patterns can be used - snake and snail. The first method is relevant for premises whose area does not exceed 10 square meters. m. When using a snake in spacious baths, only one half is fully heated; on the surface of the second, the temperature is noticeably lower. To compensate for heat losses, it is necessary to provide a smaller installation step. Here the standard figure is 30 cm, in the second half of the bath it is reduced first to 20 cm, then to 15 cm.
The spiral method is more universal; its popularity is facilitated by the ease of installation and the possibility of uniform heating of the floor. The pipe is led in a circle without sharp bends, and pressure losses along the line are reduced. For comparison: forming a snake involves bending the pipeline 180°, while for a snail 90° is sufficient.
If a compact bathhouse is being installed, heated floors are installed into it using the snake method. The justification of the solution lies in the small floor area; we also have to take into account that the temperature of the coolant in the circuit rarely exceeds 30-35 ° C; in this mode, heat loss is almost invisible.
Water heated floor in the bathhouse is an excellent solution
The assembly of the system in the bathhouse is preceded by careful preparation of the base. Dust, debris, and stones are removed from the primary coating. A deeply penetrating primer is applied to the entire surface. Next comes the waterproofing layer, the most practical option is ceresite or ready-made self-leveling mixtures. Roofing felt and bitumen mastics are not suitable here.
Stages of work execution
If you are going to install such a coating in a sauna or bathhouse, I recommend watching the video:
So, we will proceed according to this scheme:
- We clean the primary coating from debris, stones and dust.
- We treat with a deep penetration primer.
- Apply a layer of waterproofing. It is best to use store-bought bulk mixtures and ceresite. If possible, try not to use bitumen mastics or roofing felt for this purpose.
- We glue or nail damper tape around the perimeter of the room.
- We install insulation. Expanded polystyrene with a thickness of at least 50 mm is best suited.
- Again a layer of waterproofing, this time a regular construction or greenhouse film will do. You can, of course, use a special reflective coating for warm floors, but the difference in its effectiveness with film is only 1%.
- We lay the reinforcing sheathing.
- We mount it according to the pipe plan, using a snake or snail pattern.
- We tie the pipes with plastic ties.
- We connect all the equipment: heat exchanger, collector, pipes.
- We apply pressure to the system using a portable pump or compressor and set the pressure gauge to the notch.
- After 4 hours, remove the pressure and raise the entire structure by about 1 cm. It is not advisable to place wooden supports under it, as they will subsequently swell. It is necessary to use protective layer clamps for reinforcement or homemade plastic substrates.
- We display beacons.
- Prepare the screed solution: mix 1 bucket of sand, 2 buckets of granite chips (2-3 mm in diameter), 1 bucket of cement and water. Granite chips can be replaced with crushed stone.
- Fill the screed and leave for 4 hours.
- Pour water and cover with film for 3-4 days to evenly distribute moisture throughout the solution.
- We remove the film and wait another 25 days until it hardens completely.
- Apply a clean coat.
And, finally, I would like to say that the best method of heating a bathhouse is considered to be a tiled floor. It combines efficiency, practicality and durability.
This, in principle, is all, dear readers, that we wanted to tell you. If you still have any questions, we suggest you read our other articles. Subscribe to our newsletter and share with friends. Good luck!
Installation technology
Depending on the base material, it is practiced to install a wooden, polystyrene, or concrete heated water floor.
Concrete
It is widely used in Russian latitudes, it is based on a concrete screed with a flexible pipe; it also uses insulation in tandem with polyethylene film. Mineral wool and penoplex are optimal as thermal insulation materials. Concrete is mixed with special additives (they are also used in the construction of swimming pools), which prevent cracking of the dry mass under conditions of frequent temperature changes.
Preparing the base:
- the screed is made with an inclination corresponding to the direction of drainage of water, the maximum angle is 10°;
- the completely dried layer is covered with a polyethylene vapor barrier;
- insulation is laid on top - mineral wool, penoplex;
- holes are formed in the material into which beacons for future screed are placed;
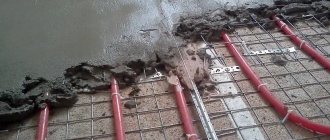
- The top of the “pie” is covered with a metal reinforcing mesh with a cell size of 10x10 cm.
Polyurethane foam tape is fixed along the perimeter along the walls: a soft membrane compensates for the potential expansion of concrete and prevents it from cracking when heated.
The pipe is laid in a spiral taking into account the following recommendations:
- between the turns you need to leave gaps no wider than 40 cm, a distance of 25 cm should be maintained from the outer pipe to the walls;
- When laying a pipeline, the permissible radius of its bend should be taken into account - this is five times the diameter. The product is sold in the form of reels, they are unwound as they are used, fixed with clamps so that there is space for pipe expansion;
- the pipes are combined into a circuit in a manifold cabinet.
After trial testing, the concrete screed is poured again.
It is important that the ambient temperature is kept in the positive range; a vibrator is used to compact the mass. The optimal layer thickness allows you to leave 2 cm of concrete above the pipes; usually it ranges from 7-8 cm. If a tiled floor covering is planned, 5 cm is enough.
Wood
The flexible pipe is placed in the grooves left between the slats; this space should be wider than 2 cm. Chipboard panels are considered the most budget-friendly base material. Operating procedure:
- The base is leveled and debris is removed.
- A sheathing is formed from timber with a cell side of at least 60 cm, and fiberboard or plywood is stuffed onto it.
- The finished raised floor is covered with a vapor barrier and insulation on top.
- Lay out the boards, in the gaps between which the pipe will be placed. Their height should exceed 2 cm.
- The grooves are insulated with foil to prevent heat leakage downwards, and pipes are placed on it.
- All ends are connected to the manifold cabinet.
- A finishing layer of cladding is formed.
To fix the foil in the gaps, you can use small nails or a stapler. If the raised floor is assembled from fiberboard, foil is glued to the smooth surface of the slabs using double-sided tape.
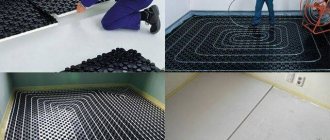
From polystyrene plates
The base is assembled from segments with ready-made grooves; pipes are inserted into them. Plates are inserted into the gaps to promote more uniform heat distribution. A low and light structure is formed that does not “eat up” the usable space in the room. No labor-intensive concrete screeds are needed here. Polystyrene does not allow moisture to pass through and retains its heat-insulating properties throughout its entire service life.
Installation features:
- the first layer is laid insulation in the form of mineral wool;
- polystyrene foam is installed starting from the far corner, the plates should be placed so that their grooves coincide;
- distribution plates are placed in the holes;
- A flexible pipe is fixed on top.
Polystyrene boards
After checking the functionality of the system, a final floor covering is formed.
Installation errors
It is not difficult to carry out independent work on laying a heated floor in a bathhouse, despite this, mistakes are often made that lead to defects in the entire system.
To avoid them, you must adhere to the following recommendations.
- When choosing a cable or mat, you need to take into account not the entire area, but only the space where furniture will not be located.
- It is not recommended to shorten the cable placed in the system. This increases the load on it, causing it to fail. That's right, reduce the pitch and increase the heated area.
- It is forbidden to turn on the system until the concrete is completely dry.
- The heating cable element can only be laid on a clean surface that has been treated with a primer.
- The distance between parallel lines in the structure must be at least 5 cm.
- When laying the cable with your own hands, the degree of bending should be in the range: 5 - 9 of its diameters.
- The heating device sensor must be installed in an accessible place, and it must be protected by a corrugated box.
- It is imperative that the floor surface comes into contact with the sensitive probe of the sensor.
- When laying the system, do not walk on it with shoes to avoid damage.
- Before installing a water floor, you must first prepare a diagram.
- You need to carefully check the water floor for leaks.
Taking these points into account, you can independently install a heating system in the bathhouse.
Common mistakes that accompany self-installation
To ensure stable operation of the system, it is important to eliminate the conditions for the occurrence of the following defects at the preparation stage:
- You can start assembling the heated floor only after 2 weeks have passed from the moment the rough screed is formed. Otherwise, the concrete will crack;
- before installing the finished floor covering, you should test the heated floor scheme so as not to brick up any errors;
- when creating a “pie” it is important to use high-quality insulation materials;
- you need to remember about the limitation regarding the length of one pipe - 100 m;
- a mandatory measure is fixation of compensation tape around the perimeter.
If the installation of the system was carried out taking into account the indicated vulnerable points, you can expect long and uninterrupted functioning of the heated floors.
The final stage: warm floor under tiles
A small screed was poured with a rough floor leveler, leveling the horizon. Floor porcelain tiles from the “kerama marazzi” collection were laid on it. Very high quality material, I recommend it for use. We had to lay out a mosaic in the sink because a slope was needed to drain the water. I also enjoyed working with mosaics; the result turned out better than expected.
It's time to take stock. Express all the pros and cons about such an interesting invention. Conclusions are drawn specifically from this project.
Benefits for the bath
Warm floors ensure a comfortable and safe stay in the bathhouse. Underfloor heating is a functional element of the main heating system. It ensures uniform heating of the air - when heated masses rise to the ceiling and cold masses fall down.
Taking into account the design features and layout of the bathhouse premises, heated floors are provided in the washing room, dressing room, bathroom and rest room.
Moreover, any modern underfloor heating system requires preliminary thermal insulation of the base. In this case, a screed is made based on sand-cement mortar or a self-leveling mixture.
In most cases, in addition to thermal insulation of the base, waterproofing is installed. This can prevent the accumulation of excess moisture in the floor pie during operation of the heating system. Polyethylene or polypropylene film is used as a waterproofing material, and polystyrene foam, mineral wool, expanded clay or penofol are used for thermal insulation.