How is heat lost?
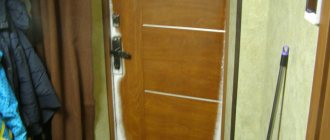
Pay your attention first of all to the main line of defense - the entrance doors. If there are gaps between the door frame, then no amount of batteries will protect you from cooling outside.
A draft makes its way into the house between the jambs and sagging doors, which are formed for a number of reasons.
There are 3 main types of thermal insulation failure:
- Gaps between the boards of the door leaf. The space can be created by the expiration of material or padding, which creates cold bridges through which the cold enters directly into the house. To avoid this problem, remove these boards when adding filler and cover empty cells with it.
- The gap between the box and the canvas. It appears due to frequent use, poor quality material or installation.
It is highly not recommended to buy a wooden entrance door made of pine and spruce, because this material tends to dry out quickly. But doors made of dark exotic woods will serve you for decades.
Also, be careful during installation, because a few carelessnesses and you will have to re-cut and align the openings.
- Gaps between the opening and the wall. A common problem in older homes and damp areas. Over time, the material dries out and thermal insulation failure occurs. The problem is solved by using polyurethane foam, but only with precise and dense placement of the platbands. If you install them loosely, the foam collapses and loses its protective properties.
When you are completely sure that the source of the cold has been eliminated, then start insulating the wooden door!
Without dismantling
Insulation without dismantling is carried out in three ways. The first is suitable for metal doors with removable panels. To do this, unscrew the screws, starting from the bottom, moving to the top of the canvas. We do not unscrew all the screws and place the metal door on a stand. Carefully advance the insulation treated with glue (liquid nails) and fix it. Foil-coated isolon is suitable for this method. We screw in the screws. The door is ready.
The second method is suitable for solid metal doors. We make holes on top, after making sure that there are no more holes or gaps. We take any crumbly insulation (non-flammable bulk wool, granulated polystyrene foam, vermiculite, sawdust). We pour it into the holes and tap the door to ensure that the cavity is completely filled. This method is completely unsuitable for doors with deadbolt locks. After filling, put plugs on the holes.
The third method is external insulation. We completely follow the step-by-step method of fastening using the external method. You can stick insulation on the inside surface of the doors.
Choosing insulation
When choosing a material, pay attention to fibrous and porous structures. This filler is perfect for the front door of the house. Choose the number of layers individually depending on the resistance of the door frame and the wall as a whole.
The more you insulate the doors with your own hands, the better the thermal insulation will be. But keep in mind that the structure will become many times heavier!
It's time to start choosing insulation for the door:
- Styrofoam. One slab contains many small polyethylene pimples connected to each other. An effective thermal insulator, but life-threatening. It ignites in the first seconds and at warm temperatures evaporates toxic substances.
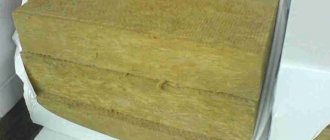
- Mineral wool. It consists of various rocks and processing. Unlike polystyrene foam, mineral wool is safe at high temperatures and does not contain toxic substances. This material is also protected from physical damage from rodents and cold temperatures, but has one significant drawback - it swells from moisture. To prevent yourself from replacing the filler, first protect it with lathing.
- Polyurethane foam. A practical product that can be applied to any surface using a spray can. Does not require any additional fastenings for fixation. A heat-resistant material that is difficult to ignite, but when burned decomposes into carbon dioxide and carbon monoxide.
- Foamed polyethylene. And finally, we recommend purchasing this moisture-resistant insulation when it comes to a sauna or bathhouse. Sold in rolls 10-15 mm thick, which is enough to eliminate drafts in the cracks and retain heat in the room. But polyethylene alone will not be enough, which is why it is used as an additional layer of insulation.
To make the insulation of a door at your dacha affordable, a small layer of structure is enough.
But still, if you are preparing for the winter in an active rhythm of life, with noisy neighbors, then be sure to install only large and warm doors, which in turn will protect you from unnecessary extraneous sounds from outside. And, of course, everything should look decent!
Properties of penofol
Foil penofol is an insulating material with a reflective effect, which has a multilayer structure.
The main purpose is to remove drafts or wind currents from building structures, eliminate condensation or moisture, steam that rise up the tiers. The material also isolates external noise or sounds. It is a universal type of insulator, as it increases sound insulation, vapor barrier, protects against moisture and retains heat. Such features are due to the structural organization of the material and the technology used in production. The main part of the material is foamed polyethylene . At the same time, the pores formed on it are closed and filled with air. This polyethylene foam is used in the form of skeins with different densities, thicknesses and different internal structures. Either on one or both sides, based on the purpose of the material, polyethylene is covered with aluminum foil. Before application, it is processed and polished to a shine with a maximum reflectivity coefficient (up to 97% and even more). More often, foil is applied using heat welding, which provides better adhesion of the material.
The thickness of penofol is from two to ten millimeters, the foil is only from 12 to 30 microns. The thickness of the material can be increased to 40 mm if it is necessary to create particularly powerful thermal insulation, for example, in arctic climate conditions.
The operation of penofol is based on the “Dewar vessel” principle known in physics. At the beginning of the last century, James Dewar established that every substance has a certain resistance to heat transfer. Whatever this indicator, the material can only stop or make the movement of heat slower, but not stop it altogether. At the same time, heat waves are collected in the substance and energy accumulates inside the substance; after some time, supersaturation is created, after which any material itself becomes a source of heat.
Experimenting further, Dewar isolated several substances that did not absorb thermal energy, but reflected it. Among these were all precious metals (platinum, silver and gold), as well as polished aluminum. In this case, heat rays are reflected from surfaces almost 100%. These reflectors themselves are excellent heat conductors and should be used together with heat absorbers.
A common thermos works in approximately the same way, and Dewar's research became the basis for the creation of space suits and materials for thermal insulation with a reflective effect.
The use of both double-sided and single-sided insulators reduces the cost of heating rooms in winter, and in warm summer weather they prevent the house from heating up too quickly.
Tools and materials
When you have finally decided which filler to use to insulate the doors, it’s time to prepare all the necessary tools:
- hammer;
- decorative nails;
- measuring instruments (tape measure, ruler, pencil);
- wood saw;
- sharpened knife for cutting;
- stapler and staples;
- pliers or nail puller;
- sealing tapes.
The list is impressive, but all items are necessary. And for this case there is an English proverb - “Necessity is the mother of invention.”
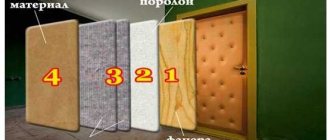
It is best to choose a leather substitute for upholstery. This material has many advantages: moisture-resistant, tension-resistant and easy to clean. Plus, it's available in many hardware stores and chain stores, so your search won't take long!
Improving the characteristics of Chinese products
The Chinese-made door is a non-demountable structure. To insulate it, remove the door and place it horizontally. We remove the handles, peephole, locks. Then we begin to attach the frame and stiffeners to it, both from the inside and from the outside. Therefore, we choose a wooden beam with a thickness of 20 * 20 mm, or more (we start from the thickness of the insulation material). If desired, you can weld a metal base, attach it with self-tapping screws or weld it to the door leaf, and fill the joints with polyurethane foam.
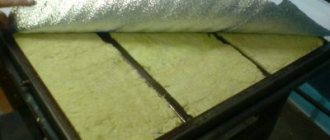
The next step is laying insulation. If fibrous materials are selected (mineral wool, stone wool), we lay out a water-repellent material larger in size than the base cavities, approximately 200 mm, secure with glue (liquid nails) and line the wool, having previously cut out a canvas slightly larger than the size of the base cells, and cover with another layer of water-repellent material. We fold the edges of the film tightly onto the top layer and secure with tape.
We cover the insulation with foil isolon or penofol with the foil side facing the room. This will improve the soundproofing qualities of the door. Polystyrene foam, expanded polystyrene, polystyrene, foil-coated isolon do not need waterproofing, since they themselves have water-repellent properties. Next, use a tape measure to measure the distance between the stiffeners, cut the insulation a little larger than necessary to avoid the formation of a cavity between the insulation and the base of the door. We glue the insulation into the cavity with glue (liquid nails).
We coat the base attached to the surface with mounting foam at the joints. The next step is to decorate the structure with an MDF sheet, panel or alternative material. It is important to remember that the decorative panel must be attached from the bottom up. We secure it, install locks, a peephole and handles, and hang the door. Now the door keeps the house warm and also protects from noise.
We insulate the door frame
And now the most important stage begins - insulating the front door. The first step is to eliminate all the cracks through which air gets in from the outside. They can be different - from noticeable to the smallest gaps between parts.
Your task is to place a seal around the entire perimeter of the box to block the cold bridges. It should be secured with the edges of the ribbon from the frame to the very edge of the door. Then the holes need to be filled with insulation. How to choose insulation for the front door was already discussed in the article.
Foam rubber or tow will work as a material, which needs to be pushed as deep as possible, creating a large layer. If the space is more than 5 mm wide, then polyurethane foam will be most effective.
Using a special nozzle, you can easily treat hard-to-reach places. But do not fill more than 50% of the free space with it, as the foam will grow over time and fill the void.
Conclusion
Penofol is an excellent modern heat-insulating, sound-proof and vapor-proof material with complex action. Working with this insulation is easy; you only need the most common tool. In the video presented in this article you will find additional information on this topic.
Penofol is one of the most popular multilayer materials on the modern market used as insulation. It consists of a polyethylene base and a layer of polished foil. Insulating the floor with penofol allows you not to retain heat, but to reflect it. This is the main difference between penofol and other insulation materials.
Penofol, foil vs film. Video. A scientific approach to why you should choose penofol
We insulate the door leaf
Now we are ready to begin the most interesting question: how to insulate a wooden door with your own hands? This means, get ready, you will have to knock down the entire door. To make it easier to remember the action plan, read the preparation instructions below:
- Remove all the fabric from the loops. You should eliminate all unevenness and deflections of the box to make sure there are no sources of cold. It is best to replace all old mechanical parts with new ones before installation.
- Cutting out components. If you already know the dimensions of the “wood guard,” then cut out the exact parameters for the insulation. Attach them to the panel using a stapler or glue, depending on the composition of the padding.
- Cover the wooden canvas with leatherette and start fixing it from the middle. If desired, leave the upholstery with an allowance of 1-2 cm for hems and decorations. And here, as fasteners, your decorative nails with a round hat will come in handy, which will add style to our “creation.” You can create a wide variety of patterns and designs with fishing line - just let your imagination run wild!
- Carefully iron the finished fabric to remove wrinkles and irregularities. If the weight of the door has increased noticeably since the start of work, then install an additional hinge between the two main ones. Security will never be unnecessary.
Video on how to insulate a wooden door
Installation
Wall treatment from the inside
For interior work, one-sided penofol with a thickness of 4–5 mm is used. You can also use double-sided, but its installation is different, since it is necessary to maintain an air gap on both sides. In ordinary apartments and houses, one-sided material is sufficient, but if the walls are too cold, then they should be additionally insulated with polystyrene foam or cotton wool.
Our instructions will help you understand how to insulate a wall with penofol from the inside:
- We roll out the roll of insulation and cut off a strip equal in length to the length of the wall;
- Starting from the ceiling, we nail the strip to the wall with a stapler;
- If the wall is wooden, you can also use a screwdriver. We put large washers on the screws, like on umbrella-type dowels;
- If the wall is concrete and it is impossible to nail the material to it with staples or screws, use glue;
- We cover the entire wall with penofol end-to-end, without making any overlaps;
- We glue the joints with aluminum adhesive tape;
- We install plasterboard, chipboard or other sheathing on the sheathing.
Important! On the side of the foil coating, be sure to leave an air gap 1.5–2 cm thick, otherwise condensation will accumulate on the surface. If the material is double-sided, the gap must be maintained on both sides.
Ceiling and floor
Installation of material on the ceiling is not fundamentally different from similar work on walls.
First, the material is cut, the desired strip is taken and attached along the wall, starting from the middle:
We reach one corner, nailing the side closest to the wall:
Then from the middle we move in the opposite direction, attaching the strip further:
Logically, you can insulate the floor with penofol or insulate the loggia. The main thing to remember is the basic rule: leave a gap between the casing and the foil!
Advice! In the case of a loggia, penofol should be used together with expanded polystyrene, since the balcony structures are too thin for serious thermal insulation.
During floor insulation work, the material is placed with the foil facing up. We glue the insulation to the screed or floor slab with any glue suitable for such substances. Then we lay logs on the carpet, on which we mount floorboards or plywood.
When using double-sided material, it is usually placed in the joist space so that there is an air gap on both sides. To do this, you can nail the carpet to the joists in the middle of the distance from the floor to the upper plane, then throw the material over the slats, and fasten it on the other side as well.
Then the insulation is stretched in the middle of the space, between the floor and the boards.
Clearance seal and door interior trim
When your canvas is ready for installation, begin twisting strips of leatherette and insulation to join the door.
To get such a detail, you need to wrap the filler in a tube made of leatherette. The shape will resemble shawarma or sushi! With their help, the entrance will be tightly closed, leaving no space for through jambs.
Rolls can be secured using standard methods - nails or paper clips.
You should end up with a box with leatherette lining on all sides, which will insulate the heat escaping from the house and will tightly secure the ajar door when closed.
Conclusion
Penofol is an excellent modern heat-insulating, sound-proof and vapor-proof material with complex action. Working with this insulation is easy; you only need the most common tool. In the video presented in this article you will find additional information on this” width=”640″ allowfullscreen=”” frameborder=”0″>
In addition, do not forget to attach the strips end-to-end, and treat the joints with aluminum tape. The material is soft and pliable, making it easy to cover curved and curved areas of walls. The low weight of the coating does not create any noticeable additional load on the structure.
Features of insulation of a metal split door
But how do you imagine insulating a metal door in a private house? Leaving it untouched would be a big mistake from a thermal insulation point of view.
For people who lived in the country, the theme of the vestibule is well known. This front part is designed to prevent air from the street from entering directly into the home. But most people don’t know about insulating a metal entrance door. And there is nothing complicated about it.
You will need to do the same technique with the seals for the box. Choose rubber gaskets and install them along the entire contour of the box.
This material is certainly the best, for its price, availability and durability - it justifies all its shortcomings. But do not forget to remove and degrease the previous seal, if there was one previously. Only then start preparing the front door in a private house for winter.
Video on how to insulate a metal door
Methods of insulation in an apartment or private house
There are several methods of insulation. Which one to choose depends on the type of structure and its location. Doors facing the street need more thermal insulation, and drafts will require the installation of a second panel.
Along the perimeter of the opening: sealing cracks in the door frame
For this installation method, you will need a sealant that is glued to the sealant or adhesive layer. To seal cracks in the door frame, you can use different types of sealant:
- Foam rubber is the most fragile of all. This material will last no longer than one season.
- Rubber - mounted on a rubber layer and has good operating characteristics.
- PVC - withstands temperature changes well and comes in various shapes. To install this material, you will need to make a groove in the doorway and use a screwdriver to push the PVC tape into it.
- Rubber is a fairly elastic and frost-resistant material.
The more elastic the seal, the more tightly it will be placed in the space of the doorway, ensuring that it is not blown through.
To measure the size of the seal, take regular plasticine, wrap it in a bag and place it in one of the cracks, and then close the door. You will receive a cast from which you can easily select the material of the desired configuration.
There are two ways to glue the tape:
- if the product is self-adhesive , then before gluing, degrease the door frame, remove the protective film and secure the seal from bottom to top;
- if there is no sticky base , use liquid nails or silicone sealant.
Upholstery
Insulation of the door leaf itself is especially important for metal structures. The procedure is as follows:
- We remove the canvas from the hinges, remove the removable fittings (handles, lock).
- We fasten the insulation with a furniture stapler every 15 cm.
- Upholstery with decorative material, secured with decorative nails.
- We return the canvas to its original place.
Don't forget to leave 5 cm of upholstery material for the hem. For upholstery use:
- skin;
- foam;
- bologna or leatherette.
The material is attached with liquid nails, starting from the top.
You can insulate in another way:
- We attach wooden slats along the edges of the canvas;
- We lay a layer of foam plastic between the slats;
- We decorate the structure with plastic or fiberboard.
Threshold
The threshold protrusion performs several tasks at once:
- closes cracks at the bottom of the door;
- provides thermal insulation;
- prevents the formation of condensation.
You can insulate the threshold in two ways:
- If the protrusion is made of plastic, use polyurethane foam. The structure is removed, the assembly seam is cleared of debris and filled with foam in several layers, then returned to its place.
- Installing a thermal damper. With this method, the threshold is also dismantled, and a heating cable is laid in its place. To control the mechanism, the thermostat is taken outside, and at the end of the procedure the threshold is set back.
Things to consider
From the point of view of effective thermal insulation, the quality and price of the purchased door are not the main success factor. If there are violations associated with cold bridges, no amount of fabric replacement will help. Just as in the case of a wooden door, you need to completely solve the problem of blowing cold in the area between the frame and the leaf.
Please note that much of the success depends on good heat treatment of the through gaps. Pay attention to which side of the canvas you are installing the mineral wool on. If you place the filler outside, then all the condensation will evaporate outside, and not into the room. This way you will protect yourself from excessive humidity and dampness.
Sealing wooden door openings using rollers
This method is suitable if it is not possible to remove the door from its hinges. For example, winter has come and severe frosts along with it. Thus, in order to maximize the thermal insulation properties of a wooden entrance door, rollers are used. They are nailed directly to the door frame. To obtain a positive and correct result, it is necessary to accurately determine the position of the roller. The closed door should be in tight contact with it.
The roller should be nailed not to the threshold, but to the box. Otherwise, it will simply become unusable. The best option would be to attach it to the bottom end of the door.
Common Mistakes
Let's briefly talk about what not to do and how to avoid being a victim of failure:
- Foam insulation. When choosing a material for sealing the joint between the door and the frame, abandon the idea of foam rubber parts. The reason lies in the fact that this filler quickly breaks down and loses its properties. And if the “guard” is used frequently, the insulation will need to be replaced after a couple of months of winter.
- Foaming the box. Polyurethane foam, like nothing else, is suitable for insulating hard-to-reach places, including door frames. But do not overdo it when applying liquid to the surface!
If this is your first time touching a can, remember that the foam significantly increases in volume after sealing.
In this case, the insulation will end up in all possible places: from wallpaper to the insides of mechanical locks. Otherwise, you will have to deal not only with insulation, but also with parallel repairs.
That's all! Now, you can independently check in practice how to insulate a door with your own hands, and create comfort in your home and family budget.
Our offer
Sika is pleased to offer you an extensive catalog of mounting foams for interior work, installation of doors and other structures. We sell professional formulations that are easy to use and have the necessary set of performance characteristics. Products are offered at competitive prices. We sell with delivery and process incoming orders promptly. The company invites legal entities and construction organizations to cooperate. Individuals can order products through the company's dealers. Contact us to find out more and get help with product selection.