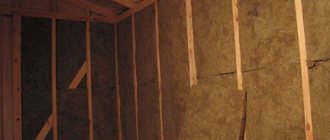
When insulating a building with your own hands, do not forget about the floors. They, just like walls, require reliable protection from the penetration of cold. In this case, it is important to use heat-insulating materials that are not afraid of getting wet or to place a protective layer on top of the insulation. Insulating a floor covering with foam plastic under a screed is an example of proper thermal protection. The cement-sand screed will prevent damage to the insulation.
Cement screed will be an excellent base for many types of coating, but not all types of insulation can be laid under it. The most rational solutions would be rigid mineral wool slabs, polystyrene foam and expanded polystyrene. The last two are very similar in appearance, but differ greatly in performance characteristics.
What type of insulation to choose for the screed
Mineral wool provides good floor insulation, but has some disadvantages, which include:
- High cost;
- water absorption capacity;
- probability of subsidence;
- the need for additional protection for builders during installation (overall clothing, gloves, mask).
Foam plastic does not have these disadvantages , but it also has its own characteristics. This insulation is a flammable material, does not have high strength and emits substances hazardous to humans when burned. All these negative aspects are smoothed out when used under a screed, since it protects the insulation from damage and contact with fire.
Extruded polystyrene foam is non-flammable, has high strength and low water absorption. This material will be a very successful solution for DIY insulation. But the cheaper option of foam insulation also does not lose ground when laid under a screed.
If you are not inclined to save money, then we recommend that you opt for extruded polystyrene foam - the best solution for floor insulation without any “BUTs”. If you are looking for options on how to save money, this article is for you!
Dry screed using GVL
Due to the fact that it is impossible to obtain a perfectly flat surface using polystyrene concrete in a short time, other methods of creating flooring are used. One of them is a heated floor on a Knauf dry screed, the peculiarity of which is not the pouring of a liquid mixture, but the filling of a special expanded clay backfill. The main stages of this process are:
- Preparation of the base;
- Laying waterproofing and sound insulation;
- Backfilling of base material. In this case, the thickness of the dry Knauf screed should be no more than 3–5 cm.
The advantages of such a floor include increased installation speed, high thermal and sound insulation characteristics, as well as minimal loss of height in the room. It is worth noting such an advantage as there is no need to wait 2-3 weeks for the surface to completely dry. And the disadvantages of dry warm Knauf floor screed include the relatively high cost of the material and the increased level of dust. Because of this, work must be performed only with the use of special personal protective equipment - suits and respirators. Although all the money spent on creating a heated floor using such a lightweight screed pays off by noticeably approaching the completion date of the repair.
Video:
Features of foam screed
Screed reinforcement scheme
Insulation with various materials requires the installation of different cement-sand screeds. Foam plastic has low strength, so the coating in this case must be additionally reinforced. For flooring, mesh made from rods with a diameter of 4-6 mm is sufficient. The cell size is 50x50 mm or 100x100 mm, depending on the expected load, screed thickness and reinforcement diameter.
When insulating with stronger polystyrene foam, reinforcement is not required. A layer of cement mortar 30-80 mm thick will be sufficient. In this case, doing the work yourself is not at all difficult.
Pouring the mixture
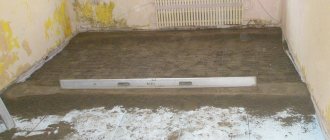
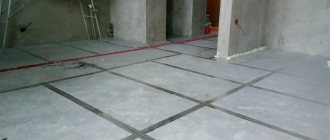
The method for pouring a polystyrene concrete floor involves installing beacons that need to be leveled in the same plane. To obtain a sufficiently warm surface and, at the same time, not reduce the height of the room too much, the upper part of such guides is installed at a level of 5 cm from the base. Then they begin to screed, moving from one of the far corners of the room to the wall and leveling the material using a rule soaked in water. To speed up the process, it is advisable to perform the pouring not alone, but with an assistant - while one performer pours the material, the second levels it.
During the work, you should also pay attention to the walls from which the remaining mortar must be removed in a timely manner. And, having finished pouring the lightweight floor screed, it is recommended to immediately provide the correct conditions for its drying - from 15 to 25 degrees, low humidity and complete absence of drafts. Failure to comply with the permissible microclimate can lead to the appearance of cracks on the surface. A day after finishing the work, it is necessary to remove the guides and seal the remaining holes with the same mixture.
Insulation technologies
Floor designs may vary. To talk about the procedure for carrying out work, it is necessary to consider individual cases.
Floor insulation on the ground
In this case, it is not recommended to use polystyrene foam, since it is not resistant to simultaneous exposure to moisture and low temperatures. Insulation with extruded polystyrene foam can ensure the durability of the structure. Insulation of the floor on the ground is carried out in the following order:
- Thorough compaction and leveling of the base soil;
- Gravel + compacted layer of sand;
- vapor barrier;
- laying expanded polystyrene (usually 100-150 mm);
- waterproofing (polyethylene film);
- reinforced cement-sand screed;
- flooring.
The cake for floor insulation on the ground.
As waterproofing, use proven roofing material or modern “Linokrom” and “Gidroizol”.
Insulation of concrete floor
When using polystyrene foam or expanded polystyrene to insulate concrete floors with your own hands, you must remember that the greater the thickness of the floor pie, the smaller the height of the room becomes.
When used in wet rooms on the ground floor, additional waterproofing will be required on top of the material.
If the insulation is installed in the attic floor above bathrooms and bathrooms, a vapor barrier is additionally provided for it. In other cases, working with polystyrene foam does not require steam protection.
In general, the floor pie with a floor structure looks like this:
- Reinforced concrete floor;
- polystyrene foam or polystyrene foam;
- cement-sand screed;
- flooring.
Pie of foam insulation on a reinforced concrete slab
For this case, the thickness of the cement is taken to be 30-50 mm. Expanded polystyrene is laid on a concrete floor not only for thermal protection, but also as sound insulation of interfloor ceilings from impact noise. For these purposes, a layer of 20-30 mm is sufficient.
Preparatory work
Before making a warm floor screed, you need to select suitable materials and prepare the base. To do this, the remnants of the old finish are removed from the floor covering, so that only concrete remains as a result of cleaning. After this, channels for communications are laid in the base - electrical wiring and pipelines (if necessary, cable channels are used for this).
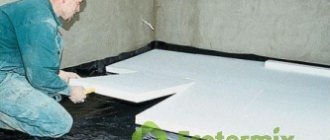
The next stage is treating the concrete slab with waterproofing mastic or laying a special moisture-protecting membrane. Now you can stick a damper tape to the lower part of the wall, which can protect the screed from cracks and increase the soundproofing parameters of the floor.
At the time of carrying out the preparatory work, suitable polystyrene foam and all the necessary components for preparing the screed must have already been selected and purchased. The base material is usually sold in 170 or 420 liter bags, and the special air-entraining additive SDO (saponified wood resin) is sold in the form of a powder or solution. The presence of SDO allows you to make the insulated floor screed even warmer and easier to work with.
Solving the price-quality issue
, polystyrene foam and extruded polystyrene foam can be used together to maintain the quality of insulation and reduce the price.
The use of these two materials in combination is an excellent solution to the price-quality issue.
In this case, the concrete floor pie will be:
- Reinforced concrete slabs or monolith;
- foam layer, approximately 50-100 mm;
- layer of extruded polystyrene foam, approximately 30-50 mm;
- layer of cement-sand mortar;
- flooring.
The thermal performance indicators of these materials are similar, so the thickness will increase slightly due to the addition of polystyrene foam. The top durable layer can withstand high loads and save on screed reinforcement.
Also read about floor insulation with polystyrene foam in a wooden house.
General information
Conditions for isolation
In order for foam insulation to work most effectively, and for the floor screed on foam to be as strong as possible, several conditions will need to be met:
To obtain high-strength insulation, you need to use foam plastic with a density of at least 25 kg/m3 for floor screed;
- The recommended thickness of the concrete screed above the insulation layer is more than 50 mm; pouring cement mortar up to 30 mm can be used as a base for underfloor heating, with the additional installation of a fiberglass mesh;
- Mandatory placement of a layer of waterproofing and damping of the seam along the perimeter of the floor area.
Insulation density
The most significant issue when using polystyrene foam is related to the strength of the foam insulation. According to GOST, foam rubber corresponds to its maximum density, for example, for grade 25, the density of foam board can vary from 16 to 25 kg/m3. This means that the strength of a slab from one manufacturer may be satisfactory if the specific gravity exceeds 20 kg/m3, or may be insufficient if the value varies from 16 to 20 kg/m3.
If you don’t bother and take ordinary foam plastic at hand, then there is a high probability of finding yourself in a situation where, when you try to lay the screed, the foam will simply choke.
It is well known that polystyrene foam is a compressed mass of polystyrene in the form of balls. With prolonged exposure to the sun, the material quickly ages and breaks up into many tiny balls. Therefore, before using foam under the screed, you should clarify how and where it was stored. If the material has been stored outdoors for a couple of months, it cannot be laid under a screed; alternatively, you can insulate the floor in the barn.
There is an opinion that polystyrene foam is not a hygroscopic material, but this is not the case. The lightest brands of polystyrene foam, which have the best thermal insulation, are able to absorb some moisture from the soil and air. After this, the water foam can come off the screed, partially losing its insulating properties, and collapse even when frozen. Foam polymer can last up to 50 years without deteriorating in its properties.
Use with underfloor heating system
When installing a heated floor system with your own hands on the ground floor, it is also rational to use polystyrene foam or expanded polystyrene. The floor pipes are laid in the thickness of the cement layer, which in this case is made thicker than 80 mm. To increase strength, reinforcing mesh is used. A layer of polystyrene foam under the insulation ensures maximum system efficiency.
Options for underfloor heating
This video discusses all the technical details of installing a semi-dry screed on polystyrene foam:
Necessary materials to create a screed
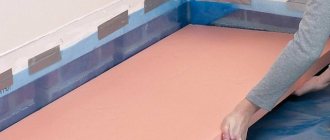
In the case when foam plastic or other heat insulators are used to insulate a concrete screed, it is called floating, since there is a layer between the base and the floor covering itself that does not allow the construction of a rigid structure.
To briefly describe the process of creating such a screed, a waterproofing material is laid on a leveled base to prevent moisture concentration. Then there is a foam layer, which is covered with a reinforcing frame and filled with cement-based mortar.
Before you begin, you should find out what tools and materials you will need.
Necessary tools for floor screed
Tools you should get:
- containers in which you can prepare a cement composition;
- a drill and a special mixing attachment;
- building level;
- trowel;
- spatula;
- rule.
You won't need a lot of materials:
- cement;
- sand;
- water;
- waterproofing agent;
- foam boards;
- mesh for reinforcement.
Polystyrene foam is available on the market in a wide range, but in any case remains an affordable material. When choosing slabs for screed, preference should be given to specimens no thicker than 5 cm. This thickness is quite enough for the resulting structure to cope with a load of up to 14 tons. For residential buildings, such characteristics are optimal, even taking into account that during operation, deformation of the foam up to 10% is possible.
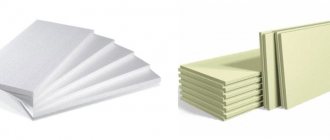
foam sheet
Ruberoid
The role of waterproofing is usually performed by roofing felt, bitumen mastic or high-density polyethylene film. The choice of material depends on the needs of the home owner and his financial capabilities.
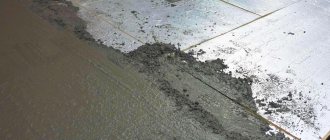
Preparation of the solution
You can use a concrete mixer
You can also use a construction mixer or a drill with an attachment
Particular attention should be paid to preparing the cement mortar for the screed. First, mix cement and sand in a ratio of 1:3, and then gradually begin to introduce water until the solution reaches the desired consistency. To avoid the appearance of lumps and speed up the process of preparing the mixture, use a drill with an attachment.
waterproofing
Cement mortar
Technical characteristics of penoplex Foundation
Main technical characteristics of penoplex Foundation:
- The thermal conductivity coefficient is 0.031−0.032 W/(m*C).
- The vapor permeability coefficient varies from 0.007 to 0.008 mg/(m*hour*Pa).
- The sound absorption of Penoplex foundation is 41 dB.
- Moisture absorption coefficient - 0.4−0.5% (according to GOST 15 588−86).
- The density of penoplex ranges from 29 to 33 kg/m³.
- Operating temperature range is from 100 to +75 °C.
- Ultimate compressive strength - 0.27 MPa.
- Fire resistance category - group G4 (according to Federal Law-123).
Table 1. Comparison of the characteristics of various materials used for foundation insulation
| Options | Penoplex Foundation | Penoplex | Styrofoam | Expanded polystyrene |
| Thermal conductivity coefficient, W/(m*C) | 0,031−0,032 | 0,034−0,039 | 0,033−0,050 | 0,032−0,044 |
| Vapor permeability coefficient, mg/(m*hour*Pa) | 0,007−0,008 | 0,01 | 0,05−0,23 | 0 |
| Density, kg/m³ | 29−33 | 25−38 | 15−35 | 11−35 |
| Moisture absorption,% | 0,4−0,5 | 0,04 | 2−4 | 4 |
| Sound absorption | good | good | good | good |
The table shows that Penoplex Foundation has almost the lowest rates of thermal conductivity, vapor permeability and moisture absorption. It retains heat well and can withstand heavy loads.
Insulation on the ground base
It is recommended to lay penoplex on a ground base, without main foundation slabs, using the following technology.
The standard insulation scheme assumes the presence of a vapor barrier layer under the foam sheet; in some cases this operation is skipped. The insulation layers are arranged as follows:
- priming;
- crushed stone (or gravel);
- sand;
- foam boards;
- waterproofing;
- reinforcing mesh;
- cement strainer;
- finished floor (laminate, parquet, linoleum, etc.).
The soil base is leveled, compacted and dried. A layer of crushed stone, about 40 cm high, is tightly laid and compacted. Sand is poured onto the crushed stone cushion in a layer of about 10 cm.
Some craftsmen use a modified technology in alternating laying layers:
- priming;
- crushed stone;
- sand.
Granite chips, crushed stone or gravel are poured onto the ground. Then everything is watered generously and compacted. After this, the soil is dried.
It is recommended to use these rules during construction only in the warm season, so that the soil has the opportunity to dry out sufficiently. Then dry sand is poured.
Penoplex is placed on the resulting base; the seams can be glued with tape (or use an adhesive solution). Layers of waterproofing are applied to sheets laid in a checkerboard pattern, onto which a reinforcing mesh is mounted.
Thermal insulation process
For subsequent cement screed, metal cellular reinforcing mesh is used. The height of the mesh should not exceed 25 cm. Fill the floor with cement mortar, checking the level.
If you do the insulation of the floor on the ground floor of a private house yourself, you should pay attention to the fact that it may be necessary to cut holes in the foam slabs for communication pipes. This stage of work should be carried out after laying the sand, during the first measurements.
Penoplex trimming
Two types of connecting edges of Penoplex insulation panels
If you need to lay insulation in non-standard rooms, or cut communication holes in sheets, use several methods of cutting the material.
Use any sharp knife. This trimming ensures relatively even edges of the sheet.
Trimming using a jigsaw. The cutting edge is very uneven; construction foam is used to tie sheets cut in this way.
Using hot wire. In this way, you can quickly cut a thick slab; for cutting, a nichrome string is heated with electric current and communication holes are easily cut out.
Being a universal insulation material, the material can also be used as thermal protection on wooden floors and on joists. The technology of laying sheets on a wooden base technically has few differences from covering a concrete base.
As an additional insulation element, mineral wool (as an additional thermal layer), construction foam (to fill possible gaps and for sealing), and mounting nails are used.
Introducing foam granules into the solution
Introducing foam granules into the solution
To create a concrete screed with foam plastic, slab material is not always used, because the surface can be given additional performance properties by introducing granules into the cement mortar. Foam granules will create an air layer, thereby ensuring good thermal insulation performance of the screed. This process is carried out in several stages.
Foam chips with cement
- A solution is prepared consisting of a small amount of water and the volume of cement required to obtain a mixture of creamy consistency. The mixing process becomes much faster and more efficient when using a drill with a suitable attachment.
- Continuing mixing, foam granules are added to the mixture. The ratio of ingredients varies: one part of concrete can contain three, four or even six parts of granular material.
The higher the percentage of granules in the solution, the better the thermal insulation properties of the screed. However, at the same time, it will be less durable, and when pressed it may even crumble, therefore, it will lose the lion’s share of its performance characteristics.
Foam chips are a material that solves the most pressing problems, being an ideal insulation material that is resistant to fires, severe fires and other types of damage, and at the same time economical and high quality
The choice of the desired proportion largely depends on how durable and rigid the finishing floor covering will be. For example, if you plan to use linoleum, then the volume of granules in the solution should be minimal, parquet - vice versa.
foam granules
Video - Polystyrene foam granules. Mixing with cement
Rating of floor insulation
The formation of the TOP by the Vyborexperta.ru team was carried out by excluding from the list of nominees, which included 30 items, the least safe, convenient, durable and cheap heat insulators.
The rating was based on the following characteristics:
- Type of floor – wooden, concrete, warm;
- Type of material – polymer, mineral, wood chip;
- Type of insulation - cotton wool, polystyrene foam, etc.;
- Release form - sheets or rolls;
- Thickness and dimensions of the heat insulator;
- Density of sheets or rolls;
- Degree of heat and sound insulation;
- Water absorption level;
- Covered area;
- Vapor permeability;
- Insulation structure;
- Operating temperature;
- Flammability and fire safety group;
- Resistant to rodents and rot;
- Composition and absence of hazardous substances in it;
- Amount in a package.
The results of the analysis are presented taking into account the relationship between the cost and quality of thermal insulators and their prevalence in stores.
The best floor paints
Basic rules for installing penoplex
Before laying penoplex, the required performance characteristics and features of the floor are determined. But there are general rules when laying insulation, compliance with which will allow you to avoid wasting time and money.
Penoplex insulation options
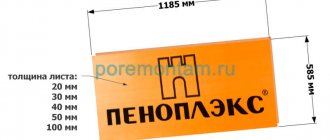
Correct calculation of the square footage of the insulated floor and selection of the appropriate slab thickness. Penoplex is produced in widths from 2 to 10 cm, with a standard width (60 cm), sheet length from 120 to 240 cm. The material is sold in blocks of four to 20 sheets.
The slab must be laid on a flat surface, regardless of the floor (rough, dirt, concrete).
Insulation technology involves the use of only polyurethane adhesive mixtures; if any other adhesive composition is used, it is important that the adhesive does not contain toluene, acetone or formaldehyde components, since they destroy the cellular structure.