Penoplex - a material with a low level of thermal conductivity - is a good heat insulator, which is also used for insulating floors. Let's figure out how to insulate a floor with penoplex, what are the features and specifics of working with this material. Let's consider its properties, main advantages and disadvantages, as well as the technology for laying such slabs. There are many options for such floor finishing, but among them 4 main methods stand out - they are the ones used most often in construction.
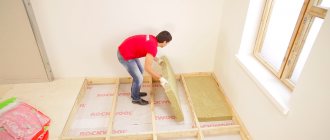
Floor insulation with penoplex Source remont-max.by
Features and specifics of working with penoplex
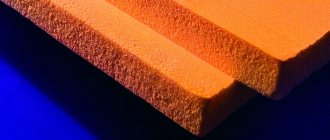
Penoplex is often used for floor insulation. Thanks to its thermal insulation properties, the material copes well with its task. Before working with it, you need to know what thickness of penoplex is needed to insulate the floor.
On a note ! Most often, penoplex 600 mm wide and 1200-2400 mm long is used to insulate floors. The packaging from the manufacturer contains 4-20 sheets of material, each thickness from 100 to 200 mm.
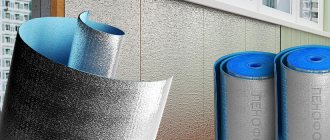
Penoplex sheets at the factory Source lestnitsygid.ru
7 advantages of a thermal insulation layer made of penoplex:
- waterproof - the material rejects moisture and always remains dry;
- vapor permeability – foam floors “breathe” and do not sweat;
- thermal conductivity is low, which allows you to retain heat inside the house;
- environmental friendliness - absolutely clean and non-toxic;
- mold and fungi - the manufacturer guarantees their absence;
- sound insulation – prevents the penetration of extraneous noise.
The material also has 2 drawbacks. The first one is on fire. The second disadvantage is the reaction with solvents. Penoplex is “afraid” of them.
How to work with penoplex correctly
The technology for working with penoplex differs depending on the chosen installation method, but they are all united by the need to create a concrete screed.
Penoplex goes under the subfloor Source pol-exp.com
4 main options for laying penoplex on the floor :
- Laying material on top of the ground.
- Insulation on floor slabs.
- Laying under heated floors.
- Thermal insulation of wooden covering.
According to builders, penoplex is most often used for warm water floors. Due to its waterproof properties, the material becomes an ideal basis in this regard.
Penoplex insulation on top of the ground
Before starting work, you need to prepare the necessary materials in advance. You will need gravel and sand, cement and small crushed stone, reinforcing mesh and a level, a tamping tool and metal beacons. You also need to purchase alabaster, moisture-proofing material and metallized tape.
The main rule when laying penoplex on the ground is to reduce the level by 500 mm in relation to the height of the floors. We also recommend that you ensure that the surface is uniform and free of cracks. It must be taken into account that without additional support after installation, the material may sag. If there are voids underneath, the floor will collapse.
If you do everything correctly, the floor will be perfectly flat Source 2proraba.com
See also: Catalog of companies that specialize in insulation and insulation of houses
8 steps on how to properly insulate a floor with penoplex :
- Leveling and compacting the soil (if the surface is saturated with moisture, you cannot work with it - you should let the soil dry, then level it).
- Adding gravel (in the process it is important to use a level and compact the material according to the measured parameters - the layer should not exceed 400 mm; you can also replace the material with crushed stone).
- Compacting sand to a thickness of 100 mm (if desired, you can use other material - granotsev).
- Laying foam sheets with a 50 percent offset (meaning the next row relative to the previous one).
- Water-repellent layering (here a special material is used or a regular film with overlapping edges and sizing with tape).
- Secure the floor with a reinforcing mesh (you need to ensure that a distance of about 2-3 cm is maintained from the walls).
- Installation of beacons 180 cm from each other (it is important to correctly measure the distance from the wall of 20 cm, and for the solution here you need to use alabaster).
- Leveling the surface (at this stage you need to fill the floor with cement mortar or self-leveling mixture, then do the external finishing).
If the floors of non-residential premises are thermally insulated (warehouses, garages, etc.), then the technology changes slightly. Penoplex sheets are laid last (that is, the fourth point becomes the eighth), then secured.
Laying foam sheets in non-residential premises Source ad-cd.net
How to lay penoplex on floor slabs
Similar to the previous method, this will require the use of plastic film to protect the internal space from water. For evenness, a building level is used. You also need to purchase polymer putty, polyurethane glue, a puncher and a primer. At the final stage you will need cement or a self-leveling compound.
5 steps on how to properly lay penoplex on the floor under a screed :
- Checking the floor slabs for evenness and then cleaning the surface (if there are defects, they must be eliminated using putty or a hammer drill).
- Covering the slabs with a primer for the second and higher floors or laying the floor with plastic film for the first (in the second case, do not forget about gluing the joints with tape).
- Laying the tiles themselves (here you need to coat them with glue to bond them to the base).
- Re-layering the film for waterproofing.
- Pouring the floor under the screed (using cement or self-leveling mixture).
After drying, finishing work is carried out for the finished floor.
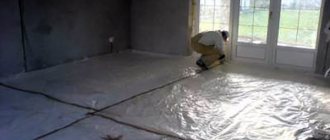
Finishing work after insulation with penoplex Source postroy-prosto.ru
Method 3 – penoplex under heated floors
This method uses already familiar materials - cement (self-leveling) mortar, glue, tape, waterproofing film, building level. The process will also require damper tape.
5 steps on how to lay penoplex under a heated floor system:
- preparing the concrete base (here it is necessary to clean the floor and cover it with a primer, but if the concrete base has many defects, a cement screed should be used for leveling);
- applying penoplex boards in a staggered manner (the reverse side is lubricated with pre-prepared glue, and after laying the sheets are pressed down level);
- sealing the surface (for this, waterproofing film and tape are used at the joints, and damper tape must be used near the walls);
- placement of a heated floor system;
- pouring the coating with a self-leveling mixture (can be replaced with cement).
Before installing the finished floor, be sure to wait until the surface is completely dry.
Penoplex under a warm floor Source strojdvor.ru
Material characteristics
It’s worth starting with the fact that, depending on the scope of application, a material of one density or another is chosen. Insulation of the floor structure is carried out using penoplex grade 35 or 45. There is also material of grade 31, 31C and 45C.
Characteristics of penoplex grades 35 and 45
Penoplex insulation grade 35 is a universal insulation material and can be used not only for floors, but also for walls with a foundation.
Table 1. Excellent performance qualities of grade 35
| Indicator name | Units | Meaning | Explanation |
| Density | Kg/m3 | From 28 to 38 | The material can withstand significant loads. |
| Coefficient of thermal conductivity | W/m×°С | 0.03 | This is a fairly low figure that guarantees the energy efficiency of the floor structure. |
| Hygroscopicity | % | 0.4 | When testing was carried out during the day, the material absorbed moisture in the specified volume only in the first 10 hours. |
| Flammability | Category | G1 | When combined with a concrete screed, which is not subject to combustion, such insulation, which already belongs to a high category of fire resistance, is completely fireproof. |
| Noise absorption | db | 41 | Relevant for apartments and multi-storey buildings |
| Tensile strength | MPa | 0.4 – 0.7 | The material allows you to create a reliable, solid base. |
| Temperature range of application | °C | -50 to +75 | It will be an ideal material for insulating screeds on cold concrete floors. |
Penoplex insulation grade 45 has a higher density, therefore it is more often used for insulating screeds on a soil base. This heavy-duty material is even used in road construction.
Application of penoplex in road construction
Table 2. Excellent performance qualities of grade 45
| Indicator name | Units | Meaning |
| Density | Kg/m3 | From 40.1 to 47 |
| Coefficient of thermal conductivity | W/m×°С | 0.03 |
| Hygroscopicity (tested during 24 hours) | % | 0.2 |
| Flammability | Category | G4 (together with a heat-resistant coating does not play a role) |
| Noise absorption | db | 41 |
| Tensile strength | MPa | 0.4 – 0.7 |
| Temperature range of application | °C | -50 to +75 |
Standard marking on the packaging of Penoplex insulation
On the packaging of penoplex you can see the following types of markings:
Characteristics of the main types of insulation
To summarize, we can distinguish several types of penoplex that are used to insulate floor screeds:
- "Penoplex" grades 35 and 45, suitable for roofs, floors above warm and cold basements, in garages and storerooms.
- “Penoplex Foundation”, which has high moisture resistance, heat and sound insulation properties and can be used not only for insulating foundations, but also for ground screeds.
- "Penoplex Comfort" is a common type of insulation for interior work and is not afraid of high humidity. Placed on a rigid base (concrete floor slabs).
Penoplex under floor screed - general information
Due to its high strength, penoplex is a universal material - it is suitable for thermal insulation of absolutely any surface. The big advantage in this regard is its ideal flatness, which makes it easy to clean the external floors.
It is important to know ! If you are choosing which penoplex to use for the floor screed, it does not matter - you just need to have enough thickness for the required level of thermal insulation. And the main thing here is the waterproofing layer.
The sheets themselves are stacked at a short distance from each other. Subsequently, the resulting void seams are eliminated. For this purpose, special construction foam is used, and sometimes adhesive tape is used.
Foaming voids with polyurethane foam Source sdelaysam-svoimirukami.ru
Insulation and preparation of the concrete base
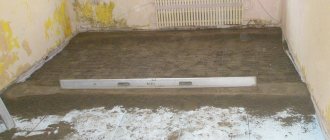
To insulate the floor with penoplex, you will need a little preparation of the base. The floor will have to be leveled with a thin concrete screed.
- The old covering is removed if it is linoleum. If the floor in the bathtub and on the loggia is insulated, then in principle you can also insulate it over the tiles. The only thing is that you will have to calculate the future floor level so that the doors open/close smoothly.
- A thin cement screed is poured to level the floor so that there are no voids left under the insulation slabs;
- A vapor barrier layer is laid to increase the service life of the penoplex. As a vapor barrier layer, you can use ordinary polyethylene, which is laid overlapping, and the joints are taped.
Video description
Watch in this video how to mix the solution yourself:
It is also important to remember about the beacons - without them you cannot start the pouring process. Otherwise the surface will be uneven. The filling technique itself involves working from the far corner (here we will work with a level). After leveling the previous layer and before pouring the next one, a reinforcing mesh is placed.
It is important! Before carrying out work, you should consider the further use of the room, since the thickness of the screed depends on this. Thin slabs are suitable for an ordinary living room. For heavy structures, it is better to give preference to dense sheets.
To prevent cracks from appearing in the frozen surface, you need to water it with water for three days. Drying takes several days. Only after all these procedures is the facial finishing performed.
Self-leveling mixtures
To understand what thickness of penoplex to choose for insulating a floor with a screed made from a self-leveling mixture, it is necessary to take into account the type of room. The greater the load on the floor, the thicker the slab should be.
In this case, it is important to take into account the thickness of the layer of the mixture itself under the screed - in this case it is no more than 2 cm Source remstroidomufa.ru
3 advantages of self-leveling mixture:
- does not require manual alignment;
- distributed with a needle roller;
- dries faster than cement.
On a note! The leveling of such a surface is carried out under the influence of gravity. The kneading process itself is described on the packaging of the material. This base polymerizes in just a few hours.
The importance of leveling the underlying base should be kept in mind. If any defects remain, there will be a difference in height, and, as a result, an uneven screed.
Attention ! Waterproofing must be installed as close to the finished floor as possible. Some people put it under penoplex - this is a mistake. If water penetrates into the floor, it will not be possible to dry it. The surface will remain wet for a long time, since the slabs have a water-repellent effect.
The finishing itself can be anything - from ceramic tiles to wooden parquet. If the technology has been followed, the result will be excellent.
Insulation on floor slabs
You will need to acquire the following tools and materials:
- building level;
- polymer putty;
- primer;
- moisture-repellent film;
- insulation;
- polyurethane glue;
- self-leveling composition.
The sequence of work is as follows:
- First of all, the floor slabs are checked for flaws. Any protrusions, cracks, or depressions must be eliminated. The protrusions can be knocked down using a hammer drill, and the cracks and holes can be covered with polymer putty. If there are a lot of flaws, the base will have to be leveled with a self-leveling mixture. If the slabs are in normal condition and free from damage, you can limit yourself to removing debris and removing dust.
- If a floor no lower than the second floor is subject to insulation, then the penoplex is spread directly onto the floor, which has been pre-treated with a primer mixture. If the ceiling is part of the basement or first floor, then it is advisable to cover the floor with a water-repellent film. It turns out that, based on the location of the ceiling, it is either primed or covered with a protective layer of moisture insulation. In the latter case, the joints of the film must be taped.
- You need to apply a layer of glue to the underside of the insulation, then apply it to the floor and press down firmly. The position of each individual slab is checked with a building level, while simultaneously controlling the horizontality of adjacent pieces of insulation so that the surface is perfectly flat. Each subsequent row of slabs is laid with an offset of half the width of the segment so that the seams do not coincide.
- A layer of polyethylene film is laid on top of the insulation for waterproofing.
- A classic cement screed up to 5 cm thick, or a self-leveling compound can be poured onto the waterproofing layer. Once the screed is completely dry, you can begin laying the finished floor.
Briefly about the main thing
Penoplex is characterized by two properties. The first is its low thermal conductivity, due to which it has good thermal insulation. Secondly, the slabs are not susceptible to mold and mildew; they create a good soundproofing layer, while rejecting moisture.
Another advantage is that penoplex is universal in use - it can be used regardless of the base flooring. But here it is important to understand what thickness of penoplex to use for the floor under the screed. The further load on the surface (purpose of the room) has a huge impact. If this is, for example, a warehouse or a garage where a car will be stored, it is better to choose denser slabs.
The type of finishing does not matter. It all depends on the preferences of the owner of the premises. You can choose laminate, tile, plywood or parquet.
Another mandatory point is waterproofing. If this layer is skipped or installed incorrectly, spilled water may accumulate under the finish coat. Penoplex does not absorb moisture, and it will be quite difficult to dry it.
Selection of expanded polystyrene
You want to provide thermal insulation using this product. How to make a choice in favor of quality material?
Before purchasing the necessary material, you need to pay attention to the following characteristics:
The first criterion is appearance. The granules should not flake off and the color should be uniform white. There should be no damage to the surface of the material.
The next criterion is smell. There should be no foreign odor
This smell is, for example, chemical.
Pay attention to the structure. The components must be perfectly sintered
When you break polystyrene foam, the boundary should pass between the granules, as well as inside them.
The material must be well packed. Also, the packaging must have labeling and manufacturer's information. The brand and manufacturer's recommendations must be written. All this will be proof that this product is of high quality.
Information on the properties of the foam should be available. It should also be on the packaging. The packaging indicates the technical, physical, and mechanical qualities of this product.
Please pay attention to where you buy this material. Make sure the store is a legal location and has a warehouse.