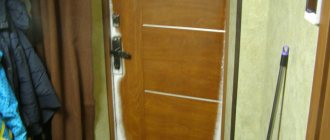
Advantages of thermal protection
Thermal insulation of a wooden door provides a range of benefits that must be carried out.
They consist of improving the indoor microclimate. Such work makes it possible to protect housing from extraneous noise. With their help you can change the design of the structure. Carrying out this work will make the door more reliable.
How can you insulate?
Felt, cotton wool, foam rubber and leatherette, which were actively used for thermal insulation several decades ago, have been replaced by new materials. The range of textures offered by manufacturers is very wide - materials vary in thickness, cost, color and smell.
You will have to choose from the following options:
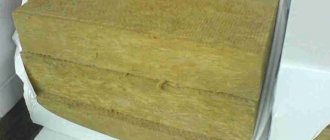
Mineral wool. Lightweight, cheap and easily penetrates even hard-to-reach places. Excellent heat retention in rooms.
The biggest “plus” is protection from rodents and microorganisms. There is also a “minus” - subsidence due to high humidity and the ability to accumulate moisture inside, so it is not recommended to use this material in baths, saunas and swimming pools.
Styrofoam. Excellent basic all-round material. It has increased thermal insulation, but is not able to fit tightly into cracks and close cracks.
The main thing to consider is that polystyrene foam is extremely flammable, which makes it impossible to use with wood that has not been treated with a special fire-fighting agent.
Izolon. A modern and convenient option with minimal thermal conductivity and a thickness of 10-15 millimeters. This will make the door attractive without being too bulky or thick.
Expanded polystyrene. Thin and cheap material, the main difference of which is its non-flammability. When a flame hits such insulation, it quickly goes out, which increases fire safety.
Nobody is talking about materials. So, if you don’t have much work experience and extra money, we insulate the front door with your own hands using foam rubber. It is easy for them to work and correct mistakes made during cutting and laying. You will also need covering - leatherette, textile or oilcloth.
How to choose material for door insulation
Seals for entrance doors are made of rubber, foam rubber, synthetic felt, and plastic. Mainly in the form of a flexible cord, which is sold by linear meters. For DIY insulation purposes, it is recommended to buy the self-adhesive version. Foam rubber and felt are easy to use; the sash with such a gasket closes without difficulty. But their resistance to the external environment and wear resistance are much less than other materials.
The most popular are soft rectangular or tubular rubber seals, as they have a service life of at least 5–7 years and protect not only from heat loss, but also from odors, smoke, and noise. The thermoplastic profile is the most durable and resistant to temperature changes - single, double or triple.
Rubber door gaskets of different profiles
It is important not to make a mistake when choosing a filler for insulating the sash and the space around the frame, since it is difficult to change often, unlike seals. The lower the thermal conductivity coefficient, the better the material retains heat. For a wooden door, the thinnest and lightest fillers are suitable, for a metal door - any. It is easier to work with soft, flexible insulation; it covers the surface with a margin and compresses as much as necessary. Solid ones are easy to cut, but choosing the thickness and maintaining the dimensions of individual elements will have to be done with high precision.
Overview of insulation used for the entrance door:
| Insulation material | Thermal conductivity, W/m•K | pros | Minuses | Life time |
| Foam rubber (polyurethane foam) from 80 rub./sheet | 0,025-0,035 | - Thin - Easy — Convenient installation | — Absorbs moisture — Low wear resistance — Operation from -15°C — Flammability | up to 10 years |
| Mineral wool from 50 rub./slab | 0,036-0,055 | — Soundproofing — Fireproof | — Water absorption | up to 50 years |
| Foamed polyethylene foil from 60 RUR/m2 | 0,039 | - Thin - Can be self-adhesive — Noise insulation — Waterproofing — Ease of installation | — Sold in rolls, rarely cut by linear meters | over 50 years |
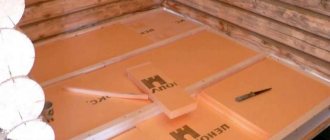
| Polystyrene foam (expanded polystyrene foam) from 40 rub./m2 | 0,033-0,05 | — Lightweight — Moisture resistant | — Freezes at the joints — Width from 5 cm - Flammable | up to 20 years |
| Penoplex (extruded polystyrene foam) from 100 RUR/slab | 0,03 | — Moisture resistant — Soundproofing — Waterproofing | — Average fire safety | up to 50 years |
Important! Glass wool is not environmentally friendly enough; fine glass dust can get into the air and lungs, since the lining is not sealed everywhere.
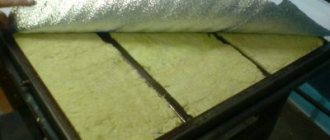
Roll and sheet insulation
Eco-leather, wooden panels or MDF are used as lining for the front door - most often the material that was previously on it. But you can completely change the design by choosing a different coating. List of components and tools that will be needed during reconstruction:
- fastening elements - staples, nails, screws or glue;
- equipment - construction stapler, angle grinder for cutting grooves;
- solutions - polyurethane foam, acetone for surface treatment before gluing parts.
In addition, you will need finishing materials for the walls around the box, plastic plugs to cover nail heads and technical holes.
Criteria for choosing building materials
If you carry out insulation yourself, it is preferable to purchase a self-adhesive version. Craftsmen advise having foam rubber or felt available. Using them is not difficult. A sash equipped with this gasket can be closed without any effort. The sealing material – rubber is characterized by high wear resistance.
Soft rectangular, tubular rubber seals are also in demand. Their service life is 5-7 years. They protect the room from odors and extraneous noise. The thermoplastic-based profile is resistant to temperature changes.
Craftsmen focus on the choice of filler for insulating the sash and the space around the frame. This process must be conscious, since it is difficult to change them.
When choosing, you need to pay attention to the thermal conductivity coefficient. It determines how the material will handle heat retention. For wooden products, thin fillers are a good option. The use of soft insulation greatly simplifies the work.
Its advantage is that it covers the surface with a margin and shrinks as much as necessary. It is important to measure the thickness and dimensions of individual structural elements with increased accuracy.
Selecting insulation thickness
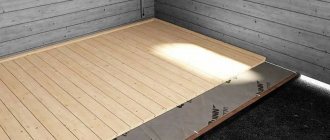
The thickness of the material depends on the size of the door. Let’s say if the door is empty inside, then you should simply put insulation there and cover it with the top layer of the door leaf.
When using sheet insulation, the seams must be fixed with glue. The rolled (soft) material used does not require additional insulating materials.
If the door does not have voids, then you need to stuff an additional frame on the inside of the door, which is filled with material and then sewn up with upholstery (leather substitute). The nuance here is the fact that the thickness of the insulation should not exceed the thickness of the door leaf.
Entrance door insulation scheme
To make a decision to insulate the door, you should familiarize yourself with the set of tools and step-by-step instructions. If you decide to hire a master for this job, you need to learn all the intricacies of his work.
How is heat lost?
Pay your attention first of all to the main line of defense - the entrance doors. If there are gaps between the door frame, then no amount of batteries will protect you from cooling outside.
A draft makes its way into the house between the jambs and sagging doors, which are formed for a number of reasons.
There are 3 main types of thermal insulation failure:
- Gaps between the boards of the door leaf. The space can be created by the expiration of material or padding, which creates cold bridges through which the cold enters directly into the house. To avoid this problem, remove these boards when adding filler and cover empty cells with it.
- The gap between the box and the canvas. It appears due to frequent use, poor quality material or installation.
It is highly not recommended to buy a wooden entrance door made of pine and spruce, because this material tends to dry out quickly. But doors made of dark exotic woods will serve you for decades.
Also, be careful during installation, because a few carelessnesses and you will have to re-cut and align the openings.
- Gaps between the opening and the wall. A common problem in older homes and damp areas. Over time, the material dries out and thermal insulation failure occurs. The problem is solved by using polyurethane foam, but only with precise and dense placement of the platbands. If you install them loosely, the foam collapses and loses its protective properties.
When you are completely sure that the source of the cold has been eliminated, then start insulating the wooden door!
Which of the tools
In addition to the insulation itself, you will also need tools. Minimum standard set:
- roulette;
- a flat board, lath or metal ruler;
- knife (stationery or kitchen);
- screwdriver;
- hacksaw or jigsaw;
- hammer;
- screwdriver or drill;
- pull out;
- furniture stapler.
It is possible that in some situations other devices may be needed. You should also prepare fittings and screws. Now we insulate wooden doors with our own hands according to the instructions below.
We prepare the necessary
First, let's do the preparatory work. Carefully remove the door from its hinges using a pry and lay it on a flat surface. Next, remove all the fittings and put them aside. If there is internal lining, carefully remove this layer as well.
How to properly upholster a door with dermantine or leather
The covering is fixed using special nails with decorative caps. To attach smoothly and neatly, you should first mark their locations on the material with a pencil. There are many design options, for example, making it in the form of a pattern or simply placing it around the perimeter of the canvas. You can cover it with inexpensive artificial leather or leatherette, the price of which starts from 120 rubles. per meter
Rollers
They help strengthen the place where the upholstery is attached and provide additional protection from wind and cold. They combat the cause of drafts by closing the gaps between the doorway and the leaf. You can make rollers by wrapping strips of foam rubber or other soft insulation with finishing material. They are nailed around the perimeter of the door from the inside.
Cut 4 strips from dermantine or faux leather. The width of each is about 100 mm. Two strips of length equal to the height of the door. And two lengths equal to the width of the door. Next, the segments are folded in half and filled with a round seal and insulation.
Features of insulating the entrance door in an apartment
Methods and materials are selected depending on the reasons for poor thermal insulation, characteristics and structural features of the opening. Building regulations must be observed to ensure that the maximum permissible weight is not exceeded.
A wooden door will not withstand certain options, for example, the installation of metal stiffeners for attaching thick insulation. Metal ones have them initially. The main differences in insulation methods are due to a specific reason.
Wear of seals
The service life of thin gaskets between the door frame and the leaf is short. Especially if they are made of a material such as batting or felt, found in old doors. Rubber and plastic also wear out. How to determine:
- visually inspect the seals, they may have worn out or come off;
- If you run your hand along the perimeter of the door, you can noticeably see through.
In this case, it is recommended to completely replace the gaskets with new ones. They come in the form of self-adhesive tape or attached to nails, screws, or glue. The mortise option is suitable for wooden doors - when a small groove is cut around the perimeter and rubber seals are inserted there. This method allows them to be easily changed later.
Replacing door gaskets with self-adhesive backing
Poorly insulated sash
Doors in old houses are usually lined with a layer of foam rubber. Such insulation quickly wears out from changes in temperature and humidity. Metal sashes are currently insulated with modern, resistant materials that do not lose their thermal insulation properties for decades.
However, they also have a service life. It is easy to determine the moment when it is time to insulate the door - the surface of the door becomes icy at low temperatures.
To insulate a door leaf with your own hands, you need to remove the covering, attach new thermal insulation and refinish the surface. It is recommended to repair a wooden door on both sides. At this point, it is advisable to also replace worn upholstery. The design of metal doors usually allows you to independently remove only the inner panel - made of wood or MDF.
General diagram of a metal door leaf
Gaps between the wall and the frame
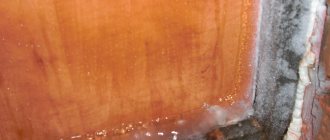
The cracks around the doorway are carefully insulated with polyurethane foam. Its service life depends on climatic conditions and composition density. On average, from 5 to 15 years, then the foam begins to crumble.
If no other insulation was used when installing the door, then it begins to blow around the perimeter. Judging by the draft with high-quality seals and a sufficiently warm sash, you can guess that the opening needs to be repaired.
Options for how to insulate the front door in an apartment with this deficiency:
- remove the layer of plaster around the box from the inside and outside, remove the old foam, foam again and plaster;
- cut grooves around the door from the inside and, in addition to foaming, lay insulation with a long service life - penoplex, mineral wool;
- nail rollers to the outside of the wooden sash - strips of leatherette with tubular foam polyethylene inside, which will cover several centimeters of the wall.
Due to the subsidence of the house or under its own weight, the iron door and frame may become warped. This can be easily determined by opening the sash to 45° - a skewed one will spontaneously close or open, and not stand still. In this case, it is recommended to tighten or replace the door hinges. If this does not help, then the box is not level. Then the cracks around it are insulated using the above methods.
The repaired wall around the door is often decorated with extensions
Procedure for insulating a door with your own hands
The methods and complexity of restoration depend on the type of door. It is necessary to calculate your strength before repairing a heavy iron structure - the weight of European standard models with thick double steel and natural wood cladding reaches up to 100 kg. Chinese single-sheet and wooden with upholstery - from 25 to 50 kg.
Elements of a modern steel door
Let's look at how a completely metal entrance door in an ordinary apartment is insulated, including the canvas, gaskets and adjacent surface:
- Cut a groove in the wall from the inside along the entire perimeter with a depth and width of 2 - 4 cm.
- Remove the old foam around the box and fill the cracks with fresh foam.
- After drying, the foam is cut off, and strips of the selected thermal insulation are inserted into the recess.
- The wall is plastered, decorated with plastic or wooden panels, wallpaper, and paint.
- Dismantle the inner panel of the sash and remove the old insulation.
- The new insulation is cut to the size of the grid of stiffening ribs, the hard one is simply inserted, the soft one is sometimes placed on glue to reduce settlement.
- The sheathing panel is attached back, preferably with new screws, and the fittings are hung.
- Strips of sealant are glued to the frame and canvas.
If you need to insulate the perimeter, then first work with the wall, then with the door surface. This procedure helps to avoid damage to the already restored frame.
Important! The joints of solid sheet insulation must be sealed with polyurethane foam to prevent the formation of cold corridors in their place.
The stiffening grid is often welded to the outer panel of the iron door
Installation of insulation on a wooden door will be different. Only soft thermal insulation is installed on a structure covered with leatherette:
- The casing is removed from both sides.
- Insulation sheets are nailed onto the wooden board from the outside and inside, the distance between the nails is 10 - 15 cm.
- The insulation is cut with a margin of 5 - 10 cm, nailed tightly, and the excess is cut off.
- New upholstery is cut out - with a slight overlap, with holes for peepholes, handles, locks - nailed, nail heads are covered with decorative elements.
- The procedure for insulating the adjacent wall is the same as for a metal door.
- The gaskets are glued, stapled, nailed, or inserted into mortise ones.
Two layers of insulation for a wooden door
Models with internal stiffeners, lined with MDF, allow the use of solid thermal insulation. A sheet door without internal filling - both wooden and metal - is insulated from the outside.
To do this, a frame of wooden slats is nailed along the edge of the sash. A layer of thin soft insulation is glued inside and covered with eco-leather. In this case, the thickness of the new frame should not greatly exceed the thickness of the door sheet.
High-quality insulation will give a completely measurable result: the absence of drafts, the door leaf is at the temperature of the external walls or warmer, a sheet of paper inserted between the frame and the door should be pulled out with little effort.
Sheathing
Instead of insulating building material, you can sheathe the structure with dermantine. This is relevant when insulating a room from the outside. The work is carried out following a certain sequence. Upon completion, you can make the following design:
- as functional as possible;
- stylish;
- attractive.
The sheathing is laid on top of the insulation. In this regard, you can use genuine leather or dermantine. The material needs to be laid on the door leaf and the edges folded. It is attached to it with a stapler.
Builders recommend watching closely to ensure that the building material does not sag. This will prevent it from moving. To avoid such troubles, you need to start fastening the upholstery from the center and gradually move towards its edges. At the end of the work, you need to secure the curved edges of the upholstery. Holes of appropriate sizes should be cut in the areas where the lock is located.
After completion of the repair work, all fittings are installed in their places. Installation of an insulated door is carried out at the place of its use. The completed work will be the key to a beautiful and warm door.
Interesting: How to make a lightning rod in a private house
Step-by-step instructions for insulating a wooden entrance door for the winter
Before insulating a wooden entrance door, you need to collect everything you need so that when working you do not waste time searching for missing parts and tools.
Finishing tools
- Ruler, tape measure and felt-tip pen.
- A knife with a long, sharp blade that allows you to make an even cut on a mineral wool or foam board.
- Saw on wood.
- Hammer and nails.
- Screwdriver or screwdriver.
- Construction stapler and set of staples.
- Pliers and nail puller.
It is better to use leatherette as a covering. It does not get wet, does not tear, and keeps its shape well. It is easy to care for. Dirt is removed with a damp cloth.
Fabric preparation
It includes several stages.
- The canvas is removed from the hinges and the distortions of the opening are eliminated. Damaged frame and sash parts are replaced with new ones or repaired.
- Install a new seal.
- Change the fittings if the old ones are worn out.
- If the insulation cake is large, install a third additional loop between the two main ones.
- Clean the surface and dry it with a radiator or a hair dryer. To avoid distortions, you should select a soft drying mode.
- Untreated parts are coated with an antiseptic, fire retardants and varnish to prevent moisture from entering the array. It is necessary to treat not only the surface, but also the holes for the fittings.
Laying insulating materials
The sash is a solid canvas or a frame made of timber and boards. The voids are filled completely. Even a small gap will lead to noticeable heat loss.
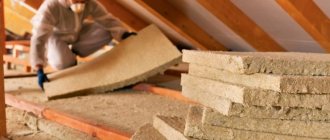
The slabs must fit tightly to the inner sides of the frame, and their curvature is not allowed. The size of the panels should be only a few millimeters larger. It is not advisable to cut mineral wool products that have a protective shell - otherwise they will lose their shape.
The main layer should be placed on the outside, facing the street. In this case, the steam in the material will turn into condensate in the insulating layers. The temperature at which condensation occurs is called the dew point.
If you place the cake on the inside, the condensation area will move along with it. This will lead to increased internal humidity, a damp smell and mold in the cake.
The fibrous structure will lose its effectiveness because the voids will be filled with water droplets, which are excellent conductors of temperature. The inner layer is used only as an addition to the outer layer.
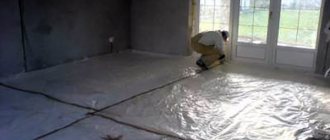
Unlike polystyrene foam, mineral wool and polyurethane foam have open voids that must be covered with a moisture-proof layer. This can be polyethylene film, isolon, or a membrane that allows steam to pass through only from the inside. It is placed on both sides of the slab, since condensate also penetrates from the side of the array.
ShutterStock
The insulating coating is cut according to measurements taken from the canvas. Its area should exceed the area of the sash by 10 cm on each side. The upholstery is cut out with the same allowance. This reserve is needed to tuck the edges, forming sealing ridges around the perimeter.
The panels are fixed on the plane using a stapler, special nails with wide heads, or glued on. There should be no gaps left. The remaining voids are filled with polyurethane foam. The edges are not hemmed - otherwise it will be difficult to make a turn under them.
Lay the upholstery on top and smooth it out. The covering is nailed with nails with wide decorative heads, moving from the middle. The edges are tucked under the slabs and sewn with nails. As a decoration, the area is covered with wire, forming identical rhombuses on it from the protruding parts of the sheathing. Instead, strips of leatherette, rolled into a tube and stuffed with foam rubber, are often used.
The top can be covered with a metal decorative sheet or veneered MDF board. In this case, the weight of the sash will increase, and additional hinges will have to be installed on it. The sheet is mounted on a timber sheathing, the cells of which are filled with insulator.
Installation of sealing tape
Its thickness is selected according to the size of the gap between the canvas and the box. A thin layer will not provide protection from the cold; too thick will prevent the sash from closing. In addition, it will quickly wear out and become deformed under pressure.
The strips are cut into four parts, corresponding in length to each side of the opening. When docking, they must fit tightly to each other, so each fragment is made with a margin of several millimeters. The products are attached with glue, staples or nails into a groove around the perimeter of the box. The back side may have an adhesive surface.
Instead of a finished sealant, a roller is often sewn together from the remaining leatherette, tightly stuffed with scraps of soft insulating materials - mineral wool or foam rubber. In this case, before insulating the wooden entrance door with your own hands, you need to calculate the consumption of materials.
Materials
Builders advise how to insulate a wooden entrance door in a private house for the winter. Different materials can be used for this:
Izolon or foam rubber
You need to apply glue to the outside of the door, and insulation or foam rubber on top. Also, such materials can be glued to liquid nails. Glue is used to prevent the insulation from moving during work. Foam rubber is not toxic.
Styrofoam
Method 1. Place polystyrene foam or polystyrene foam 30 mm thick on top of the canvas, fix it with liquid nails, and then cover it with finishing material.
Method 2. Place a frame made of dry timber with a cross-section of 20x30 onto the plane of the door. Auxiliary stiffeners are formed from the same timber inside the frame. The base must be treated with a primer. Place polystyrene foam inside the cells. It is then coated with finishing material.
Styrofoam
Mineral wool
It is possible to follow the second method with polystyrene foam, or you can do it frameless. That is, nail it to the surface of the door leaf using a stapler. It is imperative to use a hydrobarrier film, because it protects the insulation from excess moisture.
Mineral wool is light in weight, so it is easy to work with. Not recommended for use on metal doors.
Dermantin
It is necessary to place it on the door leaf and secure it with nails or regular staples. Place dermantine on top and attach it with decorative nails. You can tuck it in and thereby form protective cushions against drafts.
Metal
Metal ones are much easier to insulate. All work is carried out in the space between the doors. If there was standard insulation there, it should be removed. Select the required material and place it in special openings for insulation. The process is quite simple and does not require much effort.
How to insulate a metal door using polystyrene foam?
The question of how and with what to insulate Chinese doors is asked by almost everyone who has installed it. Basically, for the production of iron sheets, several sheets of metal are used, fastened together. To provide additional insulation, the cavity inside needs to be filled.
The size of the foam must correspond to the size of the openings
Note! To achieve good thermal insulation, before insulating a metal door, you should remember that the width of the foam must correspond to the size of the fasteners between the sheets of leaf.
Algorithm for insulation:
- Removing door parameters. Before insulating an iron door, you need to cut out a fiberboard sheet to cover the foam.
- Make holes for the door peephole and handle, having previously marked their location and dimensions on the canvas.
- Trying on a fiberboard frame (marks made must match).
- Cutting foam sheets with a sharp knife. The finished material should be attached to the inside of the door. This must be done by gluing it with silicone applied to the entire surface.
- Covering the insulation with a fiberboard sheet, which should subsequently be secured to the door using self-tapping screws.
To avoid frostbite and cold accumulation in the stiffener, you need to fill the void of this tube with polyurethane foam, having previously drilled a hole in it.
Door frame seal
If the canvas fits tightly to the box, no draft is scary. But cold air can enter the room through cracks , which are formed as a result of a loose connection to the opening trim. To close these gaps, a rubber profile is glued around the perimeter of the box. The work does not require professional knowledge, skills or additional costs. This sealant is produced on a ready-made sticky base.
You can replace the rubber seal with a leatherette tape. Fold the material in several layers and nail it to the wooden structure box with small nails. There may be gaps between the frame and the doors, even if they are of good quality.
Plastic
Installation of insulation is carried out similarly to wooden structures. A plastic door, which is covered with dermantine on top, will provide good protection from the cold. Only here it is necessary to replace the nails with construction glue. The process goes like this:
- remove the door;
- remove the fittings;
- install insulation;
- lubricate the structure and all elements, and then install the handles back;
- decorate the surface according to personal discretion.
Tips and tricks
The following recommendations should be followed:
- It is best to insulate a plastic door with glass, using an additional double-glazed window;
- it is necessary to pay equal attention to both the insulation of the canvas and the thresholds and the perimeter of the doorway;
- standard Chinese metal doors immediately need to replace the insulation.
The front door requires special attention when protecting from the cold. The entire perimeter should be insulated, and the door should be closed tightly and quietly using a seal. The insulation process for doors made of plastic and metal with wood is different.
Sources
- https://nedvigdom.ru/sposobi-uteplit-vhodnuyu-dver/
- https://chastnyjdom.ru/uteplit-dver-svoimi-rukami/
- https://ZnatokTepla.ru/utepliteli/uteplyaem-vhodnuyu-dver-v-kvartire.html
- https://svoyadver.ru/kvartira/uteplitel-dlya-vkhodnoy-dveri.html
- https://www.ivd.ru/stroitelstvo-i-remont/dveri-i-peregorodki/kak-uteplit-na-zimu-vhodnuyu-derevyannuyu-dver-v-chastnom-dome-57091
- https://www.tproekt.com/kak-uteplit-vkhodnuyu-dver/
- https://ZnatokTepla.ru/utepliteli/dver-v-chastnom-dome.html
[collapse]