Hello readers of my blog! Today we will talk about how to properly install an infrared heated floor with your own hands. It would seem that the matter is not tricky, but when you are faced with this problem, you have to think about how to do it correctly, what preparation to do, what materials to choose. Thus, I decided that this article would be useful to someone, and I am devoting my efforts to this subject. In it I will answer a number of questions that will arise immediately before How to properly install an infrared heated floor with your own hands, and some even after that. This topic is quite broad, because before work, thorough preparation is necessary, but how to do this? And this is a separate topic. You can learn about all this in great detail in the article below. Installation of film heated floors
1 Installation of a heated floor system
The rules for selecting and installing an electric heated floor differ significantly from the selection and installation of a water heated floor.
1. Selecting a heated floor kit
The recommended temperature is 20-21oC for the room and 24-26oC for the floor. The desired temperature for the room is set by the thermostat.
For comfortable heating, the installed power for the entire area should be at least 80 W/sq. m, with the main one - 140 W/m2.
2. Determine the area and configuration of the surface on which you will lay the heated floor.
When installing a heated floor with your own hands, lay the thermal film only on the free area, i.e. on the area that is not occupied by furniture and appliances (refrigerator, stove, kitchen wall, washing machine, wardrobe, etc.). When installing heating, heated floors should be laid on 75-80% of the total area. Can only be installed in areas that need to be heated.
3. Lay down heat-reflecting material.
4. Place sheets of thermal film on heat-reflective material
Cut the thermal film into strips of the size you need.
The cutting line is marked on the thermal film (cut space) and is located every 17.4 cm. It is prohibited to cut the film along other lines. Install the contact clamps onto the strip.
The contact clip is installed on the copper strip (the smooth side of the clip should be inside the thermal film, the other side should be outside on the copper strip).
Clamp the contact clamp with pliers or a special tool. Make sure the clamp is tight and there is no sparking. Insulate the cut lines of the copper strip located at the end of the strip of thermal film, for which use short bitumen insulation from the bag.
For example, on the thermal film, contact clamps are already installed at the beginning of the strip and insulation is installed at the end of the strip. Lay out the pieces of thermal film over the area of your room so that the copper conductor is at the bottom (turned towards the heat-reflecting material). The front side of the thermal film will be the side where the carbon semiconductor strip is longer, that is, the copper conductor will be at the bottom.
The thermal film is unwound on a clean, dry and flat place. It is advisable to lay the thermal film along the length of the room, avoiding damage to it; in this case, there will be more solid strips and fewer connection points for installation wires. Thermal film strips must be secured with tape to the reflective material to prevent it from shifting during further installation of the floor covering.
5. Install the thermostat
The regulator can be installed permanently, as an electrical outlet for hidden or external wiring, or connected to an existing outlet using a cord.
6. Lay out the installation wires and determine where to strip the insulation.
7. Connect the thermal film to the wire
8. Isolate connections
Each strip of thermal film includes 5 pieces of insulation. Use 2 pieces for each connection.
One piece is attached to the outside, the other covers the inside of the thermal film and the tip with the wire. The fifth section is used to insulate the copper busbar. Thus, we obtain electrical insulation and waterproofing of the connection.
9. Connect the connecting wires to the thermostat.
10. Install and connect the floor sensor to the thermostat. The floor sensor is installed under the thermal film closer to the thermostat and is attached to the black strip of the film using tape.
To level the floor under the finishing coating, make grooves (recesses) in the heat-reflective coating under the floor sensor and the wire connections.
11. Connect the thermostat to the electrical network.
12. Test the heating system.
13. Lay the finishing floor covering.
14. Installation of the heated floor is complete, turn it on and enjoy the warmth.
The heat-reflecting material is laid on the prepared and leveled floor surface. Then the sheets of material are secured with tape. After the surface is prepared, thermal film can be laid directly on it. It is recommended to install the regulator close to existing electrical wiring, unless special wiring is required to connect the system. It is installed on the wall, in the most convenient place for the user (near the sockets), so as not to interfere with the further arrangement of furniture, kitchen installation and installation of household appliances. The thermal film is connected to the network in parallel, that is, all installation wires are connected to one side of the room. The kit includes wires of two colors. One wire color is connected to only one end of each strip. Position the wires so that the main wires run under the baseboard. If you want to make the connecting cable hidden, you need to cut a channel in the wall; if you want to make it external, use a decorative mounting box. Remove the insulation where the thermal film is connected to the tip. Bring the bare wire to the terminal and clamp it tightly using pliers. The wiring diagram is indicated on each thermostat. The connection of the thermostat and power supply from the electrical network must be carried out by a qualified electrician. Be sure to consider additional electrical devices that may be connected to the same network. For a system with a power of 2 kW or more, we recommend connecting through a separate circuit breaker with a power of at least 16 A.
Turn on the system and set the floor temperature. Check the heating of each strip of thermal film. Check with a tester the connection points of the installation wires, as well as the insulation along the cut line. When installing under a laminate or parquet board: Lay the laminate or parquet board on top of the plastic film according to the instructions. When installing under linoleum, laminate, carpet: Lay the protective material (fibreboard, SML, hardboard, plywood) on top of the polyethylene film. Apply double-sided adhesive tape specially designed for laying soft floor coverings onto the protective material. Lay flooring on it. All information provided is advisory in nature. For installation, connection and maintenance of electrical devices and/or circuits, contact only professionals who have undergone appropriate training and are authorized to work. Do-it-yourself film heated floor
In previous articles, I talked about laying electric underfloor heating cables and laying heating mats. In this article I will talk about electric film flooring and how to install it with your own hands.
What is an electric heated film floor?
The floor is called film because it is not the cable that heats the surface, but a special film. Its thickness is only about half a millimeter. It consists of copper wires and carbon semiconductors.
The film does not emit an electromagnetic field, as it heats due to infrared waves, which have a beneficial effect on your health. It heats only those materials that stand in their path, and almost does not heat the air. For this specific heating property it is called infrared film heated floor.
The temperature sensor can be placed both on the film and under it (along the groove). Which method is preferable for specific films, check with the seller or manufacturer.
Additional kit KEEPLY PS-1.5x16
| Manufacturer: | KEEPLY |
| Cross section: | 1.5 mm2 |
| Length: | 16 m |
| Application: | up to 3.5 kW |
for comparison
723 rub.
Product added to cart
| Photo | Name | Price per piece | Quantity | Price |
| Additional kit KEEPLY PS-1.5x16 | 723 rub. | < 1 > | RUB 723,723 |
There are 0 items in the cart worth 0 rub.
Go to cart
Buy
Availability
Floor insulation
Choose thermal insulation material covered with foil. Infrared waves will be reflected from it into the room, and not spread down to the neighbors.
Roll out a roll of thermal film over the surface with the copper strip down. Cut it without fear, but only along the special lines specified by the manufacturer.
The lines are located on the film, so there will be no problems with choosing a cutting location. Do not allow stripes to overlap each other.
Secure the thermal film with construction tape. Install clamps or rivets under the connecting wires. Be sure to use bitumen tape and then insulating tape (insulating tape) to cover the bare copper wires that remain in the cut areas (only on one side, opposite to the place where the thermostat will be located). Now connect the strips of thermal film to each other with wires. How to do it?
Connect the right copper wire of the first strip to the right copper wire of the next strip of film. And so connect all the strips of warm floor. If the width of the film roll is 0.5 meters, then the length of one wire to connect the strips will be about 0.7 meters.
IMPORTANT!!! High-quality insulate with bitumen and then with insulating tape all the connection points of the wires. This will help avoid further troubles associated with electricity.
Stage 1
Heat-reflecting insulation is purchased separately and spreads over the entire area of the room. If the room is 15 m2, then you need to purchase 15 m2 or a little more if you have to cut it into several pieces of different shapes. Thermal insulation is laid on a hard, flat surface with the reflective side up without overlaps, tightly joined and the edges are sealed with special tape.
Finish coatings for film heated floors
You can use carpet, linoleum and other soft materials as a finishing coating. The main thing to consider is that the film underneath is easy to damage.
Also keep in mind that cork flooring is a poor conductor of heat. In this regard, laying a heated film floor under this coating is impractical, but possible.
If there is a need to lay heating film under soft coverings, do it in places that will not be subject to heavy loads and damage (wardrobe, armchair, sofa, sectional, etc.).
Ceramic tiles are not very suitable for such a floor. Tile adhesive does not adhere well to film and you will have to use reinforced mesh to hold the adhesive. For tiles it is better to use an electric mat.
The ideal finishing floor covering for a warm film floor is laminate parquet boards.
Quick installation and the absence of specific construction and finishing work, ideal for those who want to install an electric heated floor with their own hands.
Advantages and disadvantages
The advantages of infrared heated floors are:
- Versatility - infrared heated floors are used to heat not only residential premises, but also various warehouses and large greenhouses.
- Easy installation with your own hands - installation of this type of electric heated floor can be carried out without much difficulty by anyone with a minimum set of tools and skills in working with them.
- High installation speed - installation of a heated floor based on infrared heating film takes no more than 2-3 days.
- Local heating - a wide variety of standard sizes of heating film allows them to be used for heating not only spacious rooms, but also small local areas (workplaces, recreation areas, etc.).
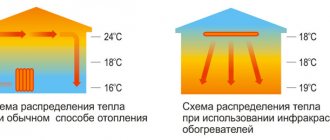
- Uniform heating of the air in the room - unlike electric convectors, batteries of the central heating system, a warm infrared floor contributes to more uniform heating of the air in the room: warm air masses heated from the floor and rising to the ceiling cool very slowly. Thanks to this, a comfortable temperature from +22 to +24+25 °C is created in the room at a height of average human height (1.7-1.8 m).
- High efficiency - approximately 80-85% of the infrared radiation emitted by carbon strips of film is spent on heating the air in the room.
- Low thermal inertia - infrared floors have a very high heating rate, ensuring the maintenance of a comfortable temperature in a heated room.
- Possibility of quick dismantling of heaters - if necessary, the infrared heating element can be quickly and easily dismantled by disconnecting it from the power cable and rolling up a compact roll.
- Environmental friendliness - the infrared rays emitted by the heating film do not have a negative effect on the human body.
The disadvantages of this heating system include
- Energy dependence - when the electricity is turned off, such a heating system stops working.
- Electrical Hazard—Electric current flowing through copper bars poses a potential hazard to the human body.
- High electricity costs - when using infrared heated floors as the main heating system, electricity costs during the cold season can be very high.
- Additional costs for protective coating - when laying infrared floors under a soft covering - carpet, linoleum - they are additionally protected with sheets of plywood and moisture-resistant plasterboard. The use of these materials increases the cost of installing the heating system and increases the final thickness of the floor.
You may be interested in this Digital electronic electricity meter
Is it possible to heat such a coating?
The first thing I would like to tell you about is whether it is possible to lay an electric heated floor under linoleum and what are the requirements for installation. The fact is that the film coating can, when heated, release toxins that are harmful to the human body.
In addition, the material may shrink over time, causing its appearance to deteriorate. Well, the last nuance - this coating option can be additionally thermally insulated, as a result of which the heating system will be completely ineffective. As you can see, there are nuances in choosing the right linoleum, and now we will tell you which type is suitable for laying an electric heated floor.
Firstly, there are natural and artificial materials.
It is advisable to give preference to the first option, since in this case no harmful substances will be released during heating.
Secondly, manufacturers indicate on the packaging the suitability/unsuitability of using products for an electric floor heating system. You understand that you need to choose products with appropriate labeling. And, thirdly, multilayer PVC linoleum has proven itself best in terms of reliability, durability and heat transfer, which we recommend buying for laying a heated film floor with your own hands!
Another important nuance is that there is a maximum allowed temperature for heating linoleum. An electric heated floor should heat the coating by no more than 30°C, which is even stipulated by SNiP rules. If you ignore this point, the material may begin to melt, darkened marks will appear, and the likelihood of the coating igniting will increase.
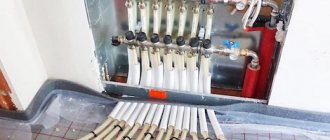
Do-it-yourself cable floor connection
Installation of a cable floor should begin with laying thermal insulation. The material can be spread directly onto the screed or hidden in a layer of self-leveling self-leveling floor. There are 2 options for cable heated floors: in the form of a separate wire or a mat with a cable attached to it. Reinforced mesh is used as a roll material.
Floor installation as a separate cable:
- Lay a special metal strip across the room in increments of 50 cm, secure with screws (can be nails).
- Lay the cable according to a pre-designed pattern, avoiding areas under furniture. The turns should not intersect with each other, the pitch is 25 cm.
- Secure the cable to the mounting tape (it has special clamp clips).
- A temperature sensor is installed between the cable lines, the wire of which is laid in a corrugation.
- One end of the cable is insulated. The incoming end, temperature sensor wire, zero, phase and ground wire are connected to the thermostat.
- Control check of the system.
- Concrete or leveling mixture is poured on top of the system or tiles are glued.
The heating mat is connected in the same way, but there is one important nuance. Do not cut the cable! You can only cut the mesh on which it is attached. Therefore, you will have to calculate in advance where the cuts of the mat will be and in which direction to turn its parts. Then everything follows the scheme described above: connecting the cable directly to the thermostat, the phase, neutral, sensor and grounding wires.
Is it possible to connect a heated floor through an outlet?
Of course it is possible, especially if you use film heated floors.
In this case, it is enough to connect the phase and neutral to the film through a cable to the copper busbars (be sure to carefully insulate it first and fulfill all safety requirements), and connect the plug.
After connecting the floor to an outlet with 220 power, you will immediately feel the heating, but due to the lack of a thermostat, the film will heat up as much as possible, so it is better to take an outlet thermostat with a remote sensor and connect it to the heated floor.
The remote sensor is usually about 2 megapixels long and is hidden directly between the film and the heat reflector.
It is advisable to use heat-reflective insulation with a thickness of 2-4 mm in such mobile heated floors
In addition to film heated floors, you can also connect cable and rod floors and mats through the socket, but without a temperature controller only for a short period of time to check the serviceability. In general, you can connect the cable through a socket thermostat, but be sure to secure the sensor correctly and follow safety precautions.
The question is often asked whether it is possible to install heated floors from an outlet, i.e. take power from the outlet to the thermostat. It all depends on the power of the heated floor, if the floor area is large - 10 or more m2, and the load on the network exceeds 2 kW or more, then you should think about it and consult with an electrician. With a smaller area, we think it can be done without problems. Only in the future this line should not be reloaded, for example, with an electric kettle. Try to ensure that the supply cable is standard for wiring - 2.5 VVn copper.
What type of heater is best to use?
We have already looked at the types of electric heated floors, which can be represented by a thermomat, infrared film or heating cable. All three options are suitable for laying a heating system, but it is best to use an infrared film coating.
This is due to the following advantages of the material:
During installation, you can do without a screed, which will save time, money and, most importantly, the height of the ceiling. The infrared system can be put into operation within 1-2 days after installation.
At the same time, the screed hardens for about 4 weeks.
A heated film floor under linoleum can be easily installed with your own hands, and this can be done even after a major overhaul, since this type of work is “clean”.
As you can see, the advantage of this version of the system speaks for itself, so we strongly recommend using it at home. The only negative is that the infrared coating is afraid of water, so installation in wet rooms is prohibited. In addition, linoleum itself begins to rot in a humid environment, which immediately prevents its use in the bathroom, bathhouse, and damp rooms.
What's included in the kit
Composition of a film heated floor kit
Before starting work, you must purchase all the components necessary for the operation of the heating system. The kit must contain:
- thermal insulation with reflective surface;
- film heated floor;
- butyl rubber insulation, which is installed on the free ends of the strips and on the connecting elements;
- connection terminals;
- thermostat (each room needs its own device);
- temperature sensor.
In addition, you need to prepare tools for cutting the film (scissors, a sharp shoe knife), as well as ordinary plumbing tools for connecting contacts and wires (pliers, a screwdriver, an insulation stripper). You will have to make a groove in the wall for a hidden connection of the thermostat. To do this you will need a wall chaser or grinder with a diamond wheel. (this is not necessary; the wires can be laid in an overhead cable channel).
Installation procedure
So, for your attention, the procedure for laying a heated film floor under linoleum with your own hands:
Calculate the heating system in order to correctly select the power of the infrared film and its size in accordance with the usable area of the room. Prepare the surface - remove the old coating and if the floor is uneven, pour a small screed to level the surface. After the solution has hardened (which may not be necessary) , lay heat-insulating material over the entire surface.
It is best to use extruded polystyrene foam. Glue a heat-reflecting layer on top of the polystyrene, which will increase the efficiency of the system. You can “kill two birds with one stone” by covering the surface with penofol, which is both a heat-insulating and heat-reflecting layer.
Cut the film into suitable pieces. This must be done in specially marked places (indicated by the manufacturer). Install an infrared heated floor under linoleum.
Please note that it is prohibited to overlap the film. Another requirement is that material cannot be laid under furniture. Also, do not forget that the film covering must be laid at a distance of at least 30 cm from other types of heaters to prevent overheating of the system.
You can find out about other requirements for laying film heated floors in the corresponding article!
According to the diagram, connect the thermostat and temperature sensor to the film and check the operation of the system by connecting it to the power supply. If everything is correct, lay a layer of plywood over the film coating, which will additionally protect the material from mechanical damage.
Lay linoleum on plywood over the entire area of the room with the heating on. After this, make a trim and leave everything as is for 2-3 days.
When this period has passed, you can trim the edges again (if necessary) and proceed to gluing the material to the plywood.
Set the thermostat to a setting of no more than 30 degrees, at which point the installation of the film heated floor under linoleum is completed!
We also recommend watching the step-by-step video instructions for installing infrared film, which discusses all stages of the work in more detail:
That's the whole procedure for laying a heated film floor under linoleum with your own hands! As you can see, there is nothing complicated and you can do everything yourself, without calling a specialist. Finally, I would like to note once again that an infrared heater is still better than an electric one (heating cable and thermomat), so use this particular installation technology in your home!
Installation of infrared floor
Non-traditional heating systems have recently been widely used in modern construction.
They can significantly reduce energy consumption, which has a significant impact on saving the family budget. Such innovative solutions include film infrared heating of the room. We will tell you how to properly install an infrared heated floor.
Selection of system components
In addition to carbon heating strips sealed in Mylar film, the film floor system requires a thermostat equipped with a temperature sensor.
Film options
There are many options for film flooring on the modern market. And they all have approximately similar characteristics: power consumption from 25 to 80 W/h, and operating temperature from 30 to 50 °C.
There are two types of film systems on sale:
- solid - in them the film is completely covered with carbon material;
- striped - in them carbon material is applied to the surface in the form of strips 15-20 mm wide.
The difference between them is that in continuous systems the material is applied by rolling it over the surface in the form of a paste, while in striped systems it is applied by fragmentary spraying.
For small rooms, it is better to choose a film whose width is 50 cm; for larger rooms it is more profitable to purchase strips 100 cm wide
The thickness of the material can vary from two microns to 0.4 millimeters. The roll length is 50 meters.
There is an opinion that it is better to choose the thinnest films. But, as reviews show, the smaller the carbon layer, the faster the system fails. Therefore, it is more advisable to purchase material no thinner than 3 mm. For example, for European countries and the USA, the optimal option is a material thickness of 0.338 mm.
Such systems are not cheap. The average price range of film IR systems from leading manufacturers varies between $20-25 per square meter. You can read more about the types of film heated floors in this material.
Calculation of the required quantity
Installation of film flooring with infrared heating is carried out only in the usable area of the room.
The percentage of area covered depends on whether the IR system acts as the main or additional heat source:
- 80% of the area - as the main heating;
- 40-50% of the area - as a supplement to radiator heating.
A pre-drawn diagram of the system zones layout on a sheet will help determine the total length of all strips. By calculating the length of each fragment and adding up their number, it is not difficult to calculate the required total length of the coating.
When calculating the area to be covered, it should be taken into account that according to the standards, each wall will need to be indented by 10 - 20 centimeters
To prevent premature failure of the floor system, it is necessary to distance yourself from the central heating pipes and risers when laying them out. The laid strips should not intersect or overlap each other.
When placing fragments on the plan and calculating their length, also keep in mind that the length of each strip should be a multiple of 17-18 centimeters, since it is in these places that the cutting lines are located.
Thermostat for temperature control
The operation of the IR system is controlled by the thermostat. The temperature sensor included with it is placed between the heating elements and connected to the device through contacts. The sensor reads the temperature from the surface of the film and transmits the data to the thermostat, which, in turn, operates and puts the system into operation.
The main purpose of the device is to monitor the floor temperature using sensor readings and adjust the heating power in accordance with the specified parameters.
There are a huge variety of options for modifications of regulators that differ in functionality on the market today.
All of them are divided into two types:
- Mechanical - equipped with keys and mechanical wheels and are suitable for arranging small systems.
- Electronic – equipped with push-button control and a display, suitable for small, unzoned rooms.
Programmable models are equipped with touch screens, with which you can set 4 time modes at once, thereby saving up to 50% of energy consumption.
Temperature sensors, depending on the type of device and type of floor covering, come in two versions. For soft surfaces they are available in the form of compact plastic containers. For hard ones - in the form of larger elements equipped with gel protection against the impact of adhesive compositions on the strips and to prevent mechanical damage.
Some models of thermostats are capable of reading information about the heating of the floor surface, others are able to additionally analyze the degree of heating of the air in the room
When choosing a device, you should focus on the power of the thermostat. It is calculated based on the fact that one square meter of film consumes on average 50-70 W. To determine the required value, the indicator is multiplied by the size of the working area covered with heating elements.
Budget models operating from the network often suffer from the fact that in the event of a power outage they cannot resume operation on their own. Therefore, it is better to give preference to models that have a battery. Read more about choosing and installing a thermostat for a heated floor.
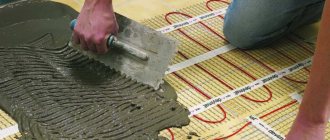
If the film system is supposed to be combined with a porcelain stoneware or tile coating, you will need to build a cement-sand screed
What is a warm film floor
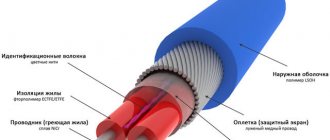
Warm infrared film floors are a heat-resistant polyethylene film in which strips of carbon paste are packed. In turn, the paste is connected by copper bars, which are also soldered into the film.
The entire structure is called IR thermal film. If a current of a certain strength and frequency is supplied through the tires, the carbon elements begin to emit infrared radiation with a wavelength of 5 to 20 microns.
It does not cause heating of the surrounding air and drying it out, as traditional radiators and heaters do. Infrared rays heat surrounding objects - flooring, walls, ceilings, furniture.
It is important to know! It should not be confused with electromagnetic radiation, which has a harmful effect on the human body, animals and plants.
This heating system has virtually no side effects and is environmentally friendly. Scientists from around the world have proven the beneficial effects of infrared rays on living organisms and humans in general.
Infrared heated floor technical characteristics have the following:
The energy consumption of an infrared heated floor directly depends on its area and mode of operation.
On the modern market, many manufacturers present their options for warm film floors. They all have approximately the same characteristics. So which infrared heated floor is best for you to decide.
The thickness of the thermal film is 0.4 mm, which allows it to be installed under any floor covering - ceramic tiles, laminate, parquet boards, linoleum and carpet. In addition, this film can be installed on walls and ceilings. In this case, heating will occur throughout the entire volume of the room.
Of course, installing infrared heated floors under one or another coating has its own characteristics. For example, to lay a film floor under carpet or linoleum, plywood should be laid on the heating strips.
Disadvantages of film systems
Despite a lot of undoubted advantages, infrared systems have certain disadvantages, which sometimes become decisive.
In order to avoid pitfalls, it is necessary to take into account the following features when you need to solve the problem of how to install a heated floor:
- Installation of the system quite often takes longer than expected by the manufacturers. This happens even with the participation of experienced specialists.
- Sometimes the clamps are not tightly connected, which leads to poor contact between individual floor elements. Damaged clamps are no longer suitable and you have to use new contacts.
- The process of laying heated floors must take place on a perfectly flat surface. Even minor distortions lead to its ruptures after the floor covering has already been laid on top.
- Despite the small thickness of the film itself, ultimately the thickness of the heated floor can be up to 35 mm, which is achieved by laying chipboard or plywood, as well as thermal and waterproofing materials along with the floor covering.
- High reliability of the system is possible only if all recommendations and instructions are strictly followed and the work is performed with high quality.
- The declared 20% savings on heating can only be achieved with high-quality insulation of the room and uninterrupted central heating.
How to lay film flooring under laminate yourself
Armed with this knowledge, it is necessary to draw a plan for the placement of heating elements. On paper it is necessary to reflect the location of the furniture and heating film.
It is important to know! Laminate flooring is laid on a pre-leveled surface.
The concrete screed should not have a difference exceeding 1 mm per 2 linear meters. To ensure that the heat from the thermal film does not escape through the floor slabs to the neighbors, a thermal insulating substrate is laid on the floor. This is foamed polypropylene 3-4 mm thick and has a foil coating on one side.
Thermal insulation strips are laid joint to joint and secured together with thermal insulating tape. The strips are carefully trimmed around the perimeter of the room. Thermal film strips are measured, cut and laid on the floor in accordance with the drawn up plan.
The heating film can only be cut in the places marked on it. They are highlighted with a dotted line and a scissors symbol.
How is the thermostat installed?
As an option, it is worth considering connecting the heated floor to the network without using a thermostat. But in this case, it is necessary to independently organize the operation of the installed system in accordance with need.
This is at least inconvenient, and deprives the owners of the premises of certain advantages:
- maintaining the required temperature at a comfortable level;
- heating the floor with a certain frequency and period of time;
- significant savings in energy consumption;
- a comfortable temperature is maintained around the clock.
When it comes to choosing a thermostat, it is worth considering the power consumption for the underfloor heating system. As practice has shown, a device with a power of about 3 kV is mainly used. The device can be connected either to the panel or through an outlet.
It is also worth considering that the device will also be sold with instructions, which describe in detail all the necessary steps, without which it is impossible to do everything correctly. It will describe exactly how to connect the power wires, how to properly install the grounding and select the phases.
Important! Heated floors should be installed on a surface that has been prepared in advance and has high-quality thermal insulation.
The thermostat is installed at a distance of 1-1.5 meters above floor level. But there are some types that are allowed to be placed at a distance of about 30 centimeters from the floor surface. Typically, they are equipped with ultra-sensitive temperature sensors that immediately respond to any changes in room temperature.
Connection diagram for heating elements
If you cut the film diagonally, it will be damaged. The cut points are located approximately every 18 cm. The heating film should not be closer to the wall than 10 cm.
The heating film strips are laid on the substrate one next to the other with a gap of at least 5 mm, but not more than 1 cm. The heating element cannot be bent at an angle of 90 degrees or more, as it will fail.
The places where the thermal film is cut, where the conductive busbars are cut, must be insulated with strips of bitumen insulation, which is supplied with the heated floor. To install the contact, insert it exactly in the middle of the end of the conductive busbar and press firmly with pliers.
Current-carrying wires are stripped to 5-10 mm with a sharp knife and clamped with pliers in the contact terminal. After this, the entire contact is isolated with a piece of bitumen insulation.
The connection of infrared heated floors (heating strips) is carried out in parallel with copper stranded wires with a cross-section of at least 1.5 mm2. In order for the automatic floor heating thermostat to work correctly, it is necessary to install a temperature sensor.
Application
Infrared heated floors are used as a system for additional heating of rooms in country cottages and houses, in apartments and offices of high-rise buildings. It is used as the main heating system for small warehouses and greenhouses.
You might be interested in Installing a radio doorbell
Also, with the help of infrared heated floors, many owners of private houses heat the entrance porch and polymer water supply pipes.
On a note. In some cases, such a system is used to heat load-bearing cold walls. This allows you to make corner rooms in high-rise buildings warmer, reducing heating costs by 20-30%.
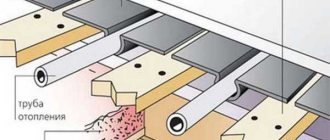
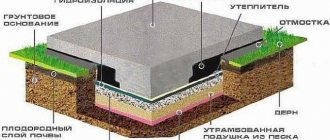
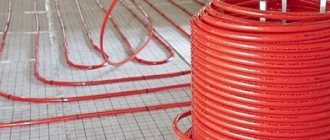
Installing a water heated floor on a wooden floor is absolutely safe
The heat source with this device is heated water circulating through tubes located directly under the laminate.
Modern industry produces pipe products for these purposes, made from the latest materials using innovative technologies. Thanks to this, polyethylene and metal-plastic pipes ensure complete safety of system operation. Any water leaks are excluded.
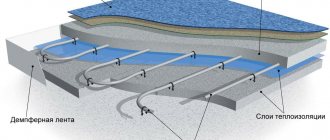
The initial stage of arranging a water-heated floor is laying a cross-linked polyethylene pipe on a heat-insulating substrate
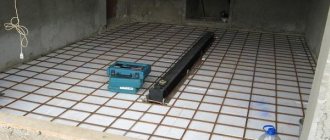
To lay a water-heated floor, it is necessary to lay a damper tape around the perimeter of the room. Then install hydro- and thermal insulation on top of the rough base and lay out the reinforcing mesh.
Then the pipes are laid in a parallel or spiral manner. In the first case, the pattern looks like a snake, and in the second, like a spiral. The ends of the pipe are closed to the heating circuit so that water circulates freely inside.
Options for laying pipes for water heated floors
The next stage is pouring the entire structure with a sand-cement mixture. The resulting screed is leveled for laying the laminate. As the coolant circulates through the pipes, the cement will warm up, uniformly transferring heat to the laminate.
This type of heated floor has a number of advantages:
Combining various options for arranging the “pie” of a water-heated floor within one living space
This system is absolutely safe for installation on a wooden floor. A warm laminate floor constructed in this way will last a long time.
Additional kit KEEPLY PS-2.5x16
| Manufacturer: | KEEPLY |
| Cross section: | 2.5 mm2 |
| Length: | 16 m |
| Application: | up to 4.4 kW |
for comparison
RUB 1,072
Product added to cart
| Photo | Name | Price per piece | Quantity | Price |
| Additional kit KEEPLY PS-2.5x16 | 1,072 rub. | < 1 > | 1,072 1,072 rub. |
There are 0 items in the cart worth 0 rub.
Go to cart
Buy
Availability
Electric floor heating device
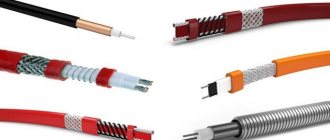
The operating principle of the system is based on the property of conductors to heat up when electric current passes through them. The heating element is a special self-regulating electrical cable.
It is capable of automatically changing resistance in those areas where overheating is detected. This is necessary to avoid burnout. The cable is available in single-core and double-core.
Most often, electric heated floor mats are laid next to and parallel to each other.
Before installation, the surface is leveled and a thin sand-cement screed up to 0.3 cm thick is made. If necessary, thermal insulation is installed underneath it.
Drying will occur in 3 days. Only after this can the mounting tape be attached. Then you need to secure the thermostat in a convenient place and lay the cable according to the instructions on the package.
Upon completion of installation, a screed from 3 to 10 cm thick is made again.
It will reach complete drying only after a month. Only then can the flooring be laid. Waterproof laminate class 33, 12 mm thick, produced in Germany, is very suitable for this.
On top of the electrical mats it is necessary to make a concrete screed with a thickness of 3 to 10 cm
Main advantages:
The disadvantages include the following:
Stages of installing an electric heated floor
Made in Germany, waterproof laminate 33 class 12 mm is perfectly combined with electric type heated floors.
Helpful advice! To install a heated floor at home, it is better to buy a two-core cable. It is much easier to install.
The peculiarity of using an electric type of heated floor is the selection of the optimal mode, which ensures sufficient heating with optimal use of electricity.
Thermal reflective insulation
| Manufacturer: | HEATED FLOOR chain store |
| Length: | 1m |
| Equipment: | per cut |
| Thickness: | 4 mm |
| Width: | 1m |
for comparison
177 rub.
Product added to cart
| Photo | Name | Price per piece | Quantity | Price |
| Thermal reflective insulation | 177 rub. | < 1 > | RUB 177,177 |
There are 0 items in the cart worth 0 rub.
Go to cart
Buy
Availability
Infrared film heated floor
This is the most innovative floor heating system. It is a film that, as a result of exposure to electric current, is capable of emitting infrared electromagnetic waves.
This range of the spectrum is invisible to the human eye, but is felt by the skin as heat. Half of the sun's energy is infrared rays. The absence of glowing elements is the main feature of this material.
Infrared film heated floor - a modern system of efficient heating in the house
This system is the most convenient to install.
It is enough to lay a heat-reflecting coating on a leveled base, and then an infrared film on it. The final coating, which may be a waterproof laminate33 class 12 mm thick made in Germany, is laid directly on the film itself. There is no need to arrange a screed, which is a long and labor-intensive process.
Helpful advice! Under the laminate, it is better to place a backing not made of foamed polyethylene, as is most often done under normal conditions, but tuplex or isoplat. These materials have waterproof properties.
Scheme of arrangement of the “pie” of infrared heated floor
Advantages of infrared film:
The disadvantages are:
Laying laminate film infrared heated floor
A special feature of using such a floor is extreme caution. He is afraid of rough mechanical influence.
Therefore, you should not place heavy furniture on such a surface. This may damage the film and render it unusable. It is better to use such a system in open spaces.
Each owner independently chooses the type of heated floor to install in his home. The decision is made depending on preferences and availability of financial capabilities.
Well, now it's time to finish the article. All the material I wanted to share has been reviewed. I hope it will be useful to you, and you will use it if you need to lay an infrared heated floor with your own hands. Improve your own practical skills and gain new knowledge, as they say: “It’s never too late to learn!” That's all, thank you for your attention, successful and easy repair!
Installing a thermostat
Connecting a heated floor is possible without using a thermostat. However, in this case, you will have to manually organize the operating mode of the system. Firstly, it is inconvenient; secondly, home owners are deprived of the following benefits:
- Maintaining the set temperature in automatic mode;
- Heating the floor at certain time intervals;
- Energy saving;
- Maintaining a comfortable temperature around the clock.
When choosing a thermostat, you need to take into account the power consumption of the floor heating system. Typically, devices with a power of 3 kV are used. The device can be connected directly to the panel or through an outlet. The device is always accompanied by instructions in what order to connect the power wires, as well as ground, phase and neutral.
The thermostat is located at a distance of 1.2-1.5 m from the floor. Some types of regulators can be installed lower - about 30 cm from the surface; they are usually equipped with ultra-sensitive temperature sensors.
Connection via socket
- Install the thermostat. There are 2 installation options: overhead and hidden. Accordingly, for hidden installation it is necessary to make a hole and a groove for the cable in the wall. For overhead installation - only a groove.
- A ground wire, phase, and neutral from the socket are supplied to the distribution box.
- The groove contains a heating cable from the heated floor and a single-core wire of the temperature sensor.
- Connect the wires according to the diagram (instructions with the diagram are included with the thermostat).
- Connect the floor system to the thermostat.
Connection via panel
If the thermostat is intended for use in a large room (20 sq. m. or more), then technicians recommend installing the device on a separate power line. In the case of connecting directly through the shield, the operation scheme is similar to that described above (grounding, phase and neutral wires), with the difference that the installation of an RCD (residual current device) is required. The RCD is installed in the panel. After fixing the thermostat, the procedure for connecting the heated floor follows.
Connecting a heated floor without using a thermostat
It is possible to install heated floors without using a thermostat. In this case, usually, the heating wire is connected to a dedicated line and, using an RCD, the floors operate in on/off mode. Simply put, you will have to constantly monitor the system with your own hands. During “manual” operation, energy consumption increases significantly. In addition, the grounding problem will have to be solved.
Features of IR films from Heat Plus
The Heat Plus brand produces heated floors (including infrared). The peculiarity of the models manufactured by this company is that they can have different film shapes, namely:
- striped;
- solid.
Related article:
Do-it-yourself water heated floor, video and description of the process
Description of the installation process of a water heated floor. Its advantages and disadvantages are different from other types.
Features of the IR floor production technology from this company make it possible to avoid the presence of unheated zones. The production of such film systems involves uniform application of carbon material on a polyester base, which allows achieving a high level of efficiency of heating communications.
Let's look at other advantages of Heat Plus IR floors:
- ease of installation;
- wear resistance;
Infrared film Heat Plus consists of safe and environmentally friendly materials and is a coating with a thickness of 0.338-2 mm, consisting of 5-9 technological layers
- reliability.
The service life of such products can reach 15 years under normal use. If desired, organizing such a system takes no more than one day, which is very convenient.
Note! The price of IR floor Heat Plus is several times higher than the standard one. However, products from this brand pay for themselves in 1-2 years.