Like any other mechanism, the water block has wear parts in its design. When they become unusable, the operation of the heater deteriorates or stops altogether. Common situation?
If a malfunction occurs, a home craftsman is quite capable of repairing the water unit of a geyser on his own by disassembling the gearbox and replacing used consumables. To begin with, we suggest you figure out how to disassemble and repair the water unit of an instantaneous water heater yourself. The information will also be useful when performing preventive examinations. We will provide the presented material with thematic photos and video materials.
Design and types of water block
The material used to make the water reducer varies and is therefore divided into several types:
- Brass. Alloy of copper and zinc.
- Plastic. The practical device is not subject to corrosion.
- Polyamide. Reliable device with fiberglass composition.
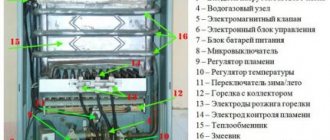
The column regulator or “frog”, as the block is also called, has protective functions. It serves to automatically turn on the device when water is supplied. It also protects against overheating when pressure in the line decreases.
- Base and cover with bolts.
- Rubber membrane with a disc on the rod.
- Flow device.
- Temperature switch.
- Flow sensor.
- Venturi tube.
- Filtering device for hot water.
The water pressure regulator cover can be held together with steel screws or plugs. Since the parts do not come into contact with water, there is no risk of corrosion. By unscrewing the screws, you will remove the cover behind which the membrane is located. The device is quite simple.
When you turn on the water, pressure is created on the membrane. It pushes out the rod, which operates the gas valve. Fuel is supplied to the burner and heating begins. When the mixer closes, the pressure drops - the parts return to their previous position.
An important part of the gas-water unit is the Venturi nozzle. What is it for? For example, in technology the tube is at the bottom. The location in the “Oasis” and “Astra” columns may differ. The part serves to reduce the pressure of the working medium. This is how the gas supply is adjusted.
When you close the tap, the tube equalizes the indicators, causing the membrane fitting to return to its place. After this, the device turns off.
The water part is also susceptible to breakdowns, so we will list the main faults and ways to repair them yourself.
Areas of responsibility
The first and main thing that the reader should pay attention to is that the inlet valve in the apartment falls under the responsibility of GorGaz or a similar organization operating in the area where you live. Both the repair and replacement of valves, and their periodic inspection, and the connection of gas equipment (stoves, boilers, convectors, hobs) should be carried out by mechanics of this organization
- you have quite a lot of experience in locksmith work; in particular, you have had to change valves and valves under pressure;
- you know where the power is cut off in your apartment, and you have access to the switchboard and the machines in it;
- the gas pipe in front of your valve has no visible signs of corrosion;
- at your disposal are plumbing tools (at least two gas wrenches No. 1 and/or No. 2), sealing material for threads and grease or graphite lubricant -
the following text will help you replace or repair the gas stove tap yourself.
Typical unit problems
Most often, the unit fails due to poor quality water. Potassium and magnesium impurities settle and clog device parts. Pressure drops in pipes also have an effect. It has been proven that 80% of gas heater failures occur due to failure of the water-gas unit.
Study the main signs and causes of breakdowns.
The water pressure is normal, but the burner does not light
- Check the membrane. The rubber element quickly wears out, breaks, and leaks. It is better to install a silicone membrane instead of the old element.
- The rod is stuck and won't budge. Perhaps he got used to it. Lubricate this area and the oil seal with grease to restore operation.
The cold flow is quite strong, but the hot flow is weak
- The mesh filter is clogged with small debris and rust. Remove and clean the part.
- The nozzle at the entrance to the unit is clogged. Cleaning is also carried out.
When opening the mixer, the column does not start immediately
- The retarder ball channel is clogged. The elements are disassembled and cleaned. The ball is located in the unit cover.
- The retarder ball is not adjusted correctly. You need to tighten the adjusting screw.
Required water pressure
The minimum pressure required to turn on the selected column is indicated in the equipment documentation
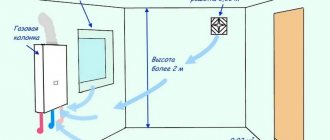
Paying attention to this parameter is especially important when installing a heater in old houses built in the 60-70s, since the pressure in their pipes is often insufficient for the heater to operate. If the manufacturer states that the minimum requirement is a pressure of more than 0.15 bar, then in an old building there may be problems with the functioning of this column
Another point is the ability of the column to withstand the hydraulic shock that periodically appears during water supply. This is the name for a short-term increase in pressure in pipes, which can cause leaks and damage to connections. With a value in the range of 11-12 bar, the column is able to withstand such changes.
Dismantling the water unit
To carry out repairs, the unit must be removed from its seat. This is only possible together with the dismantling of the gas unit.
- Turn off the gas supply valve.
- Disconnect the cold water hose.
- Using a wrench, disconnect the assembly from the pipe.
- Disconnect the wiring from the gas valve and microswitch.
- Use a screwdriver to unscrew the flange bolts.
- Remove the water-gas block.
Now you need to disassemble it and replace the broken parts:
- To disconnect the gas part from the water part, unscrew the two screws. One is on top, the other is on bottom. You can not unscrew it completely, but slightly loosen the fastening. It happens that the bolts stick. Spray these areas with WD-40.
- Separate the blocks.
- Now unscrew the frog screws on top.
- The body will split into two parts and the diaphragm will become accessible.
- Remove the rubber part (if it is faulty, prepare a new one).
- Pull out the disc with the stem. Behind them is a spring.
- Remove the spring and check the seal located behind it. It requires periodic cleaning and lubrication.
- Install new parts and reassemble the unit in reverse order. The oil seal can be lubricated before installation.
- When tightening the frog bolts, lubricate them with graphite lubricant.
To avoid running the column into a faulty state, check its components every six months and clean them of scale and dirt.
Source
Sources of danger
There are, in fact, only two of them.
The fact is that independent work related to opening the gas pipeline will inevitably lead to a gas leak.
- At a certain concentration of natural gas or propane-butane mixture in the air, it will become unbreathable.
- Long before this, the gas-air mixture will become explosive. The slightest spark when turning on an electrical appliance, triggering any relay (for example, a convector thermostat) or clicking a light switch will lead to exactly the consequences that we tried to warn the reader against in the first section of the article.
The rules that will help avoid negative consequences are quite obvious.
- All work is carried out with windows wide open throughout the entire apartment or house. Yes, yes, regardless of the time of year. Don’t be afraid that your favorite cactus will freeze: if everything goes well, forced ventilation will last no more than 10 minutes.
- The room must be completely de-energized. What the instructions relate to is, I think, clear from the previous explanation. Take it seriously: as already mentioned, the cost of a mistake can be the highest.
Let's get started
Tools
What should you prepare before opening a gas pipeline?
- We have already mentioned a pair of gas keys. Precisely a pair - because in most apartments of the old building, the supply to the stove is made of rigid pipes; To unscrew the locknut and coupling, you need to hold the drive in a stationary position, not allowing it to turn the valve.
- To seal gas threads, FUM tape or synthetic thread with Tangit Unilok sealant can be used. Linen with paint is also suitable, but the paint takes a relatively long time to apply to the threads and winding, and in our case, seconds will count.
- When repairing a tap, a special graphite lubricant for gas taps or regular grease can be used. The graphite base is more practical: it retains its properties longer.
- In addition, when repairing the valve, you will need a 1/2-inch female plug and a flathead screwdriver.
Audit
So, what to do if the gas tap smells like gas and replacing it is not in your plans?
- We close the valve by turning its handle perpendicular to the pipe.
- We use one of the gas keys to fix the outlet after the valve and then hold it in a stationary position.
- Using the second wrench, we tighten the locknut and coupling onto the long thread of the drive.
- We partially unscrew the valve with a key until it starts to rotate by hand.
- We completely unscrew the valve and immediately attach a plug to the thread. Do not be afraid that excess pressure will interfere with you: it is only 3 - 5% higher than atmospheric pressure.
- We wind the thread under the plug and tighten it by hand until the end.
- We unscrew the valve from the surge.
- We unscrew the plug with a groove for a screwdriver on the back side of the valve and remove the spring hidden under it; then we push the conical plug out of the body.
- We clean the body and plug from the remnants of the old lubricant and apply a thick layer of new one.
- Reassemble the valve in reverse order.
- We put it in place of the plug, not forgetting to replace the thread winding.
- We screw in the drive and, having re-winded the threads, we drive the coupling and locknut into the working position.
Replacement
What to do if the gas tap in the kitchen is leaking and you want to replace it with a new one?
If the new valve is the same length as the old one, the actions are completely similar to those described above - with the difference that manipulations with the plug are, for obvious reasons, made unnecessary.
How to change a gas tap in an apartment if its length does not match the length of the old one?
- The drive with the coupling and locknut is thrown out.
- The short thread after the drive is equipped with a short extension with internal and external threads. This will allow the union nut to press the gasket against the smooth, wide edge of the extension rather than against the jagged end of the pipe.
A special case
How to change the tap on a gas cylinder if it cannot be opened with a regular key? Heat the valve with a hair dryer - and its expansion will make the force required to unscrew it quite feasible.
Water block of a geyser - repair and adjustment of a gas-water unit
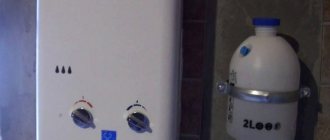
Instantaneous water heaters have a simple and at the same time reliable device that prevents emergency situations. There are various sensors and regulators inside the structure. Gas pressure and thrust intensity are controlled.
One of the important units remains the water unit of the gas water heater or “frog”. The regulation and safety module is installed in semi-automatic and automatic flow-through gas boilers. A gearbox malfunction is reflected in failures to start the burner, refusal to turn on, and other disturbances.
How to clean the frog?
The unit should be cleaned every year. After removing the cover or disassembling the gearbox into two parts, the inside of the unit is cleaned and the elements are maintained. The process of cleaning the unit removes scale and solid particles that have settled at the bottom of the unit. You should also clean the mesh on the inlet pipe. It is recommended to lubricate the rod with castor oil or grease. The gasket also needs to be lubricated if it feels like it has lost its elasticity.
Caring for the elements of the water block will extend the service life of the gas water heater and reduce the likelihood of any malfunctions.
During each cleaning, the functionality of the components is checked and, if necessary, they are replaced:
- replacement of the stem seal is usually required approximately every 3 years to protect the gas valve from moisture;
- the membrane should be changed when microcracks appear or ruptures occur.
Worn parts need to be replaced with new branded products. The membrane can be purchased separately, however, if desired, you can also find a kit that includes all the components for replacement.
Operating principle of the column water block
Instantaneous water heaters turn on immediately after the water supply tap is opened and turn off after it is closed. The working process is regulated by the water block of the geyser.
The hollow frog device is divided into two parts using a rubber membrane. One half of the reducer is connected to the cold water supply, the second has a rod connected to the gas valve. On the metal rod of automatic water heaters there are “wings” connected to the electric ignition unit.
The operating principle of the gas water heater unit is as follows:
- when the hot water tap is opened, one of the cavities is filled with water;
under the pressure of water, pressure is exerted on the membrane of the water unit;
the diaphragm bends under pressure and presses on the rod located in the second cavity;
Conclusion
In general, the device of any water block of a household geyser is quite reliably designed and executed. If the installation was carried out correctly, and preventive inspections with timely replacement of consumables are carried out regularly, then problems with the operation of the speakers do not occur often. To repair a water heater assembly, you do not always need a specialist. You can do many types of work yourself
HSV repair
Problems with ignition
Possible malfunctions of the water unit
There are malfunctions and malfunctions in the operation of a flow-through water heater, which clearly indicate failure of the structural elements of the gearbox. These include:
refusal to turn on the column;
the flame does not light up the first time;
there is a water leak from the gearbox;
Malfunctions indicate the following possible breakdowns and malfunctions in the “frog”:
- The membrane has broken - the average service life of the diaphragm is 5-7 years. Over time, due to constant mechanical stress and hard water, the rubber breaks through. A sign of membrane failure is that water drips from the gearbox.
The membrane has become coarsened - the quality of the water unit of the gas water heater depends on the elasticity of the diaphragm. To operate, it is important that the membrane responds sensitively to any changes in water pressure. If the gasket is roughened, the column will operate with a delay. After turning off the DHW tap, the gas burner continues to work for some time.
The rod is clogged - when the membrane breaks, water enters the metal surface of the rod, causing it to corrode. Rust prevents the needle from moving properly. Signs of malfunction: starting the column is difficult. The flame ignites only with strong water pressure. After closing the DHW tap, the burner does not go out.
All described breakdowns are easily fixed. The need to completely change the gearbox in a gas water heater is extremely rare. Do-it-yourself repairs, if you have the tools and understand the internal structure, will take no more than 30 minutes.
The most common breakdowns
Finally, I will give a few of the most common breakdowns of geysers.
Most often you can observe the following problems in the operation of heaters: Clogging of the coil with scale. If there is low pressure in the hot water tap, and cleaning the reducer does not solve the problem, it means that the coil is clogged. In this case, it needs to be washed with a remover such as Antiscale;
- Doesn't light up.
There are several reasons why the column may not light up: - low water pressure;
- the batteries are dead (applies to speakers with automatic ignition);
there is no draft in the chimney - perhaps a foreign object has entered the chimney;
- Doesn't heat water well
. There may be several reasons: - gas equipment clogged;
the need to adjust the burner - modern columns have a tap that allows you to adjust the gas supply to the burner.
These are all the most common malfunctions of geysers that you can fix yourself. The service instructions, which usually come with the passport, will help with this.
If you are not sure that you can fix the problem yourself, it is better to seek help from specialists. The repair price starts from 300 rubles excluding the cost of parts.
Performing serious operations, such as soldering a radiator, costs 1000-1200 rubles. Prices are valid for spring 2022.
Repair and maintenance of gas-water unit
Hard water, constant thermal load and other factors destroy the structural components of the column over time. Any gas consuming equipment requires regular maintenance. And if defects are identified, carry out immediate repairs.
The design of the gas water heater water reducer has a simple internal structure. Everything is easy to understand. If desired, you can repair the geyser frog or carry out preventive maintenance without calling a technician.
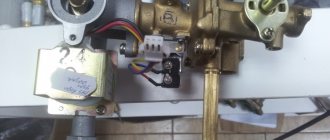
How to remove a frog from a gas water heater
First you need to turn off the water and gas supplies. After this, work is carried out in the following order:
Documentation
In order to install a gas water heater in an apartment or private house, you will need the following documents:
- Technical passport of the purchased dispenser or indication of the model in case of subsequent purchase of the unit.
- A report on the technical condition of the hood or chimney, drawn up by the exhaust and chimney duct inspection service.
- Project for placing new water heating equipment and connecting it to the gas and water mains in accordance with the technical specifications.
- An application submitted by the owner for the reconstruction of a premises with a water pump must additionally provide proof of ownership and a technical passport for the apartment.
- An application for installation work sent to the gas supply organization (Gorgaz) with a project attached.
The company engaged in the maintenance of the purchased gas water heater or specialists from the gas supply organization are required to perform the following actions when installing the equipment:
- Make a connection into the gas pipeline with the installation of metering devices and a shut-off valve.
- Hang the column with the flammable surface of the wall lined with insulating materials (tin in combination with asbestos or basalt sheets), connect a flexible gas supply to the unit.
- Connect the column to the chimney or exhaust system using a pipeline.
- Connect flexible hoses from the unit to the cold water main and hot water supply pipes.
- Upon completion of the work, the Gorgaz specialist must set up and start the dispenser, seal the gas meter and draw up a report on putting the unit into operation.
The cost of installing a gas water heater at home by private specialists will cost about 3,000 rubles; gas supply companies, depending on the region, carry out the connection at their own prices.
Rice. 10 Recommended spacing and placement of insulation
Turning on the device
The first step is to install the batteries. To do this, open the battery compartment and install them, observing the polarity. Then you need to open the cold water and gas valves. Open the hot liquid tap on the nearest faucet.
At the moment when the liquid flows through the water unit, a spark ignition occurs and, thanks to this, the burner ignites. If it is turned on for the first time or after a long period of inactivity, air may accumulate in the gas line; in order to remove it, you will need to open the mixer several times, hold it for a minute, and then close it.
If the burner ignites, you need to turn the water pressure adjustment lever (located on the right) to the right, this will make it possible to turn on the Vektor JSD 20 device when the liquid pressure in the system has decreased.
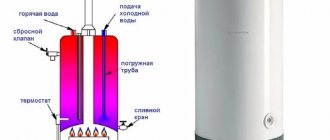
Why is a safety valve on a boiler needed?
The valve element releases excess liquid automatically, and stops the removal of water under conditions of normalization of operating pressure.
Externally, the safety valve device is represented by a brass-plated body. The internal part includes a pair of springs and locking elements.
The starting spring mechanism is located in the inner part of the flow channel. Possessing the function of a check valve, such an element prevents water from flowing back into the pipeline supply system.
When the water pressure increases, the spring device moves away, which ensures the unhindered flow of water into the storage tank. After the tank is completely filled and when the pressure indicators are equalized on both sides, the shut-off device closes the hole, which prevents the backflow of water flow into the main pipeline system.
Safety valve on the water supply to the boiler
The second spring mechanism is located on the outlet part of the device, and the function of such an element is represented by water discharge under conditions of increasing pressure.
In such a situation, the pressure arising in the pipeline is able to overcome the stiffness of the spring, which causes its compression and the opening of the hole for water flow by the shut-off element.
Safety valve installed on the boiler
The use of a safety valve device protects the storage tank from rupture, prevents the reflux of hot water from hot water equipment into the water supply system, smoothes out pressure drops, and ensures the discharge of excess water at critical levels of pressure and temperature conditions. Among other things, the valve drains water during the maintenance and repair of the boiler.
Is it dripping or flowing?
If water drips from the check valve device during the heating of the boiler equipment, then this situation indicates the normal functioning of the device and the operation of the protective group in normal mode.
During operation of a water heating device, the safety valve must discharge excess liquid if there is an increase in water pressure on the walls of the storage tank as a result of thermal expansion of the liquid. The consequence of water discharge is a noticeable decrease in water pressure inside the tank with heating elements.
Security sensors
A geyser can be dangerous, because it is connected simultaneously to water and gas mains, each of which individually can pose a threat.
If there are problems with the gas or water supply, safety sensors turn off the operation of the column, and special valves will shut off the water or gas supply.
Typically, geysers can withstand voltages of up to 10-12 bar, which is 20-50 times higher than normal pressure in pipes. Such sharp jumps are possible with so-called hydraulic shocks.
But if the pressure is lower than 0.1-0.2 bar, then the column will not be able to work. You need to carefully study the instructions and specifications before purchasing to understand whether the dispenser is optimized for low water pressure in pipes in the CIS countries and whether it will work properly. And vice versa - will it withstand sudden changes in pressure, which, alas, is also not uncommon in our conditions.