For a heating system to be reliable and energy efficient, it is not enough to perform high-quality design and installation. It is important to carry out commissioning work promptly and correctly, which includes pressure testing the heating system and flushing it. The mandatory technical control procedure is carried out upon completion of the installation of a new heating system, at the beginning of the heating season and after repair work. In apartment buildings, such work is carried out by competent organizations. In a private house, you can check the performance of the heating system yourself. This will require special equipment and knowledge of the requirements of regulations regulating the maximum pressure for the system and the time interval for checking different heating networks.
Preparatory stage
As a rule, in warm weather the heat supply structure is not used. Therefore, before starting heating in a private house, it is necessary to ensure the integrity and reliability of its elements and carry out a number of preparatory work. Before using a closed heating system, you need to determine the amount of deviation of its actual indicators from the calculated parameters.
According to the rules, preparation for the heating season is carried out in a certain sequence. First of all, a visual inspection of communications and heating equipment is carried out. For the property owner, the first question should not be how to put the radiator into operation. First of all, he needs to make sure that there is no mechanical damage to the device body and check the reliability of its connection to the pipeline.
Also, before starting the heating system, a number of preventive measures are carried out:
- Checking the condition of the smoke exhaust system. To start a boiler, there must be sufficient draft force in the chimney to maintain combustion. For this reason, the internal cavities are cleaned of soot and the integrity of the pipe is inspected. In a brick structure, if necessary, replace damaged elements. Rust, if any, is removed from galvanized pipes.
- Visual inspection of pipes. Without this, running the heating system is dangerous. You need to find out how tight the pipes are and whether there are any cracks or noticeable defects.
- Battery condition monitoring. Before starting heating in an apartment building, the management company must warn residents about this, and they must check the integrity of the radiators. You cannot disconnect individual devices from the heating network. When filling the pipelines, make sure there are no coolant leaks.
This is a list of rules without which the first start-up of the system should not be done. In order for the heating season to start correctly, a number of measures must be taken. A test run of the heating system in an apartment building is carried out 1–2 months before heating starts. It is best for property owners to stay home during this time to ensure there are no leaks.
Service organizations
In apartment buildings, the responsibility for maintaining the heating system falls on the shoulders of the management company. The latter has the right:
- carry out all work by its employees;
- attract contractors.
Concluding a contract for system maintenance
To carry out maintenance work on the heating system, a special contract must be concluded. This document contains the following information:
- list of services provided, their individual components and characteristics;
- turnaround time;
- cost of services;
- rights and obligations of the parties;
- liability for violation of the provisions of the agreement.
The agreement can be concluded once or re-signed periodically. This document is a guarantee that the heating system will work efficiently.
Filling the heating system with coolant
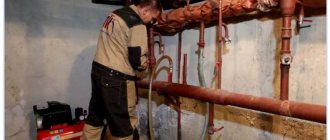
Previously, it was recommended how to check the heating system in a private house - including a visual inspection of all its components. If malfunctions are detected, individual elements are replaced. Then they begin the process of filling the risers with coolant.
If radiators are not filled with water, a slight rusty coating appears on their walls. Therefore, before filling the heating system, experts recommend cleaning it. If there are liquid residues in the pipes, they should be removed. To do this, use a special pipe located in the lowest point of the heating system; the make-up unit should also be located there.
Then you can begin to solve the problem of how to start the heating correctly. For closed systems with forced circulation of liquid, hydrodynamic flushing is used. To do this, you need to purchase or rent a special pump with filtration and a chamber designed for cleaning agent.
Washing is done in a certain sequence:
- the pump pipes are connected to the system;
- launch and visually monitor the degree of contamination of water that has passed through the pipeline through a full cycle;
- if necessary, change the fluid to a new one;
- flushing procedures are performed several times until the water becomes clear.
Next, pressure testing is done. Before starting the heating radiator, carefully check the condition of its connection to the pipes. Experts advise changing gaskets and keeping the integrity of the couplings under control.
When it is necessary to start a closed system, an increased volume of coolant or air is pumped into the pipeline and thus the reliability of the joining of structural elements and assemblies is checked. In this case, the pressure value should exceed the nominal value by 1.2 times.
The liquid used in the flushing process must not be discharged into the sewer system, as it contains harmful substances that can negatively affect the functioning of the autonomous sewer system.
Adding coolant volume to the heating structure
The working medium can be ordinary distilled water and antifreeze. Filling is carried out before starting the heating system in a private house, through the make-up unit located at the lowest point. This order is very important, since trying to add liquid through other pipes located above leads to the formation of air locks.
To ensure correct startup of the radiator, check the presence and functionality of Mayevsky taps. To do this, each of them is opened.
Then a certain procedure follows:
- It is necessary to open the air and bleed valves located at the highest point of the structure.
- Next, smoothly open the tap of the make-up unit, while keeping the water pressure low so that air pockets do not occur.
- After coolant begins to flow from the pipes of both valves, they are shut off.
- Mayevsky's taps remain open until working fluid flows out of them instead of air. This point is important, since starting the heating boiler if there are air pockets can lead to damage to the entire system.
If pressure testing has not been carried out previously, it is done during the process of filling with coolant. When starting the heating system, pressure gauges installed on the collectors, safety group, and boiler help control the pressure when filling with water.
Types of system maintenance work
According to Appendix 1 to the Methodological Manual for the Maintenance and Repair of Housing Stock MDK 2-04.2004, maintenance of communications, technical devices and premises consists of the following list of works:
- conservation and re-preservation;
- adjustment of taps, valves, gate valves;
- adjustment and packing of oil seals;
- compaction of squeegees;
- system check;
- descaling;
- turning off radiators in case of leakage;
- washing and cleaning of constituent components;
- draining/filling the system with water;
- eliminating air jams;
- strengthening pipelines.
If an accident is detected, the damaged fittings are repaired and replaced.
First start of the heating boiler
The sequence of actions when starting the boiler for the first time before the start of the heating season largely depends on the model of the device and its type, but it requires a visual inspection. This is one of the important stages that precedes the final start of heating in the house.
The heat exchanger is the most vulnerable component of the unit. Checking it is a must, since during operation it is constantly exposed to high temperatures. Simultaneously with starting the radiator, inspecting the boiler is one of the most important tasks of the preparatory stage.
A gas boiler
To live in a house in comfort, you need to know how to properly start the heating system if the water is heated by a gas boiler. For different models of units, the startup sequence is different, which is due to differences in their design.
This especially applies to condensing devices, in which condensate must form correctly during operation, because without it, heating the secondary heat exchanger is impossible.
To correctly start heating with a gas boiler, after filling the system with liquid, you need to perform certain actions:
- The valve located at the bottom of the unit should be opened to prevent liquid from entering the circuits, since it is usually closed after the end of the heating season. As a result, the pressure gauge readings change, and the pressure value cannot exceed 3 atmospheres.
- When the coolant has heated up, open the make-up valve again. In order to remove the remaining air pockets, Mayevsky cranes are used. During this procedure, the pressure decreases slightly.
- In reality, the radiators have to be started 2 times - when filling with hot water and when turning on the boiler.
- The correct operation of the unit is monitored using the values that appear on the dashboard.
If you strictly follow the instructions for starting the heating system, it will maintain a stable temperature without pressure surges in the pipelines.
It is advisable that the first start-up of a gas boiler is carried out by employees of specialized service centers for servicing this heating equipment. It also doesn’t hurt to know what to do if the gas boiler blows out with the wind, in order to solve such a problem if necessary.
What is important to know about the process of flushing pipes and radiators
Pressure testing of a heating system is “blowing” it under pressure, carried out after hydroprophylaxis. Washing, as well as pressure testing, is carried out in 2 stages. Drainage holes remove contaminants that come out with the water.
For effective cleaning, calcium deposits mixed with rust require loosening with chemical reagents. Part of the silt deposits easily rises in the form of a suspension and is removed from the system during pressure testing by any method. After removing deposits on the inner wall of the pipe, repeated flushing is required. There is a possibility that in turning and narrow areas the deposits not only did not go away, but also “grabbed” new dirt.
This is interesting! The question often arises as to why the equipment worked flawlessly for many years, but when pressure testing the heating system of an apartment building there was a sudden depressurization. It's all about the properties of hot water, in which scale forms, like in an electric kettle. It is able to “patch” small holes caused by corrosion, replacing rust.
Pressure testing is carried out under high pressure, which is pumped into the system using a special apparatus.
The unreliable “temporary covering” of a rotted pipe is revealed by pressure treatment. Sooner or later, water will flow from the problem area during the heating season. Residents often hear a strange noise when the system is filled with coolant. This indicates “aired” areas, especially when the battery remains cold after hot water is supplied. Air locks are also eliminated under pressure, but the air is released on the upper floor before starting.
Before washing, be sure to remove things that could be hopelessly damaged in an emergency. Experts also recommend paying attention to mud traps at the injection equipment and at the outlet. This will provide some protection from heating radiator contaminants that have accumulated over several years.
Regardless of the timing of the planned release of coolant into the pipes according to SNiP, according to the city or regional schedule, it is recommended to pressurize the heating system in the summer if there are doubts about its integrity.
Checking heating system elements
Without the correct functioning of all components of the heating system, it will not be possible to start it correctly. First of all, you need to check the operation of measuring devices - thermometers and pressure gauges.
It is also necessary to check the functioning of the protective elements. The system may not start if the bleed valve or air vent seats do not move due to limescale or rust. For this reason, each of them is opened manually.
The pressure of the air chamber controls the expansion tank; it must exceed the nominal value in the system by 5-7%. If the design of the tank allows you to change the membrane, it should be disassembled and checked in what condition it is.
The cost of the service for launching a heat supply system in a private household depends on many factors and is determined individually.
Water heating in a modern home is a complex system that must work reliably and uninterruptedly. However, there are a number of reasons why a failure occurs, such as installation errors, equipment wear and tear over time, etc. All these factors can affect the tightness of the circuits and cause malfunctions. To find the damaged area, a pressure test of the entire water heating system is required. How is this manipulation performed in a private (country) house and is it possible to do it with your own strength and hands? What level of pressure should it be? You can read about all this and watch the video.
Pressure testing - what is it?
Pressure testing of a finished water heating system is a test of tightness and assembly quality. Whether the system can be put into operation or not depends entirely on the results of such a check. This is the first procedure that needs to be carried out after installation and before turning on the heating.
At its core, it is control without destruction. Air or water is pumped into the system, thereby creating increased pressure. If there are no leaks, you can safely put the system into operation.
Pressure testing is also carried out when checking an already operating system. After all, leaks often appear at the places where parts are connected using fittings, soldering or welding. The pipes themselves may also suffer, for example, from mechanical stress or corrosion. High temperature and pressure also cause gradual wear of pipes and parts of the water heating system. To detect and eliminate the location of the flaw, crimping is required.
This is a set of measures through which not only the heating system, but also the hot water supply, sewage system, and pipes in the water well can be checked in a private home.
The crimping procedure includes:
- pipeline testing and flushing;
- checking and, if necessary, replacing parts;
- restoration of damaged insulation.
The following are tested under high pressure:
- strength of housings, as well as walls of pipes, radiators, heat exchangers and fittings;
- fastening when connecting the elements that make up the system;
- maintenance of taps, pressure gauges, as well as gate valves.
Conditions for performing crimping work
Pressure testing of the heating was carried out correctly and in full if all conditions were met during its implementation:
- During testing, no other work is allowed at the site.
- If pressure testing of the heating system and radiators is carried out by a specialist company, it must proceed in accordance with the plan agreed by the lead engineer. The instructions must contain information about the work to be done, their sequence and the equipment used.
- The presence of persons other than specialists conducting tests at the facility, turning it on and off is not allowed.
- If any work is being carried out at adjacent facilities simultaneously with testing, it is important to ensure the safety of its implementation.
A visual assessment of the operation of heating devices during their inspection should be carried out only under operating pressure conditions. Upon completion of the work, a report is drawn up confirming the tightness of the heating system.
Types of tests and timing
Pressure testing of the heated floor is carried out before pouring the concrete.
Leak testing of the heating unit is carried out in the following situations:
- In a private house, an initial check of the system is carried out at the stage of preparing the house for commissioning. Diagnostics of the pipeline in the grooves and the contours of the heated floor is carried out before sealing and pouring the screed. When the mortar has completely dried, it is recommended to conduct additional hydraulic tests to identify and eliminate possible leaks before laying expensive finishing material.
- To prepare the heating supply network for unplanned switching on, a periodic hydraulic test is carried out once a year after the end of the heating season. The check is also carried out immediately before the start of the heating season at positive ambient temperatures.
- One-time extraordinary checks of the strength and tightness of the system follow immediately after the completion of scheduled and unscheduled repair activities.
All of the above measures are diagnostic in nature and allow timely identification of problems with the heating system, leading to its shutdown and repair.
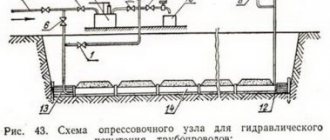
Existing methods for pressure testing a heating system
Pressure testing with water . With this method, a hose running from the water supply is connected to a tap located on the collector or boiler. After filling the system with water, the pressure level should reach operating figures - 1.5 atm.
Pressure testing with air . With this method, a pressure tester is connected to the system - a compressor that pumps air. The pressure in the area being tested should become greater than the working pressure, which is usually 1.5 - 2 atm. In this case, an adapter is installed in place of the Mayevsky tap, designed to connect a compressor.
Advice. In order not to specifically purchase an expensive pressure tester, when carrying out independent work to check a small area, you can use a car pump with a pressure gauge.
Air pressure testing is carried out when it is not possible to connect to a water supply system, as well as in winter, when there is a possibility of water remaining in the pipes with subsequent freezing. When working with air, the integrity of the system is determined using pressure gauge readings. If the discharge pressure is kept at the same level, there are no leaks. To visually detect fistulas, a soap solution is applied to the suspected areas.
Pneumatic test
Pneumatic test diagram.
The pneumatic method is tested if the ambient temperature drops below 5°C. In this case, the pressure in the pipes should not drop below 10 kPa. This method is excellent for a system of polymer pipes where there are plastic connecting parts.
Article on the topic: How to make a blind area around the house with your own hands: installation of concrete, soft, video
The conditions for conducting a pneumatic test of the heating system are:
- in the absence of liquid in the volume required for testing;
- at ambient temperatures below plus five degrees (some experts indicate below zero);
- if for technical reasons it is impossible to use the working fluid.
This method is rarely used. This is due to the fact that it is more difficult to find leaks and leaky connections than during hydraulic tests.
How does the crimping process work?
- Preparing the system before pressure testing. If the system is autonomous, then the heat generator is turned off first. If not, then taps are used to close off the area where inspection is required. The coolant must be drained.
- The system circuit is filled with water having a temperature of no higher than 45 C. The air is gradually released.
- The compressor is connected and air begins to flow into the pipes.
- At the beginning of the procedure, the pressure is brought to the working level and the area is visually inspected for violations. Then the pressure is gradually increased to the test level - this is maintained for at least 10 minutes.
- The area or the entire system is inspected for leaks at the connections. It is mandatory to visually inspect fittings, radiators and the entire length of pipe walls for fistulas. If deviations are detected, all defects and shifts are recorded. The operation of taps and valves is checked.
- Using pressure gauge readings, the drop in pressure level is determined. If it has not decreased, the system is in normal operating condition.
- Based on the results of the inspection, a report is drawn up.
Pressure in pipes during crimping process
The test pressure level, as recommended by building codes and regulations (SNiP), should be 1.5 times higher than the working pressure, but not lower than 0.6 MPa. According to the rules of technical operation of heating networks - 1.25 times higher than the working one and not lower than 0.2 MPa.
In a private house with up to three floors, the pressure usually does not exceed 2 atm. When it is exceeded, a special valve is activated and a reset occurs. In five-story buildings the pressure is 3-6 atm; in buildings from 8 floors - 7-10 atm. The maximum test pressure level depends on the characteristics of the constituent elements of the system: pipes, radiators, fittings, etc.
Permissible test pressure
A situation where the quality criteria declared by the manufacturer do not correspond to reality.
According to regulatory documents, the pressure during leak testing of heating equipment should be:
- for hot water supply and heating systems with a water heater - 10 atm;
- with convector heating – 10 atm;
- for cast iron and steel radiators – 6 atm.
The following indicates that the equipment has successfully passed the tests:
- During the tests, no fogging of heating equipment was detected - boilers, pipes, radiators, shut-off valves and seams;
- in 5 minutes the pressure inside the circuit decreased by no more than 0.2 bar;
- in 10 minutes in a hot water supply system consisting of metal pipes, the pressure drop did not exceed 0.5 bar;
- if the pipes are plastic, the normal indicator is a pressure drop to 0.6 bar during the first 30 minutes, and to 0.2 bar over the next 2 hours;
- When carrying out air tests of steam heating, the pressure in the first 5 minutes should drop by no more than 0.1 bar.
When testing a DHW system, 5 atm can be added to the operating pressure. When choosing a pressure that exceeds the operating value, take into account the data in the equipment passport.
Crimping: how to do it yourself
Often, when building a private house, the heating system is installed before the water is connected. Therefore, a large water container and a submersible pump are used to pump water into the pipes. During the manipulation, you need to constantly monitor the pressure using a pressure gauge and control the water level in the container, gradually adding it if necessary.
When the pressure readings rise to 2-2.5 atm, the pump is turned off, and the remaining air is gradually released from the system using Mayevsky taps. Further, after the mark on the pressure gauge drops below 1 atm, filling with water continues. This is done until the water completely displaces the air and the pressure reaches a level of 1.2-1.5 atm.
If no leaks are detected, you can connect the boiler and start the system.
For such an important event as crimping, it is better to hire a team that has the appropriate license. These people are fully responsible for the actions performed. In this case, the customer receives all the necessary documents about the work performed.
Attention! The report on the pressure testing carried out must include the time during which the system was under test pressure and indicate its level.
Pressure testing of a heating system is a matter that requires a serious approach. This operation should be carried out with your own hands only in extreme cases.
Certificate of pressure testing
When testing the strength of the heating system is carried out by professional organizations in residential buildings with a centralized scheme, a report on the work performed must be drawn up. This document describes the test conditions and provides an opinion on the quality of the heating network and equipment.
However, a certificate of pressure testing is needed by the person responsible for the operation of centralized heating systems.
For a private household with decentralized heating, especially one made with one’s own hands, the responsible person by default is the homeowner himself. Naturally, when performing work aimed at checking the integrity and reliability of home heating, the owner is unlikely to write a report on the tests performed to himself.
Based on the results of pressure testing carried out by municipal services and housing associations, a report is drawn up. It also wouldn’t hurt for the owner of a private house to record pressure gauge readings while checking the system’s performance
It would not be superfluous to save for the future the conditions and parameters under which the crimping was carried out:
- test pressure values;
- holding time;
- temperature of the liquid medium;
- the difference in pressure at the beginning and end of the holding period.
This data will be useful for comparison with the next audit. The numbers can to some extent judge the general condition of the heating system. It is advisable to record and store information in a home journal specially made for this purpose. Or choose a more modern option - an electronic magazine.
Despite the relatively low values of the operating parameters of a decentralized heating system of a private home, it is recommended that pressure testing be carried out in accordance with all the laws for testing such systems. This approach will provide protection from unexpected impulses and will allow timely identification of potential defects.
Detailed information about crimping metal-plastic pipelines is presented in this article.
Pressure testing of the heating system: video
In the question: what should be the pressure in the heating system in a private house - every homeowner should have a good understanding.
After all, not only the efficiency and performance of the circuit, but also its integrity depends on this parameter.
In this article we will consider this issue in detail and understand the reasons for the deviation of pressure from the norm.
How to perform hydropneumatic flushing
Hydropneumatic flushing
Hydropneumatic flushing can be performed using two methods:
- filling;
- flow-through.
The entire technology of the filling method is that compressed air is supplied to heating pipes that are filled with water. Thanks to the shock wave, the speed of water passage increases, and all deposits on the walls are washed out and removed from the system. The contaminated coolant is released through the drain valve. This procedure must be performed several times. This is similar to how you use your mouth to clear foam from a drinking straw. This method is effective, but it is unlikely that you will be able to complete it completely on your own.
To perform hydropneumatic flushing, it is necessary to cut in pipes with taps and check valves. If the system is small, then the air is supplied through the pipes that are already in the heating system. Next you need to drain all the water from the system. There are special taps for this. If suddenly there are none, they need to be inserted into the return pipeline. The water is then pumped back into the system.
A compressor is used to supply air, creating a pressure of 0.6 MPa. A check valve must be installed on the compressed air line. It will limit the entry of water into the receiver of the compressor itself. To choose the right compressor, you need to look at the technical specifications. It is important that it be equipped with a function that regulates the frequency of formation of mixture supply pulses. It would be nice if you can add disinfectants to it. The equipment must have the following features:
- Reliability, mobility and compactness.
- Protection against self-starting of the device.
- Built-in indicator of pressure level and water flow.
What pressure in the heating system of a private home is considered normal?
First of all, you need to know that the pressure in any heating system should not exceed the strength threshold of its weakest component.
Typically these are boiler heat exchangers.
The most durable of them can withstand pressures of up to 3 atmospheres or bar.
Pressure is often indicated in MPa (megapascal). The correspondence of the values is as follows: 1 atm = 0.1 MPa.
Fittings and radiators are generally more durable. For example, a cast iron radiator can withstand a pressure of 6 atm.
The answer to the question of what pressure can be considered normal for a particular heating system will depend on its type. The simplest type is systems with natural circulation of coolant, also called thermosiphon. In such a circuit, the coolant moves only due to convection. This phenomenon is caused by gravity, which is why such systems are also called gravitational.
The pressure in a thermosiphon system depends only on the height of the water column, that is, on the difference in height between the lowest and highest points. This pressure is called static. A height difference of 10.34 m creates a pressure of 1 atm at the lowest point. Thus, a boiler tank designed for 3 atm can only collapse if the system rises 10.34 x 3 = 31.02 m above it.
Heating system with expansion tank
Once again, we draw the reader’s attention to the fact that the static pressure in the heating system is maximum only at the lowest point. In the direction from bottom to top, it gradually decreases and at the top point it becomes equal to zero.
The actual pressure at the top point of the liquid volume is equal to atmospheric pressure, but we are interested in the so-called excess pressure - it is precisely this that is equal to zero.
Since there is no excess pressure at the top point of the circuit, the expansion tank installed here can look like a simple open container. Therefore, such systems are also called open.
If the heating system is equipped with a circulation pump that pumps coolant, it must be made closed.
Why might pressure changes occur?
As mentioned earlier, in multi-story buildings, operating pressure can depend on the number of floors, as well as a number of other factors.
Pressure readings may deviate from established standards for the following reasons:
There are many reasons that can negatively affect the stability of pressure in the general house system and its compliance with established standards
- The most common prerequisite for reducing pressure in old houses is the overgrowing of the internal surfaces of pipes and radiators with lime deposits and debris.
- The pressure can drop sharply if there is no electricity in the boiler room where the circulation pumps are installed. Failure of such pumps cannot be ruled out. And in general, outdated equipment in boiler rooms that has not changed for a long time can lead to a decrease in the efficiency of the entire system.
- The cause is often a coolant leak, that is, depressurization of the system.
- The normal temperature in the room where the elevator unit is equipped, from which the coolant is “distributed” to the risers, is also important. At subzero temperatures, the unit may respond by increasing the pressure in the system.
- Sometimes the reason lies in the ill-considered actions of apartment owners. This could be the unauthorized replacement of pipes with an oversized or, conversely, narrowed diameter, the installation of taps on bypasses, the installation of additional sections of heating gates or the installation of heat exchange devices with increased thermal power, the installation of radiators in loggias or on the balcony.
- The “enemy” of the normal operation of the system is always air pockets in heating radiators if the owners do not ensure timely checking and bleeding of air.
- Poor quality coolant in a central heating system can also lead to pressure instability.
- Differences are always observed during preparatory work before the heating season, when the system is being pressure tested. Likewise, after repair or modernization work to replace radiators or pipeline sections, under test loads, when the pressure increases by 0.5÷1.5 times. These measures are carried out before the start of the heating season to identify vulnerable areas of the system in advance so that they do not appear later, during the cold season. Then this will become a real problem, since when carrying out repairs, one or even several houses have to be completely disconnected from heating.
- Water hammer is a short-term sharp increase in pressure that cannot be foreseen. Therefore, when purchasing new radiators, you need to study their characteristics, since they must have a safety margin. So, if during pressure testing of the system, the pressure rises to 10 atmospheres (bar), then you need to choose radiators designed for 13–15 atmospheres.
Pressure and temperature are monitored by common house-wide control and measuring instruments located in the heating station (at the elevator unit). If you want to independently control the condition of your section of the heating system, these devices can be installed in your apartment. They are usually placed at the coolant inlet to the radiator.
Pressure in a closed heating system
The circulation pump creates increased pressure in the section of the pipeline located behind it, thereby providing a number of advantages:
- The maximum length of the circuit becomes virtually unlimited (for a circuit with natural circulation - no more than 30 m). You just need to select a pump with sufficient power and devices with sufficient strength (in the area with the highest pressure).
- Smaller diameter pipes can be used.
- Radiators can be connected in series (single-pipe circuit).
- If the radiators are connected in parallel (two-pipe circuit), then with a circulation pump the heat distribution in the circuit will be more uniform.
- Since the coolant moves faster, it does not have time to cool down much, which means the boiler operates in a gentle mode.
- A system equipped with a circulation pump can be operated in low temperature mode, which may be required during the off-season. In a thermosiphon system, under such conditions, the convective flow will not be powerful enough to push the coolant through all the pipes and radiators.
The pressure developed by the circulation pump is called dynamic.
Closed heating system
Obviously, it must meet two requirements:
- Be no more than the value specified in the instructions for the boiler and other devices.
- Have power sufficient to overcome the hydraulic resistance of the heating circuit, which depends on its duration, configuration (single-pipe with series connection of radiators or two-pipe with parallel), pipe diameters and coolant movement speed. The user does not need to make complex calculations linking all these parameters. He just needs to adjust the pump power so that the temperature difference between the supply and return is not too large - usually 20 degrees.
In private homes, circulation pumps usually develop such a pressure that, combined with the static pressure (which does not go away), it amounts to 1.5 - 2.5 atm. As you move away from the pump, the dynamic pressure, “eaten up” by the hydraulic resistance of the circuit, gradually drops, while remaining quite high.
What is it for?
Clogged system
During operation, scale and other deposits accumulate on the pipe walls. This leads to a number of problems. Firstly, pipes wear out faster and become unusable. Secondly, due to the thick layer, the pipes take longer to heat up, and heat transfer is significantly reduced. These are negative factors, since, according to experts, just 1 mm of scale can reduce the level of heat transfer by 15%. This is not surprising, since scale has a thermal conductivity that is approximately 40 times lower than metals. What if the layer is 3 mm or even 5? In this case, the efficiency of the system is low and you do not get the proper heat. In this case, you pay a lot for heat, but the house or apartment is still cold. Scale can also damage metal, which can lead to pipe rupture. Moreover, deposits make the flow diameter of the pipes halved, which reduces the speed of liquid circulation.
Shooting a battery with a thermal imager
Flushing the system is necessary in order to achieve maximum savings in heat and money for the homeowner. It is important to understand that pipes clogged with sediment and scale can cause emergency situations, which in turn can lead to dire consequences. This flushing of pipelines and heating radiators should be done every few years.
The battery is clogged
. Ideally, such work should be left to specialists who are trained and can flush the system without any problems. First, you need to diagnose the entire heating system. This data will help the specialist see the full picture, find out the composition and nature of scale and deposits in the pipes. Then he will be able to select the necessary equipment. After the washing has taken place, the pipe walls will be treated with an anti-corrosion agent. Thanks to this, scale and deposits will not appear for some time.
Reasons for the drop in performance
A decrease in coolant pressure in the heating system may be due to one of the following reasons:
There are leaks
Part of the working environment can leave the system in several ways:
- Through a crack in the expansion tank membrane. The leaked coolant remains inside the tank, so the leak is hidden. To check, you need to press your finger on the spool, through which air is pumped into the expansion tank. If water flows from it, the assumption can be considered confirmed.
- Through a safety valve when the coolant boils in the boiler heat exchanger.
- Through microcracks in devices (special attention should be paid to areas affected by rust) and loose connections.
Air was released from the coolant, which was then removed through an automatic air vent
In this case, the pressure drops soon after the system is filled. To avoid such problems, water should be deaerated before pouring into the heating circuit, which reduces the amount of dissolved air by 30 times. It is also very important to fill slowly, from the bottom and only with cold water.
The heating system contains aluminum radiators
Water that comes into contact with aluminum breaks down into its components: oxygen reacts with the metal, forming an oxide film, and the hydrogen released is removed through an automatic air vent.
This phenomenon is observed only in new radiators: as soon as the entire surface of the aluminum is oxidized, the water decomposition reaction will stop.
The user will need to make up for the lack of coolant, and will no longer have to deal with this problem.
Reasons for a sharp increase in pressure
There may also be several reasons causing an excessive increase in pressure:
- Boiling of the coolant in the boiler tank (this sometimes happens in solid fuel boilers, the thermal power of which cannot be reduced too quickly).
- Formation of a difficult-to-pass area, for example, due to the appearance of an air lock, scale overgrowing of pipes or clogged filter. In front of such a section, a backwater appears, the pressure in which may be too great.
The gasket in the make-up valve may wear out or become jammed, as a result of which the pressure in the heating circuit reaches the same value as in the water supply system.
Control methods
The pressure in the system is monitored using pressure gauges. They should be installed at the following points:
- At the entrance to the boiler and at the exit from it (modern heaters have built-in pressure gauges).
- At the lowest and highest points of the system (for houses with several floors).
- In branching areas: after tees, in manifolds, after two- and three-way valves.
Pressure gauges allow you to monitor pressure visually. And to reset it at a critical value, safety valves are used. Such a device must be installed on the supply pipeline immediately after the boiler - the working medium is discharged through it when it boils in the heat exchanger.
Typically this safety valve is classified as a so-called safety group, which also includes a pressure gauge and an automatic air vent. In addition, diaphragm expansion tanks are equipped with relief valves.
In addition to relief valves, bypass valves are used. Such a valve is installed on the bypass, through which the coolant can bypass the circuit. If a blockage or air lock forms somewhere in the circuit, and because of this, backpressure (increased pressure) occurs in the previous section, the bypass valve is activated. The pump begins to pump the coolant through the small counter “boiler - bypass - pump - boiler”.
Without such a fuse, the pump would be overloaded due to the formation of backwater and would soon fail.
To ensure proper coolant pressure in the system, it is necessary to maintain the correct pressure in the air chamber of the expansion tank. Typically it is 1.5 atm. If the value is lower, the membrane may rupture; if it is higher, the coolant pressure will also increase.
Leak test
To check the tightness of pipelines, a procedure called pressure testing is performed.
- A pressure tester - a pump with a pressure gauge - is connected to the emptied system through a special pipe.
- Air is pumped into the system until its pressure exceeds the operating pressure in the heating system by 20%.
- The system is left under pressure for several hours. If it falls, then the system is leaking. Leaks can be detected by the hissing of air or by applying soap foam to the connections.
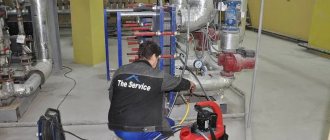
Pressure testing of heating systems of private houses, with a relatively small volume, can be performed using inexpensive manual pressure testing machines.
How to check for leaks
The initial stage is filling the heating circuit with water whose temperature is not lower than 5°C. Next, the pressure testing process begins - the pressure in the system is raised to the test value (Pwork × 1.5).
Considering that the decentralized system of a private home is being checked, the operating pressure here, as a rule, is no more than 0.1-0.2 MPa. This coolant pressure is provided by most modern heating boilers equipped with circulation pumps.
However, for schemes with centralized connections, the parameters are higher - up to 1.5 MPa.
Based on the operating pressure of the decentralized scheme, a test pressure value of 0.2-0.3 MPa is set. A pressure test pump will help raise the pressure in the heating circuit to such values.
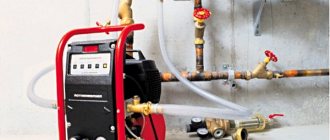
You can use a small electric device, but in private households it is more advisable to use a hand pump.
The choice of such devices is extensive. For example, pressure testing pumps of the HA , RP , TR are inexpensive, simple and convenient designs, equipped with a control pressure gauge. Their market price ranges from 4,000 to 9,000 rubles.
One of the designs of an electric pump for pressure testing. This is a compact, convenient product designed to create a test pressure of up to 50 atm at a liquid supply rate of up to 7 liters per minute. Can also pump technical oil
It is irrational to use electric pumps for pressure testing heating systems assembled by hand due to their high cost. These devices are usually designed for high operating pressures, which is also not necessary when testing a decentralized system in a private home.
The only benefit for the homeowner is that there is no need to put in extra physical effort. Therefore, for those who wish to choose from pumps such as MGF , RP , “Saturn” and others. Price range 17,000 – 65,000 rub.
The priority of choosing a hand pump should also be justified by its design features. This type of equipment provides a smooth increase in pressure, which is important both in terms of safety for the tester and in terms of protecting the heating system from water hammer.
In small systems with heating boilers, water hammer can damage some elements. Therefore, a manual pressure test pump is optimal for testing small heating networks made by yourself.
The heating system pipeline is tested at a pressure exceeding the operating parameters by 0.1 MPa. The minimum pressure indicators must be at least 0.3 MPa. If within 5 min. the drop in pressure indicators does not exceed 0.02 MPa, then the system is considered operational and does not require repair
Subtleties of the testing process
Filling the system with water and subsequent pressure testing is permissible provided the indoor temperature is above zero. Heating boilers and expansion tanks are disconnected from the system during testing.
For control, two pressure gauges installed at different points are required. During pressure testing of the heating system, it is not allowed to try to eliminate defects, twist valve stems, or tap joints.
Using pressure gauges, the pressure created in the circuit is monitored in order to check the tightness of connections and the reliability of all elements. The testing process requires the inclusion of at least two control devices in the circuit
During the pressurization process, care must be taken to effectively remove air from the system. Special devices installed at different points of pipelines – air vents – help to achieve this.
If the heating circuit is not equipped with a device for releasing air, you should raise the pressure to operating pressure and then open for a short time any valve located in the heating circuit at a level higher than the others.
After air is removed, the pressure build-up continues to the test value (not less than 0.2 MPa). For small decentralized heating systems of private households, the test pressure is usually 0.2-0.3 MPa.
The liquid in the system under such pressure must be maintained for a specified time. The minimum exposure time setting is 5 minutes. If during this period there is no pressure drop of more than 0.01-0.02 MPa, in general, do-it-yourself pressure testing of the heating system can be considered successful.
After completing pressure testing of the heating circuit with test pressure, its level is reduced to working level and a visual inspection of all accessible elements of the circuit is carried out
Other important test points
Similar to the process described above, heating is pressurized with a centralized circuit. True, pressure calculations should be made taking into account the operating parameters of just such a system. After pressure testing, relieve the pressure in the heating system to the operating level and carefully check all accessible areas.
In this state, the heating circuit is visually inspected for possible leaks:
- pipelines and fittings are checked;
- installation locations of measuring instruments;
- flange connections of circulation pumps;
- heating boiler valve seals;
- shut-off valves of the expansion tank, etc.
A hydraulic test, based on the results of which no leaks were detected in the area of welds, destruction or deformation of pipelines and equipment elements, tightness violations in threaded connections, leaks in heating devices and fittings, is considered passed.
Shut-off valves (taps, valves, gate valves) are considered to have passed the hydrostatic test for integrity and tightness if, after turning the shut-off valve rod twice, no traces of water appear in the area of the stuffing box.
Pneumatic crimping method
Checking the tightness of the home heating network can be done pneumatically. It is noteworthy that the manometric technique allows testing networks and equipment at low temperatures.
Typically this test method is used to test individual thermal equipment for density. Thus, radiators, boiler heat exchangers, and expansion tanks are checked for leaks using pressurized air.
Pressure testing using the manometric method can be performed with negative thermometer readings. The tests are carried out in two stages. First, the strength of the system is tested with an excess pressure of 0.15 MPa. After eliminating the defects, if they were detected by ear, the system is again filled with a medium with a pressure of 0.10 MPa for testing
The air pressure testing process is carried out in a similar way to the hydraulic pressure testing technique. An air compressor or a conventional automobile air pump is used as a source of working fluid.
High pressures are not used here. To check for density using the manometric method, a small pressure (0.1 -0.15 MPa) is sufficient.
If leaks caused by installation defects are detected under an air pressure of 0.15 MPa, the pressure is released and the defects are eliminated. Then the process is repeated - the heating system is filled with air at a pressure of 0.1 MPa and remains in such conditions for at least 5 minutes.
Pressure control in this case allows a pressure drop of no more than 0.01 MPa over a specified period of time. With this result, the system is considered complete and ready for use.
There are often cases of the introduction of specific equipment into the heating system of a private household. It is also not always possible to check equipment using the hydrostatic method, when high pressures are required for pressure testing.
For example, SNiP and GOST provide for testing cast iron or steel radiators with a water pressure of at least 0.9 MPa (9 ATI). However, to perform the same tests using the manometric method (pneumatic), a pressure of 0.1 MPa (1 ATI) is sufficient.
Filling the heating system with air for pressure testing. A conventional air pump is used to inflate car tires.
Convector modules require water pressure testing of at least 1.5 MPa (15 kg/cm2). At the same time, if you resort to pneumatic tests, pressure testing of the convector module in order to confirm its quality guarantees is allowed with air at a pressure of 0.15 MPa.
The testing procedure for such devices is as follows:
- filling devices with air at the specified pressure;
- immersing devices in a container of water;
- check for leaks within 5 minutes.
Some technological elements of the heating circuit have a design that can be checked for integrity using the pneumatic method. You can learn about this from the recommendations for servicing the device.
Typically, instructions on crimping methods are given in the operating instructions that come with any heating equipment.
It must be emphasized: the pneumatic (manometric) method is good specifically for checking density. However, it is recommended to check the strength of a heating system, including one made by yourself, using the hydraulic method. Also, the hydrostatic crimping method is preferable for panel heating systems.
Installation of heating pipelines according to the principle of panel systems assumes that the pipeline is embedded in a panel of walls or ceilings. This requires high-quality crimping to ensure reliable operation in the future.
Checking steam and panel heating systems
Pressure testing of panel heating systems using the hydrostatic method is carried out at the installation stage, subject to full access to components and devices through the installation windows. Conditions for pressure testing, including with your own hands, imply a rise in pressure inside the system to a level of 1 MPa.
The test is carried out for a minimum of 15 minutes. During this period of time, there should not be a decrease in pressure of more than 0.01 MPa.
If the heating circuit is built taking into account the combination of heating panels with other heating devices, the test pressure value is set equal to the parameters of other heating devices.
Pressure testing of heating panel systems using the manometric method is performed under an air pressure of 0.1 MPa. Exposure time 5 minutes. The permissible pressure drop is not more than 0.01 MPa.
Individual test conditions apply to steam system piping and equipment. If steam heating is designed for an operating pressure of 0.07 MPa, the hydraulic test pressure value will be 0.25 MPa.
At operating pressures greater than 0.07 MPa, crimping is carried out under pressure P slave + 0.1 MPa, but not less than 0.3 MPa. The holding time for steam systems is 5 minutes. The permissible minus pressure difference is no more than 0.02 MPa. After completion of the tests, the circuit is additionally checked under operating steam pressure.
If, when carrying out pressure testing using the manometric method, it is difficult to determine the leakage of medium from the heating system by ear, you can lather the connecting nodes and places of possible weakening of the pipeline
Thermal testing of heating systems
In addition to hydraulic and pneumatic tests of residential heating systems, a thermal test is also provided. The essence of this procedure is to check the uniform distribution of the coolant, testing the heating and thermal output of each individual heating device.
The process is carried out under positive ambient temperatures. The coolant temperature is not lower than 60°C.
If a thermal test is possible only in the cold season (for example, due to the lack of coolant), it is performed immediately after the system is started in operating mode. Test at water temperature, which must correspond to the heating temperature schedule, but not lower than 50ºС.
The coolant pressure must correspond to the operating pressure. The thermal test takes at least 7 hours. During this period of time, the uniformity of heating of all available heating devices is periodically checked.
Before filling the grooves selected for the heating device with a solution, in addition to hydraulic or pneumatic pressure testing, thermal tests are mandatory.
Possible faults and corrective actions
Significant pressure drops in the heating system when the boiler operating temperature changes can be caused by incorrect calculation of the volume of the expansion tank and the pressure in its air chamber.
Leaks are usually found at threaded connections and are due to insufficient sealant. It will be easier for a beginner to achieve the tightness of such a connection using the Tang it Unilock sealing thread. In case of some “overdose”, unlike tow, it does not cause destruction of the screwed-on part.
In polypropylene pipelines, leaks often occur due to improper welding technology.
For example, some users weld pipes without a coupling - just butt welding.
Such a connection is very short-lived and breaks down very quickly under pressure.
Incorrectly made or defective connections must be cut off and replaced with high-quality ones.
If the water used as a coolant has not been desalted, the heat exchanger will have to be descaled over time. To do this, the boiler is disconnected from the heating circuit and washed with special reagents, for example, Antiscale. The entire heating system can be subjected to such flushing, but due to its complexity, this task should be entrusted to professionals.
Spring safety valves can stick, so they must be opened periodically using a special lever.
In the USSR, the issue of reducing the cost of construction, including the organization of the heating system, was especially relevant. It was at that time that the Leningradka heating system for private and apartment buildings was invented. Let's consider whether it is relevant today.
In what cases is a hydraulic arrow needed for heating and how it functions, read this article.
Types of crimping
Depending on the task at hand, there are three options for crimping:
- primary,
- repeated,
- emergency.
Let's look at each in more detail.
Primary pressure testing is carried out before putting a new heating system into operation as part of diagnostics. The heat generator, radiators, expansion tank for heating are pre-connected, and a full check is carried out with an emphasis on the quality of the assembly and identification of defects or defects. Only after this is it allowed to carry out cosmetic repairs and hide the pipelines under the screed or false wall frames.
Repeated pressure testing is preventive in nature and is performed annually by housing office workers or homeowners. It is recommended to carry out such checks once a year, at the end of the heating season or at the beginning of it. The main goal is to prepare the system and reduce the likelihood of an accident to a minimum.
Emergency pressure testing is necessary when performing repairs at a local site, for example, when you need to dismantle a radiator, boiler or heating tank. In addition, flushing the system or starting it up is required if there has been a long downtime - this will help identify possible problems and damage in areas.