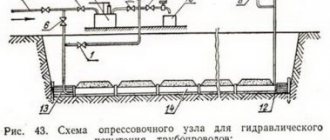
In a private house, the heating system is different from that installed in apartment buildings. This may sound funny, but systems in private homes are much more complex in design. After all, they can include both heated floors and radiators with a large number of connections. Air pressure testing of the heating system is carried out only after final installation. In order to perform this work, you need to use special equipment - automatic or manual. If one is available, then there will be no difficulties. But when pumping air or liquid into the system, it is necessary to take into account the fact that the time intervals are specified in the standards.
Pressure testing - what is it?
Pressure testing of an air heating system in a private house is necessary in order to check the tightness of all connections. Once you have completed all the installation work, you need to carry out testing and commissioning. But if leaks are detected, the system must not be used. Pressure testing is a test of a heating system by pumping air or liquid into it under pressure that will be approximately twice the operating pressure.
In private households, you need to carefully check all the circuits of radiators, heated floors, as well as connections. It is imperative to pay due attention to boilers, electric pumps, and water heating boilers, if any are included in the system design. The requirements for crimp testing will be discussed later in our article.
Using pressure testing, you can determine the ability of all elements and materials to withstand high pressure for a long time. If the tests are completed successfully, you can begin operating the equipment. If not, then defects are eliminated and diagnostics are repeated.
Crimping machines, pumps for crimping pipes
First of all, the pumps used for pressure testing differ in the design of the discharge mechanism.
On this basis they are divided into the following groups:
- Piston.
- Vane-rotor.
- Membrane.
For crimping systems with a small volume, for example, heating circuits in private homes, you can purchase an inexpensive and easy-to-maintain manual crimping machine.
Using such a device, the operator will be able to pump up to 3 liters of working fluid per minute into the pipeline. For a multi-storey building, this option, of course, will be unacceptable; here you will need a crimping machine with an electric or internal combustion engine drive.
The most popular is the domestically produced manual crimping machine UGO-30, designed for a maximum pressure of 30 atm. The cylinder volume is 36 cubic meters. cm, force on the handle – 2 kg. Equipped with a 16 liter tank.
For more serious tasks, manual two-stage pumps UGO-50 (up to 50 atm) and UGI-450 (up to 450 atm) are intended.
Manual hydraulic crimping machine UGO 30
Among electric crimpers, units from the German company Rothenberger are known, for example, the self-priming model RP PRO II, which develops a pressure of 60 atm and a flow of 8 l/min. The drive power is 1.6 kW.
Ridgid products are also highly rated, for example, model 1460-E. This crimping machine develops pressure up to 40 atm.
The autonomous water supply system will operate uninterruptedly only if the pressure switch for the hydraulic accumulator is correctly configured. Let's consider the principle of operation and the procedure for adjusting the relay.
Read how to make a drainage well with your own hands here.
Who doesn't dream of a swimming pool in their country house? Such a custom-made design will be expensive, but you can save money and build a pool yourself. Here https://aquacomm.ru/vodosnabzenie/zagorodnyie-doma-v/bassejn-na-dache-svoimi-rukami.html you will find instructions for building a concrete reservoir.
When is crimping done?
All work is carried out strictly in accordance with SNIP-41-01-2003, which clearly indicates when, and by what methods, pressure testing of the heating system is carried out. In the same document you will find everything about the requirements for ventilation and air conditioning. There are three cases when testing is required:
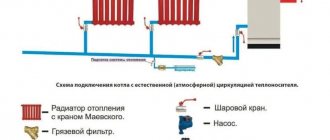
- Primary crimping - performed immediately after completion of installation work. Diagnostics are carried out before the pipes are sealed into grooves. The underfloor heating system must also be accessible - it cannot be filled before crimping. It should be noted that it is allowed to re-diagnosis all circuits after making the screed and sealing. In this case, you can get rid of troubles.
- Periodic hydrotests must be carried out every year before the start of the heating season and immediately after it. The purpose of the test is to pre-prepare the heating network for operation.
- Extraordinary tests should be carried out after each repair or long equipment downtime. Diagnostics is especially important in cases where water is drained from the system.
In all of the above cases, crimp testing will be a means that will allow you to diagnose the system and identify in advance all problem areas in the equipment. After all, if a leak appears, heating will not be very effective in the cold season.
Limitation of responsibility
First, let's figure out what we will be crimping. There are several options for connecting a building to the heating network. The first, most common option is when inlet valves are installed next to the wall at the entrance from the city. With this option, the boundary of division of responsibility is considered to be the flange of the inlet valve, and the owner of the building is responsible for everything beyond (including the inlet valve). Accordingly, the heating unit and heating system of the building are pressurized.
The second option is when the heating unit is located inside the building, and an internal heating main runs through the building from the input valves to it. With this connection option, you need to clarify where the demarcation line lies. The “Heat Supply Agreement”, which is concluded between the owner and the heat supply company, will help us with this. This agreement has an annex, which indicates where the demarcation line lies.
If the delimitation boundary is considered to be inlet valves, we press three elements of the system: the internal heating main, the heating unit and the heating system. If the boundary of division of responsibility passes through the valves at the heating unit, naturally, we pressurize only the elevator (heating) unit and the heating system.
Work rules
Now let's talk about what requirements exist for the pressure testing procedure for an air heating system. All diagnostic work must be carried out in the warm season. It is possible to test heating at sub-zero temperatures, but only in emergency cases. In this case, the temperature inside the room must be maintained above +5 degrees.
Tests can be considered successful if:
- During the diagnostics, you did not detect any fogging of seams, leaks in radiators, pipes, boilers, fittings, or other devices.
- The pressure drop during 5 minutes of diagnosis is no more than 0.2 bar.
- In the case of panel heating, the pressure reading on the pressure gauge did not drop by more than 0.1 bar in 15 minutes.
- A drop of no more than 0.5 bar per 10 minutes is allowed in hot water systems using metal pipes.
- As for plastic pipes, a fall is allowed within half an hour, but not more than 0.6 bar. Over the next two hours, the drop should not exceed 0.2 bar.
- If tests are carried out with compressed air on panel and steam heating, the pressure must not decrease by more than 0.1 bar in the first 5 minutes.
Shut-off valves
Shut-off valves must perform their main function - block the flow of coolant. If there are valves on the heating unit that do not “hold”, they need to be replaced. Different sections of the system are pressurized under different pressures, and if there is a non-working valve in the circuit, it will definitely manifest itself.
Marking of fittings
Ideally, everything should look like this: at the heating point there should be a diagram showing numbered and marked inlet and outlet pipelines, shut-off and control valves, drainage and drainage devices. The diagram must correspond to the current state of the system, that is, if changes have been made to the system, they must be displayed on the diagram.
All of the above devices must have tags with symbols corresponding to the symbols in the diagram (1,2 - shut-off valves on the supply and discharge pipelines, t1 and t2 - thermometers, P1 and P2 - pressure gauges, etc.).
In practice, at small heating points, inspectors do not always focus on this. The main thing is to make it clear what goes where, for example: “supply to the left wing”, “return from the right wing”, “supply to ventilation”, etc. But if everything goes according to Feng Shui, this is an additional plus.
Inspection of wedge valves
Old-style wedge valves require additional attention during operation.
Wedge valve design: 1 - wedge, 2 - cover, 3 - flywheel, 4 - seat, 5 - body, 6 - o-ring, 7 - spindle, 8 - threaded bushing, 9 - bushing, 10 - stand, 11 - gland flange , 12 — stuffing box made of thermally expanded graphite.
In such valves, it is mandatory to pack the stuffing box every year. And during the year, if a leak occurs from the seal, it is necessary to tighten the flange. If this is not done, the valve will become unusable.
To replace the stuffing box, you need to unscrew the nuts on the union bolts, lift the flange, remove the old stuffing box and install a new one. The seal is wound in rings around the spindle and pressed against the flange.
When tightening the flange, you need to be careful: if you overdo it, the cast iron flange may burst, and replacing it is very problematic; in practice, it is easier to change the valve completely.
There should be no signs of rust on the valve. The body should be painted black, the flywheel red, and the retractable spindle should be lubricated with grease.
Diagnostic methods
In total, according to SNIP-41-01-2003, two methods can be distinguished by which it is allowed to test the heating system:
- Water testing is the main method by which all circuits are tested. In this case, water should be pumped into the lower part of the pipes through a tap. It is possible to pump liquid using both automatic and manual pressure testing pumps. The advantage of this method is that it is very simple to complete all the work, and the efficiency of leak detection is high. The fact is that traces of liquid will immediately appear on the pipes.
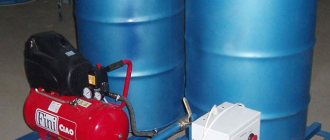
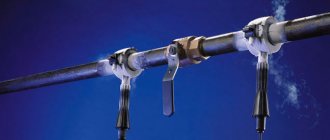
- Testing with air is not a very effective method, since it is quite difficult to detect leaks. But it is permissible to use this technique at subzero temperatures – the air will not freeze. A compressor is used to force air into the system. It is connected using an adapter to the pipeline. In order to find the leak, you need to listen. Once you find the approximate location of the leak, use a soap solution.
Test pressure
According to SNIP 3-05-01-85, which was replaced in 2003, pressure testing must be carried out according to the rules. When carrying out work in apartment buildings, it is necessary to:
- The pressure was more than 1 mPa (that's 10 bar) - for hot water supply systems and heating circuits with heaters.
- At least 10 bar for panel and convector heating systems.
- At least 6 bar for circuits in which radiators made of stamped steel or cast iron are installed.
- The pressure for hot water supply must be greater than the working one and another 5 bar on top (but cannot exceed 10 bar).
If panel heating and heat exchangers are used, the pressure should not have a pressure greater than the maximum permissible for the devices. If you are testing air in a steam or panel heating system, you need to check the pipes that fit into the ventilation equipment. The air should have a pressure of 1 bar.
Test procedure
According to the rules for the technical operation of thermal appliances, tests should be carried out in the following sequence:
- The circuit is filled with water using a pressure tester. The temperature of the liquid should be about 45 degrees. The air must be vented through special vents.
- Next, water is pumped under pressure for at least 10 minutes. During this time, you need to visually inspect all seams, pipe joints, connections of all equipment, and fittings.
- Afterwards, the pressure can be brought to maximum pressure and maintained for 10 minutes. If the pipes are made of polymer materials, then the tests should be carried out for at least half an hour.
- If the pressure does not change during the tests, then we can judge that there are completely no defects.
You can complete the tests and begin directly operating the equipment.
What testing tool is needed?
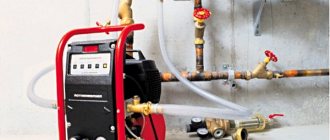
Now let's talk about what crimping equipment is used during the work. To perform hydraulic tests, you need to use specially designed pumps (they are called pressure testers). You can find two modifications - electric and manual.
Hand pumps are a cuvette in the shape of a rectangle; water is poured into it, which is then pumped into the heating system. A plunger-type pump is placed on its side, with a handle on top of it. It is with its help that the pump plunger is driven. There are pressure gauges on the body, with their help the pressure of the liquid pumped into the system is controlled. One shut-off valve allows water to be shut off after pumping into the pipes is completed. The second valve allows liquid to be drained from the tank.
Plunger pumps operate on the same principle as simple piston pumps, which are used to inflate bicycle or car inner tubes. But there is also a difference - the plunger pump design has a cylindrical steel piston that moves in the housing with minimal clearance. It is with this that it is possible to pump liquid into the heating system at a pressure of up to 60 bar.
The main disadvantage of manual mechanisms is that it takes a long time to carry out crimping work. Moreover, the test time depends on the length of the heating circuits. Sometimes it takes several hours to completely fill. Imagine how much strength you will expend to pull the handle.
It is with the aim of reducing costs and automating the process that electric pumps are used by specialists. They work on the same principle as manual ones, only muscle power is replaced by an electric drive. Automatic systems are good because you can set the required level of discharge pressure. Once it is reached, all equipment is turned off.
Automatic devices can pump liquid at a pressure of 40-100 bar. But there are also industrial designs that are capable of creating pressure up to 1000 bar.
Please note that the Ministry of Energy sets requirements according to which it is necessary to use only spring-type pressure gauges for control; their accuracy class must be 1.5. The circumference of the housing must be more than 160 mm. The scale must be designed to measure pressure, the value of which is at least 4/3 of the minimum, the division value is less than 0.1 bar.
Types of testing and crimping of the system
As we were able to find out, if the tightness of the heating system is broken, heat transfer is significantly reduced. And the most important thing is that the working fluid is lost and it has to be constantly added. The standards that we discussed above must be taken into account when servicing heating systems by utilities and government organizations. As for private houses, it is not at all necessary to adhere to, for example, SNIP 3-05-01-85.
Crimping must be carried out after the work has been handed over to the customer. Tests must be carried out before commissioning. In the future, it is recommended to repeat the tests every 5 years. When pressurizing a heating system with air, what pressure should be maintained? As in the case of the liquid method, you need to double the operating pressure.
To carry out diagnostics, you do not need to have special knowledge and skills, so anyone can perform it. There is no point in purchasing an electric or manual unit, since the most primitive one will cost you at least $100. If you wish, you can rent a device; in large cities, this opportunity is often provided by individuals or companies.
If you don’t want to take risks and conduct tests yourself, you can hire specialists. Upon completion of the procedure, they will issue you with a heating system pressure test certificate, which will indicate how and under what conditions the work was carried out. But the cost of the services of such specialists is quite high - you will have to pay about 2,000 rubles for each hour.
Requirements for crimp testing
A heating system inspection can only be considered completed if certain requirements are met:
- All tests are carried out under the strict supervision of the shift supervisor.
- During control activities, it is prohibited to perform any work at the site.
- The testing program must be approved by the chief engineer of the testing organization. The program strictly regulates the actions of each employee and the sequence of the technological process. In addition, it outlines safety measures when carrying out inspection activities and scheduled work at adjacent facilities.
- The presence of strangers at the site during pressure testing of the heating system is not allowed. Only specialists directly involved in the inspection should be on site.
- It is prohibited to enable or disable the object being checked.
- During testing, adjacent areas must be fenced off with special structures, and the testing equipment must be turned off.
- During the inspection of the equipment being tested, the operating pressure must be maintained in the system; exceeding these values is not allowed.
- To confirm the tightness of the water heating system, the responsible specialist draws up a report on the performance of pressure testing.
Tests in apartment buildings
In apartment buildings, pressure testing of the heating system with air can also be carried out. We will now consider the necessary conditions for carrying out the work. If you find water leaks, they need to be repaired. But often, without high pressure in the system, it is quite difficult to find thin cracks in the seams. In apartment buildings, it is necessary to carry out pressure testing of both individual apartments and all highways.
You need to prepare:
- Inspect all locking hardware. If the valves are made of cast iron, then be sure to replace the seals on them. Replace gaskets on flange connections. All bolts that have lost their original appearance must also be replaced. Be sure to install new pressure gauges; it is recommended to send the old ones for verification to decide whether they can continue to be used for measurements.
- Visually inspect all pipes and fittings to identify even minor defects and damage. If you find problem areas, you need to quickly repair them.
- Check the condition of the thermal insulation material on the lines laid in the basement and between floors.
After preparation, you can begin to carry out the actual crimping work:
- Fill the entire circuit with low-hardness water (to prevent scale from appearing). It is better to pump it into the system, of course, with an electric pump. Pressure - 6-10 bar. You need to lower the drain and supply hoses into the container with the liquid. Next, connect the pump to the heating network and turn on the pressure tester. It is necessary to set the pressure in advance.
- Time it for half an hour - during this period the pressure should remain almost the same level. If the pressure does not drop, the test can be considered completed. You can fill the system with working fluid and begin active operation.
- If the pressure drops, then there are defects in the heating system. The procedure for pressure testing a heating system with air is approximately the same, but you will have to use a soap solution - without it it is difficult to find a leak. Once you find the defects, you can begin draining the system and making repairs. Afterwards, you perform a re-diagnosis of the entire heating system.
The input unit is carried out similarly - the pressure should be about 10 bar.
Carrying out tests in private homes
It is worth noting that in autonomous heating networks, which are used in private homes, the pressure is usually no more than 2 bar. Therefore, in order to carry out tests, it is necessary to pump liquid into the system at a pressure of 3.5-4 bar. It is allowed to use both air and hydraulic methods of crimping.
Sequence of testing work:
- First, drain the coolant and pump pressurized water into the heating system circuit. It is imperative to add additives that are used when flushing the system. The circuit is filled with water through a pipe located at the bottom.
- Before washing, the filters must be thoroughly cleaned. It is recommended to carry out washing at least once a year.
- Next, drain the flushing fluid and fill the system with clean fluid. You can skip this step if you let the washing liquid cool to 45 degrees. After this, you need to use a pressure testing device to pump in more water to bring its pressure to 4 bar.
- If you use a manual pressure tester, then fill its tank with liquid, then connect it to the drain pipe of the heating system circuit. Next you need to open the taps and pump in water. This is done simply - you need to raise and lower the handle of the device. As soon as the required pressure is reached, close all valves.
- Leave the entire system filled for about half an hour and carefully monitor the pressure. If there is a drop of less than 0.2 bar over a period of 30 minutes, we can say there are no leaks. If the pressure drop is too large, then the defects need to be found and eliminated.
Remember that it is imperative to comply with the permissible pressure standards when performing pressure testing. It should also be noted that there is a high probability of leaks occurring inside the walls. In this case, you will need a thermal radiation meter. Only he is able to determine the presence of hot liquid leaks in the walls or under the floor.
Some may ask the question: “What pressure should be maintained when pressurizing a heating system with air?” Air is not a liquid, so it is allowed to pump about 2 bar into a system whose length is no more than 10 meters. But it all depends on the specific heating system, its length and volume. If it is relatively small, then the test pressure can be reduced.
Pressure testing of individual heating points in the Perm region
It must be remembered that hydraulic testing of ITP is a rather complex multi-stage procedure, and not all contracting organizations in the Perm Territory have the technical capabilities to carry it out at a high level. Our company has extensive practical experience in crimping Perm individual heating points, as well as a thorough understanding of all the nuances of this type of work. Having all the capabilities (experienced personnel, professional equipment, precise control equipment), we are ready to offer the best prices for crimping work and ITP maintenance. Region – Perm and Perm region.
Are you interested in professional crimping of ITP (Perm region)? You can ask questions, calculate prices or place an order directly on the website or by calling the specified phone numbers.