To install a water underfloor heating system in a house, apartment or office, you need to select the appropriate equipment. When selecting pipes, the pressure in the heated floor must be taken into account.
This indicator may vary depending on the area of the heated premises, the heat source, the total length of the pipe, its diameter and other factors. For example, for a small private house, the operating pressure in an underfloor heating system is usually about 2-2.5 atm.
The pipes used in the water heated floor system are designed for a certain level of pressure in the system. If the pressure is higher, there is a risk of pipe rupture, and to prevent this from happening, a material with a double margin of “strength” is selected.
If the pressure in the system is significantly lower than the nominal one, the coolant simply will not circulate through the system.
Calculations of system operating parameters should only be performed by qualified engineers.
The pressure level in heated floors is regulated using boiler and circulation pumps.
Each of us is free to independently choose which heating system will be optimal for heating residential premises. The choice of heating equipment depends on where you live, in a city apartment or in a private house. For an apartment in an apartment building, the ideal option would be to install heating radiators. Underfloor heating can be installed in the bathroom or kitchen, in small rooms. For a private home, a “warm floor” heating system looks preferable. In this case, it is convenient to equip such a heating system from an engineering point of view.
There is plenty of information on how to install heated floors on the Internet. Let's look at other issues. How do you install a water-heated floor in your home? What follows and what is the algorithm of actions?
Types of expansion tanks
The next equipment in the auxiliary series is the expansion tank.
The photo below shows that there are many expansion tanks of various sizes (volumes). Rice. 1. Expansion tanks for the heating system.
The expansion tank works to compensate for the thermal expansion of heating systems. What does it mean? When heated, the density of water decreases and it increases in volume. In order not to damage the heating system, so as not to burst the pipes and damage the boiler (boilers are also designed for a certain pressure), there are expansion tanks.
In old heating systems with metal pipes, it was usually located at the highest point, where all excess coolant was squeezed out. But in closed systems they (the excess) have nowhere to go. That's why these tanks were invented.
Let's look at what types of expansion tanks there are and what the principle of their operation is.
All expansion tanks for heating systems are painted red. The volume of the expansion tank is selected based on 10% of the volume of coolant in the system. How to calculate this volume (roughly)?
We take the number of all radiators - approximately we know the volume of one radiator (for example, the volume of one section of an aluminum radiator is approximately 300 ml, that is, 0.3 liters. If there are only 100 sections in the system, then this is 30 liters of water). Plus the volume of coolant in the pipes, and plus the amount of water in the boiler. The total volume can be determined when pouring water into the system (if we fill it manually, in buckets, or with some other container with a known volume). Let’s assume that the total volume of the system turns out to be 60 liters, then the tank needs to be selected at least 6 liters. In reality, you should have a small reserve, that is, purchase a tank one size larger.
There are blue tanks on sale - these tanks are intended for the water supply system .
Rice. 2. Expansion tanks for the water supply system.
They are almost no different from tanks for heating systems. Their only difference is that they have a diaphragm made of food-grade rubber. In tanks for heating systems, the diaphragm is made of ordinary rubber, technical.
There are flat tanks (see photo below).
Rice. 3. Expansion tank installed in wall-mounted gas boilers.
These tanks are used in wall-mounted boilers. It is either on the side of the boiler or on the back wall inside the boiler. Like all other tanks, such tanks have a connecting size for connecting to the heating system and a nipple (regular car) for pumping up pressure in the tank (sometimes air evaporates from the tank for various reasons).
Types of compressors, which one to choose
Compressors used to test warm water floors are manual and electric.
Their main task is to pump up the pipeline with water or air. In this case, the operation of the unit is controlled using a pressure gauge.
Do-it-yourself pressure testing pump. How to pressurize a heating system.
Hand pumps
Manual crimping devices are mechanical. The advantage of this application is its low price, unpretentiousness and ease of use. They are mobile and do not require a power source to operate. Mechanical compressors include all the necessary components, such as hoses, a pressure gauge and a tank.
The disadvantages include low productivity. If you decide to carry out pressure testing yourself with such a pump, then for high-quality testing you will need to make a lot of effort.
Electrical
Electric compressors are more bulky and more expensive, but they are fully automated. When using them you will not need to make any effort at all. Using a hydraulic pump it is easy to achieve any pressure in the system. More often, these devices are used by professionals when they need to carry out crimping frequently and in large volumes.
Despite the high cost of such pumps, a significant advantage is the increased productivity factor, since the device is equipped with a motor, which saves time and effort.
Which to choose?
When choosing the type of pump for pressure testing, you need to consider the following points:
- heating system volume;
- frequency of crimping work.
If you need to pressurize a small system, then a manual compressor is quite suitable as an option, and there is no point in buying an expensive electric device.
To check the heating system in a room with a large area, the power of this equipment may not be enough, so it is better to buy an electric-type compressor pump.
Hydraulic crimper
We recommend purchasing devices that have a steel rather than plastic body and are equipped with special valves that do not allow the pressure to rise above normal.
Start of work on testing (pressure testing) of water heated floors
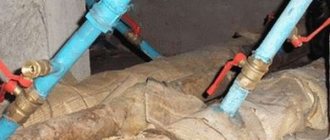
Pressure testing is a hydraulic or pneumatic test for the absence of leaks in a pipeline, its connection points (fittings) and other equipment operating under pressure. Pressure testing is performed immediately before closing the heat pipes for further laying of the finished floor. With a concrete water heated floor system, testing (pressure testing) is carried out before pouring the concrete screed. With a polystyrene water floor system and with a wooden heated floor system, crimping must be done before covering the heat pipes with sheets of gypsum fiber board or plywood.
Checking (pressure testing) of a water heated floor is carried out after connecting all heating circuits to the distribution manifold of the heated floor. Let me remind you that the distribution manifold cabinet is installed before the start of all work on installing a water heated floor.
Heating circuits are checked separately. Each circuit is filled with water until the air is completely displaced. For this to happen, the thermostat and control valves must be opened and closed. Instead of valves, you can open and close the flow meters after the air has escaped.
Startup sequence
Within a few days, the water floor system is brought to operating temperature conditions. First, the supply temperature is set at 20 - 25 degrees and then every day it is increased by 5 - 10 degrees. It is increased by 5 degrees if antifreeze is used, and if water is used, then by 10 degrees.
In addition, the rate of temperature increase depends on the size of the heated area. If the screed has a small array, then it reaches the desired mode earlier. But at the same time, experts advise not to rush, since if it warms up quickly and unevenly, it will become covered with cracks, and if a non-freezing liquid is used, it may overheat and the entire system will fail.
How to install an expansion tank?
What mistakes can happen when installing an expansion tank?
The first mistake is letting air out of the tank. This should not be done under any circumstances!
It happens, for some reason, that the air leaves the tank on its own. Then the pressure gauge in the heating system will jump. There is nothing wrong with this - you just need to pump air into the tank through the nipple. This is done with a regular car pump. At the factory, the pressure is usually pumped to 1.5 atm.
Sometimes you have to adjust the pressure in the expansion tank yourself. This may be due to the fact that systems, for example, come in different lengths... The pressure in the tank should be 0.2 atm. less than in the system. Try to adhere to this rule. If the pressure in the expansion tank is greater than in the system, the coolant will not be able to enter the tank and overpower the diaphragm.
warm basement in a private house
The photo below shows how a floor-mounted expansion tank is installed.
Rice. 5. Connecting the expansion tank in the heating system.
It can be seen that the tank is connected to the heating system through a connecting size. There is a bolted flange. Why is this design good? If the diaphragm becomes damaged for any reason, you can unscrew the flange and replace the diaphragm.
How can you protect your heating system?
Regardless of the type of heating (static or forced circulation), it must be equipped with control devices. A mandatory monitoring device that allows you to calculate parameters and monitor the operation of the system is a pressure gauge. This device must be inserted at the following points:
- On pipes of heating devices (both inlet and outlet);
- At the lowest and highest points of the heating system;
- At each branch of the heating main: three-way valves, tees and manifolds.
The closed heating line must be equipped with a sealed expansion tank. According to the design, this tank (hydraulic accumulator) has two chambers with a partition in the form of a rubber membrane. One of the chambers must be connected to the main network, the second must be filled with air or inert gas. If there is an excess of coolant in the first chamber, the partition membrane moves and the tank collects the excess. When the coolant cools and the pressure in the line decreases, the membrane allows you to compensate for the lack of coolant by squeezing it into the system.
Additionally, to protect the heating, you need to use an air vent and a safety valve. These devices eliminate the following problems: the air vent prevents the occurrence of air locks, and the valve, if the maximum pressure level is reached, removes excess coolant from the network.
Advice! In a closed heating system, it is important not to skimp on the hydraulic accumulator. Using a reliable expansion tank will avoid depressurization of the housings of circuit elements (such as a heat exchanger) and connections on the line. With a well-functioning hydraulic accumulator, it is easy to prevent the operating pressure from rising to excessive levels.
Setting indicators in a new membrane-type expansion tank
The device is divided into two parts, separated by a membrane. It exerts pressure on one of the halves , this is taken into account when setting up.
Most devices have factory default values, which are not always suitable for use in certain conditions.
To change the indicators, there is a nipple to which the plumber connects a compressor or hand pump.
Attention! Many pressure gauges show excess. To determine the actual pressure, add 1 atm.
The initial indicator is made equal to that obtained in the cold system by adding 0.2 atm. The sum gives the value of the static head divided by 10 . For example, in a house 8 m high:
P = 8/10 + 0.2 atm.
The values are achieved by filling the container with air through the spool.
Incorrect calculations can lead to one of two problems:
Photo 2. Pressure standards in the expansion tank: when it is empty, filled with water and when the filling of the device reaches the limit.
Important! The initial setup must be done correctly to avoid problems. But even after the work of a good specialist, fuses may begin to trip. This is usually due to insufficient volume of the expansion tank.
To solve this you will need to purchase a new device. It must contain at least 10% of the volume of the entire harness.
Why do you need pressure and its types?
If there is no pressure, the system simply will not work. Excessive pressure can lead to an accident, so its optimal values are calculated in advance. The pressure value in the heating system is the result of the addition of two quantities:
- Static pressure is a value that depends on the height of the water column in the heating system. The pressure is calculated with an increase of one atmosphere for every ten meters of altitude. The static pressure is not affected by the temperature change, therefore it is constant for the coolant regardless of its temperature, being a consequence of gravitational influence.
- Dynamic - created by pumps to ensure forced circulation of the coolant in the general network, as well as by the convective flow of water during heating. In this case, not only the declared characteristics of pumps connected to a common line are taken into account. The value of the dynamic value is influenced by the operation of the heating regulator, which is responsible for the distribution of the coolant. Also, a system of elevators and booster pumps is often added to the regulator circuit.
The value of the permissible operating water pressure in the system is taken into account. The maximum pressure is calculated according to SNiP, based on the operating capabilities of the equipment. The level of permissible operating pressure is the maximum possible for all heating elements, at which their operation will be trouble-free. In open systems, only static pressure with natural circulation operates, which is difficult to regulate, so we will take a closer look at a closed-type system.
What else will need to be taken into account in the process of designing a heated floor?
In the process of developing a project for a heated floor system, it is recommended to make a schematic drawing indicating the laying of pipes, main dimensions, distances and indentations, and furniture placement.
At the design stage, the type of coolant is determined: in 70% of cases water is used, since it is the most accessible and cheapest substance. Its only drawback is its reaction to temperature changes, which result in a change in the physical properties of water.
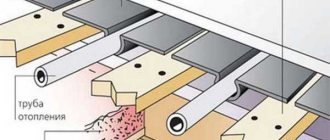
Floor pie with pipes in screed
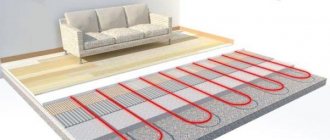
Antifreeze based on ethylene glycol or propylene glycol with special additives that reduce the chemical and physical activity of liquids is often used as a coolant for underfloor heating. In any case, the type of coolant must be taken into account at the design stage, since its properties form the basis for hydraulic calculations.
Antifreeze as a coolant
You will also need to take into account the following nuances:
One circuit is installed per room. To place the collector, choose the center of the house. If this is not possible, then to regulate the uniformity of coolant flow through circuits of different lengths, flow meters are used, which are installed on the collector. The number of circuits connected to one collector depends on their length
So, with a circuit length of 90 m or more, no more than 9 circuits can be connected to one collector, and with a circuit length of 60 - 80 m - up to 11 loops. If there are several collectors, each has its own pump. When choosing a mixing unit (mixing module), it is important to take into account the length of the circuit pipe. A more accurate calculation would be based not only on data on heat loss in the room, but also on information on heat influx from household equipment and equipment, from the ceiling, if a heated floor is also installed on the upper floor. This is relevant when calculating for a multi-storey building, which is built from the upper floors to the lower ones. For the first and ground floors, the thickness of the insulation is taken to be at least 5 cm, for higher floors - at least 3 cm
Insulation on the second floor is used to prevent heat loss through the concrete base. If the pressure loss in the circuit exceeds 15 kPa, and the optimal value is 13 kPa, it is necessary to change the coolant flow towards a decrease. You can lay several smaller contours in the room. The minimum permissible coolant flow rate in one loop is 28-30 l/hour. If this value is higher, then the loops are combined. Low coolant flow leads to the fact that it cools down without passing the entire length of the circuit, which indicates the inoperability of the system. To fix the minimum value of coolant flow in each loop, use a flow meter (control valve) installed on the manifold.
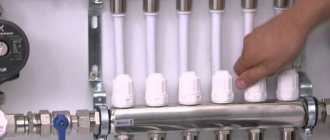
Connecting pipes to the collector
Interesting points
Warm water floors cannot be installed in city apartments without the consent of the housing and communal services. This is due to the fact that water from the general system of the building gives up its heat to the warm water floor system, thereby cooling it and reducing the pressure of the general riser of the house.
But for a country cottage, the most ideal option is a water floor. When you need to heat a decent-sized room, a water floor is more profitable, since almost no electricity is consumed.
For a country cottage, the most ideal option is a water floor.
You should not use low-quality material as the final coating, the quality of which you are not sure of. Bad material, even when heated slightly, will begin to smell bad and become deformed.
And you should not install the same underfloor heating system in rooms with different temperature conditions. If you need to make a heated floor both in the room and on the balcony, it is better to make the systems separate rather than connected.
Pressure testing - checking the reliability of a heated floor
After a heated floor has been installed in your home, pressure testing should be carried out. But it must be done before the final surface is poured. Pressure testing is done due to the fact that although a guarantee is given for the pipes used in heated floors, this does not mean that these pipes do not have any defects. They may not be visible to the naked eye, and although they will work for a while, they may develop leaks if used under severe pressure. With the help of crimping, the reliability of pipes, the quality of the material from which they are made, as well as their tightness are checked.
specialtrans lodeynoye field telephone
After a heated floor has been installed in your home, pressure testing should be carried out
The integrity of the system can be checked before the installation of the heated floor is completed. When only part of the work has been done or the boiler has not yet been connected.
There are 2 options for how to pressurize the floor. The first is using water, the second method is using air.
In the first method, the pipe must be connected to the collector, and shut-off valves must be installed on it. The entire system should be filled from any supplied tap through a hose connected to the water supply system. The pressure created by the water should be approximately 2.5 atmospheres or a little more. If such pressure is not possible, then you need to make at least a pressure of 2 atmospheres. Water should fill everything as the coolant moves. Weight caps are closed. As water is filled, air will escape through an automatic air vent. Next, you should open the circuits one by one and bleed air through the valve to drain the system. And we do this with all the contours.
As water is filled, air will escape through an automatic air vent.
It is necessary to remove all the air, and when the system is completely filled, we leave it under pressure and see if it leaks somewhere. If a defect is found, we fix it.
The second way is with air. All taps are closed, including drainage taps. The automatic air vent is removed and a plug is installed in its place.
In order to create pressure, you will need a compressor, a pump with a pressure gauge. The pressure that needs to be created during such crimping is almost 2-3 times higher than the working one. What is the pressure on the floor in a heated water field? This pressure is usually about 1.5 or 2 atmospheres, and then when using air it should be from 4 to 5 atmospheres. Pressure should be created precisely in the heated floor, but not in the area from the collector to the boiler, since many boilers are designed for a maximum of 3 atmospheres; a larger number of atmospheres can create a risk of damage. This section is checked separately at the permissible pressure.
Pressure should be created precisely in the warm floor, but not in the area from the collector to the boiler
What pressure should be created before pouring a heated floor? A pressure of about 4 atmospheres is created. After the pressure reaches this mark, the tap is closed and the system is left alone for 24 hours. At this time, you can periodically monitor the pressure level and its drop. Even with ideal components, the pressure will drop slightly during such crimping. And an important point. The air in the heated floor should remain until the work on the floor is completed, until the final touches.
After creating pressure, all joints should be treated with soapy water or something similar.
After creating pressure, all joints should be treated with soapy water or something similar. And by the presence or absence of bubbles, it will become clear where the connection is tight and where it is not.
When choosing between the first and second methods, the second option is considered the best, especially in the natural conditions of our country. If the system is tested with water in the summer, but it will be under pressure until the cold weather, and if for unforeseen reasons it cannot be turned on before the frost, there is a danger of defrosting the heating system. And if it is possible to drain the water from the radiators, then this will not work so easily from the heated floor. There are no problems when pressing with air.
How much pressure does furniture exert on the floor?
A popular question is how much pressure a table, cabinet, or other furniture puts on the floor. Here it is worth paying attention that when laying a heated floor, it does not make sense to do it over the entire surface of the room. There is no need to heat the places where the furniture will be placed. This is an unnecessary waste of electricity, and areas of the floor that are under pressure from cabinets, sofas, and carpets will be more susceptible to overheating, and therefore will fail faster.
There is no need to heat the places where the furniture will be placed
Usually, when installing a floor, depending on the level of heat consumption (the number of windows and their sizes are a significant factor here), the distance from the walls that the furniture will approximately occupy is measured. There is no exact number as the sizes of rooms and furniture can vary significantly. But the point is that it doesn't matter how much pressure a rug or table puts on the floor. It is better to think about the location of these elements in advance, before installing a heated floor, and think about the internal laying of pipes. Whatever pressure is exerted on the floor, for example, by a carpet, remove it or do not install a warm floor in this place. Since wear and overheating of the floor will still be increased regardless of the pressure level. And do not forget, after completing all the work, to keep a plan for laying the heated floor, in case you need to subsequently rearrange the interior elements.
It is better to think about the location of furniture in advance, before installing heated floors.
If the numbers are important, what pressure something puts on the floor, what pressure a person puts on the floor, use the usual mathematical formula. To do this, you only need one tool - a scale to determine mass. We take the resulting mass and convert it into force, multiplying it by 9.8 (gravitational acceleration). Next, we place the foot on a regular sheet of paper in a box, circle it and count the number of boxes inside the outline. Each cell is equal to 0.25 square meters. cm. The sum of all cells is multiplied by another 0.25 and divided by 10,000 to convert to square meters. The weight is then divided by the area of the two feet. The result is pressure per 1 sq. m, that is, Pascals.
Ways to increase pressure
Installation of a pumping station and possible malfunctions
Today there is a fairly extensive range of equipment designed specifically for this purpose. One way to ensure the ability to obtain the required water pressure in the system is to purchase and install a pumping station.
Typically, this set of equipment is used in private homes, since many problems arise when installing it in an apartment:
The pumping station does not gain pressure - what to do?
Situations arise when the pumping station does not gain pressure, but at the same time it works and does not turn off. There may be several reasons for this malfunction:
When choosing the equipment necessary to increase the pressure in the water supply system, you should definitely consult a specialist. Only a professional who knows the capabilities of such equipment well will be able to help in choosing a way to increase the pressure in an apartment or in a private house.
Inclusion of an additional centrifugal pump into the circuit
A more realistic way is to install a centrifugal pump at the entrance of the pipeline to the apartment, designed to increase water pressure. Its installation is carried out if water enters the apartment, but in extremely small quantities, insufficient for the operation of household appliances.
who hosts the Field of Miracles program on Channel One
Centrifugal pumps of this type are available in two operating modes:
The start of operation of the device is ensured by the flow sensor included in its design. When the liquid begins to move through the pipe, a signal is received from the sensor to turn on the unit. Closing the tap serves as a signal to turn it off. The presence of such a sensor becomes protection against burnout. For this reason, devices equipped with a flow sensor are the most popular.
Centrifugal pumps for increasing water pressure in an apartment are divided into two types according to their cooling method:
When purchasing a centrifugal pump, you should keep in mind that there are universal pumps, and there are also those that can only be used in cold or only in hot water supply. A pump installed at the entrance of the water supply to the apartment, immediately after the water flow meter, can increase the pressure by 1-3 BAR.
Partial redesign of the system using flexible fittings
There are situations when the pressure is not enough for a particular device. In this case, the pump can only be installed on this device.
It often happens that the water pressure is not enough to operate the boiler. There is cold water in the apartment, but practically no hot water. The existing pressure in the water supply is not enough to pass through the heating device. In this case, you can choose a place to install the water pressure booster pump directly in front of the household appliance.
If installing a pump that increases pressure at the inlet of the system requires the ability to solder pipes for water supply, then using a pump for a specific device is much simpler. It is attached to the plumbing fixture using flexible fittings. First of all, you need to choose the right centrifugal pump.
When choosing, you should consider:
Instructions for welding polypropylene pipes - useful to know when installing yourself.
How to connect the boiler to the water supply, read this article.
Installation of an additional pressure booster pump
The sensor may not operate at extremely low pressure. In this case, you will have to switch to manual mode.
In case of insufficient amount of water (most often this problem occurs when it is taken from wells and free-flow wells), experts recommend purchasing a storage tank (hydraulic accumulator). Its use will allow you to accumulate water in the tank, using it when necessary.
It is better to place a hydraulic accumulator installed in a private house in a heated room.
Draining water from circuits
The design of a water floor, if installed correctly, will not have a tap or a lower point. For this reason, a compressor is used. Before draining the heated floor, this device is connected to the supply manifold. When it is factory assembled, then it has devices that prevent the reverse movement of the coolant.
At the liquid fill valve located on the supply manifold, remove the air vent and screw the adapter into this place and connect the compressor output. A hose is connected to the drain hole on the return manifold and discharged into a container or sewer.
The shut-off valves on one loop remain open. After turning on the compressor, the liquid begins to drain under pressure. The device is not turned off until an airborne suspension appears. Only then is it turned off, the valves of the first circuit are closed, the shut-off valves of the next loop are opened and the compressor is turned on again. As a result, water is drained from the entire system.
Since the length of the contours can be significant, a considerable amount of liquid remains on their walls. It is removed again, repeating the above procedure after a few hours.
After installation is completed and before operation, you need to fill the system with coolant and start the heated floor for the first time. The working medium is replaced depending on its type. The water is changed every year, and the antifreeze liquid is changed once every 3 to 5 years.
How to install an expansion tank?
What mistakes can happen when installing an expansion tank?
The first mistake is letting air out of the tank. This should not be done under any circumstances!
It happens, for some reason, that the air leaves the tank on its own. Then the pressure gauge in the heating system will jump. There is nothing wrong with this - you just need to pump air into the tank through the nipple. This is done with a regular car pump. At the factory, the pressure is usually pumped to 1.5 atm.
Sometimes you have to adjust the pressure in the expansion tank yourself. This may be due to the fact that systems, for example, come in different lengths... The pressure in the tank should be 0.2 atm. less than in the system. Try to adhere to this rule. If the pressure in the expansion tank is greater than in the system, the coolant will not be able to enter the tank and overpower the diaphragm.
The photo below shows how a floor-mounted expansion tank is installed.
Rice. 5. Connecting the expansion tank in the heating system.
It can be seen that the tank is connected to the heating system through a connecting size. There is a bolted flange. Why is this design good? If the diaphragm becomes damaged for any reason, you can unscrew the flange and replace the diaphragm.
How can you create pressure in a heating system?
If we consider the example of creating pressure in a closed-type heating system, then creating the design pressure for the general circuit will not be difficult. There are three steps to do this:
- Pressure testing, which is performed by filling the circuit with coolant through a jumper connected to the water supply. This process is accompanied by pumping up the pressure of the heating system to values 2-3 times higher than the operating indicators. Pressure testing is performed to avoid pressure drops and displacement of air trapped in the line. During the operation, parameters should be continuously monitored using a pressure gauge.
- Checking the heating main for tightness and leaks. The verification is carried out in two stages. First, there is a cold stage - the pressure in the line gradually increases (the time interval between increases is 15 minutes) until the minimum operating value of the indicators in the circuit is reached. After 30 minutes, the initial pressure must be maintained with an error of no more than 0.06 MPa in the direction of decrease. After two hours, changes should not exceed 0.02 MPa. The hot stage is carried out after connecting the working boiler to the main line. The test pressure should be set at the maximum operating level. The fixed values must remain the same as those made according to the original calculation.
- Creation of working pressure, for which it is enough, after pressure testing, to discharge the excess volume of coolant through any valve or air valve (air vent).
Important! A leak test should be carried out after three days of operation of the heating system.
Once all tests have been successfully completed and leaks (if any) have been eliminated, you can continue operating the system.
Method of performing pressure testing using water
Before performing pressure testing yourself, you need to install the collector box at the selected location and connect the mounted heating water circuits.
Installation of the manifold cabinet
Then the circuits are filled with water from the supply. To do this, close the caps on the return manifold, and open the tap on the supply. The water entering the pipes begins to displace air from them with a clearly audible hiss through an automatic air vent.
After this, the return valve opens to also bleed off the air. If there are several circuits, then the actions are repeated with each of them until all the air has left the system. After this, you should close the valve located on the supply at the inlet to the manifold.
The next action is to open the valve located in front of the return line.
The process of crimping a heated floor
Reason 1. Dumping excess air
During the first start-up, air gradually leaves the system. Therefore, the pressure in the heating system drops . Initially, it comes out of the boilers themselves. And since there are automatic air vents on the boilers and inside the boilers, usually on the walls, the air comes out of the boilers on its own.
Plus, when you start a wall-mounted boiler, there is a screw on the boiler pump that serves to bleed air right down the middle of the pump. If you unscrew it, air will come out first. Then water will flow in a thin stream. After this, you need to lightly tighten the screw, usually it is on a rubber band, and after that the wall-mounted boiler will not contain air and will be able to function normally.
Often, upon first start-up, the pressure in the heating system of water heated floors drops significantly. Huge floors can be one hundred or two hundred square meters in size. Below them are long pipes that initially contain air. Subsequently, they are filled with coolant. So when you start the heated floor circulation pump, the automatic air vents that are located on the heated floor manifold immediately begin to hiss. Those. The coolant that begins to circulate through the water-heated floor begins to push this air into the collector. And as a result, air begins to flow out of the air vents intensively, especially at the very beginning. This causes the pressure in the heating system to drop.
It is imperative to monitor the pressure on the safety group and on the pressure gauge of the wall-mounted boiler, and if necessary, top it up. Air may be escaping from the boiler coil. It can also break through to an automatic air vent. And possibly to radiators on other floors. It will accumulate in radiators, so they must have Mayevsky taps. If you see that the radiator has stopped heating, open the Mayevsky tap. At first the air will also hiss, then water will flow in a thin stream. This means that the air has completely escaped.
After the start of operation, for another week or two, maybe longer, air may escape from the water-heated floor. Accordingly, the pressure in the heating system will drop. This should not scare you, because over time the intensity will subside and after a few weeks it will practically stop.