Tile is a popular floor covering, it is practical and beautiful. Most often installed in the bathroom or kitchen.
However, tile is a cold material, this becomes especially noticeable in winter. Therefore, if you want to use this coating, the best option for installing under the tiles would be a water-heated floor - we suggest you learn how to install it yourself.
Possibilities of a water floor in an apartment
Heating is a decisive factor in the life of every person, especially if their apartment is on the ground floor, so the idea of installing water-based heating in their home often creeps into their heads.
But it will be quite difficult to implement this, and in many houses it will be completely impossible, because it will interfere with the normal operation of the hot water supply system.
It is prohibited to connect the floor heating system to a centralized system. In apartments with central heating, only electric heated floors are used, which is very practical and convenient.
As for the water type, its implementation is allowed only in houses with individual heating from a separate gas boiler. Moreover, to implement such solutions, you will have to take appropriate permission and carry out work under the supervision of specialists, since the system may depressurize and cause damage to property.
Water heated floors are most often installed in private houses for screeding, since they use an independent heating system from a gas or solid fuel boiler.
This is a great way to provide yourself with relatively inexpensive thermal energy. In addition, having such a floor heating system, you will protect yourself and your loved ones from unwanted colds and ailments, since it is hypothermic feet that are the main cause of such processes.
Reviews
“My husband insisted on making water floors on the loggia. I resisted for a long time, but in the end they did it. In winter, of course, it’s just great, I go to the loggia barefoot, it’s very comfortable and warm.” Alina, Moscow
“The builders did something wrong when installing the pipes. Part of the floor is barely warm. I don't want to dismantle the floors. So we live, half of the kitchen is heated, the other is covered with a carpet. We’re already used to it.” Sergey, Omsk
“I can’t imagine how we used to live without heated floors!!! It took us a long time to choose what to put on the floor. We settled on tiles and really liked how they looked. And they said that it is best to make water floors for it. You made the right decision!” Sveta, Astrakhan
“We spent a long time choosing what floors to make. We looked at all the options, both film and mats. But for us there is only one choice - water ones. Of course, you need to do screed and thermal insulation, but it’s worth it. They warm 100%!”
Oleg, Kovrov
Installation methods
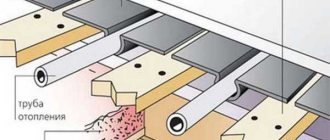
There are several ways to install a water heated floor under liquid heated tiles, but the general principle remains the same: there is a pipe that is located in the thickness of the screed. Depending on the design, there are at least 2 heating technologies. They differ in the type of substrate and the method of attaching the pipes:
- Using special plates with grooves for laying pipes.
- Installation of the pipeline on a steel mesh or reinforcement.
When applying this or that method, it is important to use high-quality materials and strictly follow the technology so as not to deteriorate the quality of the heating system.
Tools for work
To install a warm water floor yourself, you will need a certain set of tools and materials:
- Pipes of any chosen composition and quality.
- Pump.
- Several valves.
- Reinforcing mesh for laying the base.
- A system of fasteners that will fix the pipes.
- Open-end wrench.
- Roulette.
- Hammer.
To install a floor with a screed, you will need tools to level it.
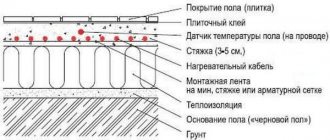
Floor installation or what kind of pie should be
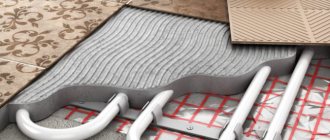
As mentioned above, installation of a water heated floor is a layer cake, which consists of the following materials:
- The base is compacted soil and sand. It is important to compact the entire surface to obtain maximum density. To increase the efficiency of the process, moisten the sand with water, which will promote natural compaction.
- Waterproofing is an important stage on which the effectiveness of all work will depend.
Here it is necessary to isolate the layers of the cake and the concrete base from groundwater, eliminating the possibility of unwanted dampness. Any bitumen roll material with the direction of the joints or polyethylene, predominantly dense black oilcloth, can be used as a hydraulic separator. - Next, a layer of crushed stone is laid.
- Next, a layer of concrete is poured with reinforcement, which acts as a secondary base. For reinforcement, 8-10 mm reinforcement is used, woven into a wall with a window of at least 20x20 cm. If a heated floor is installed in an apartment or in a house based on the foundation, then only a screed may be required.
- A second layer of waterproofing and thermal insulation is laid on top of the concrete or screed; for the latter, it is recommended to use extruded polystyrene foam with a thickness of 5 cm. Use 10 cm at once, which will make the floor even warmer.
- Another layer of waterproofing is rolled out on top of the insulation, only for the finishing screed.
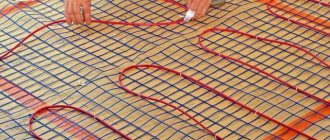
- Mesh or reinforcement is laid to reinforce the screed and for fastening pipes. If slabs with grooves for pipes are used, they also act as insulation. If necessary, an additional layer is added.
If a mesh is used, it is recommended to tie the pipes with the coolant using plastic clamps. It is highly not recommended to use wire, since during the process of linear thermal expansion, the material from which the pipes are made can wear through, which will lead to leakage.
- When using slabs with grooves, pipes are laid in them and fixed with special brackets with wedges, which are driven directly into the insulation.
- A cement-sand screed is poured over the pipes. Damper tape is pre-glued around the perimeter of the room. It will protect the floor from cracking due to thermal expansion.
What and how to fill the base?
To lay out the base for a heated floor, use concrete grade M300. If the construction of the floor is carried out in a private house, then the thickness of the base should be at least 10 cm. It is better to make it thicker, since the quality of the floor and its effectiveness will depend on it.
It is better to use fine crushed stone 20 mm in size as a filler for the concrete mixture. It is easier to work with, as it is easier to level and flows even into the smallest voids and cracks.
System design
The structure of the floor heating system is summarized as follows.
There is a boiler, from which through a distribution manifold with pressure regulators and a pump. Water is supplied to various circuits, separated into separate rooms. The number of sewer outlets is equal to the number of rooms in your house. Each branch of the system is looped onto the collector.
If the area is small, then the pump may be absent, since it is located inside the boiler.
Quite often, heated floors are equipped in private homes together with conventional wall-mounted radiators, which are located under the windows. In this case, a separate pump for pumping coolant into the floor must be provided.
Advantages and disadvantages
The following other points count in favor of underfloor heating:
- savings during operation up to 45%;
- the ability to avoid installing radiators, which allows for better use of room space;
- The finishing coating is suitable from any material;
- the air warms up more evenly, there are no drafts;
- The comfort of being in a space heated by thermal radiation is much higher than with radiator heating.
However, there are also disadvantages, which include a drop in pressure in the heating system due to the coolant diverted to heated floors, as well as the inability to quickly find and repair a leak in the event of an accident.
In any case, the main argument in favor of underfloor heating is the ability to increase living comfort while saving significant money.
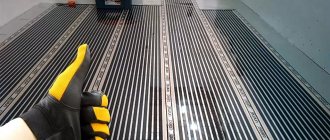
Types of pipes for heated floors
There are at least 4 types of pipes on sale that are used to create underfloor heating systems. We list them in descending order of their heat transfer properties:
- Copper is the most effective type of heating pipeline. They better transfer heat to the floor due to high thermal conductivity. The main nuance of their use is that they are much more expensive than the most popular alternative - metal plastic.
- Metal-plastic pipes are the most popular material for laying underfloor heating. Its advantages are that they are relatively cheap and also transfer heat from the coolant well, but in a significant proportion less than copper ones. This is explained by their structure - inside there is a thin polypropylene shell, on top of which there is aluminum foil 1 mm thick. The outside of the pipe is protected by a layer of polypropylene. Bends to almost any radius of at least 20 cm for a pipe with a diameter of 16 mm. With its help, lay the heating circuit without breaking all the way to the collector.
- Polypropylene pipes are a convenient material from which it is easy to make connections for heated floors, to the manifold and to the boiler. The pipe is connected using a welding machine.
- Pipes made of cross-linked polyethylene are a modern, very durable material with good heat transfer. It is convenient because it can be used to lay a heating main throughout the entire space. Produced in coils of 300 m.
Tips for choosing flooring
From the assortment presented on the consumer market, the consumer himself decides which floor to choose for his living space. But still, the general opinion of construction specialists and professional designers agreed that it is better to combine the aesthetics of the interior with the technical qualities of the flooring. So, according to their recommendations, it is advisable to make a warm floor in each room using different materials.
Water floor pipe laying step
Let's look at a few tips on how to make a heated floor comfortable and beautiful at the same time.
Ceramic tile
Ceramic tiles are ideal for rooms such as:
- bathroom;
- bathroom;
- kitchen;
- corridor.
For the bathroom and toilet it is rational to choose a corrugated product. In this case, your bare foot will not slide on the floor.
It is better to choose ceramic tiles for corridors in dark colors that will hide accumulated dust and dirt.
In kitchens, it is recommended to place products in light colors, due to which you can visually expand the space of the room.
Linoleum
This material is suitable for all types of rooms. When choosing a color scheme, you should take into account the interior of the rooms. The right combination will create an interesting design for the room and emphasize the good taste of the owner. The only place where you can't put linoleum is in bathrooms. High humidity in this room will quickly deteriorate the material.
Laminate
Laminate has a fairly reasonable price, but at the same time perfectly imitates natural wood or parquet boards. Such products will look good in offices, living rooms and kitchens. But in children's playrooms and bedrooms, it is not recommended to install laminate flooring for heated floors. Evaporation of phenol-formaldehyde resins can adversely affect human health.
Having considered the types of flooring that are suitable for a water system and which should be abandoned, beginners will not make mistakes when choosing them. After all, not only the aesthetics of the room design, but also the quality of its heating will depend on a correctly made decision. But don’t forget about installation. Properly performed work will also ensure a long service life of the water heating system as a whole.
AdminAuthor of the article
Did you like the article?
Share with your friends:
Thermal calculation
On average, to install a heated floor and create the most comfortable conditions in the premises, the average temperature of the coolant in it should be in the range from 45 to 55 degrees. If the finishing material is tile, then for a normal feeling it is enough to have a carrier temperature of 45 degrees.
If laminate is used as a covering, then it should be higher, since it is partially insulated by the board.
The underfloor heating system is calculated based on needs, and in general, it is considered flexible because the water supply can be adjusted to any temperature. Therefore, they are usually guided by general data: the temperature on the floor surface should be from 29 to 35 degrees.
Much is decided by the choice of method of laying pipes in the system, which is determined based on preferences for intensity and heating zones. If it is necessary for the heat to be evenly distributed throughout the room, then it is better to use the so-called snail.
With this laying scheme, the return alternates with the primary, so no strong differences will be felt.
Organization of the concrete layer
Tiling on a concrete screed is the most common method of installation work for installing a warm water floor.
Note!
Mosaic from broken tiles: step-by-step instructions on how to lay it out with your own hands (140 photo ideas)
Mosaic for the bathroom: TOP-150 photos of new designs, as well as modern ideas for combining mosaic tiles
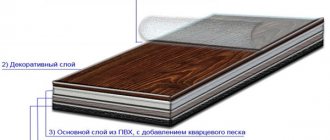
Quartz vinyl floor tiles - what is it? Application features, advantages, disadvantages, choice, manufacturers, photos
Experts recommend using ready-made building mixtures that contain a number of polymer resins (the compositions are designed specifically for heated floors). The total thickness of the concrete screed is 6 cm, above the pipes - up to 3 cm.
Laying heated floors under tiles
Usually, for the sake of greater efficiency, a warm floor is installed only under tiles, because this material, due to its high density, transfers heat very well. And due to its porosity, it also partially accumulates, which allows you to save some money on heating water.
Materials and tools
To build a heated floor on a finished base made of concrete or reinforced concrete slabs, you will need a small set of tools: a plumbing set, scissors for cutting plastic, polypropylene, cross-linked polyethylene, a hacksaw or grinder for cutting copper.
You will also need measuring devices such as a ruler and tape measure. Pencil for marking and labeling.
The materials you will need are a film for waterproofing, thick insulation with a lock, a mesh in cards, clamps for tying pipes, dowels for attaching the mesh. The main material is a pipe, the choice of which determines the number of fittings and other parts.
Calculation of material quantity
To determine the required number of pipes for a heated floor, you will have to make accurate measurements of the geometry of the room. Multiply each of the two adjacent sides by a step, which is usually 10-15 cm, and sum the resulting values.
This will be the approximate length of the pipe that is necessary for laying the heated floor system. It is only important to take into account the length of the pipe sections for supply to the manifold cabinet, which is usually located in the boiler room.
Clamps are attached every 30-40 cm to prevent unwanted rise of the heating main. The mesh is purchased according to the square footage of the room.
Installation of a manifold cabinet
The manifold cabinet is installed in the boiler room, closer to the heat source. Immediately from there it is output to all rooms via separate circuits. A pump and a safety valve are immediately mounted on the manifold assembly to protect against overpressure. To ensure that the pump does not rotate constantly, but maintains the set temperature, a thermostat with an integrated timer is attached to it.
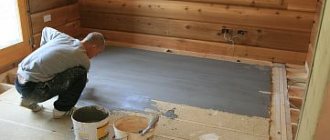
Filling the screed
After the pipe has been laid, proceed to pouring the screed. For this purpose, a cement-sand mortar is prepared, which is poured indoors and leveled according to the rule.
The recommended thickness of the screed should not exceed 5-6 cm.
Before pouring the solution, damper tape must be glued around the perimeter of the room.
Tile selection
After the warm floor has been installed, proceed to choosing tiles. It can be anything depending on the preferences of the owner. Here the imagination is limitless, but you should choose something suitable for the existing interior, if available.
How to prepare tiles for laying on a heated floor?
The tiles do not require any special preparation when laying them on a heated floor. Choose the right adhesive composition, which should be adapted for use on slippery surfaces.
Preparation involves trimming, but it is better to do this after the entire tile has been laid in order to minimize losses due to incorrect cutting. Pre-impregnate the surface on which the tiles will be laid with high-penetration soil.
We also recommend watching - How to cut tiles with a manual tile cutter
Marking the room
To facilitate the process of marking the room for further laying of tiles, you can use a laser level. This is the most convenient and technologically advanced option. But you can also do it the old fashioned way - use a string with coloring powder.
Laying tiles
It is necessary to lay the tiles from the middle, marking the zero line with a perpendicular intersection. It will be convenient to move away from this place in different directions. Control each tile with a level at several points.
Seam processing
The next day, after the glue has dried, it is carefully removed from the seams using a spatula or other device. This is necessary for their decorative sealing with grout.
System pressure testing
After the heating system has been installed and connected to the collector and boiler, perform pressure testing. The procedure consists of raising the pressure in it to the maximum limit and holding the system for some time. As a result, all fittings are sealed due to internal pressure.
Functionality check
A test run of the warm floor covering system is carried out after installing the heating elements. If you do this at the last stages of the work, when the structure has already been filled with screed, it will be difficult to detect errors in the installation of communications, which means that the leak will remain invisible. To avoid flooding of the room, it is recommended to perform a test run. To do this, the warm floor covering system is turned on and the condition of the pipes is monitored for several hours, gradually increasing the heating temperature and pressure.