Warm floors come in water and electric types. The systems were originally developed to heat cold ceramic tiles and porcelain tiles, but the technology has been so successful that it has spread to other floor coverings. Any heated floor can be used in conjunction with all types of PVC tiles, however, most manufacturers impose restrictions on the surface heating temperature (28°C). There are also some features of operating infrared systems.
The information in the article is for informational purposes only and does not constitute instructions . Before laying floor coverings on heated floors, we strongly recommend that you clarify all the details with the seller. Laying any coatings other than ceramic tiles on a warm floor carries certain risks that can be avoided or at least be able to take advantage of an official guarantee if you follow the manufacturers' recommendations.
Requirements for PVC tiles under which heating can be installed
Considering the minimum heat loss (see table below), the recommended temperature limit of 28°C is sufficient for comfortable heating of the feet, but it is not enough if you plan to use a heated floor as the only source of heating. Prolonged overheating threatens to soften the polymer and deform the floor covering.
In addition, the base under the PVC tiles must be level and solid, which is not always achieved in conjunction with an infrared heated floor, under which it is necessary to lay a thermal insulation substrate. There is a technique here that is prohibited by manufacturers of film systems: you can place foil under the mats, which will do an excellent job of reflecting heat. But in this case, the warranty for the heated floor is terminated.
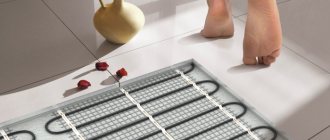
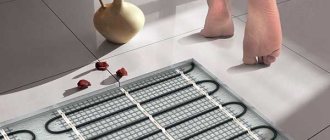
Elastic quartz vinyl and PVC tiles, as well as WPC laminate with a built-in backing, are combined only with a heated floor, which is mounted in a screed, and not laid directly under the floor covering (infrared heating mats).
Installation technology
Having prepared all the components and tools, you can proceed directly to laying infrared heated film floors under the tiles.
Watch video installation instructions
DIY installation of infrared film under tiles. Step-by-step installation instructions
Preparation
Infrared floors are especially sensitive to defects in the base, and its preparation should be taken seriously.
Preparation before installation
The process includes:
- Dismantling the old covering.
- Cleaning the floor from dirt and debris.
- Surface degreasing and primer treatment.
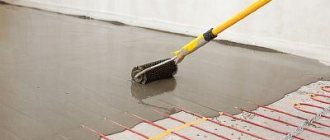
- Leveling the subfloor: “dry” method - expanded clay sand is used, the method is simple, but expanded clay can harm the heating elements; concrete-cement or self-leveling composition - this option allows you to make a flat and smooth floor.
If you have a solid and level base, the preparatory process is greatly simplified. It is enough just to apply a small layer of self-leveling mortar.
Development of laying scheme
Before you begin installation, you need to draw a plan for placing the canvases. The film floor does not lie under heavy furniture and plumbing fixtures. Therefore, you need to think about the layout of the room in advance. According to this diagram, place marks on the base where the heating element will be placed. The distance from the walls should be at least 20 cm.
After this, the location for the thermostat is determined; it should be located on the wall, at a distance of 15 cm from the floor. For the wires that will go from the device to the film, it is recommended to make grooves in which they will be placed.
For your information! It is recommended to install the thermostat before installing the floor, as this is a dirty job.
Waterproofing
Waterproofing material is laid on the prepared surface; you can use a special membrane or ordinary polyethylene film.
The product is laid with an overlap, and tape is used to seal the joints.
Thermal insulation
Thermal insulation material prevents heat from escaping into the floor, but directs it upward. A foil product - penofol or isolon - is better suited for this role.
Material with such a coating is capable of reflecting up to 90% of thermal energy, which makes film floors more efficient.
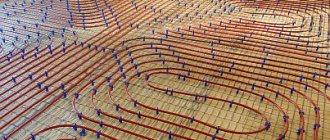
Laying thermal film
The thermal film is laid according to the developed scheme. Installation of the film should be done carefully so as not to damage the elements. To connect the strips to each other, terminal clamps are used.
The sheets are mounted in such a way that the copper contacts are located below, towards the walls, only then will the device work correctly.
Floor connection
Once the floor is laid, it should be connected to the thermostat. To do this, according to the developed scheme, from the heating elements to the regulator, you need to stretch a cable that fits into a corrugation.
To connect the cable and the IR mat, the insulation is partially cut off from the wire, after which it is connected using clips to the heating elements. Clamp the terminal with pliers carefully but tightly to ensure reliable contact. The cut areas must be insulated with bitumen.
After this, a temperature sensor is installed, it is placed on graphite strips, and connected to the thermostat. The sensor is mounted in a special recess, which is equipped with heat-reflecting material, this minimizes differences in surface height.
When the system is connected, it should be tested. The test is done for each strip separately, at a temperature of 25 - 30 degrees.
If testing shows that the floor is functioning correctly, it should be covered with polyethylene, it will serve as an additional protective layer.
Important! When connecting a film floor, it is necessary to ground the device.
The feasibility of using heated floors with vinyl tiles
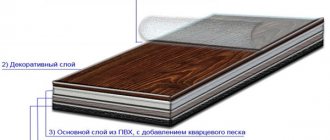
PVC tiles have a very low thermal conductivity coefficient: 0.15-0.25 W/(m*K). Thanks to this, the surface of the flooring takes on the temperature of the air in the room and is never cold. In addition, thermal conductivity also determines how well a material retains heat and, accordingly, how efficiently electricity is used.
Based on this, the conclusion suggests itself: the use of heated floors with PVC tiles, although allowed by all manufacturers, is in most cases redundant, because the surface of a vinyl floor covering, unlike porcelain stoneware or tiles, does not cool down to an uncomfortable state.
However, for the bathroom, in the nursery or on an insulated balcony, especially in winter, you want to feel the warmth under your feet and be able to walk barefoot. And here the possibility of operating energy-efficient and comfortable heating seems to be a clear advantage.
Materials we will need
If you plan to install an infrared floor with a finishing coating (tiles) yourself, you should stock up on the necessary material and tools.
Required purchase:
- thermal film with a set of clamps;
- electrical wire;
- temperature controller;
- insulating bitumen material;
- thermal insulation;
- reinforcing product;
- plastic film;
- dry self-leveling mixture;
- tile adhesive;
- construction tape.
The tools that will be required when installing infrared heated floors under tiles include: multimeter, tape measure, screwdriver, square, meter, wire cutters and rubber hammer.
If you buy a standard set of film flooring, then it includes, in addition to the thermal film itself, clamps, electrical wires, insulating bitumen material with a self-adhesive base.
For your information! It is important to choose the correct cable cross-section with which the floor will be connected to the thermostat.
Types of vinyl floor coverings for heated floors
Optimizing the use of heated floors is one of the key factors in the development of vinyl flooring, in particular, the emergence of stone-polymer SPC laminate and wood-polymer WPC tiles with a density of 2000 kg/m3 and 1050 kg/m3, respectively. Learn more about the evolution of vinyl flooring and the role of heating systems.
Stone SPC laminate
◈ Details about SPC laminate.
SPC laminate with a thermal conductivity of 0.18-0.25 W/(m*K) is the flooring closest to porcelain stoneware. Due to the high content of compressed stone (up to 80% calcium carbonate), the surface heats up quickly and evenly, with virtually no heat loss. But at the same time, thanks to the binding polymer, the floor cools down much more slowly. In addition, you cannot use film flooring with ceramic tiles, but you can with SPC vinyl.
Only two brands of stone-polymer SPC tiles - Fargo, Stone Floor - officially allow heated floor heating to 40°C. There is also a collection of Art Stone Armor with two heat-stabilizing layers: it is interesting that in the presentation the manufacturer states 45°C, but in the instructions he repeatedly warns against overheating above 28°C.
Vinyl WPC Tile
◈ Details about WPC tiles.
WPC tiles with a high content of wood flour and a foamed structure are also suitable for all types of heated floors, but the density is 2 times lower than that of SPC and the minimum content of stone chips greatly increases heat loss, the floor takes a long time to heat up and at 40°C micro-expansion of the planks is observed ( see comparison table below).
Resilient Vinyl Flooring
◈ Details about quartz vinyl tiles and PVC tiles.
Adhesive PVC or quartz vinyl tiles are compatible only with built-in systems: water and electric heating up to 28°C. Film systems can also be used in conjunction with the locking installation method, however, only elastic underlay materials or foil recommended for vinyl should be used as a thermal insulation substrate (not recommended by manufacturers of heated floors).
Interlocking quartz vinyl or interlocking LVT tiles with a thickness of 3.5 mm and thinner are a poor choice for any type of heated floor: when heated, the interlocking joints soften, which leads to a violation of the tightness and integrity of the entire flooring.
Rigid Vinyl covering
◈ Details about Rigid Vinyl floors.
Interlocking flooring with a thick vinyl layer is also compatible with heating systems. Thanks to a thickness of 5 mm or more, Rigid Vinyl can be used with infrared heated floors and with increased surface heating. As with the vast majority of vinyl flooring, Rigid Vinyl manufacturers also declare a heating limit of up to 28°C.
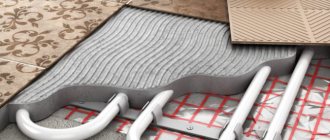
Principle of operation
IR floor is a thin film, between the layers of which carbon plates are placed. They serve as a heating element that generates heat. The device operates from the mains, heating is carried out using infrared rays measuring 10 - 20 microns.
The film quickly heats the floor, and the presence of a thermostat allows it to turn off when the desired heating level is reached, and turn on again when cooling. As a result, the device operates approximately 20 minutes per hour.
Film flooring has the highest efficiency when compared with other systems. With rapid heating, electricity consumption is not significant, thereby infrared flooring is considered more profitable and economical.
In addition, it does not heat the air masses in the room, but the objects in it, and they already heat the air. This allows you to create a wonderful atmosphere in the apartment, since the air does not dry out, while it is saturated with negatively charged particles.
Infrared flooring is perfect for different rooms; the ideal option is to install it under the tiles in the toilet or bathroom (we suggest you read the step-by-step instructions for installing the TP in the bathroom).
Comparative table of heat loss and thermal expansion
| The basis | Heating up to 28°C* | Heating up to 40°C** | ||
| Thermal expansion | Heat loss | Thermal expansion | Heat loss | |
| SPC | No | 0.5°C | 0,04% | 0.5°C |
| WPC | No | 6.5°C | 0,21% | 6.5°C |
| LVT, quartz vinyl | No | 1.5°C | — | — |
| Rigid Vinyl | No | 1.5°C | 0,21% | 1.5°C |
* - Up to 28°C. Heating floor.
** - Up to 40°C. Enough to heat the room, the maximum permissible temperature for comfortable walking on the floor.
Recommendations for the installation and use of heated floors with PVC coatings
- All types of heated floors can be used together with SPC laminate, WPC and Rigid Vinyl tiles.
- Together with adhesive PVC and quartz vinyl tiles, only water and cable systems built into the screed are allowed.
- It is not allowed to use heated floors with elastic interlocking vinyl up to 3.5 mm thick.
- When using flexible vinyl tiles, as well as WPC and Rigid Vinyl together with heated floors, it is necessary to provide expansion gaps at the walls of 8-10 mm so that potential thermal expansion does not deform the flooring.
- The recommended heating temperature for heated floors under vinyl is 28°C. Prolonged overheating can lead to softening of the polymer. In practice, the restriction does not apply to SPC laminate, which is based on up to 80% mineral filler.
- It is not recommended to use heated floors as the main and only source of heating.
- Under carpets and some types of furniture, heat accumulation and spot overheating are possible, which is unacceptable.
Connecting wires
Electrical diagram for connecting a heated floor
Connection of several strips of heating film is carried out in parallel connection using a distribution box. In the case of using a film with a grounding layer, the grounding wire is connected bypassing the thermostat (connection to the grounding layer is made using a separate terminal). It is recommended to use an 8-fold junction box with a depth of at least 25 mm. After connecting the wires, a control test of the system is carried out.
Carefully lift the protective layer and insert one connector plate so that there is reliable contact with the conductive busbar.
After connecting the connectors to the two copper bars, first crimp the clips with your fingers and then with pliers.
Strip the end of the wire and clamp it securely into the barrel connector with pliers.
Use 50x40mm butyl rubber insulation tape to insulate the copper bars. Copper busbars with connected wires are insulated in two sections (top and bottom).
Busbar sections free from connections are insulated with one piece of insulation.
It is necessary to carefully “wash” the contact area with your fingers, while 25 mm of the wires must be covered with insulation.
The wires are laid around the perimeter of the room in a 50-mm gap left or in a groove cut into the thermal insulation, starting with the strip of film furthest from the mounting box. Secure the wires with special tape. It is not allowed to lay electrical wires on top of or under the heating film. Route the wires from the heating film to the thermostat or junction box.
Typical installation patterns
All types of vinyl flooring are suitable, including adhesive quartz vinyl tiles. Before laying the adhesive floor, the plywood base must be puttied and sanded along the seams and on the screws.
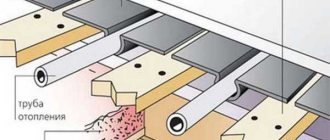
Scheme 1. Water-heated floor on a wooden floor
Pattern 2 is suitable for interlocking and glue-down vinyl floors on any substrate.
Scheme 2. Cement-sand screed and water heated floor
Pattern 3 is suitable for interlocking vinyl floors on any substrate.
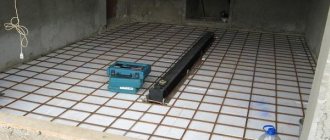
Scheme 3. Cement-polymer screed and cable heated floor
Scheme 4 is only suitable for interlocking vinyl floor coverings on any substrate with a thickness of 4mm or more.
Scheme 4. Cement screed and film heated floor
Subscribe to the mailing list of new articles and reviews from Doctorfloor.ru
The editors do not claim to have the only correct and correct opinion regarding vinyl floor coverings. If you think that you have more professional, complete and reliable information, contact us by e-mail or through the feedback form in the Contacts section. We will be grateful for your help in filling the resource!
Similar articles
Vinyl wall tiles: choice in…
PVC tiles for the nursery: comfort and…
Quartz vinyl for the kitchen: a universal choice...
Quartz vinyl tiles in the bathroom: finishing with…
Quartz vinyl tiles on the balcony: a stylish area…
Water heating
Regarding this solution, we can say that it has many disadvantages with a small number of positive aspects. The only advantages are that after pouring the cement, a flat surface is formed, perfect for laying vinyl, and the fact that thin parts compensate for the increase in the height of the floor relative to the ceiling with their small thickness. There are many more disadvantages:
- You will have to fill the screed and this will inevitably require either the involvement of professionals or long-term independent work.
- After the screed is made, it needs a lot of time to dry. At the same time, the filling process itself also takes a lot of time.
- The temperature of water floors can be quite high, which negatively affects the condition of the decorative coating.
- Such a floor is very difficult to configure in rooms of complex shape.
- The height of the room will be significantly reduced after installation of all components of the structure.
- There is a risk of leaks.