One of the most important problems that utilities face is starting heating. The risk of errors occurring in an apartment building is, of course, higher than in a private building. But in each case, it arises mainly due to non-compliance with the rules. To avoid unpleasant situations when connecting heating, you need to follow the sequence of necessary actions.
When the heating season begins, it often happens that the heat is distributed unevenly on the top floors. The reason for this is that the heating system starts up too quickly, which creates air pockets that prevent the uniform heating of all apartments in the house.
When the heating season ends, the system remains idle, causing its pressure to drop. That is why the question of how to properly do heating, as well as its further regulation in an apartment building, is a fairly pressing issue.
Procedure before starting the heating system
Open the tap on the expansion tank.
Open the taps that shut off the coolant in the supply and return from the boiler.
Important! The listed taps must always be open; after starting the system, it is best to remove the handwheels from them completely and put them “in a visible place.”
There should be no taps at all on the safety block.
Open the valves on all radiators. And close Mayevsky’s taps.
If the heating system has collectors, then open the taps on the collectors (on the supply and return, and not those for feeding and draining the system).
If there are automatic air vents, check whether they are open: there is a black cap on top of them, which must be unscrewed so that air can escape.
Bottlings
Depending on their placement, there are two heating distribution schemes.
Lower
Bottom filling, or a heating system with bottom wiring, is used in most modern buildings. Both the feed and return bottling stations are located in the basement. The risers are connected in pairs by jumpers located in the apartment on the top floor or in the attic; at the top point of each jumper there is an air vent (Mayevsky tap).
Any riser is a bridge between bottlings. The inevitable imbalance between the risers closest to the elevator unit and those farthest from it is compensated by the difference in the permeability and size of the pipes. Let us present the usual values of remote control for a heating circuit serving the entrance to a modern ten-story building.
| Plot | DU pipes |
| Spills near the elevator unit | 50 |
| Spills at end risers | 40 |
| Risers | 20-25 |
What specific advantages does bottom routing of heating pipes provide?
- All shut-off valves on paired risers are concentrated in one place. There is no need to go up to the attic to turn it off.
- Discharging coolant into a technical basement during repairs does not pose any problems.
But: often basements are used for storage or utility rooms of stores. In this case, you yourself realize that there is no need to talk about any advantage: you will have to dump the risers through a hose into the sewer.
The main drawback of the lower wiring of heating systems is the complexity of starting them after the reset is completed. In order for circulation to begin through all risers, it is necessary to bleed off the air space. At the same time, not all residents of the upper apartments can do this; we should not forget about the empty premises.
Upper
Top filling, or heating with a top supply distribution, is completely and predictably different in that the filling supply thread is placed in the attic. The return remains in the basement. Any riser is a separate element, free from other risers.
In the attic, in addition to bottling the supply, in this case there are:
- Shut-off risers from the valve supply.
- Plugs for relieving them (more correctly, for sucking in air necessary to completely dry a group of heating devices).
- Expansion tank. Regardless of the name, it does not compensate for the increase in coolant volume during heating (the system is not autonomous, but connected to the heating main). A tank located at the top point of the filling bottling, laid with a minimum slope, helps to collect air, which is removed from there through the relief valve.
This heating system wiring scheme was widely used until approximately the 80s of the last century.
How does it look against the background of the bottom bottling?
- The main trouble here is the complexity of resetting the launch of a separate riser. To dry it completely you need:
- Close the attic valve.
- Close the valve in the basement and unscrew the plug.
- Unscrew the plug in the attic.
It’s curious: a whole house heating system with an upper supply distribution is reset and started much more easily, especially if the discharge from the heating expansion tank is routed to the elevator unit. Alas: dumping a house is associated with the loss of a huge amount of coolant, which is undesirable from the standpoint of saving thermal energy.
- The main advantage of top filling is that starting it up is extremely simple and does not depend on the residents of the house. It is enough just to slowly (so that there is no water hammer) open the house valves on the supply and return, after which all that remains is to dump the air space from the expansion tank.
Heating system adjustment
After filling the system, you need to go through all the radiators and bleed air through the Mayevsky taps: open the Mayevsky tap, first the air comes out, then the tap “spits” air with water... when only water flows, it means the radiator is filled with water, close the Mayevsky tap. And so on for all radiators.
Most likely, the pressure will drop after manipulating the radiators, so we re-charge the system to operating pressure. If there is a second floor, we bleed air from its radiators in the same way. And – we feed the system to operating pressure.
We bleed the air from the circulation pump. The pump has a screw; you need to loosen it with a wide slotted screwdriver. First, air will come out like from radiators, and then water will come out in a thin stream. After this, tighten the screw. Check the pressure and add coolant if necessary.
Important! Before going any further, listen to see if the pump is working. It happens that it does not work because its rotor is soured. Turn off the pump and fix it by: 1) unscrewing the screw in the center of the pump motor; 2) inside, at the end of the rotor, there is a slot, insert a screwdriver into it and turn the rotor; 3) screw the screw into place. Let's turn on the pump again, it simply must now work.
For 10-15 minutes. Moreover, after 1...2 minutes of operation, we unscrew the screw on the pump again, if water flows, everything is in order. When you turn on the pump, you will hear air coming out of the air vents again, this is also normal. And the pressure will drop, and we will feed the system to the 1.5 atm we need.
While the pump is running, we go through all the Mayevsky taps and check for the presence or absence of air in the radiators. And again we feed the system to the required pressure.
Now we believe (for now we only believe) that the system is completely filled with coolant (but we are not too delusional, air can leave the system for up to 3 weeks or even up to a month, especially if there is a water-heated floor; air will leave the warm floors itself through air vents on the manifolds).
How to turn on the radiator correctly for the first time
A very important point is to turn on the central heating battery for the first time in your home. When a long period of time has passed, and the thermal power plant begins to supply water to our batteries, then usually the first water flowing through the heating systems is the dirtiest and rustiest. Imagine. You have just installed a brand new battery, one might say, off the assembly line, and suddenly a powerful stream of dirt is thrown in there. It is not surprising that many batteries become clogged precisely from the first such inclusion, and then we are surprised that out of 12 battery bends, only 8 are heated, the rest remain cold. To prevent this from happening, a jumper (bypass) is needed when installing the battery. If you have done the installation correctly, then set the position of the ball valves as shown in the figure:
In this case, the entire flow of dirt when turned on for the first time will go through the jumper, keeping your battery intact and safe. In this option, it is better to keep hot water running for several days. Of course, many are looking forward to when it will be turned on. However, my advice is, if you can’t wait a few days, wait at least one day. By the way, here is a detailed article on how to turn off the battery.
Starting the heating system
Now everything is ready to start the heating system. We turn on the boiler (the pump must be on!) to warm up to 40 degrees.
Our concern is to go and check which radiators are heating and which are not. It is clear that the system does not warm up instantly; you will have to spend half a hour or an hour. If the radiator does not heat, it means that air is accumulating in it; bleed off in the manner described above.
Finally, we turn on the boiler to warm up to 60-80 degrees. Keep the heating system in this mode for 3-4 hours to make sure that the radiators warm up evenly and the return returns warm.
How to regulate heat in batteries
Suppose you put a battery of 10 bends in the room, and you feel good with it when it’s -20 degrees outside. But now, the cold has passed and now it’s been -2 degrees for several days. Hot water, as often happens with us, at the same temperature continues to flow through our pipes in a powerful stream and a gas chamber is formed in the room, from which there is no escape. In this case, the temperature regulator comes to the rescue. There are many of them in nature. In the picture below you see one of them.
What brand of thermostat should be is the topic of a separate article. And now it is important for you and me to understand the principle. The figure shows one of the simplest thermostats. It has a knob on top that you can rotate and set values from 0 to 5:
5 - means that the entire flow of hot water will pass through the battery; 4, 3, 2, 1 - means that the regulator will reduce the diameter of the flow pipe, providing less hot water flow through the battery per unit time. Thus, at 4 the battery will be colder, at 3 even colder, etc.
If you want to disconnect the battery altogether, you can set it to “*” - the water current will be very small. Practically it will not exist:
Or you can simply close the ball valves on the battery. The effect will be approximately the same:
If you have 2 windows in your room and 2 radiators under them, then during installation it is advisable to install them wisely. For example, you need 20 sections for the entire room. Then it is better to put, for example, 12 sections on one battery, and 8 sections on the other. In this case, in addition to the regulator on each battery, you can completely turn off or turn on 8, 12 or all 20 sections at the same time.
If the radiator does not heat.
If water comes out of the radiator, but the radiator still does not heat, what is the reason? If installed incorrectly, debris can get inside the pipes and accumulate in thin places, for example, in valves. Will have to clean it up. Close both valves on the cold radiator. Loosen the union nuts on the valves. Carefully drain the water from the radiator.
If the pressure in the system is working, then you can sharply open the valve on the supply pipe, and a stream of water should remove the debris. We put the radiator in place, open both valves, again bleed air through the Mayevsky tap... well, I think everything is already quite clear. After such manipulations, two positive results should appear:
1) heat all radiators;
2) you have the habit of working carefully, preventing debris from getting into the pipes.
Also: the difference between supply and return for a normally operating system is 15-20 degrees. Not more. But this also depends on the ambient temperature during the launch period. In the cold season, the system will need to “accelerate,” so to speak. And it makes sense to observe the difference between supply and return when the temperature in the room is established.
That's all, nothing complicated. If the heating system is assembled correctly, then there should be no other problems, and the heating system should start without problems .
What does the normal functioning of the heating system depend on? There are several objective factors that directly affect efficiency, reliability and maintenance of its performance. Therefore, first of all, you need to know how to properly start the heating system in the house. It is best to consider this procedure using the example of an autonomous system of a country cottage.
Problem
The main problem that my relatives told me about was absolutely cold radiators in two adjacent rooms, while in other rooms the radiators became noticeably warmer with the start of the heating season.
- In rooms with warm radiators, the average daily temperature was +17C;
- In rooms with non-working heating +13C.
As they say, feel the difference...
For several days, calls from neighbors and relatives to the heating network ended in approximately the same way - nothing, because... the house is a cooperative one, and its maintenance is not their responsibility, except in emergency cases.
And for a cooperative of 60 apartments (4 entrances), where more than half of the residents are people of deep retirement age, it was expensive to maintain its permanent plumber out of pocket. The part-time specialist only made sure that there were no leaks during the startup of the system, and nothing more.
Searching of decisions
Having arrived at the place, the first thing I do is check the taps on the radiators and on the bypasses - everything is in the open position in both rooms. I open the Mayevsky taps on each radiator - a thin stream of water informs that there is pressure in the system and the radiator is not air-filled. But you need to find out whether there is any coolant in the system at all.
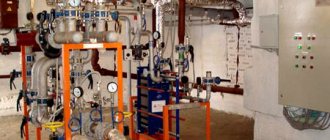
For this purpose I go to the basement of the house. From the elevator unit I determine the direction and find “my” supply and return pipes.
This is our highway.
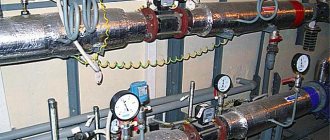
Having reached the location of the apartments at our entrance, I see two pipes - supply and return. To the touch, both pipes differ quite noticeably, so it was not difficult to determine that the colder one was the return pipe.
In the foreground is the return line.
I use my hands again - both risers are cold, although literally a meter before this section the temperature was more than comfortable. The reason is the airing of the system on the upper fifth floor, which is why the coolant does not circulate.
I leave the basement and go to get acquainted with the neighbors on the upper floor, simultaneously inquiring from other residents about the presence of shut-off valves and their condition. As you would expect, they all have cast iron radiators installed 30 years ago.
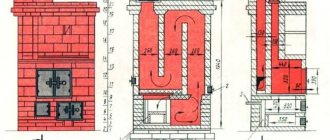
The fifth floor is a bridge between rooms.
In Khrushchev-era houses there is no technical floor, so the coolant is supplied from below from the basement. To clarify the operation of the heating system, I propose to consider the diagram presented below.
Red arrows show the direction of movement from the supply, blue arrows indicate the return direction.
We return to the fifth floor apartment. In two rooms of a family of pensioners, cast iron radiators with 12 and 7 sections were installed. They were the ones who had to be ventilated.
The reason for the lack of heat is the accumulated air inside the radiator.
The only way available for this is using a nipple (a prototype of the Mayevsky tap) embedded in the radiator plug.
Upcoming job.
- Old galvanized bucket 12 liters;
- Pliers;
- Two flat blade screwdrivers;
- Several floor rags - splashes will be inevitable.
Here it is our simple tool.
I install a bucket under the radiator.
Since a lot of splashes are expected, I provide a place to work around the radiator - I remove the flower pots and move the furniture further away. Then I take a screwdriver and, carefully, so as not to lick the edges, unscrew the screw counterclockwise.
The effort has to be excessive.
- The old system did not work on the first try, I had to use pliers - with their help I turned the screwdriver until the screw came off the stuck place;
- The hiss of air marked the beginning of the air lock coming out. Within 3-4 minutes, the air left the radiator, after which cold water flowed in a thin stream;
- Having adjusted the screw so that the water poured into the bucket, I gave it time - in about half an hour, when the bucket was half filled, the temperature of the water changed from ice to warm, after which I screwed the screw back.
Preparing the heating system for startup
In the vast majority of cases, heating is inactive in the summer. Therefore, it is necessary to check the safety and reliability of its main components, as well as carry out a number of preparatory work. Before starting a closed heating system, you need to find out the degree of deviation of its actual parameters from the calculated ones.
First, a visual inspection of the pipeline and heating radiators is carried out. For the owner, the priority question should not be how to start the heating battery. It is necessary to check its body for possible mechanical damage, and also check the reliability of the connection to the pipeline.
Along with this, the following monitoring and preventive work is carried out:
- Checking the chimney system. How to start a heating boiler if the draft in the chimney is not enough to maintain the combustion process? Therefore, they clean the internal cavity from soot and also check the integrity of the pipe. Brick structures can be "renovated" by replacing damaged bricks. Galvanized pipes may develop rust that must be removed;
- Visual inspection of pipes. Since starting the heating without this will be simply dangerous - you need to find out whether all the pipes have retained their tightness, whether there are any cracks or obvious defects in the system;
- Monitoring the condition of radiators. You need to know that before starting heating in an apartment building, the management company must warn the residents. They, in turn, check the condition of the batteries. It is not allowed to disconnect individual radiators from the network. While filling the pipes with coolant, the absence of leaks is checked.
These are general rules, without which the first start of heating is not recommended. But how to start heating in a private house correctly? To do this, it is recommended to follow a number of procedures.
A test start-up of heating in an apartment building is carried out 1.2-2 months before the start of the heating season. It is recommended to stay at home while performing it to check for leaks.
What to do with a stuck ball valve
If the ball valve is stuck, you can try to repair it yourself. For this:
- Unscrew the fixing nut and remove the handle. Below it is the upper part of the rod.
- If there is a hexagon clamping sleeve, you can loosen it a little.
- Using an adjustable wrench, turn the rod from side to side. Attention! You need to act slowly and smoothly. If you apply too much force or turn the key too quickly, you can deform the ball or the entire mechanism.
- Check the system. If the mechanism works normally and there are no leaks, you can install the adjusting knob. To do this, rotate it to the protrusions of the permitted degree of opening to determine whether it is possible to clamp the clamping sleeve all the way.
Important! If it is not known what material the device is made of, it is not recommended to repair it. After all, the use of additional mechanical tools can lead to its complete deformation.
To avoid damage to the ball valve, it is necessary to use only high-quality products. It is not recommended to purchase silumin devices with pipe wall thicknesses less than 2.8 mm. It is better to give preference to taps from European or Turkish manufacturers.
To prevent breakdowns, it is necessary to periodically change the position of the mechanism in order to develop the crane. It is recommended to do this at least once a month.
Filling the heating system with coolant
We need to remind you once again that before starting the heating system of the house, a visual inspection of all elements is performed. If necessary, individual units and components are replaced. Only after this can you begin the procedure of filling with coolant.
In the absence of water, a small coating of rust will inevitably form on the inner walls of the radiators and heat exchanger. Therefore, before adding coolant, it is recommended to clean the system.
Flushing the heating system
If there is still coolant left in the pipes, you need to remove it. This can be done through a special pipe located at the lowest point of the system. There should also be a make-up unit there. Only after this can we continue to solve the question of how to properly start the heating system.
For closed heating circuits with forced circulation, it is recommended to do hydrodynamic flushing. To do this, you should purchase (or better yet, rent) a special pump with filtration and a chamber for cleaning liquid.
Washing procedure:
- Connecting the pump pipes to the system;
- Launch and visual monitoring of the degree of contamination of water that has flowed through the pipeline through a full cycle;
- If necessary, replace the fluid with a new one;
- Do several rinsing cycles until the water is completely clear.
After this, crimping is performed. Before starting the heating radiator, you need to check the condition of its connection to the pipeline. It is recommended to replace the gaskets and also check the integrity of the couplings.
How to turn on the radiator correctly for the first time
A very important point is to turn on the central heating battery for the first time in your home. When a long period of time has passed, and the thermal power plant begins to supply water to our batteries, then usually the first water flowing through the heating systems is the dirtiest and rustiest. Imagine. You have just installed a brand new battery, one might say, off the assembly line, and suddenly a powerful stream of dirt is thrown in there. It is not surprising that many batteries become clogged precisely from the first such inclusion, and then we are surprised that out of 12 battery bends, only 8 are heated, the rest remain cold. To prevent this from happening, a jumper (bypass) is needed when installing the battery. If you have done the installation correctly, then set the position of the ball valves as shown in the figure:
In this case, the entire flow of dirt when turned on for the first time will go through the jumper, keeping your battery intact and safe. In this option, it is better to keep hot water running for several days. Of course, many are looking forward to when it will be turned on. However, my advice is, if you can’t wait a few days, wait at least one day. By the way, here is a detailed article on how to turn off the battery.
First start of the heating boiler
The procedure for starting the boiler for the first time before the start of the heating season depends on its model and type. But despite this, a visual check of its condition is performed. This is one of the most important stages preceding the final launch of heating in a private home.
The heat exchanger is one of the most “vulnerable” elements of the boiler. Checking it is mandatory, because during operation of the device it is constantly exposed to high temperatures. Along with the task of starting the heating radiator, preparing the boiler is one of the most important during the process.
Solid fuel boiler
Before the starting of the heating system has not yet taken place, a comprehensive monitoring of the condition of the solid fuel boiler is carried out. Its surface is cleaned of rust, and the functionality of the pressure gauge and thermometer is checked.
Then follow the following steps to properly start the heating system:
- Cleaning the firebox and ash pan from soot. This can be done with a metal brush;
- Checking the condition of the chimney. Its pipe must be securely connected to the boiler pipe.
For pyrolysis and pellet models, the operation of the electronic control unit, fans and nozzles is tested. When the heating system is started correctly, improper functioning of these elements can lead to sudden temperature changes, which directly affects the condition of other components.
In the room where the solid fuel boiler is located, flammable substances must not be stored. For fuel storage you also need to allocate a separate room or annex.
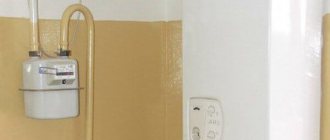
A gas boiler
Before starting a gas heating boiler, you should read its instructions. For different models, the order of steps may vary slightly. This is due to the different types of construction. This especially applies to condensation models, in which the correct formation of condensate must be monitored during operation. Without it, heating the secondary heat exchanger will be impossible.
How to correctly start heating with a gas boiler? After filling the system with water, you need to do the following:
- There is a valve at the bottom of the boiler that shuts off the flow of water into the circuits. After the end of the heating season it can be closed. Therefore, you need to open it - the pressure gauge readings will change. The pressure value should not exceed 3 atm;
- After heating the coolant, you need to open the make-up tap again. If there are air pockets left in the system, you can remove them using Mayevsky taps. The pressure in the system may decrease slightly during this stage;
- In fact, you will have to start the heating radiator 2 times. The first - during filling with coolant, and the second - when turning on the boiler;
- The correct functioning of the boiler is controlled by the values on the dashboard.
The result of starting heating in a private house should be a stable temperature regime of the entire system, as well as the absence of pressure surges in the pipes.
Often, the service for the first start-up of a gas boiler is provided by specialized service centers from manufacturers. Their prices are much lower than other companies.
How to regulate heat in batteries
Suppose you put a battery of 10 bends in the room, and you feel good with it when it’s -20 degrees outside. But now, the cold has passed and now it’s been -2 degrees for several days. Hot water, as often happens with us, at the same temperature continues to flow through our pipes in a powerful stream and a gas chamber is formed in the room, from which there is no escape. In this case, the temperature regulator comes to the rescue. There are many of them in nature. In the picture below you see one of them.
What brand of thermostat should be is the topic of a separate article. And now it is important for you and me to understand the principle. The figure shows one of the simplest thermostats. It has a knob on top that you can rotate and set values from 0 to 5:
5 - means that the entire flow of hot water will pass through the battery; 4, 3, 2, 1 - means that the regulator will reduce the diameter of the flow pipe, providing less hot water flow through the battery per unit time. Thus, at 4 the battery will be colder, at 3 even colder, etc.
If you want to disconnect the battery altogether, you can set it to “*” - the water current will be very small. Practically it will not exist:
Or you can simply close the ball valves on the battery. The effect will be approximately the same:
If you have 2 windows in your room and 2 radiators under them, then during installation it is advisable to install them wisely. For example, you need 20 sections for the entire room. Then it is better to put, for example, 12 sections on one battery, and 8 sections on the other. In this case, in addition to the regulator on each battery, you can completely turn off or turn on 8, 12 or all 20 sections at the same time.
Starting the heating system
During the warm season, the heating systems of private houses are idle. In some regions of our country, the period when the heating system is turned off can exceed six months. But sooner or later, usually when the outside temperature drops to +8 °C for three or four days in a row, it’s time to start heating again. Before this important event for the entire house and its abodes, it is necessary to properly prepare, check and take everything into account.
We strongly advise you not to delay checking your heating system until it gets cold. It is better to carry out all the necessary actions and test start the heating while it is relatively warm outside. If a problem is identified, you will have time to fix it. Let's get started:
- To begin with, simply check the water level in the expansion tank if you have an open type system. If necessary, of course, add coolant. Most often this is water, very preferably distilled, or, in extreme cases, boiled. Antifreeze is usually used in heating systems that are not used regularly;
- In a closed heating system where a diaphragm expansion tank is installed, the pressure should also be checked. To do this, you will need a pressure gauge installed in the boiler room on the pipeline. The average is 1.5 atmospheres. You need to focus on the fact that the pressure in the expansion tank is 10% less than the operating pressure in the system itself. If the numbers meet these standards, there is no need to add water. Low pressure may indicate a coolant leak from the system;
- You should go through all the radiators and bleed the air. It’s good if you have special Mayevsky cranes. Otherwise, you will need to unscrew the valves, and if there are none at all, as on old cast-iron batteries, hope that there is no air in this place. In modern heating systems, air valves are installed at the highest point of the system, in the boiler room, near the comb separators. Automatic air valves should also be checked by pressing the float mechanism - water should appear;
- We start the system to check all pipes and radiators for leaks. Particular attention is paid to joints and valve installation locations. Often, leaks can be barely noticeable; you need to wait, supply water under slightly increased pressure;
- The operation of the circulation pump must be checked. Due to long periods of inactivity, the rotor may become soured. Experts advise, even in the summer, to start the heating system pump at least once a month for a couple of minutes to avoid problems with its operation. Modern models have an automatic periodic start system that will work in the summer, of course, if the owners do not disconnect the pump from the power supply. In addition, with the circulation pump turned on and running, you need to slightly open the central plug and wait until water begins to flow out from under the plug to make sure that there is no air in the device;
- Dirt filters for coolant should be cleaned at least once a year. Before starting the system, it’s time to carry out this procedure;
- We check the condition of the chimneys if the house has a boiler with an open combustion chamber - this is a very important procedure. Checking the draft and cleanliness of the chimney will be the key to its normal operation;
- After all stages of checking the system, a trial start of the boiler is carried out. Experts advise to start by turning the heating on low, waiting an hour and turning it off. Then turn it on at a higher temperature and leave it for two hours to make sure that all radiators heat up evenly, the pump does not make noise, and everything is in order with the boiler.
If you have any questions on this topic, ask them to the experts and readers of our project here.
Did you like the article? Then support us, click
:
All about plumbing
Tips for using your heating system
Navigation
Glossary of terms
Publication rating:
Hello. Today I want to talk about some details, ignorance of which can cause many problems.
So, after completing the installation of the heating system, first of all, try to carefully examine all the mounted components, radiators, and boiler. It often happens that we missed something, or made some mistake. If we notice something, it’s better to fix it right away, don’t wait for something to happen.
Powering the system
If everything is in order, then you can start powering the system. What's the best way to do this?
In general, it is correct to feed it through the return line (a pipe that removes cooled coolant from the radiators), which is what we will do. To do this, you need to close all the valves on the radiators, then gradually add water to the system, go to the end radiators (those that are the last or farthest from the boiler), and open the valve on the return line, while simultaneously opening the Mayevsky valve (air vent from the radiator). After water flows from Mayevsky’s tap, open the radiator supply tap (of course, before closing the air vent). Next, we repeat this procedure with the next radiator, moving towards the boiler.
When all the radiators are powered, we check that the air is vented at the top point of the system (there should be a safety group, or just an air vent, depending on the type of system), then we turn on the pump, and after 5-10 minutes, we go and go through each radiator, venting the air through the vent valve (before venting the air, be sure to close the supply valve, open it after venting), and refuel the system as necessary. This will have to be repeated until there is no air left in the radiators.
TIP: to determine the presence of air in the system, you need to listen near the radiators; if there is noise or the gurgling of water, then air is still present. The airless system operates almost silently!
Starting the system
After we have made sure that the system is ventilated and there are no visual leaks anywhere, we can start starting the boiler. We light the firebox or turn on the boiler (depending on the type of boiler: solid fuel, gas, electric boiler), and maintain a low temperature, for example 40 - 45 C°
Adjusting or balancing the heating system
To properly adjust the heating system, you must do the following:
- Fully open the taps on the end radiator (or radiators if you have two or more heating circuits)
- Close the supply taps and all other radiators (leave the return open)
- Return to the penultimate radiator and open the supply tap just enough to allow heat to flow to the radiator, i.e. as little as possible
- We do the same with the remaining radiators, one by one, towards the boiler.
You may ask, why so much complexity? This method allows you to adjust even a very problematic system, that is, an incorrectly calculated one (but not any system, you can ruin the system so much that nothing will help except dismantling and reworking). Water always flows along the path of least resistance, i.e., for example, if you open the taps on the first 2-3 radiators (from the boiler) completely, then it may not reach the last ones!
Well, now in winter we will be warm and comfortable!
ADVICE:
- Don’t skimp on the essentials, as this will cost you much more in losses, for example: be sure to install two taps on the radiators (supply + return).
- Be sure to place a filter in front of the boiler or in front of the pump (you can use an ordinary oblique mesh filter). After installing the system and adjusting the radiators, the pump should run the system for at least 1 - 2 days, then clean the filter from residues in the pipes and other debris. And also before the start of each heating season, do not wait until the circulation stops and an accident occurs.
- Start the pump at maximum speed (see the instructions for the pump), after adjusting and cleaning the filter, you can switch to the minimum speed.
- You can regulate the heat transfer of radiators not only with taps (if the taps are open enough, but there is not enough heat), but also with a pump. Modern circulation pumps are mainly two or three speed. We simply disconnect the pump from the network, switch the speed, for example from 2 to 3, and turn the pump back on (this will take a few seconds), if switching under load the pump may fail.
If you have any questions, ask them on the forum, I will try to answer them.
Water heated floor in an apartment: advantages and disadvantages
If there is a water heating input unit into the apartment, you can connect several different room heating systems. It’s worth considering the features of each of them!
The list of positive characteristics of a warm water floor in a new building apartment includes the following:
- Uniform heat distribution over the area of each room;
- Directly positive component, tied to tactile sensations: warm floor - warmth in the feet;
- Solving an interior problem based on the installation of radiators;
- Cost-effectiveness of the system - home heating costs can be reduced by 20-30%;
- Safety of the heating system – avoiding injuries and burns!
Disadvantages of the solution:
- Reducing the height of the room;
- Labor intensity and duration of the process;
- The difficulty of choosing a quality system and hiring qualified craftsmen;
- There is a risk of rupture, leakage, and mechanical damage!
Radiator heating in the apartment
The main advantages of using radiators:
- A standard, classic solution, which may already be in a ready-made, implemented form at the time of purchasing an apartment. There is no need to change anything upon moving in, just decorate the premises and install new furniture;
- Simple repair and replacement of equipment, self-cleaning to increase heat transfer, as well as adding radiators to increase the temperature inside the rooms;
- Additional installations for drying clothes;
- Interior addition. Not in every case external radiators are a disadvantage. In certain styles of room design, they play their role as object decor. To do this, you can choose from manufacturers radiators of retro, classic design in various colors and with patina, patterns, and other positive aesthetic features;
- Large assortment on the market for the most popular solution. And not only in the quality of manufacturers and manufacturing materials. But also in terms of cost, materials used to produce components and liners, colors, sizes and other characteristics;
- Several types of radiators to determine the best type of heating - convection or radiant;
- Low, really affordable price!
Disadvantages of a radiator heating system:
- The presence of heating systems on the walls, reducing the usable area of the premises, introducing inconvenience parameters into the interior design and arrangement of furniture;
- Possibility of getting burned from a surface heated to high temperatures;
- Uneven heating of rooms!
Determination of coolant volume
If in an apartment building the total amount of coolant is rarely of interest to anyone, then in a private house knowing it is not just useful - it is necessary. For what?
- As already mentioned, the volume of the expansion tank is calculated based on the volume of the system. If it turns out to be more than necessary, it does not threaten anything other than the loss of a certain amount of money; but if the volume is less than the demand for it, the coolant will constantly be released through the safety valve that protects against rupture.
- If you do not live permanently in a country house, it is impractical to maintain a constant temperature in it, and in the case of a solid fuel boiler, it is simply impossible. However, simply leaving a house with water heating to freeze means dooming yourself to replacing pipes and radiators: they will be torn apart by ice.
The problem is solved by using non-freezing coolants, which cost about 50-70 rubles per liter. Accordingly, before purchasing it is better to know exactly the required volume.
There are two ways to measure the volume of a circuit without resorting to complex formulas and without looking for technical documentation for used radiators.
- If the system is filled through a jumper with a water supply system, when the heating is turned off, turn off all the taps in the house and fill the entire system, bleeding the air. The water meter will show you the volume consumed with acceptable accuracy.
By changes in water meter readings when filling the system, you can find out the approximate volume of coolant. The error will be only a few liters.
- An alternative method is to simply drain the system through a vent, using any container with a known volume as a meter. Do not forget to open the air vents on all heating devices, otherwise a significant part of the water will hang in the circuit.
Features of using water as a coolant
From the point of view of heat transfer efficiency, water is an ideal coolant. It has a very high heat capacity and fluidity, which allows it to deliver heat to the radiators in the required volume. What kind of water should I fill? If the system is closed, you can fill it with water directly from the tap.
Yes, tap water is not ideal in composition; it contains salts and a certain amount of mechanical impurities. And yes, they will settle on the elements of the heating system. But this will happen once: in a closed system, the coolant circulates for years, and replenishment with a small amount is very rarely required. Therefore, some amount of sediment will not cause any tangible harm.
Water as a coolant for heating systems is almost ideal
If the heating is of an open type, the requirements for the quality of water as a coolant are much higher. Here, gradual evaporation of water occurs, which is periodically replenished by adding water. Thus, it turns out that the concentration of salts in the liquid increases all the time. This means that sediment also accumulates on the elements. That is why purified or distilled water is poured into open-type heating systems (with an open expansion tank in the attic).
In this case, it is better to use distillate, but getting it in the required volume can be problematic and expensive. Then you can fill in purified water that has been passed through filters. The most critical is the presence of large amounts of iron and hardness salts. Mechanical impurities are also useless, but they are the easiest thing to deal with - several mesh filters with cells of different sizes will help catch most of them.
In order not to buy purified water or distillate, you can prepare it yourself. First, pour and let sit until most of the iron settles. Carefully pour the settled water into a large container and boil (do not cover with a lid). This removes hardness salts (potassium and magnesium). In principle, such water is already well prepared and can be poured into the system. And then top up with either distilled water or purified drinking water. This is no longer as expensive as the initial fill.