Keeping any living space warm is a top priority for the homeowner. “Leakage” of warm air will increase the cost of coolants in the cold season and electricity, which will be spent on cooling the air in the hot summer . Such unforeseen expenses can be reduced by insulating the facade of the house. To perform insulation work, you can choose any convenient method and material. Each has its own advantages and disadvantages, but the material performs one functional task - to retain heat.
Preparing the wall plane
Move to top
This is the first stage of starting work on facade insulation. The main task of preparing the wall before gluing the insulation is to clean it from residual mortar, paint, whitewash, and remove the old plaster layer. If the wall contains cracks, they must first be sealed with mortar or filled with foam.
The second stage of wall preparation is applying a deep penetration primer. The most common are Kreisel 301, Ceresit ST 17, Pana Farb.
Facade hanging
Move to top
Construction practice shows that there are practically no perfectly smooth walls, so an important step is to identify the unevenness of the wall in order to subsequently, using insulation, bring out the plane of the future facade. To do this, they do the so-called facade hanging.
The process consists of stuffing reinforcing pins at the top point of the façade along the entire perimeter with a distance relative to the wall equal to the thickness of the glue (5-10 mm) + the thickness of the insulation. The pitch of the pins should be within 0.5-1 meter, which depends on the quality of construction. A cord with a weight (vertical plumb line) is attached to each pin, which is also fixed at the bottom of the wall. Next, a horizontal cord is pulled along the resulting vertical plumbs, which should be able to move vertically; the distance from this cord to the wall will show the differences in the plane.
Scheme of hanging a plane for insulation
Penoplex and foam plastic
Foam plastic inherently refers to foamed polymers, which, in principle, are not durable. As you know, any plastic has the property of aging quickly and foam is no exception. The fact is that polystyrene simply has a huge area of interaction with air, which predominates inside the material. Based on this, we can conclude that the service life of fifty or even a hundred years declared by manufacturers is a common deception of consumers. Such insulation can last a maximum of twenty-five years. Then the foam must be replaced with new insulation.
Penoplex is the same polystyrene foam, but has one difference. This material is obtained using the extrusion method, that is, through elevated pressure and temperatures. Penoplex can last longer than regular foam, but the service life still does not reach the fifty years promised by manufacturers.
Also, many manufacturers claim that their foam products are super environmentally friendly. In reality, everything is far from the case. Such a statement can be very easily disputed. When polystyrene foam ages, it undergoes decomposition, after which it releases a toxic substance such as styrene. Although there is not a lot of it, and its penetration through the walls into a living space is almost impossible, it still means that the manufacturer does not hesitate to deceive its consumers.
The second very dubious statement about polystyrene foam is the fact that it is supposedly endowed with excellent soundproofing qualities. The foam itself is light in weight and has sufficient rigidity. Similar combinations of such properties cannot be found in materials with high sound insulation. Therefore, thermal insulation of the facade with polystyrene foam will in no way provide any noise-reducing effects.
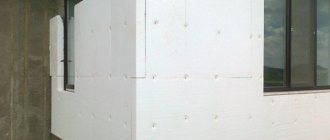
Insulation with penoplex or polystyrene foam
The main and undeniable positive qualities of penoplex and polystyrene foam are their simplicity in home decoration and ease of installation work. Due to its rigid structural qualities, this insulation material can support not only plaster, but also lightweight ceramic tiles.
If you decide to use facade insulation made of foam plastic, then special attention should be paid to the modern type of thermal panels, which have clinker-type tiles applied to it. This material does not require final finishing, as it is already equipped with composite tiles. To obtain such insulation, polystyrene is foamed together with tiles for cladding. This gives a good result in the form of excellent adhesion of the insulating material to the external cladding.
Many thermal panels, which have a high cost, are made from special polyurethane foam. Composite facade cladding is made using a special glue, connecting all the panels with the side where there are jagged projections.
How to level out uneven walls for insulation?
Move to top
The technology for leveling walls for gluing insulation depends on the amount of their curvature. For deviations of up to 10-15 mm in one direction or another, the issue is resolved by adding a layer of glue for concave areas and trimming the insulation for convex areas.
If the deviations are large, then use an additional layer of insulation for the concave areas.
For areas with strongly protruding irregularities, it is necessary to initially calculate the plane during hanging based on these irregularities, i.e. actually increase it. In this case, when hanging the facade, it is necessary to take into account the maximum unevenness of the convex part and the ratio of the vertical plumb line to be done according to the formula: glue thickness + insulation thickness + maximum protrusion of the wall unevenness.
This is the only correct approach, since cutting off a large amount of insulation will lead to a loss of its effectiveness in these areas and possible further freezing of the facade.
It is also possible that the plane of the façade is tilted forward or backward. If it is within 10 mm per floor, then you can install the insulation parallel to the plane of the facade; if it is more, then you need to solve the issue of leveling the plane.
Applying glue
Move to top
There are 2 main schemes for applying glue to insulation boards. According to the first scheme, the glue is applied along the perimeter of the slab and pointwise (in blobs) inside the perimeter. Applying glue along the edging does not allow air to penetrate under the insulation, and spot application saves glue consumption.
According to the second scheme, the glue is applied over the entire area of the slab, the so-called comb. With this scheme, it is recommended to apply glue both to the wall plane and to the insulation, which leads to excess glue consumption. Therefore, this adhesive application scheme is recommended to be used only on relatively flat walls.
The thickness of the adhesive layer usually ranges from 5 to 10 mm. These are the indicators recommended by the manufacturers.
Before applying glue to polystyrene foam, it is recommended to sand the surface on which the glue is applied for better adhesion. When trimming or combing mineral wool in case of leveling the plane, the combed plane must be primed with glue, then allowed to dry and only then apply glue.
The area of glue applied to the insulation must be at least 40% of the surface of the slab.
Schemes for applying glue to insulation
Modern thermal insulation
For the first time, scientists began to closely study and develop effective heat insulators with the development of aviation, communications and refrigeration technology. In the construction industry, for a long time, expanded clay concrete and foam concrete remained the main protection against the cold. The first insulation material successfully used to insulate buildings, heating mains, refrigerators and airplanes was glass wool. Today, many other materials have appeared. Each has its own characteristic advantages that determine their scope of application.
Each heat-insulating material is produced in various modifications, adapted for a specific use.
Glass wool
This is a type of mineral insulation. Glass wool was made from sand, soda, dolomite, limestone and borax, and in modern production they mainly use recycled materials - cullet. Glass wool, which is still considered quite effective and has a wide range of applications, is used to make mats and slabs of varying hardness.
The disadvantage of glass wool is working with it. Thin, almost invisible fibers float in the air when laid and cause serious irritation if inhaled or in contact with the skin. Working with this insulation requires special training and the use of personal protective equipment.
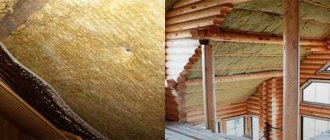
Stone wool
This is a new generation of mineral insulation, which, together with the thermal insulation function, is an excellent sound insulator. Stone wool is made from a natural resource – gabbro-basalt rock. It is also called basalt insulation. The range of modifications is divided into roll insulation, plates and shaped (cylinders, segments, etc.). According to its intended purpose, it is used for insulation of enclosing structures, roofs, ceilings, pipes and boiler equipment.
Due to the resistance of basalt materials to high temperatures, it is also used as fire protection. Basalt insulation materials are often produced with additional additives.
Styrofoam
Foamed polystyrene is one of the most used materials due to its relatively low cost. Along with excellent thermal insulation properties, polystyrene foam has a number of disadvantages. Moreover, at first its use did not have a clear definition and regulations, which gave rise to a lot of rumors and contradictions. Indeed, at the beginning of the second half of the 20th century. Styrofoam was mainly used for packaging, so there was not much concern about health safety. Low-quality foam could easily ignite and release styrene and other toxins when heated.
Modern polystyrene insulation in the form of plates, regulated by GOST 15588-86, is absolutely safe. They are made from high-quality stabilized polystyrene with the addition of fire retardant, which makes the material self-extinguishing. At the same time, the foam is susceptible to aging under the influence of sunlight. In order for the thermal insulation to last for a long time, the foam layer must be covered with a facing element (plaster, primer, paint, etc.). Polystyrene-based boards are produced in various thicknesses, sizes and rigidities.
Food packaging containers that come into direct contact with the product are made from safe polystyrene foam. These products have permits and expert opinions from sanitary services.
Izolon
Izolon is foamed polyethylene, produced in the form of a roll material for sound and heat insulation. Foil-coated isolon is also produced to reflect infrared radiation. Its heat-insulating properties are several times superior to polystyrene foam.
Izolon is more often used for internal thermal insulation of walls, partitions, ceilings, laying it under facing materials - drywall, lining, block house, etc. Thermal insulating wallpaper is also made on its basis.
Polyurethane foam
Sprayed thermal insulation materials are, perhaps, the newest technologies for insulating house facades, which, in addition to being of high quality, are carried out in a short time. Polyurethane foam is obtained by mixing polyisocyanate and polyol.
The process takes place directly at the insulation site in special equipment during spraying. The foaming reaction occurs directly on the wall, forming a monolithic structure. The resulting layer prevents the penetration of heat, sound and moisture, is fireproof, resistant to natural aggressive influences, climatic cycles and fungal growth.
Warm paint
This direction was initially intended for space technologies, but eventually became available in construction. The secret is in the composition of the paint, or rather in its filler. These are microscopic spheres made of glass or ceramics, inside of which there is a rarefied space. The binder can be latex, acrylic, silicone or combinations thereof.
A layer of paint of just 1 mm creates thermal protection comparable to mineral insulation 2.5 cm thick.
Thermal panels
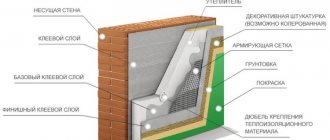
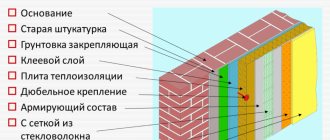
These materials are facing and thermal insulation at the same time. Their design and content may vary. For example, mineral slabs, polystyrene foam, cellulose, polyurethane foam can serve as a heat insulator, and decorative plaster, metal, metal-plastic, etc. can serve as the front layer. The design may include connecting grooves or other installation methods.
The greatest thermal insulation effect is achieved if the thermal conductivity of the insulating layer is 1.2 times lower than that of the wall. This allows not only to eliminate heat loss, but also to protect the wall from the destructive effects of climate cycles.
Bonding insulation boards
Move to top
Three types of insulation have been found in practical use for insulating “wet” facades - polystyrene foam, extruded polystyrene foam, and mineral wool. For gluing them, both specialized adhesive mixtures are produced, which are suitable only for a certain type of insulation, and universal ones. For polystyrene foam, a specialized adhesive composition is used: Polymin P-22 or Ceresit CT-85, for extruded polystyrene foam Ceresit CT-83 and Artisan S-15, for mineral wool - Ceresit ST-190 and Artisan S-14. Universal adhesive mixtures that are suitable for gluing all 3 types of insulation - Polymin P-19, Baumit, Novofix.
Before installation begins, at a level of 50-60 cm from the level of the blind area, a starting strip is installed along the perimeter of the facade, from which gluing will then begin.
The gluing of insulation begins from the corner areas, as well as the frames of the openings. Next, empty zones are laid out. Each row of insulation is laid with overlapping seams to reduce freezing zones. The seams are sealed with polyurethane foam. If the seam is more than 20 mm, then additional insulation is placed in it.
All work must be carried out from the bottom up.
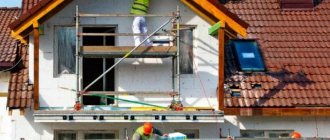
The final appearance of houses insulated using VWS/WM technology (wet facade) Ceresit
As a result, we get beautiful, reliable Ceresit facades that are warm, economical and comfortable to live in at home.
- Appearance of the finished facade using the VWS/WM Ceresit system. Photo 1.
- Appearance of the finished facade using the VWS/WM Ceresit system. Photo 2.
- Appearance of the finished facade using the VWS/WM Ceresit system. Photo 3.
- Appearance of the finished facade using the VWS/WM Ceresit system. Photo 4.
- Appearance of the finished facade using the VWS/WM Ceresit system. Photo 5.
- Appearance of the finished facade using the VWS/WM Ceresit system. Photo 6.
- Appearance of the finished facade using the VWS/WM Ceresit system. Photo 7.
The article is based on materials from ForumHouse user with the nickname Reliable. Perhaps someone will say that he lobbies the interests of Ceresit and sells their goods. Firstly, following technology and selling quality goods is not a sin; secondly, the technology will be almost 1-in-1 for any wet facade system, be it Kraisel or something else.
Thanks to the author of the original publication for permission to use a wealth of practical information. The original can be seen here: https://www.ceresit.msk.ru/index.php/fasadnye-sistemy/eifs1/reglament-rabot-po-utepleniyu-fasadov-ceresit
Article rating
Doweling
Move to top
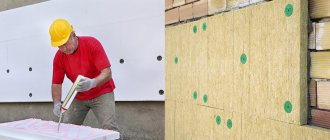
After the glue has dried, the slabs are additionally secured with disc-shaped dowels. It is recommended to use dowels with a metal or fiberglass core. Disc-type dowels with a plastic rod do not always allow for reliable fastening. A metal nail must have a plastic head used as a thermal break. The cap (umbrella) of the dowel should be recessed into the insulation by 3-5 mm. The number of disc dowels is usually no more than 5-7 pieces per 1 square meter. Star arrangement (one dowel in the center, the rest closer to the edges).
The installation sites of the dowels are leveled with an adhesive composition, after which the facade is ready for the installation of the reinforcing layer.