The technology for installing water heated floors appeared relatively recently, but has already won the hearts of many residents of private houses and apartments. Among all the varieties of heated floors, water occupies not the last place in terms of economical operation. This is what makes it popular. The question is what kind of finishing floor covering can be used and how to properly fit laminate onto a warm water-heated floor, because this material is controversial and even capricious when it comes to moisture and temperature changes. Therefore, it is important to purchase a laminate with the necessary set of performance characteristics so that the coating lasts for many years and does not lose its attractiveness.
Laminate flooring for water heating
Installation of a warm water floor
Before moving on to considering the types of laminate, you should understand what a warm water floor is. Water is used as a coolant.
The “warm water floor” system includes:
- Pipeline.
- Pump and mixing module.
- Collector.
- Pipes (metal-plastic, cross-linked polyethylene).
Basic elements of a water heated floor
Advantages and disadvantages of heated floors
The following positive qualities of heated floors can be highlighted:
- The versatility of the system regarding the choice of finishing material (linoleum, tiles, laminate, carpet, etc.).
- Installation of the system does not require major financial investments.
- Heated floors can be autonomous, not dependent on power outages, or connected to an existing heating system - boiler or central heating.
- The result of choosing a heated floor is the abandonment of standard heating devices, which allows you to save living space and make it more attractive.
- The energy efficiency of a residential building increases - thermal energy savings amount to up to 30%.
Warm floors will be appreciated by all family members
The disadvantages include the following:
- It is rare that the installation of this type of heated floor can be implemented in an apartment. Most often, a water system is used in private homes.
- It is impossible to regulate the heating intensity of the coolant when connecting it to the central heating system. In stand-alone mode, heating control is limited.
- Flooding is possible if pipeline damage is detected late.
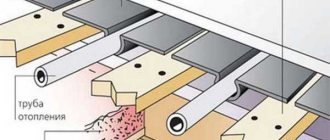
Types of water heated floors by type of installation
There are two ways to install a water heated floor: using concrete and flooring technology.
Table 1. Methods for installing a water floor
| Concrete technology | Laying technology |
| Installation of pipes with coolant is carried out under a monolithic concrete screed. This technology takes a lot of time and effort and is associated with “dirty, wet” work. The main disadvantage is that laying the topcoat is possible only after the screed has completely dried, which can take up to 28 days. | Thanks to the use of ready-made materials, installation of such a floor occurs in a short time, it is not associated with the formation of contamination and does not require waiting a long time before installing the finishing coating. The disadvantage is the cost, which is higher than when working with concrete screed. This technology can be rack, modular and polystyrene. |
One of our articles will help you calculate a warm water floor. In it you will find a special calculator, calculation examples and instructions.
Where is it advisable to install water heated floors?
Warm water floors are more often used in private houses than in apartments. This is due to the fact that the current legislation of our country prohibits residents from making unauthorized changes to the central heating system of an apartment building.
Changes to the apartment heating system, according to SNiP, can only be made on the basis of obtaining official approval from representatives of the Heating Network and Housing and Communal Services and, as practice shows, this is possible only if the project provides for the organization of autonomous heating of the apartment.
In the event of flooding of the neighbors below, you may incur serious material costs for compensation for damage, restoration of the damaged heating system and payment of fines
There are no obstacles to installing flooring in a private residential building, except that in small rooms it is problematic to position the pipes properly.
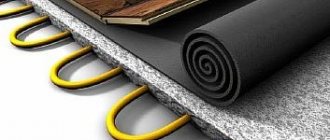
Selecting underlay by floor type
The same substrate is used for electric and water heating, but not all are suitable in one case or another.
It is required to be used. Otherwise:
- the slats will not lie flat to the floor;
- when walking on the floor, conductive elements will be damaged and they will break;
- Electricity will be wasted unproductively on heating the load-bearing structures of the floor.
The underlay for electric floor heating is easy to distinguish by its appearance. It's foil.
The material is laid on the floor with the foil down. The mirror reflects heat and directs it upward. Therefore, the substrate material is made so that it freely transmits heat. It has already been said above that its thermal resistance indicator should not be higher than 0.04-0.06 K/W per 1 m2.
The substrate must meet the following criteria:
- conducts heat well;
- when heated, do not emit harmful fumes;
- do not collapse or deform due to temperature changes;
- be vapor-permeable so that condensation does not accumulate under it.
Currently, there are three substrate materials that meet all of these criteria.
Foamed polyethylene
The most common material. Sold in different thicknesses. Popular due to low price. It cuts well, which is convenient when working in rooms with complex shapes. It is convenient to connect the mat joints with tape.
Extruded polystyrene
The best option for electric heating. Suitable for water heating. More expensive than polyethylene, but it transmits heat better and is stronger. Thanks to perforation, it has good vapor permeability.
Cork
The best material for regular laminate. Suitable for water floors. But it is better not to use it for electric heating. Cork is too good an insulator for this. The price is much higher than synthetic materials.
Laminate - a brief overview of the material
To understand whether laminate can be used when installing a water-heated floor system, you need to have an idea of the structure and properties of this material.
Laminate flooring is popular in modern interiors because of its main feature - a realistic imitation of the natural pattern, shade and texture of natural wood.
Conventionally, the structure of the laminate is divided into four layers: facial protective, decorative, load-bearing (core) and stabilizing. Let's look at them in more detail:
- The topmost layer of the laminate, protective, is a transparent polymer, high-strength and wear-resistant coating based on melamine resin and small particles of corundum (crystalline aluminum oxide). The thickness of this layer determines the class of the laminate; the higher it is, the thicker the protective layer.
- To form the appearance of the floor covering, a decorative layer of special paper is used, with the required pattern applied to its surface using rotary printing. Laminate can imitate not only wood, but also ceramics, natural stone, other natural materials, or even have an abstract image on its surface.
Laminate with decorative inserts
- Located under the HDF slab, the stabilizing layer is made of a material impregnated with a special composition that protects the underlying elements from temperature changes and moisture. Creates sound insulation of the floor covering.
- The load-bearing (middle) layer is an HDF board (high-strength fiberboard).
The above layers are laid on it. The density of the slab determines the mechanical strength of the product, and its thickness determines the reliability of the locking connection. The thicker the core, the higher the soundproofing properties of the product and the easier its installation. Structure of a laminate board
Important! The main requirements that the load-bearing layer of the laminate must meet are moisture resistance, preservation of geometry under conditions of temperature changes, high rigidity and strength.
What to look for when choosing a laminate for water-heated floors
This question is quite natural and is related to the characteristics of the material.
The most common concerns are related to the possibility of deformation of the coating under the influence of temperature changes. Therefore, it is necessary to choose a laminate with a high level of resistance to moisture, mechanical and abrasive loads.
Which coating is most suitable for warm water floors? Find the answer here.
Example of floor covering deformation
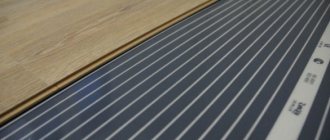
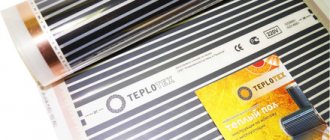
Many modern manufacturers produce material that suggests its use in a “warm water floor” system. The thermal and moisture resistance of the material is indicated by special icons on the information sheet that is attached to the products.
Pictograms for laminate
One of the most important conditions for using laminate flooring in a “warm floor” system is its environmental friendliness and safety for humans and the environment. When the coating temperature increases during operation of the heating system, no harmful, toxic substances hazardous to human health should be released from the surface of the laminate. The evaporation of a minimum amount of toxins that are not capable of causing harm to the body is allowed. The pictograms on the information sheet included with each product package will help you choose the right material.
Table 2. Pictograms for laminate
| Pictogram (Emission of harmful substances) | Value (class) |
| Formaldehyde was not used in the production of products with this marking, therefore they are not assigned the HCHO class. | |
| Formaldehyde (HCHO), used as a binder in the manufacture of wood composite materials, is continuously released in a volume not exceeding 3.5 mg/m2h to 5 mg/m2h within 3 days after production. | |
| Formaldehyde (HCHO) is released continuously in a volume not exceeding 3.5 – 8 mg/m2h or 5 – 12 mg/m2h within 3 days after manufacture. | |
| Absence of pentachlorophenol (PVC antiseptic) in the composition of the products. |
For use in residential premises, it is recommended to choose products with zero or minimal evaporation class of harmful substances.
Important! Manufacturers producing floor coverings for the “warm floor” system indicate the temperature value for which the laminate is designed. Usually it ranges from 27 to 29 degrees. This is the optimal value at which the coating, under conditions of correct operation, will not lose its integrity and other characteristics for many years. Considering that a comfortable temperature for a floor covering is a value not exceeding 26–27 degrees, this parameter is quite justified.
The advantage of a "warm floor" heating system
An important criterion is the thermal resistance of the floor covering
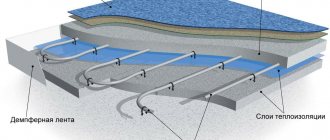
An important parameter affecting the efficiency of a water floor system is the thermal resistance of the floor covering located above it. According to established European standards, it should be no more than 0.15 m²×°K/W.
The concrete screed, which most often encloses the contours of a water thermal system, quite actively accumulates the resulting heat. However, it is important to provide conditions for this heat to escape into the room.
Correctly made calculations and the material selected on their basis will be the key to a high-quality floor covering
The thermal resistance value for a laminate to be used in a water floor system averages from 0.005 to 0.10 m²×°K/W. The value of this parameter is affected by the thickness and structural density of the product material. But it is worth considering that when laying a water floor, the total thermal resistance of all layers of the coating is taken into account - the concrete screed into which the contour of the heated floor is embedded, the laminate and the substrate, which is necessarily used when laying it. Normally, this figure should not exceed 0.15 m²×°K/W.
Important! When using a floor covering whose total value exceeds the permissible value of 0.15 m²×°K/W, the lower layers of the laminate flooring overheat, as a result of which formaldehyde begins to be actively released and there is a risk of surface deformation. As a result, the base of the floor will warm up, not the room.
Connection type
The strength of laminate flooring largely depends on the type of interlocking joint chosen.
Table 3. Type of locking connection
| LOCK | CLICK |
| Such locks are connected using a glueless method. By placing the panels with their end sides facing each other, they are nailed with a hammer. The peculiarities of such a connection are that the base under the floor covering must be perfectly flat; the process of laying such a laminate is more labor-intensive, despite the fact that the quality of adhesion of the panels to each other is lower than with a “Click” type lock. | These are collapsible or double locks. During the fastening process, the panel is brought to the panel lying on the floor at an angle of 40-45 degrees, inserting a tenon into the groove. Slightly rock the bar and snap the lock into place. In this case, the panels are tightly fixed to each other. The advantages of this type of connection include minimizing the possibility of damage to products during the connection process, the strength of the coating and its long service life. |
Both types of locks are subject to reassembly/disassembly, but as practice shows, a “Lock” type lock can be damaged in the process.
Laminate with a “Click” lock can lie on the surface with a difference of up to 3 mm per 1 linear meter. Laminate with a “Lock” lock is more demanding regarding the evenness of the base.
Important! Often, adhesive compounds are used to more firmly connect the lamellas to each other, but in the case of installing the floor covering on a water-heated floor system, it is better to avoid using glue, since the glue will disperse during the heating process and the floor covering will be deformed.
According to experts, when installing a floor with a water coolant, laminate flooring with a “Click” type locking connection is better suited because of their reliability and resistance to deformation during temperature changes.
The process of laying laminate flooring with a click lock
Prices for Tarkett laminate
Tarquette laminate
Panel connection types
The principle of laying slabs is almost the same for concrete and floor surfaces. Connection methods can be: glue and lock. The first option is not applicable in this case, since rigidly fixed panels are deformed when heated, so only interlocking “floating” installation is allowed.
- Click locks. Snap-on products ensuring high reliability of the connection. The planks are connected at an angle of 45° and then snapped into place. At the same time, a characteristic sound is heard, thanks to which the connection got its name. Even when heated, there are no gaps or deformations. The requirements for the quality of the base are moderate.
- “Lock” locks (drive-in). Tongue and groove connection. A perfectly level base is required. Any deformation may cause the connection to break, leading to the formation of gaps.
Compliance with the rules for choosing a substrate and laminate, the technology for laying them when doing DIY work and subsequent operation ensures the installation of a decoratively attractive and durable floor covering.
Choosing a laminate class depending on the room
One of the most important parameters that is taken into account when choosing a laminate is its belonging to a particular abrasion class. More reliable and durable coatings for a warm water floor system are those made from class 32 laminate. When choosing the type of coating, take into account the load level characteristic of the room in which it will be laid.
Table 3. Household laminate
| Class | Impact level | In what rooms is it used? |
| Loads of light and moderate intensity. | Low traffic – bedroom, office, balcony, storage room. | |
| Loads of general and medium intensity. | Average traffic – kitchen, living room, children's room, hall. | |
| Loads of general intensity. | Average traffic - kitchen, living room, children's room, hall, dining room, corridor. | |
| High intensity loads. | High traffic – kitchen, hallway. |
Table 4. Commercial laminate
| Class | Impact level | In what rooms is it used? |
| Loads of moderate intensity. | Low traffic – hotel room, bedroom, conference room, small office, home office, recreation room. | |
| Loads of general intensity. | Average traffic – classroom, hotel, small office, reception area, boutique. | |
| High intensity loads. | High traffic – shops, restaurants, cafes, bars, gyms, reception areas, medical institutions. | |
| High intensity loads. | High traffic – multifunctional hall, waiting room. |
Initially, the division of laminate into classes of household and commercial types occurred in connection with the level of formaldehyde emission, therefore, household laminate was intended for residential premises, and commercial laminate was intended for public places with short-term stays. At the same time, the latter type of laminate has more serious resistance to abrasive loads. Modern manufacturers offer class 32 laminate without formaldehyde content or with an acceptable amount within the limits of E0 - E1, which allows it to be used in residential premises. This material is most often used in the renovation of apartments and private houses. In light of the installation of a water heated floor system, class 32 laminate can be used if it is appropriately marked and the emission class is not higher than E1.
Kitchen
This is a specific room in the house, subject to special loads in the form of temperature changes, high humidity, various types of pollution and possible mechanical effects on the coating when sharp or heavy objects fall. In addition, all family members and, sometimes, guests are often present in the kitchen at the same time. The coating is subject to pressure from the dining room furniture.
In this regard, the laminate in the kitchen must be durable, resistant to mechanical, abrasive loads and moisture, since its surface requires frequent and careful maintenance. The class of a suitable laminate is 32, 33 with appropriate thermal conductivity and markings that allow it to be used in a water heated floor system.
Laminate flooring in the kitchen is subject to particularly heavy loads
Hallway
The hallway is a passage area; it is the one that connects the living quarters with the street, from where all kinds of pollution and moisture enter its territory. In addition, the coating in the hallway must withstand the impact of dirty, wet shoes and sharp heels. The need for high moisture resistance of such a coating is obvious - in bad weather the floor in the hallway is washed several times a day. For this room, class 32, 33 laminate is recommended.
Hallway - area of increased floor load
Living room
The living room is a common room where all family members gather. But since the floor surface is not exposed to moisture and street shoes, you can use class 22 laminate.
Laminate flooring in the living room
Bedroom
The bedroom has minimal traffic. The laminate in this room must have soundproofing, antistatic properties, a minimum concentration or absence of formaldehyde emissions. You can use laminate class 21, 22. Attention should be paid to the quality of the front layer and the presence of comfortable tactile sensations, because in the bedroom most often people walk on the floor barefoot.
Laminate flooring in the bedroom
Bathroom and balcony
These two rooms, like no other, need a comfortable, warm floor covering, and installing a water heating system becomes a real way out of the situation. But it is important to remember that when using laminate in a heated floor system in these rooms, it should not be allowed to overheat. A sealant is used to treat joints. Another important quality that laminate flooring should have in the bathroom, as in the kitchen, is an anti-slip surface. Laminate class, both for a combined bathroom and for separate baths and toilets, 32 classes are chosen.
Laminate in the bathroom
You may need information on how to properly connect laminate flooring between rooms. You will find step-by-step instructions in a special article.
The combination of laminate and warm floor - “two in one”
As a lighter option, there is a developed version of the purchase, where the heated floor is combined with a laminated coating. It’s great, the consumer doesn’t need to think about what type of laminate to choose; the manufacturer has solved this problem.
Here there are heating elements between the substrate, which has sound insulation properties and laminated strips of class 32-33. The presence of aluminum locks allows you to perfectly fix and save joints during work.
Using this system, installation of heated floors and laminate occurs immediately. Initially, the wires of the heating elements are connected, then the locks of the slats are connected. There is also a programmable thermostat. In general, this is a fully equipped structure for assembling a heated floor, which has a turnkey laminated finish.
The consumer decides which method of installing a water-heated floor and selecting a laminate for it, the main thing is that there are many options to choose from. A carefully manufactured and properly selected laminated floor covering should last at least 15 years.
Average cost of laminate flooring
Table 5. Average cost of laminate for heated water floors as of April 2022
| Illustration | Class | Name | Average cost of 1m2 (as of April 2022), rubles |
| 33 | Paul Mayer Family PM-12 Baltic Oak | 670 | |
| 32 | Quick Step Eligna U-3459 Oak warm gray | 780 | |
| 32 | Quick Step U3458 Warm Natural Oak | 920 | |
| 33 | Epi Alsafloor Osmoze O140 Congo Oak | 990 | |
| 34 | Westerhof Maestro Super Step A24010 Oak Herentals | 980 |
To calculate the amount of laminate per room, use a special calculator. You will find it in our article.
Wet areas
Laminate is rarely used in wet rooms, but there are still fans of such solutions. In such conditions, it is not recommended to use infrared heating mats, since they are not covered with screed and all electrical elements are open to water.
Waterproof laminate is distinguished by the presence of water-repellent additives in its composition, which reduce the speed of inscription. Like regular laminate, it will warp over time when exposed to water. We discussed this issue in more detail in a separate article.
Choosing a substrate
Another important parameter that affects the quality of a laminate flooring over a warm water floor is the correct choice of underlay. Its purpose is to level out small differences in the base as a result of the formation of a new screed on which the laminate will be laid. In addition, the underlay improves the soundproofing characteristics of the floor covering and provides additional thermal insulation.
Floor slab “Isoplaat” (Izoplat)
The substrate laid on top of the concrete screed prevents friction of the laminate with the concrete base, eliminating the appearance of extraneous, unpleasant sounds. An important criterion is its ability to maintain the thermal conductivity of the floor covering at the required level without reducing it, therefore the small thickness of the selected material - from 1.5 to 2 mm - plays a significant role.
Nowadays, in light of the popularity of caring for one’s health and attention to the environmental situation in the apartment, coniferous underlay for laminate flooring is especially popular. We will tell you about it in detail in our article.
Construction stores are ready to offer this material in a large assortment. Some laminate manufacturers offer a specific suitable type of underlay for their products.
Taking into account the fact that a water heating system will pass under the laminate, not every substrate can be used
Some manufacturers offer coatings with perforations (small holes), which significantly reduce the thermal resistance of the material while maintaining its elasticity.
Perforated backing
The thermal conductivity coefficient of the substrate should be as high as possible, then it will better transmit heat without retaining it. This material must have the following qualities:
- Resistant to the “operating” temperature of the “warm floor” system.
- Environmentally friendly and free of toxins that could be released when heated.
- Vapor permeability.
Most often, when installing a water heated floor system, cork or polyethylene foam is used as a substrate.
Table 6. Substrate options
| Illustration | Description |
| Foamed polyethylene | This type of substrate is the most common and affordable. This material is available in a wide range and has different thicknesses, which allows you to choose the necessary material for the water floor. This backing is easy to work with - it can be easily cut to fit the required size of the room and the individual fragments can be glued together using special tape. |
| Cork | Often a cork backing is used under a laminate, but in a warm water floor system its use is limited by the high thermal insulation characteristics of the material. In addition, the cost of the material is quite high. In fact, cork is a natural insulating material with high thermal resistance, so its use in a heated floor system is not advisable. |
Arbiton Floor Thermo underlay | This perforated material for a narrow purpose is produced specifically for the installation of the underlying layer of the finishing coating of a heated floor system. The manufacturing material is foamed chemically neutral polystyrene with a thermal resistance of 0.06 m²×°K/W. Can be supplied in the form of slabs or roll material. |
| Rolled foamed polystyrene with aluminum foil layer | This material, the purpose of which is to reflect heat towards the room, is placed under the heated floor pipes. Therefore, it is important to remember that when installing a heated floor, such a substrate should under no circumstances be laid directly under the laminate. |
Preparation for laying laminated panels
After installing the heated floor pipes into the screed, the heating of the system is turned on, which is stopped on the day of delivery of the laminated panels. Laminate does not tolerate sudden temperature fluctuations, so before laying it, it is left for three days in the room in which installation will take place.
After completion of installation work, the temperature in the room should be maintained at approximately the same level for three days (at least). With the beginning of the heating season, the temperature of the underfloor heating is increased gradually - from 15-18°C by about 3°C per day, until the optimal temperature regime is reached. Finish heating, gradually reducing the temperature to 15-18°C.
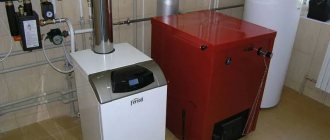
Choosing pipes for a warm water floor system
The quality of a heating system is determined by the elements used in it with the appropriate characteristics. By choosing the right pipe material when installing a water floor, you can ensure the necessary level of comfort and forget about expensive system maintenance.
Soft pipes for water floors
Recommendations for choosing quality material
Installing a heated floor system is not a case where you can save money by using scraps and scraps of pipes fastened together. Only new, high-quality materials can reduce the cost of installation and subsequent operation of the floor.
To select the right pipes, you must consider the following:
- Make sure that the material purchased has the appropriate purpose.
- The pipe should have as few joints as possible - this will minimize the possibility of leakage.
- What matters is the material of the pipe and its diameter.
- It is advisable to purchase products from time-tested and reputable manufacturers. Such material may cost more, but it guarantees the quality and durability of the system.
- It is worth paying attention to the quality of the accompanying fasteners and other products that are involved in creating a heated floor system.
Polyethylene pipes
The heating circuit is subject to specific requirements related to the special conditions of its operation. It is important to choose the right pipes according to geometric parameters and material of manufacture
Geometric parameters of pipes
The diameter of the pipes for installing a warm water floor system is 20 or 16 mm. Sometimes the transverse size reaches 25 mm. When choosing a pipe geometric parameter, it is necessary to take into account the total length of the system. Transportation of coolant through the circuit may be disrupted due to the limited capabilities of the circulation pump, when the total length of the floor exceeds the recommended value and a “locked loop” effect is formed.
The maximum circuit length for a pipe with a diameter of 16 mm is 70 meters, for a pipe with a diameter of 20 - 90 meters, 25 mm - 120 m.
The diameter of the pipe is selected depending on the permissible values of the length of the circuit
Pipe material
Filling the circuit with liquid concrete and using a coolant that can cause corrosion of the inside of the pipes significantly narrows the range of materials recommended for use in a water heated floor system. The most suitable materials in such conditions are: polypropylene, copper, stainless steel, cross-linked polyethylene and metal-plastic.
Table 7. Most popular pipe material
| Illustration | Description |
Polypropylene pipes | Polymer products are the most accessible. For the “warm floor” system, the choice of reinforced products is recommended. The disadvantage of such pipes is their rigidity; they bend with difficulty, which causes difficulties during installation. To form a radius of curvature, such pipes must be heated with warm air. Small radii are created using fittings, but the connections ultimately negatively affect the quality of the entire system, since it is possible to purchase a low-quality product or create a loose connection if there is a lack of experience in using a special welding machine. To ensure the reliability of the installed system of these pipes, water is pumped into it under high pressure and the system is monitored for several days. The mechanical strength of propylene pipes is low, so the screed is poured at least 5 cm deep. |
| Stainless steel pipes | The advantage of stainless steel is the long service life of this material - for corrugated pipes, as some manufacturers claim, the service life is unlimited. In such a system, rubber seals have a limited service life (30 years). The cost of such pipes does not fall into the budget category, so they are not used so often. |
| XLPE pipes | The use of modified polyethylene, which is cross-linked during the production process, forming a certain spatial structure, allows us to obtain a product with unique performance qualities. They are characterized by high resistance to temperature changes. Thanks to the presence of an anti-oxygen barrier, the service life of the circuit is significantly increased. The main disadvantage of this material is its high elasticity, therefore, in order for the pipe not to return to its original state, it must be securely fixed in a given position. Often such pipes are used in tandem with special backing mats, which significantly increases the cost of the heated floor system |
| Copper pipes | Copper pipes are characterized by high heat transfer. They are used when installing floor coverings with high thermal insulation characteristics. Excellent thermal efficiency and long service life fully justify the high cost of such pipes. In addition to water, antifreeze or antifreeze can be used as a coolant in them |
Metal-plastic pipes | These pipes are the most flexible and allow you to form a minimum radius of curvature without preheating. These pipes are elastic, but have a short service life - no more than 30 years |
Materials and tools
To create a “warm floor” cake, from the ceiling to the floor covering, you need to buy the following materials:
- a set of water heated floors for laminate (boiler, collectors, electric pumps);
- pipes along with special fasteners;
- fittings for polypropylene or coupling-press for metal-plastic;
- roll waterproofing or mastic (only for concrete floors);
- insulation;
- damper tape;
- reinforcing metal mesh;
- metal profile for beacons;
- cement M300;
- sifted river sand;
- fiberglass fiber;
- plasticizers for cement-sand mortar;
- underlay for laminate;
- slats or wedges;
- laminate.
Tools you will need:
For preparatory work:
- perforator;
- level;
- hydraulic level;
- roulette;
- construction cord;
- trowel.
For laying pipes:
- grinder or hacksaw;
- wrench or adjustable wrench;
- soldering machine (needed for joining cross-linked polyethylene).
For the screed:
- concrete mixer (rented);
- bucket;
- rule;
- grinder (rent).
To lay laminate:
- jigsaw or hand saw for cutting laminated boards;
- mount;
- a block or a special metal bracket for padding the lamellas;
- wooden or cast rubber mallet;
- square;
- marker or construction pencil.
Pipe length calculation
The total length of the pipes is calculated by adding the length of each circuit. In turn, the number of circuits depends on the diameter of the pipe. Thus, through a 16-millimeter pipe, a pump of any power can pump water over a distance of 80-100 m (depending on the material of the pipes).
When this indicator is exceeded, a “locked loop” effect occurs - the movement of liquid stops due to the resistance of the pipe walls. Therefore, in large rooms, several circuits are installed. To simplify calculations, the pipe length for each room is determined, and then the number of circuits is determined. The calculation is carried out according to the formula:
L = S/P*1.05+(K*2) , where:
- L—pipe length in m;
- S—room area in m2;
- P - laying step in m (optimal - 0.2 m);
- K is the distance to the collector in m.
For information: a factor of 1.05 is used for the margin for radii and connections.
The value obtained after calculation is divided by the maximum possible length of the circuit for each type of pipe and rounded up. The calculation can be carried out in a simplified manner: multiply the area of the room by 5 - according to SNiP, there should be 5 m of pipes per 1 m2 of floor.
Installation of water heated floors followed by laying laminate
There are several ways to install a water heated floor. Let's look at some of them.
Table 8. Installation of the floor using thermal insulation boards (before pouring the concrete screed)
| Image | Description |
| Before installing the manifold cabinet, markings must be applied to the wall using a laser level | |
| Dig out a niche of the required depth | |
| Installing a cabinet | |
| Expanded polystyrene slabs are laid on the floor, the plastic top covering of which acts as a guide for fixing the pipe | |
| Damper tape is laid along the walls of the room | |
| Then the cross-linked polyethylene pipe is laid in increments of 15 cm | |
| At the next stage, the distribution manifold is installed, to which the underfloor heating pipes will be connected | |
| The collector is connected using a line laid from the boiler room | |
| In the boiler room, the main line is connected to the pumping and mixing module | |
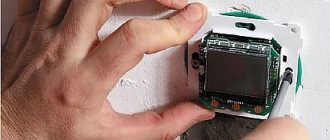
| To automatically maintain the set temperature in the pipe, you must connect a temperature sensor | |
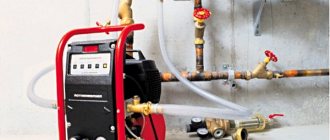
| When the installation of pipes is completed, they are filled with water and air is removed | |
| In order for all circuits to heat up evenly, it is necessary to adjust the flow |
Table 9. Installation using insulation (before pouring the concrete screed)
| Illustration | Description |
| First, insulation is laid on the floor | |
| The insulation is fixed to the floor slab using construction fasteners (mushrooms) | |
| A metal mesh is fixed to the insulation | |
| Along the perimeter of the room, to compensate for the expansion of the concrete screed, a damper tape made of foamed polyethylene 10 mm thick is installed. Its height must exceed the height of the screed. | |
| You can quickly fix the material to the wall using a construction stapler | |
| Next, they begin laying out the heated floor pipes. To make it easier to roll out the 500-meter bay from the inside, it is wrapped with film on the outside | |
| The pipes are fixed at a distance of 15 cm from each other to a previously laid metal mesh | |
| This method of laying pipes for a water heated floor is called “Snail”, it ensures uniform heating of the floor | |
| When pouring the concrete screed and for 24 hours after, the pipes must be under pressure with cold water to effectively identify faults. The heated floor can be used for its intended purpose no earlier than after 28 days, when the screed is completely dry |
Table 10. Pouring concrete screed
| Illustration | Description |
| To create a level floor screed, you will need to use ordinary metal beacons 10 mm high. It is important that the height of the screed above the top point of the pipe surface is at least 30 mm, so that the floor warms up evenly. Under the beacons, every 50 cm, you can place cuttings of concrete paving slabs on the cement-sand mortar - its flat surface will make it easy to level the beacons in height | |
| The metal beacon is laid on top of the tile and fixed with a self-tapping screw. | |
| To ensure that the beacons are installed perfectly in a horizontal plane, the work is controlled using a building level | |
| The second and third rows of beacons are displayed | |
| In a day, when the solution under the beacons has set, it will be possible to pour the concrete screed |
Table 11. Laying a warm water floor using the “dry” laying method
| Illustration | Description |
| A damper tape is fixed around the perimeter of the room. Its soft layer compensates for the thermal expansion of the upper layers of the floor structure | |
| Then double-density thermal insulation slabs are laid, made of two layers of foam - very dense on top and soft on the bottom. | |
| Thermal insulation slabs are overlapped with each other using the technology of hermetic joining of edges. The high mechanical strength of the thermal insulation slabs allows you to walk on them when installing a heating system | |
| When laid over the entire area, the slabs form a continuous layer of thermal insulation | |
| The main element of the lightweight water floor design is the heat distribution plates. Large plates are 1200 mm long and 190 mm wide. Small plates are 1 meter long and 120 mm wide. | |
| The plates have notches that allow you to divide them by hand into smaller pieces without the use of tools. | |
| Heat distribution plates are securely fixed on the surface of the thermal insulation boards | |
| The internal contour is laid in increments of 200, occupying 90% of the entire floor area. Laying method - “Snake” | |
| Small plates are laid in supply from the collector along the perimeter of the outer walls of the room | |
| Plastic pipes with a diameter of 16 mm are rolled out and inserted into the grooves of the heat distribution plates. Laying the pipe begins from the supply manifold. The hottest pipe is led from it first along the perimeter along the outer walls of the room, using small plates and a laying step of 150 | |
| Inside the premises, pipes are laid in a “snake” pattern, using large plates and a laying pitch of 200 | |
| The pipe lies flat, since the top layer of thermal insulation boards and a high-quality steel plate lock hold it well in the plane of the floor | |
| Then lay the waterproofing film | |
| Gypsum fiber sheets are laid on top, forming a base for the finishing layer |
The process of laying laminate on top of a water-heated floor system is fundamentally no different from laying it on another base, except for the correct choice of the laminate itself and the substrate. We will omit the installation process itself, but we will give some useful tips.
What tools may be needed when laying laminate flooring? We'll talk about it here.
Table 12. Useful tips for laying laminate flooring
| Illustration | Description |
| Modern products with a plastic latch on the lock will significantly facilitate and speed up the process of laying laminate flooring. | |
| To securely fix the laminate, use a rubber hammer and a piece of another board. It is not advisable to hit the laminate lock directly with a hammer. | |
| It is necessary to leave a 10 mm expansion joint around the perimeter of the room between the wall and the laminate, since the laminate is subject to seasonal expansion. | |
| It is important to take into account the pattern on the surface of the laminate and lay it parallel to the light. It is also worth considering that in the purchased batch of laminate, the pattern on individual boards may be repeated. | |
| The base on which the laminate is laid must be perfectly level. |
Installation procedure
Installation of laminated panels is carried out on a ready-made screed or flooring system.
- If the building design allows the installation of a water heating system in a concrete screed, then this option is usually chosen.
- In houses with wooden floors, the slabs have to be laid on a stacked structure, since they may not be able to withstand the weight of the concrete screed.
Attention! For both installation options, the base surface must be completely flat.
The process of installing screed on a heated floor system.
Before starting installation work, the concrete screed is treated with a primer to compact the top layer and remove dust. In this case, waterproofing measures are not required; the substrate is laid directly on the concrete. The substrate without the foil layer is laid on the walls with an overlap of 50 mm. The joints are taped with non-metallic tape.
Laminated panels are mounted on a substrate with a gap between them and the wall of 10 mm. It is recommended to start work from the far left corner of the room. To bandage the seams, the slabs are laid offset in rows. So, if in the first row a whole panel is first installed, then in the second row it is shortened by 30-40 cm.
After completing the work with the screed, the substrate under the laminate is laid directly on the concrete, then you can begin laying the laminate.
Malfunctions and their elimination
The design of a water heated floor is simple in structure, so there are not many reasons for malfunctions. Let's look at the most typical ones and how to eliminate them:
- If the circulation pump does not make a characteristic noise when power is applied, then it is recommended to check the distribution panel on each circuit - the shut-off valves are typically in an open position.
- “Airing” of the system can occur due to a sharp drop in pressure inside the heating circuit, its overheating, leakage and depressurization of connections, or improper installation of the system. You can solve the problem by closing all the kennels, leaving one, and then running each branch separately with the circulation pump turned on at low speed.
- To set up the system, it is important to understand the principle of operation of the collector, which directs waste and warm liquid. To adjust the operation of the circuits, use the balancing table. The valve is closed after removing the cap from it. According to the table, the revolutions are determined for each circuit by turning the valve the required number of times.
- The reason for the low system temperature may be insufficient boiler power, which needs cleaning, maintenance or replacement of the temperature sensor.
- A decrease in heat transfer occurs if the floor is filled with furniture and covered with carpet, as well as due to poor-quality, unsuitable insulating material.
- The cause of uneven heating can be not only air, but also poorly organized vapor barrier
Finally, we invite you to watch a video on how to lay laminate flooring on warm water floors.
Laminate flooring with built-in heating. What is this? How is it arranged?
For homeowners who are hesitant to combine heated floors with a laminated surface, we have developed a special floor covering that has a built-in heating system. ALLOC Heating system is the only floor in the world with a built-in heating system. Such technology has only recently become available to domestic consumers.
This is a laminate flooring with built-in heating elements. With Alloc Heating System you install both the floor and its heating system at the same time.
Unlike other systems, in the Alloc Heating System the heating elements do not lie under the floor, but are built into it, and due to this they are much closer to the surface. The heating element is located between the bottom layer of the HDF core board and the sound-absorbing insulation. In this case, heat loss is reduced by 25-30%.
The installation of such a covering differs in that before snapping the locks into place, you need to connect the terminals protruding from the dies.
CHARACTERISTICS:
- Power: 60 W/sq.m.
- 30% cheaper than heating cables
- You can combine heated and unheated areas
- Inertia: 10 minutes at room temperature 20C
Nuances to consider
Any job has its own subtleties and limitations, below is a list of points that you need to consider:
- The maximum length of the working circuit is 70 meters; if a pipe of this length does not cover the entire area of the room, then the organization of a second heating circuit is necessary;
- Reliable waterproofing. In a wooden house, the presence of excellent insulation from moisture is the guarantee that your floor will last a long time without repair. Waterproofing must be done in several layers.
Tips for quality styling
According to reviews from users and craftsmen, laying a laminated coating on a warm water floor does not differ in its method from the usual one. Once the question of which flooring to choose has been decided and all the materials have been purchased, you can move on to the practical part. By the time of installation, the screed should have stood well and gained the required rigidity and strength. This may take about a month. It is worth waiting in order to reduce the humidity level. Two weeks after pouring, you can turn on the heating. Every day you will need to monitor the temperature of the circulating fluid of the heated floor and raise it by 5° once a day. This will allow the entire surface to be heated evenly without temperature imbalance. Two days before installation, the temperature of the heated floor must be set to the permissible maximum.
The laminate is brought to the installation room not an hour before the operation. It is advisable to do this a day, or even more. This will allow the laminate to gain the temperature of the heated floor and undergo the process of deformation expansion. If this is not done in advance, then problems will begin after installation, when everything is covered with cracks. It is advisable to store the laminate boards closed for the first day, and then unpack them for another day. If the weather is not frosty, then you can unpack the laminate immediately.
The first step is to inspect the level of the surface that was formed after laying the heated floor. Before installing the inat on a warm floor after wet pouring, it is necessary to treat the area with a primer. This will hold the base together and prevent sand and dust from appearing on the surface. The difference in area should not exceed 2 cm per 10 m. There is no need to use a waterproofing layer. The substrate is immediately laid. The latter for heated floors must be used without a foil layer, otherwise heat waves will not pass through sufficiently.
The substrate is laid over the entire area with an overlap of 5 cm on the walls. The excess will be cut off after the process is completed. Adjacent sheets are glued together using regular tape; metallized tape cannot be used. It is necessary to make a gap of 1 cm from each wall. This will allow the laminate to take the required shape without deformation when the temperature changes. You can mark this space for the laminate using wedges or pieces of bars. Subsequently, it will be covered with baseboards and will not be visible.
Everyone begins installing the laminate in the way that is most convenient for them. But professionals advise doing this from the far left corner of the door and moving to the right and down. This way it will be possible to lay the contour more efficiently. If in the first row the initial board was intact, then in the second the laminate board must be shortened by 30–40 cm. This is necessary for bandaging the seams. For a denser arrangement, each row of laminate is tapped with a mallet through a block. An additional skill can be learned from a video on laying laminate flooring.
Hydraulics and circuit lengths
- Schemes for direct connection of all underfloor heating circuits directly to automated gas or electric boilers, which can produce a low coolant temperature of 60 - 65 degrees, appear to be workable. In this case, in short circuits (up to 50 meters are recommended), the energy output (temperature) is adjusted by changing the flow rate using a tuning valve. To create the simplest system, one manifold with such valves on each outlet is sufficient. For a solid fuel boiler, you will need an outgoing temperature stabilizer in the form of a buffer tank and a three-way valve...
- A more progressive option with automatic temperature maintenance in short circuits (up to 40 m in length) can be implemented using RTL taps - thermal heads that respond to the temperature of the coolant and which are installed strictly on the outgoing stream from each circuit. Here, too, the energy output of the circuit is regulated only by the amount of passing fluid. But it is also recommended to install a maximum temperature limiter in the heating system, for example up to +70 degrees.
- If you make a warm floor of a large area throughout a wooden house, then it is recommended to use classic hydraulics with long circuits of 80 - 90 meters and a temperature controller with a separate mixing pump unit, which would maintain the desired temperature in the entire system. In this case, adjustment of the energy output along the circuits is carried out by slightly changing the flow rate by adjusting valves.
Foundation installation on concrete
The installation of the floor surface begins with cleaning and inspecting the screed to identify irregularities and cracks. If defects are detected, a thin leveling screed, 2 to 4 cm thick, is poured. Next, waterproofing is performed: bitumen-roofing felt, or using polymer films.
Then extruded polystyrene foam insulation (EPS) 3-4 cm thick is laid. A reinforcing mesh is mounted on the EPS layer to secure the coolant pipes, or they are fastened with staples to the expanded polystyrene.
Suitable heating systems for laminate flooring
For standard brands of laminate, electric and infrared heated floors are used. Electrical systems are universal and can be used for all types of flooring, including laminate. Kits for a specific room area are offered for sale. Available in the form of mats, cable and film. The floor level rises only 1 cm.
Film infrared floors are inexpensive, the process is less labor-intensive, can be completed in almost a few hours and eliminates the need to fill a screed. Quick installation involves connecting the material spread over the surface to the thermostat.
The disadvantage of electric and film floors is the expensive power supply, the rapid cooling of the surface during an emergency power outage, which often leads to the impossibility of restoring the structure.
Recently, modern laminate flooring options suitable for water floors have appeared on the market.