Types of mineral wool
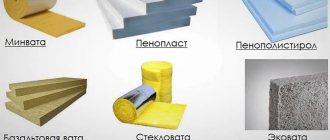
If it is necessary to prevent the cold from penetrating into the house and the heat from escaping outside, the home is insulated with mineral wool. All its types have fibers in their structure. They arise during the manufacture of this material. Certain minerals are cooled and the resulting composition is shaped into long strings of fibers. It is based on the raw materials that were used directly in the processing process that several types of mineral wool are distinguished:
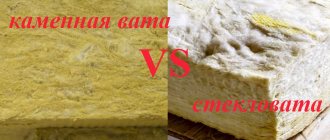
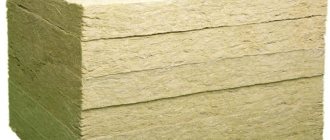
- Stone - made from the hardest minerals (basalt, porphyrite or granite) and is needed to insulate houses from the outside. This type of material has the highest strength and wear resistance.
This type of material has the highest strength and wear resistance. - Slag - this material is based on waste from metallurgical production. In terms of quality and efficiency, it is lower than mineral wool. After all, it is susceptible to changes in high and low temperatures. This mineral wool is suitable for insulating cottages, summer kitchens and outbuildings;
This mineral wool is suitable for insulating cottages, summer kitchens and outbuildings. - Glass - the main component in it is hot glass. Dolomite, limestone and sodium bicarbonate are also added to it. This material is not subject to combustion and can be used in buildings where this is important.
This material is not subject to combustion and can be used in buildings where this is important.
In its form, mineral wool can be rolled or made in the form of slabs. Rolled wool has the following dimensions:
- The length of insulation for walls is 6-9 meters;
- The width of the insulation is 100-120 centimeters;
- Thickness – one and a half centimeters.
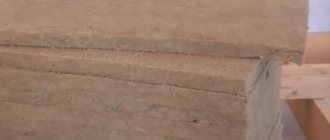
Slab mineral wool is 120 centimeters long and 1 meter wide. Its thickness varies from 2.5 to 10 centimeters. Thicker material is used for thermal insulation of the roof, and thinner material is used for floors and walls.
Thicker material is used for thermal insulation of the roof, and thinner material is used for floors and walls.
Advantages and disadvantages of mineral wool
Mineral insulation is successfully used both outside and inside buildings. It can be used to insulate both a residential building and an outbuilding. Sometimes mineral wool is even used for decorative purposes and used to decorate the façade of houses. What other advantages this material has will be discussed below:
- It can be used not only as thermal insulation, but also to suppress sound vibrations;
- There is mineral wool, which is not subject to combustion;
- When in contact with metal, mineral wool does not rust;
- The material is resistant to high and low temperatures and does not deteriorate under their influence (some of its types);
- It is easy to saw and mount on the walls.
The material can be used not only as thermal insulation, but also to suppress sound vibrations.
Of course, mineral wool has its small disadvantages:
- Steam does not pass through mineral wool well. This may cause unwanted condensation to form. Therefore, it is better to attach a special film to the top of the insulation;
- Poor quality material can be harmful to human health. However, if you buy it from trusted manufacturers and choose it correctly, no health problems will arise.
Before you buy mineral wool, you need to know exactly what type of finish it will be used for. After all, in each individual case a specific type of insulation must be used.
Steam does not pass through mineral wool well.
About the use of insulation
The general category of insulation, obtained by dividing the raw material into fibers, is usually called mineral wool.
The widespread use of inorganic insulators is associated with high heat and sound insulation properties:
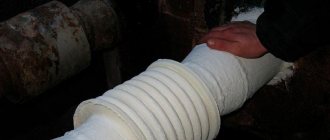
- construction of engineering communications;
- to protect industrial equipment;
- in the field of construction.
Insulation of the roof of a building
The main advantages of mineral wool:
- There are completely no organic elements in the structure of the product, which allows the service life to be unlimited;
- does not burn - class NG, NPB 244-97;
- the material belongs to breathable insulation - the fibrous structure allows excess moisture vapor to pass through, air circulation is maintained;
- does not decompose or mold;
- does not attract insects and rodents;
- tolerates temperature fluctuations and exposure to aggressive environments.
Mineral wool is used in interior decoration in accordance with building codes (SNiP) and codes of practice. The vapor permeability of the material is especially important for insulation and sound insulation of wooden and stone structures. High performance properties of the best types of mineral wool and reasonable price are the main factors for consumer choice. v
In what cases is insulation done with mineral wool?
When building a house, summer kitchen or other structures, there is a need for high-quality insulation of wall surfaces made of different materials. Mineral wool is perfect for achieving these goals. It maintains a comfortable temperature in the rooms and does not let cool air inside. Thanks to it, homeowners are able to save energy and, consequently, costs.
Mineral wall insulation can be used outside. In this case, it can play an additional decorative role. It is also possible to use this material for internal cladding and wall insulation.
Mineral wool maintains a comfortable temperature in the rooms and does not let cool air inside.
Necessary tools and materials for work
When starting insulation work using mineral wool, you must first prepare all the necessary tools, as well as the basic materials. The standard set of tools is as follows:
- Tape measure, water level or level;
- Electric screwdriver;
- Products for fixing cotton wool (nails, self-tapping screws, screws, dowels);
- Membrane for vapor and waterproofing;
- Wooden slats or metal profile for sheathing;
- Construction knives;
- Solution for priming walls.
You also need to remember about protective equipment. To prevent fine dust from getting into the nasopharynx and eyes when cutting mineral wool, the master must wear a respirator and goggles, and also protect his hands from cuts with thick gloves.
We must not forget about protective equipment.
How to calculate the density of mineral wool
The main material for work, of course, is the mineral wool itself. How to calculate its density? Of course, for such a calculation it is necessary to take into account the climatic conditions of the region where the house was built.
For Moscow and St. Petersburg, the thickness of this material can range from 8 to 10 centimeters. For the Murmansk region this figure will be higher – 15 centimeters.
In addition, the density of mineral wool depends on where it will be located. If mineral insulation is used outside, its density should vary from 50 to 75 kilograms per 1 cubic meter.
If the facade is ventilated, then the density of mineral wool should reach 110 kilograms per 1 cubic meter.
For insulation inside rooms, you can install cotton wool with a density of 40 kilograms per 1 cubic meter on the walls. Typically, material of this density is produced directly in rolls and can only be used horizontally and for surfaces on which the load is relatively small.
If the facade is ventilated, then the density of mineral wool should reach 110 kilograms per 1 cubic meter.
Description of slabs with different density levels
There are basalt slabs of various density levels. This is reflected in the following properties of insulation: vapor permeability, moisture resistance, resistance to high loads and response to compression of the material.
Table of parameters of basalt insulation
Based on density, slabs are divided into the following categories:
- Up to 35 kg/m3 – used for vertical and inclined insulation without load.
- Up to 50 kg/m3 - with the help of such insulation they increase the level of thermal insulation of interior partitions, attics or attics. Where there is no load on the surface.
- Up to 75 kg/m3 – lightly loaded surfaces, under floors when placed between joists.
- Up to 100 kg/m3 – external insulation of industrial and residential buildings.
- Up to 125 kg/m3 – arrangement of ventilated facades.
- Up to 150 kg/m3 – single-layer insulation of reinforced concrete or metal building frames.
- Up to 175 kg/m3 – insulation of heavy buildings with further plastering of the facade. Or it is located inside a three-layer cake.
- Up to 200 kg/m3 - insulation with such a density can withstand the highest loads. The soundproofing qualities of the material are significantly higher than analogues with a lower density level.
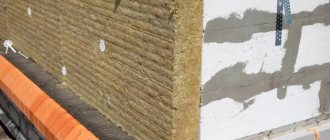
Do-it-yourself insulation of walls outside the house
There are 3 ways to insulate the walls with mineral wool outside the house. The first involves laying mineral wool between the building material from which the wall is made. This method is called a “well system” and is great for foam block or brick houses.
This method is called a “well system” and is great for foam block or brick houses.
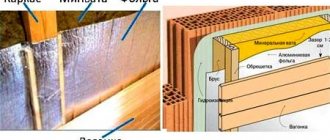
The second method is called a ventilated facade and is applicable to wooden houses. In this option, a wooden frame is erected around the house, and insulation material is placed inside this frame. In this case, the mineral wool is attached using dowels and self-tapping screws, or with liquid nails. Below are detailed instructions for insulating the selected surface using this method:
- First, be sure to cover the wall with an antifungal solution.
- Next, you need to remove all window slopes and casings.
- Now you will need to let the walls dry for about 1 day.
- If the wall has any differences or unevenness, a protective membrane is laid on it with the smooth side facing the insulation.
- Now slats made of wood with a thickness equal to the thickness of mineral wool are nailed to the wall using self-tapping screws. The distance between the bars should be 2 centimeters less than the width of the insulation.
- This creates a wooden sheathing into which the mineral wool is placed.
- Next, the resulting structure is covered with protective material from moisture and cold air.
- At the end, new casings and slopes are attached to the windows, because the walls have become thicker, which means the old casings will no longer fit.
A wooden frame is built around the house, and insulation material is placed inside this frame.
The third method is called “wet”. In it, mineral wool slabs are attached directly to the surface of the wall, and not inside. Step-by-step instructions for this method will be given:
- Clean the selected surface with a dry cloth and make sure that the walls are fairly level.
- How to attach the basement cornice.
- Attach the mineral wool with a special adhesive.
- To ensure that the insulation is securely fastened, dowels must be driven in around the entire perimeter of the wall.
- Next, you need to install a reinforcing mesh so that it supports the mineral wool.
- Now you need to prime the surface of the wall well, and then plaster it.
- At the end, the dried plaster is simply painted in the desired color.
Mineral wool slabs are attached directly to the surface of the wall, and not inside.
Wet facade insulation technology: we understand the intricacies of this insulation technique
The walls of houses built from brick, various wall blocks, and even more so those that are a reinforced concrete structure, in most cases do not meet the requirements for regulatory thermal insulation. In a word, such houses need additional insulation in order to prevent significant heat loss through the building’s enclosing elements.
Wet facade insulation technology
There are many different approaches to thermal insulation of external walls. But if the owners prefer the exterior decoration of their house, made of decorative plaster, in a “pure” form or using facade paints, then the optimal choice is the wet facade insulation technology. This publication will discuss how complex such work is, what is required to carry it out, and how all this can be done on your own.
What is meant by a “wet façade” insulation system?
First of all, it is necessary to understand the terminology - what is the “wet facade” technology, and how does it differ from, say, conventional wall cladding with insulating materials with further decorative cladding with wall panels (siding, block house, etc.)
The technology allows both insulation and decorative finishing of the building facade
The clue lies in the name itself - all stages of work are carried out using building compounds and solutions that are diluted with water. The final stage is plastering the already insulated walls, so that the thermally insulated walls become completely indistinguishable from ordinary ones covered with decorative plaster. As a result, two important tasks are solved at once - ensuring reliable insulation of wall structures and high-quality facade design.
An approximate insulation scheme using the “wet facade” technology is shown in the figure:
Schematic diagram of insulation using “wet facade” technology
1 – insulated facade wall of the building.
2 – layer of construction adhesive mixture.
3 – insulating boards of synthetic (expanded polystyrene of one type or another) or mineral (basalt wool) origin.
4 – additional mechanical fastening of the thermal insulation layer – “fungi” dowels.
5 – protective and leveling plaster layer, reinforced with mesh (item 6).
7 – decorative plaster finishing of the facade.
This system of complete thermal insulation and facade finishing has a number of significant advantages:
- Very material-intensive installation of the frame structure is not required.
- The system turns out to be quite light. And it can be successfully used on most façade walls.
- The frameless system also predetermines the almost complete absence of “cold bridges” - the insulating layer is monolithic over the entire surface of the facade.
- In addition to insulation, facade walls also receive an excellent soundproofing barrier, which helps reduce both airborne and impact noise.
- With the correct calculation of the insulating layer, the “dew point” is completely removed from the wall structure and taken outside. The possibility of the wall getting wet and colonies of mold or mildew appearing in it is eliminated.
- The outer plaster layer is characterized by good resistance to mechanical loads and atmospheric influences.
- In principle, the technology is not complicated, and if the rules are strictly followed, any homeowner can handle it.
If desired, the external decoration of the facade can be updated
- If the work is done well, such an insulated facade will not require repairs for at least 20 years. However, if you want to update the finish, this can easily be done without compromising the integrity of the thermal insulation structure.
The disadvantages of this method of insulation include:
- Seasonality of work - it is permissible to carry it out only at positive (at least +5°C) temperatures and in stable good weather. It is undesirable to carry out work in windy weather, at too high (over +30°C) air temperatures, on the sunny side without providing protection from direct rays.
- Increased demands on both high quality materials and strict adherence to technological recommendations. Violation of the rules makes the system very vulnerable to cracking or even peeling of large fragments of insulation and finishing.
The insulation was clearly carried out in violation of the technology
. As mentioned, mineral wool or expanded polystyrene can be used as insulation. Both materials have their advantages and disadvantages, but still, for a “wet facade”, high-quality mineral wool looks preferable. With approximately equal values of thermal conductivity, mineral wool has a significant advantage - vapor permeability. Excess moisture will freely find its way out of the premises through the wall structure and evaporate into the atmosphere. With expanded polystyrene it is more difficult - its vapor permeability is low, and in some types it even tends to zero. Thus, the accumulation of moisture between the wall material and the insulating layer is not excluded. This is not good in itself, but at abnormally low winter temperatures, cracking and even “shooting” of large sections of insulation along with finishing layers occur.
There are special topics of expanded polystyrene - with a perforated structure, in which this issue is resolved to a certain extent. But basalt wool has another important advantage - absolute non-flammability, which expanded polystyrene cannot boast of. But for facade walls this is a very serious issue. And in this article we will consider the best option - the “wet facade” insulation technology using mineral wool.
How to choose insulation?
Which mineral wool is suitable for a “wet facade”?
Expert opinion: Afanasyev E.V.
Chief editor of the Stroyday.ru project. Engineer.
As is already clear from the concept diagram of a “wet facade,” the insulation must, on one side, be mounted on an adhesive solution, and on the other, withstand the considerable load of the plaster layer. Thus, thermal insulation boards must meet certain requirements in terms of density and ability to withstand loads - both dent (compression) and rupture of their fiber structure (delamination).
Naturally, not every insulation classified as mineral wool is suitable for these purposes. Glass wool and slag wool are completely excluded. Only slabs made of basalt fibers are applicable, produced using a special technology - with increased rigidity and density of the material.
Leading manufacturers of insulation based on basalt fibers in their product line include the production of slabs specifically designed for thermal insulation of walls with subsequent finishing with plaster, that is, for a “wet facade”. The characteristics of several of the most popular types are shown in the table below:
| Name of parameters | "ROCKWOOL FACADE BUTTS" | "Baswool Facade" | "Izovol F-120" | "TechnoNIKOL Technofas" |
| Illustration | ||||
| Material density, kg/m³ | 130 | 135-175 | 120 | 136-159 |
| Tensile strength, kPa, not less | ||||
| — for compression at 10% deformation | 45 | 45 | 42 | 45 |
| - for delamination | 15 | 15 | 17 | 15 |
| Thermal conductivity coefficient (W/m×°C): | ||||
| — calculated at t = 10 °С | 0,037 | 0,038 | 0,034 | 0,037 |
| — calculated at t = 25 °С | 0,039 | 0,040 | 0,036 | 0,038 |
| -operational under conditions “A” | 0,040 | 0,045 | 0,038 | 0,040 |
| — operational under conditions “B” | 0,042 | 0,048 | 0,040 | 0,042 |
| Flammability group | NG | NG | NG | NG |
| Fire safety class | KM0 | — | — | — |
| Vapor permeability (mg/(m×h×Pa), not less | 0,3 | 0,31 | 0,3 | 0,3 |
| Moisture absorption by volume when partially immersed | no more than 1% | no more than 1% | no more than 1% | no more than 1% |
| Slab dimensions, mm | ||||
| - lenght and width | 1000×600 | 1200 ×600 | 1000 ×600 | 1000 ×500 1200×600 |
| - slab thickness | 25, from 30 to 180 | from 40 to 160 | from 40 to 200 | from 40 to 150 |
There is no point in experimenting with lighter and cheaper types of basalt wool, since such a “wet facade” will probably not last long.
How to determine the required thickness of insulation?
As can be seen from the table, manufacturers offer a wide range of insulation thicknesses for “wet facades”, from 25 to 200 mm, usually in increments of 10 mm.
Plates for facade work can have different thicknesses
What thickness should I choose? This is by no means an idle question, since the created “wet facade” system must provide high-quality thermal insulation of the walls. At the same time, excessive thickness means extra costs, and in addition, excessive insulation can even be harmful from the point of view of maintaining an optimal temperature and humidity balance.
Usually, the optimal thickness of insulation is calculated by specialists. But it is quite possible to do this yourself, using the calculation algorithm presented below.
So, an insulated wall must have a total heat transfer resistance not lower than the standard value determined for a given region. This parameter is tabular, it is in reference books, it is known in local construction companies, and in addition, for convenience, you can use the diagram map located below.
Schematic map with normalized values of thermal resistance of building structures
A wall is a multilayer structure, each layer of which has its own thermophysical characteristics. If the thickness and material of each layer, existing or planned (the wall itself, interior and exterior decoration, etc.) is known, then it is easy to calculate their total resistance, compare with the standard value in order to obtain the difference that needs to be “covered” by additional thermal insulation.
We will not bore the reader with formulas, but will immediately suggest using a calculation calculator that will quickly and with minimal error calculate the required thickness of insulation with basalt wool intended for facade work.
Calculator for calculating the thickness of insulation of the “wet facade” system
The calculation is carried out in the following sequence:
- Using the diagram map for your region, determine the normalized value of heat transfer resistance for walls (purple numbers).
- Check the material of the wall itself and its thickness.
- Decide on the thickness and material of the interior walls.
The thickness of the external plaster finishing of the walls is already taken into account in the calculator and will not need to be added.
- Enter the requested values and get the result. It can be rounded up to the standard thickness of manufactured insulation boards.
If suddenly a negative value is obtained, insulation of the walls is not required.
Go to calculations
What other materials and components will be required?
To decide on the materials, it is necessary to once again consider in detail the scheme of the future “wet facade”.
Materials and components required for insulation using “wet facade” technology
1 — starting (basement) profile. Its width must exactly match the thickness of the insulation. The number of profiles corresponds to the perimeter of the insulated walls.
2 – connecting elements for the base profile. They ensure precise joining of profiles in one plane and set the required temperature gap between them. Quantity: one for each joint, or two for insulation thickness of 100 or more.
3 – profile fastening. Expansion dowel nails must have a length of at least:
- for concrete walls or those lined with solid brick - 40 mm;
— for walls made of hollow bricks – 60 mm;
— for gas silicate blocks or other low-strength materials – 100 mm.
It is not difficult to calculate the number of fastening points: for insulation with a thickness of 80 mm and above, increments of 300 mm; for thicknesses less than 80 mm, it can be installed in increments of 500 mm.
A plastic spacer washer is provided at each attachment point for precise alignment of the profile.
4 – primer for preparing the wall for gluing slabs.
— For brick, plaster or gas silicate walls, deep penetration soil will be the best choice. Average consumption – 300 ml/m².
— For concrete walls, soil of the “concrete contact” type is purchased. Average consumption – 400 ml/m².
5 – adhesive composition for installation of insulation boards. It should be designed specifically for such tasks - for attaching a thermal insulation layer.
Various types of adhesives for insulation work
There are many of its varieties - usually mineral wool manufacturers give their recommendations on the most adapted compositions or even offer their own proprietary mixtures.
The average glue consumption at this stage of work is approximately 6 kg/m².
6 – insulation boards with calculated thickness. Average consumption, taking into account cutting and possible waste, is 1.05 m² per 1 m² of wall.
7 – “fungi” dowels for additional mechanical fastening of the insulation. The total length of the dowel must correspond to the thickness of the insulation plus the length of the spacer - depending on the wall material (see above).
Dowel-mushroom with metal spacer nail and thermal head
It is preferable to use dowels with a plastic expansion nail or with a core equipped with a special thermal insulation head - so that “cold bridges” are not created.
Average consumption – 6 pcs/m².
8 – basic protective reinforced plaster layer over insulating boards. A special plaster composition or the same adhesive composition that was used for installing the slabs is used.
The thickness of the layer is 4 mm - for further application of decorative plaster, or 5 mm - if simply painting with facade paint is intended. Based on this, the consumption also varies - from 4 to 5 kg/m².
9 – reinforcing mesh made of alkali-resistant fiberglass. Usually sold in rolls 1000 mm wide. Average consumption is 1.1 linear meters per 1 m² of wall.
9a - not shown in the diagram, but during the work you will definitely need reinforcing corners with mesh strips - for plastering corners on knocking walls and on window and door slopes.
PVC corner with strips of reinforcing mesh
Consumption - based on the actual total length of all corners.
10 – water-dispersion primer – for preparing the plastered surface for finishing work. Average consumption - 150÷200 ml/m².
11 – decorative plaster of the selected class. Consumption depends on the type of plaster and its specific qualities.
12 – facade paint.
Points 11 and 12 already relate, rather, to finishing work, and will not be considered within the framework of this publication.
Some manufacturers offer complex “wet facade” systems that include all the necessary materials - from insulation to finishing decorative plaster of facade paint, and a full range of all necessary components. This is generally the optimal solution, since all components of the system are maximally adapted to each other.
The calculator below will help you quickly calculate the required amount of basic materials for a wall of a certain area.
The area of the wall is easy to calculate. For a rectangle, this is the product of length and height. If the wall has a complex configuration, other geometric relationships are used.
Need help finding the areas of complex shapes?
A special publication on our portal dedicated to calculating areas will help the reader quickly and accurately make the necessary calculations.
Calculator for calculating the amount of required materials
Go to calculations
Carrying out work using “wet facade” technology
In order for the insulation of walls using the “wet facade” principle to be high-quality and durable, it must be carried out strictly in stages, with strict adherence to all technological recommendations. Each step is important, and ignoring one or another operation will inevitably lead to marriage.
Preparing the wall surface for insulation work
When insulating a facade using this technology, thermal insulation will be effective only if maximum contact is ensured between the wall and the insulating layer. This, in turn, means that careful surface preparation is essential.
- The slabs will be mounted with glue, but it is designed for “clean” wall surfaces, without paint residues. If the façade was previously painted, you will have to clean it down to the base or a stable plaster layer.
Walls for such insulation require high-quality cleaning.
Cleaning can be carried out mechanically, using heat using a construction hair dryer or using special flushing compounds - depending on the specific initial conditions. But the goal is the same - the base must be clean, without paint stains, oiled or bitumen-impregnated areas.
- You can leave old plaster only if its condition does not cause any concern. This must be verified by carrying out a thorough tapping test - unstable areas must be removed without any pity.
- It is prohibited to carry out work on a wall that has even the slightest signs of mold, moss, fungus, etc. All this must be cleaned off, and then the entire wall is treated with a special “treating” composition - in accordance with the instructions attached to it. You can proceed to further stages only after the bactericidal treatment has completely dried.
The wall clearly needs “treatment” with antiseptic compounds.
However, even if there are no obvious signs of damage to the wall by microflora, it will not hurt to carry out such “health” measures in any case.
- The wall should be fairly level. All potholes, remote areas, cracks, crevices must be repaired - cut, primed and tightly filled with repair mortar, leveling these “patches” to the general level of the wall. Existing protrusions are knocked down - in the same way, to the general level.
- They inspect the plane of the wall - vertically and horizontally. If there are significant deviations (more than 20 mm), then you should not hope to level them later, with a layer of insulation and subsequent decorative plaster - nothing good will come of this. Leveling will have to be done now, using conventional cement-sand plaster, optimal for the specific wall material. True, the work will be delayed - it will be possible to proceed to the installation of insulating boards no earlier than in 3 ÷ 4 weeks.
- All metal elements necessary for the installation of antennas, drains, air conditioning systems, lighting, etc. must be pre-installed on the walls. These brackets must be immediately coated with anti-corrosion primers.
All metal parts of the facade must be treated with anti-corrosion primer
- When the repair or plaster layer on the wall is completely dry, the entire surface is treated with a primer. The type of primer and its consumption have already been discussed above. Application is carried out with a roller or, in hard-to-reach places, with a brush. It is important not to miss the slightest section. If excessive absorption of the composition is detected in any area, then do not skimp on the primer - the area should be treated twice.
Once the soil has dried, the first stage can be considered complete.
Installation of the base profile
The base profile on which the first row of insulation boards will be installed must be mounted strictly along the horizontal “zero” line, which is marked using a laser or water level. An important condition for high-quality insulation of the first floor is that this line must be at least 300 mm below the floor level in the rooms so that there is no “cold bridge” left.
A correctly set profile solves two main problems. It ensures even laying of insulation boards and becomes protection from below, in the only place where mineral wool will not be covered by a plaster layer.
Scheme of fastening the base profile
The types of fasteners and the step of their installation have already been discussed above. Plastic spacer washers (item 1) are used to compensate for slight curvature of the walls, if necessary, so that the profile is pressed tightly to the surface but at the same time does not deform.
Profiles are never installed overlapping - only end-to-end, leaving an interval of 2-3 mm. This is ensured by connecting elements (item 2) - one or two for each joint.
At the outer or inner corners of the wall, the profiles are also joined, leaving a gap. To do this, they are cut at an angle of 45°, and a connecting element is inserted at the joint. Another option is to cut a 90° angle inside the profile, leaving only the outer limiting edge intact. Then the profile is bent at a right angle, and a connecting element is also inserted at the joint. These measures will allow you to maintain a perfectly even horizontal profile line along the entire perimeter of the building.
In the event that insulation with a thickness of over 80 mm will be installed, you should consider the issue of temporary stops under the starting profile so that it does not sag at the initial stage of gluing the slabs. After the insulation is installed, these stops are simply removed.
Typically, the base profile is installed immediately along the entire perimeter of the insulated walls. Then you can move on to the next stage - gluing the plates.
Installation of insulation boards
To install the slabs, the adhesive composition is prepared in strict accordance with the instructions attached to it.
The dry mixture is gradually added to the required amount of water and at low speeds of the mixer it is gradually brought to the desired consistency, without lumps. This usually takes at least 5 minutes. Then a pause is made - for 6 ÷ 8 minutes, and after that the composition is mixed again for 5 minutes.
The adhesive composition is diluted in strict accordance with the instructions attached to it.
You should not make too much of the mixture at once - its “life” is limited, and adding water when signs of setting appear will not do anything. If there was a short break during work, about 10÷15 minutes, the mixture should be mixed again with a mixer.
Glue can be applied to slabs in several ways.
- This is usually done around the perimeter, with a distance from the edge of 20-30 mm, strips 100 mm thick, and also in the center - three slides with a diameter of about 200 mm. The height of the applied layer is about 20 mm, but it can vary slightly (no more than +10 mm) depending on the degree of evenness of the base.
Recommended scheme for applying adhesive to boards
- If the wall to be insulated has excellent evenness, then ruts can be applied over the entire surface using a notched trowel with a comb height of 12 mm.
In both cases, it is recommended to apply the glue in two stages:
- first, a small amount of glue is rubbed with force into the surface of the slab in the right place.
— then the required amount of composition is applied.
In those places where the slab will extend around a corner or over a slope, glue is not applied.
The glue-coated slab is installed in its intended place and pressed tightly against the wall surface. Light movements up and down and to the sides while pressing against the surface ensure uniform distribution of the glue. All excess that appears at the edges is immediately removed with a spatula.
When installing the next slab, they achieve the tightest possible connection, without the slightest gaps. If gaps cannot be avoided, then they are subsequently tightly filled with cut out wedges of mineral wool. Filling the voids between the blocks with glue is strictly prohibited!
Laying is usually done from one of the corners, in a row. At the same time, be sure to follow several important rules.
Basic principles of correct placement of insulation boards
- The first row should rest against the starting profile, exactly along the limiting edge.
- The slabs are laid “in a bandage”, with the vertical joints offset by at least 200 mm (item 1).
- At the corners, the “gear lock” principle is observed (item 2).
- A slab fragment adjacent to a corner or slope cannot be less than 200 mm wide (item 3).
- Usually, a connection is immediately provided for the insulation of the wall and slopes, which is also done with mineral wool slabs, but of lesser thickness (item 4).
The junction of slabs to slopes requires special attention.
This arrangement of the slabs relative to the edges of the slopes will certainly lead to cracks.
No matter how the vertical and horizontal seams go when laying the slabs, they should not coincide with the continuation lines of the slopes, otherwise the plaster finish will inevitably crack in this place. If such a situation occurs during installation, then inserts are made at the corners of the slopes, the thickness of which both vertically and horizontally must be at least 200 mm. These inserts can then be cut to fit the window opening.
This issue is solved by inserts at the corners of the opening.
The cutting of the slabs is carried out using a hacksaw with a fine tooth or a special knife.
Special knife for high-quality cutting of mineral wool boards
During installation, constant monitoring of the evenness of the resulting plane is carried out - until the adhesive mass has hardened. There is still an opportunity to make certain adjustments. For control, use a long rule and a building level.
The adhesive mixture must be given about three days to dry completely, and then additional mechanical fastening of the insulation water is carried out using dowels-“fungi”. Typically, 5 fasteners are used for each slab - in the corners and in the center. Often, in order to save money, dowels are installed in such a way that their head simultaneously holds adjacent slabs.
Recommended arrangement of dowels-"fungi"
A drilling depth limiter is installed on the hammer drill to ensure the required length of immersion of the spacer part of the dowel into the wall + 15 mm.
A hole is carefully drilled directly through the insulation, avoiding beating. A “fungus” is inserted into it and fixed with a spacer core. The hat should be slightly wrinkled, 0.5 ÷ 1 mm, into the mineral wool layer. The central hole of the dowel should be covered with a thermal cap. If it is not there, you can insulate it with polyurethane foam.
The installation of insulation boards is completed by checking the surface for the absence of cracks or places of loose fit. All identified defects are eliminated by densely inserting mineral wool wedges.
Find out which insulation is not chewed by mice from a new article on our portal.
Application of a base layer of reinforced plaster
The installed insulation requires covering with a protective reinforced plaster layer. as already mentioned, the same adhesive mixture can be used as the base material, but it is also possible to use a different solution recommended by the slab manufacturer and included in the overall insulation system. For example, in the ROCKWOOL ROCKFASAD system, the use of a special ROCKmortar plaster mixture is recommended. But the application technology does not change.
ROCKmortar plaster mixture
- The composition is diluted in the required quantity (ensuring its production within 1÷1.5 hours) in accordance with the instructions.
- Work begins with the most difficult areas - corners and slopes.
- An adhesive composition approximately 200 mm wide and 2 mm thick is applied to the sides adjacent to the corner. It is advisable to use a notched trowel with a ridge height of 5 mm - this will make it easier to stick the reinforcing layer.
- A corner with mesh stripes is installed, strictly along the line of the corner.
Corner reinforcement using a special profile
- Using a regular flat spatula, the mesh is pressed and sunk into the layer of solution. It is important not to leave “dry” areas, but at the same time, the mesh should remain in the thickness of the solution, and not lie close to the insulation.
On slopes the task is a little more complicated - here it is necessary to ensure a connection to the window or door structure. I usually do this - a special connection profile (U-shaped) is attached to the window or door block. The corner mesh is inserted into it (item 1), and then the entire slope is plastered with a base layer, so that the reinforcement remains inside it. The total layer of plaster on slopes should usually be thicker than on walls - about 6 - 7 mm.
Approximate scheme of slope reinforcement
Additional reinforcement of the tops of the corners of window and door openings is required. To do this, rectangular “kerchiefs” are cut out, which are applied as shown in the figure (item 2) and sunk into the plaster mortar.
Now you can move on to the surface of the walls. It is covered with plaster according to the same principle.
— The mesh is cut into strips (you shouldn’t get carried away with too long ones - it will be inconvenient).
— The glue is applied and distributed over the wall in a vertical strip of 1100 - 1200 mm, using a notched trowel.
— The first mesh strip from the corner is glued to the mortar so that there is an overlap of approximately 100 mm with the already completed reinforcement.
— Using the force of a spatula, the mesh is recessed into the applied (approximately 2 mm) layer of solution.
Embedding reinforcing mesh into a layer of plaster
— The next strips are also laid with an overlap of 100 mm both vertically and horizontally.
— From below, the excess mesh is trimmed to the level of the base profile.
Trimming excess reinforcing mesh
It is important to ensure uniform distribution of the solution over the entire surface of the wall and complete “immersion” of the mesh. That is why the use of a notched trowel seems to be the most convenient method.
The glue should set slightly - and it will be possible to carry out preliminary grouting, so as to achieve a uniform layer of approximately 2 mm. Then another layer of mortar is applied - also 2 mm, or 3 mm if it is not intended to use decorative plaster, but to limit it to façade paint.
When grouting the second layer, the task is to level the wall surface as much as possible in order to avoid even small defects, which may well appear through the decorative finish.
Grouting the base plaster layer
After the plaster leveled surface has completely dried (and this will take at least 72 hours), it is covered with a layer of water-dispersion primer, which will ensure reliable adhesion to the decorative coating.
If work is carried out during a hot period, then while the plaster layer is drying, it must be protected from direct sunlight - uneven evaporation of moisture can lead to the appearance of a network of small cracks.
The finished surface becomes a “blank slate” for any type of facade paint or plaster. But this is already a topic for a separate consideration, dedicated specifically to finishing work.
The work is completed by applying decorative plaster or facade paint
And at the end of the publication - a video tutorial on how to insulate walls using the “wet facade” technology using TechnoNIKOL materials.
Video: insulation using “wet facade” technology
Do-it-yourself insulation of walls inside the house
There are two ways to insulate the walls inside a house: glue mineral wool directly onto the surface itself, or lay it in a frame made of an aluminum profile. Below are step-by-step instructions for the first method:
- First, the walls are prepared for insulation. They are thoroughly cleaned and primed.
- After complete drying, you can glue the mineral wool to the wall using special glue.
- Next, for a more reliable result, the insulation is attached to the wall with dowels.
- A membrane film is applied on top, and a reinforcing mesh is installed on top.
- At the end the whole thing is primed and plastered.
After complete drying, you can glue the mineral wool to the wall using special glue.
The second method is used when mineral wool is in the form of slabs. It consists of the following steps:
- First, the entire wall is protected from moisture with a special film.
- Next, a metal frame is attached to the wall.
- After the aluminum profile is completely installed, mineral wool is inserted into the space between the slats. It is cut with a margin so that there are no gaps between it and the slats.
- When the wool is completely laid, it is covered with a vapor barrier film.
- At the end, the entire insulated wall is sheathed with the selected material. Typically, plasterboard boards are used for this.
After the aluminum profile is completely installed, mineral wool is inserted into the space between the slats.
Criteria for choosing mineral wool for wall insulation
Insulation of external and internal walls with mineral wool slabs will not be effective if the material is chosen incorrectly. After all, when purchasing insulation, it is important to consider several important criteria:
- The thickness of the mineral wool, which is selected depending on the climatic conditions of the region where the house is built.
- The form of insulation, selected based on the insulation method.
- Environmental friendliness of materials used during the production of mineral wool.
- Degree of vapor permeability. It is desirable that it be maximum.
- The degree of flammability that mineral wool should have is minimal.
- The type of insulation selected in accordance with the purpose of the building (residential or commercial).
Today, in construction stores it is possible to find mineral wool slabs and rolls that meet all these criteria.
The thickness of the mineral wool is selected depending on the climatic conditions of the region where the house is built.
Tips and tricks for insulating walls with mineral wool
Below you will find advice from experienced craftsmen on insulating walls with mineral wool. They will help you perform installation work on insulation efficiently:
- Before starting work, you must carefully read the step-by-step instructions for insulation;
- Do not forget about creating a vapor barrier after laying mineral wool inside the frame or when attaching it directly to the wall itself;
- It is important to wear protective equipment to protect your eyes, hands and respiratory tract from small cotton wool particles;
- It is necessary to ensure that there are no gaps between the sheathing and the slabs through which cold air and moisture can penetrate.
It is necessary to ensure that there are no gaps between the sheathing and the slabs through which cold air and moisture can penetrate.
If you follow all these recommendations, anyone can insulate walls with mineral wool without outside help.
Content:
- What is mineral wool
- What types of mineral wool are there?
- Advantages and disadvantages: why mineral wool is preferable for insulating a residential building
- Methods of wall insulation:
- External insulation
- Insulation from the inside
- Waterproofing
- How to correctly calculate insulation
The modern market offers a large number of different insulation options. However, the most common among them is mineral wool. It is most widely used in housing construction, including individual construction, where, due to its characteristics, there is practically no alternative.