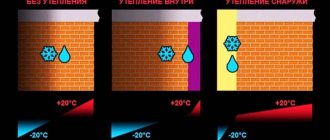
Heating or insulating?
When the temperature in the garage is below freezing, the condensation freezes. And when the engine heats up, it begins to melt. Freeze-thaw cycles do not benefit either the metal or the internal mechanisms.
But heating the room is not the optimal solution. By leaving a warm garage into the cold, we create a situation of sharp temperature changes. And when we return back to the heated space, we get the formation of condensation even on those parts where moisture does not enter when the car is moving.
Experts say that the best conditions for winter car storage are created when the thermometer shows +5°C. The danger of corrosion under such conditions is minimal, and the temperature difference between the street and the room does not have such a detrimental effect on the car.
Accordingly, when choosing between connecting to the heating system and insulating the garage with your own hands, it is wiser to choose the second option. Moreover, it will help you save on your monthly energy bills.
Restoring air circulation
Cheap air recuperator.
has both positive and negative consequences. The positive aspects are obvious - it becomes warm, the car is easy to start in the morning. The negative aspects include the lack of air circulation. Logically, heat preservation is required in the cold season, that is, in winter. In winter there is a lot of snow, which sticks to the car wherever possible.
When the vehicle warms up in the garage, the snow will also melt, increasing the humidity in the room. And, as you know, high humidity, heat and lack of air circulation cause fungus to appear. In addition, high humidity, caused by the thermal insulation of the garage from the inside, negatively affects the car body. It begins to rust, the effect is enhanced by the salt that is scattered all over the roads. How to make it so that:
- the room was warm;
- there was a constant flow of fresh air.
As an option, you need to insert an air recuperator into the air window, which has long been sealed and sealed. There are units for 3 thousand rubles, which are built into a hole in the wall. In this case, it’s simply an ideal option. The device is connected to the network and works constantly without turning off. It takes heat from the exhaust air and transfers it to the supply air. An article about air recuperators will help you study this issue in more detail. One of the options for how to insulate a garage from the inside is clearly shown in the video:
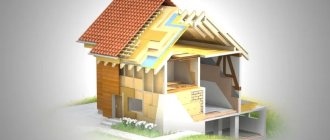
Basic requirements for garage insulation
When insulating a car storage area, it is worth remembering a number of key points.
- Ventilation holes must not be sealed - any thermally insulated structure needs ventilation just as much as a heated one.
- Thermal protection should affect not only walls, but also garage doors, floors, and roofs.
- If you want to do everything according to the rules, it would be useful to study the sixth section of SNiP 2.07.01–89. It regulates the requirements for premises where vehicles are stored. Of course, when it comes to a personal garage, it is not necessary to comply with them. However, standards can help address a number of issues.
- To insulate the gate, in most cases, internal thermal protection is installed.
Materials market review: choosing the best
The first thing you have to consider when choosing a heat insulator is the type of insulation you choose. For example, moisture-permeable materials, when wet, change their properties. Therefore, they are not a good option for external thermal protection. And for internal thermal insulation, insulation materials that emit harmful substances in the summer heat or during domestic heating are not suitable.
The modern market offers several types of materials for thermal insulation of garages. Let's consider the main properties and characteristics of the most popular of them.
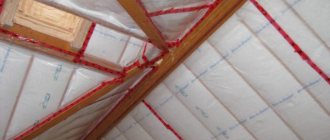
Roof treatment
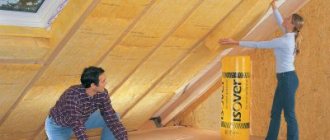
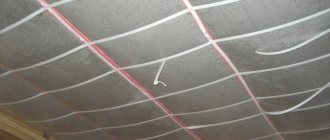
The roof also requires thermal insulation, because all the warm air passes through the cracks. If the roof is made of wooden boards, then it is necessary to secure it with nails or dowels. The top of the roof is covered with insulating material.
The method of attaching foam depends on the characteristics of the ceiling
If the garage has a concrete floor, internal thermal insulation will require a frame attached to the slabs with self-tapping screws. They are screwed into dowels. To make it more convenient, the foam plastic must first be secured with tape to the frame.
To do this, waterproofing is laid on the street side, and vapor barrier is installed on the inside. It is this that prevents moisture from penetrating in the form of steam.
Mineral wool
Available in the form of slabs and rolls. It retains heat well and has sound insulation properties. But at the same time, it easily absorbs moisture - high humidity is the main enemy of cotton insulation. And when wet, it completely loses its ability to insulate heat. Therefore, its use requires high-quality hydro- and vapor barrier. It is almost impossible to dry this insulation; it becomes brittle and easily damaged. And when the glass wool gets wet during installation, it clumps and becomes unsuitable for further use (cavities appear inside it).
Considering that the external insulation pie can be damaged or depressurized, using this material is risky. In general, mineral wool is not the best choice for vertical installation. It has considerable weight and consists of fibers. Under their own weight, they can sag over the years, and voids will begin to form between them - the so-called cold bridges.
This heat insulator has two advantages: low price and equally low thermal conductivity. But that's all. Then only the shortcomings begin. Once in the lungs, glass particles are no longer excreted from the body. They leave itching and irritation on the skin. When installing them, a protective suit, a respirator and a mask are required, and after completion of work, a thorough cleaning of the room is required. Then you will have to wait a day or two until the glass dust, invisible to the eye, settles.
If during operation there is at least partial damage to the protective layer of films or foil material, you will again need to rent special clothing and resort to cleaning after completion of the repair.
And finally, the material shrinks and is not durable. Therefore, it does not matter what type of insulation you prefer: internal or external, it is better not to stop at this option.
From the perspective of the insulation used
When considering how to insulate a garage, you may encounter a number of materials that have similar or different properties, but are recommended for performing thermal insulation work.
Which insulation for a garage is better to choose?
Insulation requirements:
- hygroscopicity. Regardless of the environment, the material must perform its functions. And, as you know, wet insulation loses its thermal insulation ability. Of course, it is possible to provide additional protection to any material, but this will affect the cost estimate;
- thermal conductivity. The lower this indicator, the longer the heat will stay in the garage;
- thermal inertia. Shows how quickly the room cools down. The thermal inertia index is inversely proportional to thermal conductivity;
- Fire safety. The insulation should not support combustion;
- price. If the goal is to insulate the garage inexpensively, then you need to pay attention to this parameter. Moreover, you should start not from the cost of insulation (cheap does not always mean bad), but from the total amount of expenses, which include other materials, tools and wages;
- ease of processing and installation.
Several thermal insulation materials meet these criteria.
Table of thermal conductivity of insulation
Insulating a garage with foam plastic
The most common option that allows you to provide thermal insulation for a garage relatively cheaply. The leading position of foam plastic was ensured by: low price, hygroscopicity, excellent thermal insulation properties, light weight, availability, ease of installation. Disadvantages include: flammability, exposure to ultraviolet radiation, and the ability to crumble. Polystyrene foam needs protection.
Insulating a garage with polystyrene foam
It is an improved version of polystyrene foam. The main component of expanded polystyrene is styrene with the addition of foaming agents. Extruded polystyrene foam does not support combustion, is hygroscopic and has excellent thermal insulation properties. In addition, it is not a medium for the development of bacteria and can withstand the effects of some chemical reagents. However, petroleum products, alcohol and organic solvents can harm it.
From an installation point of view, polystyrene foam is also preferable, because due to its dense structure, it is more convenient to use and has a reliable “groove-tongue” connecting system, which reduces the area of cold bridges. A relative disadvantage can be considered a higher cost than polystyrene foam. One of the patented brands of expanded polystyrene is Penoplex (thermal insulating boards made of foamed polystyrene Penoplex). Insulating a garage with penoplex has the same advantages and disadvantages as with expanded polystyrene.
Insulation of garage with foam insulation
Penoizol is a urea-formaldehyde foam. It has advantages similar to the materials described above and several additional ones. The most important of them is insulation technology. Penoizol is pumped into technical voids; for this purpose, holes are made in the finished building and the solution fills the space between the frame, wall, floor or roof, and in a building under construction it is poured into the voids. Thus, insulation with penoizol is the most airtight of all existing ones, because has no seams or joints, fills all the cracks.
Penoizol is often called liquid foam, due to its fluidity and good insulating properties. At the same time, it has optimal vapor permeability. However, insulating a garage with foam is difficult to do on your own, because... The work is fraught with a number of difficulties. Among them: the need to prepare the mixture directly near the garage (a lot of space is required), the need to use special equipment for preparing and pumping the mixture (penoizol is injected under pressure).
In addition, it should be noted that in Western European countries and some states of the USA, penoizol is prohibited for installation in residential premises.
Insulating a garage with polyurethane foam
PPU is also a liquid insulation material. But, unlike penoizol, its basis is plastic (polymers). Thus, imparting additional properties to the material, such as: elasticity, structural integrity (the material does not crumble), good adhesion to any surfaces.
Polyurethane foam is applied by spraying onto the surface. PPU, unlike penoizol, is not prohibited in any country in the world, and can be used without restrictions, provided that the application technology is followed. Thus, insulating a garage with PPU is the most progressive option, but also the most expensive.
Insulating a garage with penofol
Penofol insulation is a thin foil material made of polyethylene foam. Penofol is rarely used as an independent insulation, but its advantages include: small thickness, the ability to reflect heat, ease of installation, and environmental friendliness.
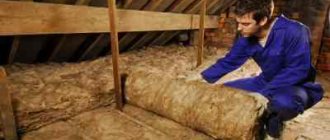
Insulating a garage with mineral wool
Mineral or glass wool have one common drawback - they are afraid of moisture, which means they need additional protection with hydro- and vapor barrier films. In addition, wool is a flexible thermal insulation material, i.e. its installation requires the installation of a frame. All this leads to the fact that wool, despite its excellent thermal insulation properties, is rarely used to insulate a garage.
Insulating a garage with expanded clay
Another thermal insulation material that is used to insulate a garage. Expanded clay is poured onto the floor or roof slab. The advantages of expanded clay gravel are that it has high strength, resistance to the environment, is accessible and easy to backfill.
Styrofoam
This material is very popular due to its low cost and ease of installation. It retains heat well and lasts for decades. You can install it yourself, without having any special tools or special construction skills at hand. But it still cannot be called an ideal solution. Although not as significant as mineral wool, it absorbs moisture. Very easily damaged and crumbles. Its granules have low adhesive strength, so over the years they can fly out even with accidental pressure on the material.
But that’s not even the main thing. There is a huge amount of uncertified polystyrene foam in the market due to the high demand for it. Finding a high-quality and safe product for health is not an easy task. And the one that was produced in violation of technology, when the temperature rises and the sun’s rays hit it, it begins to release toxic substances. Considering that the garage is a closed space, this is fraught with serious health problems for the car owner.
Flat roofing is correct and not
Flat roofing in Russia has a worse reputation. According to ordinary people, it must leak, because rain moisture and snow have nowhere to go compared to a pitched rafter roof. Water must certainly accumulate and test the strength of the waterproofing layer every second. And this means constant repairs, waste, effort, nerves...
Where does the stereotype come from? From the very recent past.
In the USSR, flat roofs were used in the construction of multi-story administrative and utility buildings, as well as residential buildings from three to twelve floors. Until now, in advertisements for searching for an apartment they write the sacramental: “Not the last floor,” because it is firmly entrenched in the mind that the roof will leak, the ceiling will get wet and turn black. Proven by practice. In those days, the issue of energy efficiency of buildings was not on the agenda, and therefore no one was particularly concerned about how to get rid of the disadvantages and turn them into advantages. Year after year they patched up roofing felt, whitewashed the ceilings, scolded the material, the hands and those who came up with the idea of building flat roofs, and that was all.
Meanwhile, already in those years it was possible to build truly aesthetic and practical roofs, including in the private sector. Moreover, such a roof has a number of advantages over pitched roofs:
- the final area is significantly smaller, which means the consumption of materials is also reduced;
- there is no need to erect complex rafter structures, and there is no need to ventilate the attic;
- it is easier to work on construction: all manipulations are carried out on a plane, and not at a serious slope;
- more convenient to use: you can walk on it, you can mount solar collectors, antennas, external air conditioning units on it, and also organize an additional recreational area - solarium, barbecue, even a swimming pool;
- there is no risk of snow melting, and there is no need to clear the roof of it: with the correct construction technology, the snow cover will become an additional heat-insulating layer, and in the spring it will melt and neatly flow in rivulets into, again, a properly organized drain;
- gives more options for architectural solutions.
Strictly speaking, a flat roof is not flat at all, it has a slight slope of 2 to 4% to drain water. The slope can be centripetal, then moisture flows from the edges to the center, like in a kitchen sink, and enters the internal drain pipe. Or there may be a reverse slope, when the edge of the roof is 2-4% below the central point, the ridge. Then rain or melt water goes into gutters and drainpipes located on the facade. Therefore, a properly constructed roof should not leak.
The second mandatory condition for a “correct flat roof”, which previously was not taken into account at all, is insulation. After all, from 30 to 40% of heat loss occurs through the roof: warm air collects under the ceiling, and if it does not meet a barrier, it easily leaves your home.
Another side of this coin: it is the warm air from the room that heats the ceiling and melts the snow accumulated outside. Alone, waterproofing can withstand this pressure for some time, and then the layer begins to deteriorate and requires replacement. At the same time, the ceilings are covered with black and white painting of fungus.
Therefore, although the installation of a flat roof is more budgetary, you cannot save on technology. All layers of the roofing pie must be in place and made of materials of proper quality. But what it will be like depends on which design you choose. They are distinguished based on:
- Constructive division into attic and non-attic. From the names it is clear that we are talking about whether you want to equip the under-roof space or not.
- Functional division into exploited and non-exploited. Installing a roof on which people will actively walk, on which they will install furniture, appliances, lay lawns and install swimming pools, is significantly different from installing a roof that will not be inhabited in the future.
- Divided according to the method of insulation into traditional and inversion. That is, the layers are laid in the usual or reverse order.
All classifications are closely related and influence each other. For example, a green roof that is in use, that is, on which a plant carpet will appear, requires inversion laying of the “pie”. And the attic allows you to use both methods.
Whatever problems you solve, constructive or functional, the basis for the execution of any option will be insulation. It serves not only its intended purpose - with its help, the same slope of 2-4% is formed, and also ensures the strength of the top layer. So you need to take the choice as responsibly as possible.
PENOPLEX (extruded polystyrene foam)
Perhaps, for insulating a garage from the inside with your own hands, this is the best option. It is affordable and even easier to install than foam plastic - the joints do not need to be sealed with foam, because they have L-shaped grooves. It is easy to cut and can be glued directly to the wall.
But the most important thing, of course, is its thermal insulation ability - one of the best among modern materials. Moreover, it remains unchanged in any situation. PENOPLEX does not get wet (moisture absorption coefficient is less than 0.4% in 28 days), is not afraid of defrost-freeze cycles and lasts for more than 50 years.
It is resistant to compression, does not shrink, absorbs noise, does not rot, does not harbor insects, and to top it all off, it is a homogeneous mass of polymer without individual granules. This provides it with high strength even many years after the work has been carried out.
Summarizing all of the above, we conclude that this material is ideal for both external and internal insulation.
How to insulate a garage from the outside - step-by-step instructions
For external work, it is most convenient to use rigid slabs. The cheapest option is polystyrene foam. PENOPLEX is more expensive, but much more effective in terms of moisture resistance, heat protection, service life and strength. Therefore, we will consider the installation procedure for this particular material. However, it is almost no different from the foam insulation technology.
We will need:
- glue (branded PENOPLEX is best, since its composition is specially adapted for this insulation and does not destroy it);
- a spatula for applying glue or a special gun;
- paint knife or jigsaw for cutting sheets;
- fastening disc elements (4 pieces for each plate).
Step 1.
We prepare the walls.
We clean them of old paint, dirt, dust, cobwebs and other things. You can use a primer to help the glue adhere better. But this is an optional point.
Step 2.
We fix the bottom bar.
It is typical for slabs to start installation from the ground. We attach the starting profile to the dowels and begin laying the material in a checkerboard pattern.
Step 3.
Insulation fasteners.
This is a simple matter: apply glue in strips to the slab and apply it to the wall. We connect the L-shaped grooves to each other, thereby ensuring a tight fit of the material without gaps. When the glue dries, for greater reliability we fix the sheet with disc-shaped dowels.
Step 4.
Final works.
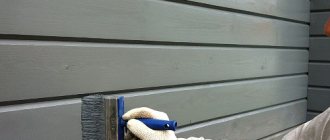
To protect PENOPLEX from ultraviolet radiation and make the facade more aesthetically pleasing, we plaster the walls or cover them with siding, DSP, or other material.
Walls
We start, similar to the ceiling, with waterproofing. At a distance of approximately 60 cm from the floor, frame beams are installed to attach the insulation, but you can use a simplified version by placing the insulation on glue or attaching it to the wall with self-tapping screws.
Insulation is laid between the beams if you still choose this type of fastening. The next stage is attaching the vapor barrier film with staples and covering the walls with any material desired.
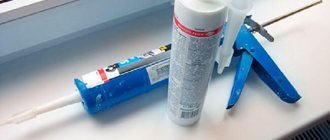
An important point: before starting facing work, seal with sealant or foam all the cracks and inconsistencies left after attaching the insulation. The exception is ventilation.
Floor insulation
It can be done in different ways. One of the simplest and least labor-intensive options is PENOPLEX insulation under the screed. To do this, the floor will need to be raised a little. This will reduce the height of the room, but you won’t have to dig a pit - you can install the heat insulator on the existing floor. The procedure is simple.
1. Clean the surface, make a cement-sand screed (CSS) or level the coating using building mixtures. It is important that the differences do not exceed 5 mm.
2. At the next stage, we lay the PENOPLEX FOUNDATION® directly on the floor without using glue or dowels. You can put insulating material in one or several layers.
3. To distribute upcoming point loads, it is necessary to fill with concrete mortar or self-leveling mixture 40 mm thick. In this case, the insulation is insulated with film, and its seams are securely fastened with tape. Leave 1–2 cm of empty space between the wall and the screed to take into account thermal expansion and subsequently make noise insulation by filling it with polyethylene foam.
4. At the finish, the finishing floor is laid.
Stages of internal thermal insulation work
Internal thermal insulation of a garage with foam plastic should be carried out only with additional forced ventilation. This way the room will maintain the microclimate necessary for the car.
You can ensure air circulation by placing air vents near the floor and ventilation holes near the ceiling. Do not forget to equip them with protective nets so that uninvited guests - birds, rodents, insects - do not end up in the garage
Floor insulation
The feasibility of floor insulation with foam plastic must be assessed in each individual case. Of course, the picture will not be complete if only part of the surfaces are protected from the cold, leaving the other with an open gate. This disrupts the balance of the microclimate.
But there are situations when it is impossible to build a full layer of insulation on the garage floor. Installing insulation will raise the floor by 10-20 cm in height. Accordingly, you need to be sure that this will not interfere with the passage of the car through the garage door. A peeled car roof, even in a very cozy garage, is unlikely to add joy to you.
If you did not insulate the floor according to the classical scheme at the construction stage, you can modify it to slightly reduce heat loss. Cover the floor with boards or OSB boards. The insulation will not be serious, but it will have a certain effect. The floor will not be very cold, and the air gap under the boards will contain the cold.
If you still want to more seriously insulate the floor in a built garage, you will have to remove some of the soil and deepen the floor. After this you need:
- level and compact the ground;
- pour a sand cushion 10 - 30 cm high;
- make a screed with reinforcement;
- lay polystyrene foam;
- make a screed with a nylon mesh;
- make the finishing coat.
Insulation of walls from the inside
Thermal insulation of garage walls with polystyrene foam is the easiest and most cost-effective way.
- Clean the walls from dirt, fill cracks and potholes.
- Create a sheathing from wooden beams if the finishing material is not plaster, but plastic panels or plywood.
- Treat the surface with a primer to increase adhesion.
- Attach the foam with glue.
- Secure it with umbrella dowels.
- Treat the seams with polyurethane foam.
- If the wall is covered with plaster, then glue the reinforced mesh.
- Do the finishing touches.
Ceiling insulation
How to properly insulate the ceiling in a garage? Same as walls. All stages are repeated. True, the process itself will seem a little more complicated to you. It is not very convenient to fix the slabs to the ceiling; a concrete ceiling is more difficult to drill.
Alternatively, you can use liquid nails or polyurethane foam. The sheets will set quickly and fixing the dowels will be easier. Some craftsmen believe that you can do without dowels altogether if you glue them with liquid nails. But this is at your discretion. We talked in detail about how to glue sheets here.
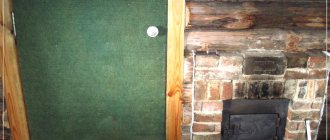
Gate insulation
Foam plastic is best suited for insulating gates, as it is lightweight and not afraid of moisture. The sequence of actions looks the same. But first you need to cover the contact areas between the EPS and the metal of the gate with anti-corrosion protection. This will help avoid corrosion if condensation occurs.
Insulation of the cellar
The technology for insulating the cellar is similar to that already described. But special attention should be paid to the issue of waterproofing. Since the contact of the walls and floor of the basement with earthen soil causes increased humidity.
You can make a waterproofing layer on the inside of the cellar using a polymer film, bitumen mastic or roll insulation. The ceiling of the cellar can be covered with a vapor-waterproofing membrane.
After this layer, you need to install foam sheets in the usual way.
Gate protection
Many people are faced with the problem of seasonal “walking” of the pillars (the base of the gate), which is why they do not close. The best solution is to protect the base (posts) from freezing when installing the gate. If you have already installed ordinary iron gates, then they must also be thermally insulated from the inside. If it is possible to attach the sheets with dowels to the material from which the gate is made, it is worth doing so. If not, the usual glue method will do. The already glued insulation is covered first with a vapor barrier film, then with outer skin. To enhance thermal protection, you can use foiled polyethylene.
Thus, the correct choice of thermal insulation material makes insulating a garage a fairly simple process that anyone can do.
15.06.2018
Return to list
Let's sum it up
In conclusion, we can say that covering a roof with insulation is not so difficult. The main thing is to understand the feasibility of such work: if the garage is built, then there is no point in dismantling the entire roof for the sake of insulation from the outside, because in this case it can be insulated from the inside. When insulating the roof, you need to understand the types of materials and, if possible, take into account the specifics of your garage, use non-flammable insulation if you are working with a welding machine or burners. We wish you good luck in all your endeavors!
dimensions of TechnoNIKOL insulation 100 mm
Source