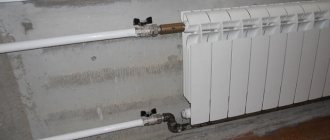
Are you planning to change the heating appliances in your own home? For this, knowledge about the types of battery wiring, methods of connecting and placing them will be useful. Agree, because the correctness of the selected connection diagram for heating radiators in a particular house or room directly determines its effectiveness.
Correctly connecting the batteries is a very important task, because it can provide all rooms with a comfortable temperature at any time of the year. It’s good when fuel consumption is minimal and your home is warm on the coldest days.
We'll help you understand what you need to get your radiators running as efficiently as possible. In the article you will find a lot of useful information about ways to connect batteries and their implementation without the involvement of specialists. Diagrams and videos are provided that will help you clearly understand the essence of the issue.
Types of heating systems
The amount of heat that the heating radiator will emit depends not least on the type of heating system and the selected type of connection. To choose the best option, you must first understand what kind of heating systems there are and how they differ.
Monotube
A single-pipe heating system is the most economical option in terms of installation costs. Therefore, this type of wiring is preferred in multi-storey buildings, although in private buildings such a system is far from uncommon. With this scheme, the radiators are connected to the main line in series and the coolant first passes through one heating outlet, then enters the input of the second, and so on. The output of the last radiator is connected to the input of the heating boiler or to the riser in high-rise buildings.
Example of a one-pipe system
The disadvantage of this wiring method is the impossibility of adjusting the heat transfer of radiators. By installing a regulator on any of the radiators, you will regulate the rest of the system. The second significant drawback is the different coolant temperatures on different radiators. Those that are closer to the boiler heat up very well, those that are further away become increasingly colder. This is a consequence of the serial connection of heating radiators.
Two-pipe wiring
A two-pipe heating system is distinguished by the fact that it has two pipelines - supply and return. Each radiator is connected to both, that is, it turns out that all radiators are connected to the system in parallel. This is good because the coolant of the same temperature enters the input of each of them. The second positive point is that you can install a thermostat on each of the radiators and use it to change the amount of heat it emits.
The disadvantage of such a system is that the number of pipes when laying out the system is almost twice as large. But the system can be easily balanced.
Single-pipe
The operating principle of a single-pipe heating system is circular circulation of liquid along one line. The heated coolant leaves the boiler and passes sequentially through each connected convector.
Each subsequent one receives water from the previous one; as it passes through, part of the heat is lost as a result of cooling. The further the battery is from the boiler, the lower its temperature. If one element fails, the operation of the entire circuit is disrupted.
To avoid this, it is recommended to install the wiring with a bypass path.
Installation is carried out horizontally or vertically ; in the second case, it is optimal to install the boiler at the lower level to ensure natural circulation of liquid.
Advantages of a single-pipe scheme: ease of installation, low cost of consumables, aesthetics (with horizontal wiring, the pipe can be hidden, for example, mounted under the floor).
Flaws:
- Interconnection of circuit elements - failure of one radiator leads to disruption of the entire system;
- High heat loss;
- Inability to control the heating of individual elements of the system;
- Limited heating area (up to 150 m2).
However, for a one-story house with a small area, it is more rational to choose this type of heating.
Connection features
Methods for connecting radiators
When installing heating systems in private homes, the following connection methods are used:
In this case, the supply pipe is connected from above, and the return pipe is connected from below to the same section. This connection diagram for the heating battery allows the radiator to heat up evenly. However, if the accordion has a large number of sections, then significant heat loss will occur, so it is better to use other connection options.
Saddle and bottom
This method is an excellent option for cases where pipes run through the floor. The connection is made to the pipes located at the bottom of the structure, in opposite sections. The only disadvantage of this method is its low efficiency, since heat loss can reach 15 percent.
Used when connecting devices with a large number of sections. As you might guess, the inlet pipe in this case is connected from above, and the outlet pipe from below, in the opposite section. This scheme for connecting heating radiators in a private house promotes uniform distribution of coolant and maximum heat transfer from appliances.
Note! When using a thermostat for heating parallel to the radiator, a bypass must be installed. This will allow you to regulate the degree of heating of the device.
Radiator connection diagram
As we can see, the methods for connecting heating radiators depend on a number of factors, such as the method of laying pipes, the power of the equipment, etc. In particular, the type of system is of great importance. We will talk in more detail about the types of heating systems below.
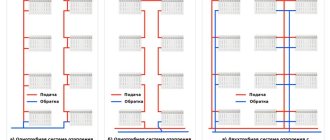
Single-pipe system diagram
Types of system
When installing heating systems, two schemes are used:
- Single-pipe - is the simplest, since the coolant circulates through one pipe, to which heating devices are connected in series. Its disadvantage is that it does not allow you to regulate the heat supply. Therefore, heat transfer corresponds to the design norm laid down during the design. This scheme is used in small systems, since with a long pipeline and a large number of radiators, the devices will heat up unevenly.
- Double-pipe - its meaning is that hot water flows through one pipe, and cooled water returns to the boiler through the other. In this case, heating batteries are connected in a private house, respectively, in parallel. The advantage of such a device is the uniform heating of the sections, as well as the ability to adjust the heat transfer. The only drawbacks that can be identified are the need for more pipes; accordingly, the cost of the structure increases.
Diagram of a two-pipe system
It should be noted that, regardless of the type of system, connecting heating batteries with your own hands can be done in two ways:
- According to the vertical scheme, the heating device is connected to a vertical riser, from which wiring is carried out to the radiators.
- According to the horizontal scheme, the coolant circulates through horizontal pipelines.
The choice of heating battery connection diagram depends on the characteristics of the house. For example, if the housing contains several floors, then the connection is realized according to a vertical scheme.
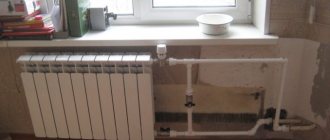
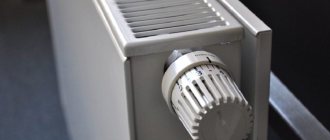
In the photo there is a radiator located under the window
What does it take for batteries to work efficiently?
An efficient heating system can save money on fuel costs. Therefore, when designing it, you should make informed decisions. After all, sometimes the advice of a neighbor in the country or a friend who recommends a system like his is not at all suitable.
It happens that there is no time to deal with these issues yourself. In this case, it is better to turn to professionals who have been working in this field for at least 5 years and have grateful reviews.
Image gallery
Photo from
Marking the wall and installing brackets
Position control before fastening
Connecting the radiator to the supply pipe
Connecting the radiator to the return pipe
When deciding to install new batteries or replace heating radiators yourself, you need to take into account that their efficiency is directly affected by the following indicators:
- size and thermal power of heating devices;
- their location in the room;
- connection method.
The choice of heating devices amazes the imagination of the inexperienced consumer. Among the offers are wall-mounted radiators made of various materials, floor and baseboard convectors. They all have different shapes, sizes, heat transfer levels, and connection types. These characteristics must be taken into account when installing heating devices into the system.
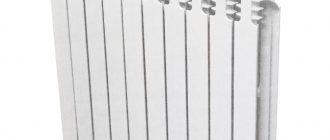
Among the models of heating devices on the market, it is better to choose based on the material and thermal power specified by the manufacturer
For each room, the number of radiators and their size will be different. It all depends on the area of the room, the level of insulation of the external walls of the building, the connection diagram, the thermal power indicated by the manufacturer in the product passport.
The location of the batteries is under the window, between windows located at a fairly long distance from each other, along a blank wall or in the corner of the room, in the hallway, pantry, bathroom, in the entrances of apartment buildings.
Depending on the location and method of installation of the heating device, there will be different heat losses. The worst option is a radiator completely covered with a screen
It is recommended to install a heat-reflecting screen between the wall and the heating device. You can make it yourself using one of the heat-reflecting materials - penofol, isospan or another foil analogue.
You should also adhere to the following basic rules for installing a battery under a window:
- all radiators in one room are located on the same level;
- convector fins in a vertical position;
- the center of the heating equipment coincides with the center of the window or is 2 cm to the right (to the left);
- the length of the battery is at least 75% of the length of the window itself;
- the distance to the window sill is at least 5 cm, to the floor - no less than 6 cm. The optimal distance is 10-12 cm.
The level of heat transfer from devices and heat loss depends on the correct connection of radiators to the heating system in the house.
By following the basic standards for the placement of radiators, you can maximally prevent the penetration of cold into the room through the window
It happens that the owner of a home is guided by the advice of a friend, but the result is not at all as expected. Everything is done like his, but the batteries don’t want to heat up.
This means that the selected connection diagram was not suitable specifically for this house, the area of the premises, the thermal power of the heating devices were not taken into account, or annoying mistakes were made during installation.
Serial connection of two heating radiators
sansvar wrote. What the customer bought, I delivered. the number of sections and location, the choice made in advance before my recommendations and advice. For example, I actually suggested that he put one instead of two, well, I don’t like the diagonal connection. It’s kind of ugly, there’s a lot of “extra” pipes
Yes, I realized this right away, I’ve seen loads of them like that, by the way, I know that there are weirdos, enough.
sansvar wrote. You can’t put the tap on bypass, I’m just not one of those people... if something is very critical in the customer’s desires, I refuse even for an additional payment
And it is right.
I'll bring up the topic. From the developer we have two steel panel radiators Maxterm type 22 (double-row, double-panel) with bottom connections (apartment wiring, Bir Pex). In appearance, they seem to have bypasses (they didn’t answer anything about this on the manufacturer’s website). No, I’m lying. Answered:
Please tell me, when the thermal valve is closed, the coolant bypasses the radiator (the coolant flow remains constant) or the thermal valve simply blocks the coolant flow. Thanks in advance for your answer. Yes. The thermostatic head regulates the flow through the radiator through the valve stem. Those. regulates the coolant flow through the radiator. And the constant flow through the system is maintained. Moreover, if all radiators operate to limit flow, then the system resistance increases. And in this case a bypass must be provided.
My task is to modernize the distribution of heating pipes in the apartment in order to ultimately get as few intersections and joints of pipes as possible. There is already one piece of advice to replace my Wishlist with a collector circuit. But I can’t understand why it is believed that water shunted through the bypass (after all, there are very strong suspicions of its presence) will poorly heat the second radiator?
Registration: 03/25/2011 Penza Messages: 7080
12/10/2013 at 16:18
Loki wrote. we have two steel panel radiators Maxterm type 22 (double-row, double-panel) with bottom connection
Loki wrote. have bypasses (nothing was answered about this on the manufacturer’s website)
Bypasses are used only in single-pipe heating systems. And they don't happen inside radiators. There are bottom connection fittings with built-in bypasses.
Draw a general diagram of the heating system in the apartment. Without it, it is unclear whether you have a one-pipe or two-pipe system. Also indicate the brand of radiator bottom connection fittings used.
Loki wrote. Will the second radiator heat up badly?
If the pressure difference on the supply and output lines (supply/return) is sufficient, then the radiators will heat normally, provided that the hydraulics of the entire residential heating system are calculated and rebalanced with adjustment. Because connecting an additional radiator will introduce an imbalance in the operation of the apartment’s heating system.
It is not possible to answer how critical the imbalance will be without carrying out hydraulic calculations.
Hydraulic calculation of heating systems. Heat calculation (calculation of insulation) of houses and apartments.
Sergants. poorly legible photo. But from what I was able to see, I conclude that the system is two-pipe.
It is better to install a floor (in-floor) convector of sufficient power under the window. Then there will be no need for additional radiators.
Sergants wrote. And is it possible to leave the fittings that are in place now?
It is strange that there is a regular ball valve on the return line, instead of a shut-off valve. Then the thermal valve under the blue cap should have presets. If so, then leave it and do not upset the design presets.
Hydraulic calculation of heating systems. Heat calculation (calculation of insulation) of houses and apartments.
Video instruction with advice from a specialist
Hello! I have the following problems with heat: 1) In the corner apartment in the children's room there are two supply and return pipes. The supply pipe is fiery and the return pipe is several times colder. The radiators are connected to the return line, is this correct or not? Can I connect radiators in addition to the supply and run them along a cold street wall? 2) There is no radiator or pipe in the toilet at all, although the wall is also cold (outdoor). 3) In the bedroom there is only a pipe (return) with a radiator battery connected to it, and through the wall in our kitchen there is a supply. Is it possible to somehow combine two rooms and install them in two rooms with a supply pipe?
In our 9-story building, the heating system is built like this: one supply pipe goes from bottom to top. Radiators are connected to it on all floors in parallel with jumpers. The coolant enters the radiator from below, and the upper outlet from the radiator is connected to the same pipe. Only part of the radiator warms up. How to properly connect a radiator so that it warms up completely?
Good afternoon. The nine-story building has a two-pipe heating system in every room. In one room, the heating supply pipe runs upstairs past all the radiators. Accordingly, all the radiators from the ninth floor are connected to the return line, and my battery on the second floor is generally almost cold. Tell me whether this connection is natural, or is it just a mistake made by the mechanics?
Hello! Please tell me how correct your data is in determining an effective method for connecting a radiator? And what sources can you refer to to obtain the above data? Thanks in advance everyone!
Embed the valve into the jumper (which is not entirely legal if there are valves on the radiator) or reconnect the radiator in a diagonal pattern. On propylene it is simple and fast, compact and quite aesthetically pleasing. The top insert (outlet) is transferred instead of the top plug opposite. Do not forget that the thread direction of the plugs is mutually opposite.
Obviously, you have a single-pipe heating system in your house, in which some rooms are connected to the pressure line, and other rooms are on the return line. This is a moronic Soviet system - the return water is already cooled and cannot heat the room. But you may be fined for installing additional batteries, because... such alteration of the project is not permitted
Connecting a radiator to a single-pipe heating system
“Leningradka” is the most common, cost-effective single-pipe heating system (see diagram). It is used in apartments and small houses. It can be vertical - in the entrances of a house between floors, and horizontal - in a room or on the same floor.
Radiators with bottom and top connections can be connected to a single-pipe heating system. If the radiator has a bottom wiring, then the coolant is installed below the level of the heating devices, pipes run horizontally from it, which then rise up to the radiators. For radiators with top wiring, on the contrary, the coolant is installed at the highest point of the heating system, and water circulates from there.
Only in single-pipe heating circuits are valves used to shut off the water. They are located in so-called branch sections, the volume of which is several times smaller than the main pipes of the heating system.
Radiator design
Structurally, batteries can be assembled from several sections or non-removable (panel). Collapsible ones can be lengthened by adding sections, or shortened. Any radiator has a collector at the top and bottom for the passage of water.
In sectional designs, each section has a small vertical channel connecting the upper and lower collectors. Vertical passages are also available in panel models.
The radiator has four inputs. Usually only two are used. Hot water supply and return pipes are connected to them. The remaining two inlet openings are plugged with plugs; a Mayevsky faucet is installed in one of them to bleed air.
What is the importance of choosing a radiator installation location?
Regardless of whether the heating radiators are connected in series or in parallel, the functional purpose of these devices is not only to heat the room. By means of batteries, a certain protection (screen) is created from the penetration of cold from the outside. This is precisely what explains the location of the batteries under the window sills. With this distribution of radiators in places of greatest heat loss, that is, in the area of window openings, an effective thermal curtain is created.
There simply cannot be a battery in this place. With its help, a barrier is created to the cold air from the street
Before considering ways to connect heating radiators, it is necessary to draw up a diagram of the location of these devices
It is important to determine the correct installation distances for radiators, which will ensure their maximum heat transfer. So, the heating batteries are absolutely correctly positioned if:
- lowered from the bottom of the window sill by 100 mm;
- are located at a distance of 120 mm from the floor;
- spaced from the wall at a distance of 20 mm.
Violating these standards is strictly not recommended.
Direction of coolant circulation
The lower saddle connection of the batteries using a lower vertical collector allows you to not depend on the direction of coolant supply. This cannot be said about the lateral and diagonal leash, as well as when radiators with a bottom connection point are used: here the supply must be clearly adjusted. Otherwise, the heating of the device may stop completely, or it will heat up very weakly. A lateral or diagonal connection involves the use of a top feed (the return pipe in this case comes from below).
When installing a bimetallic radiator with a bottom connection, it is important to clarify in advance which of the inputs will be connected to the supply. Usually this information is indicated in the passport
It is important not to confuse the directions, because... The supply in such heating devices is equipped with a tube extending upward from the inlet assembly. With its help, the coolant is brought to the upper collector. After this, it spreads over the radiator.
Series connection of heating radiators
With this method, the batteries are connected using one pipe. Most often, if a series connection of heating radiators is required, then in order to increase the power of the heating devices and ensure a sufficient degree of heating of the room, it is necessary to increase the number of sections at the end of the line.
The series connection method is characterized by uneven distribution of thermal power. As a result, the first radiator heats up much hotter than the subsequent ones, and the last device in the circuit will be barely warm.
Despite a number of inconveniences, this method is in demand because of its simplicity, and adjustment of the required degree of heat transfer is carried out by building up several sections of batteries in different places of the heating structure. Examples of connecting heating radiators in the video:
Heating in the house
At the first stage, you should decide on the types of radiators and options for their connection, since buildings should be prepared in advance for the selected type of heating. A modern space heating system includes several components.
These include:
Do-it-yourself polypropylene heating wiring without a soldering iron
You can find different versions of them in large quantities in our markets.
General instructions for installing batteries look like this:
- First select a place to place them;
- bring pipes to them;
- connect them together;
- perform a test run, and if everything is in order, turn on the heating at full power.
How to install heating radiators with polypropylene pipes with a jumper for quick shutdown
Application
All of the above schemes can be applied in a private home. If desired, you can use two heating sources: a boiler built into the stove and a gas or electric boiler, which is connected in parallel.
Let's consider the correctly executed sequence of installation of a single-pipe heating system in a private house:
- installation of a heating boiler;
- finishing the walls where the battery is installed, thermal insulation if necessary;
- installation of radiators on walls;
- determination of places for attaching pipes and tapping branches;
- filling the system with water and performing a test run.
The connection of heating radiators can be flow-through and with closing sections. The first method is simpler, requires less materials and labor, and is used for small systems. The second method allows you to regulate the coolant supply for each individual radiator, but requires the installation of additional bypass sections - bypasses. Additional shut-off valves are also required here.
Installation materials and tools
To install radiators yourself, you need to prepare tools for attaching radiators. Also special equipment for installing a heating system.
When attaching and assembling heating batteries you will need:
- hammer drill or impact drill;
- a set of keys;
- construction or laser level, you can use a water level;
- tape measure, marker or pencil;
- sealant.
When using polypropylene pipes, you need a special soldering iron for welding PP. With it you can easily and quickly solder polypropylene pipes.
Materials for connecting radiators:
- Brackets. For mounting the device on the wall.
- Mayevsky crane. Bleeds air from the system.
- Stub. Closes an unused hole.
- Cranes. To adjust the amount of coolant or shut it off completely.
Everything except the shut-off valves is included with the heating device. Or such sets can be purchased separately.
What is the importance of choosing a radiator installation location?
Regardless of whether the heating radiators are connected in series or in parallel, the functional purpose of these devices is not only to heat the room. By means of batteries, a certain protection (screen) is created from the penetration of cold from the outside. This is precisely what explains the location of the batteries under the window sills. With this distribution of radiators in places of greatest heat loss, that is, in the area of window openings, an effective thermal curtain is created.
There simply cannot be a battery in this place. With its help, a barrier is created to the cold air from the street
Before considering ways to connect heating radiators, it is necessary to draw up a diagram of the location of these devices
It is important to determine the correct installation distances for radiators, which will ensure their maximum heat transfer. So, the heating batteries are absolutely correctly positioned if:
- lowered from the bottom of the window sill by 100 mm;
- are located at a distance of 120 mm from the floor;
- spaced from the wall at a distance of 20 mm.
Violating these standards is strictly not recommended.
Serial connection of two heating radiators
sansvar wrote. What the customer bought, I delivered. the number of sections and location, the choice made in advance before my recommendations and advice. For example, I actually suggested that he put one instead of two, well, I don’t like the diagonal connection. It’s kind of ugly, there’s a lot of “extra” pipes
Yes, I realized this right away, I’ve seen loads of them like that, by the way, I know that there are weirdos, enough.
sansvar wrote. You can’t put the tap on bypass, I’m just not one of those people... if something is very critical in the customer’s desires, I refuse even for an additional payment
And it is right.
I'll bring up the topic. From the developer we have two steel panel radiators Maxterm type 22 (double-row, double-panel) with bottom connections (apartment wiring, Bir Pex). In appearance, they seem to have bypasses (they didn’t answer anything about this on the manufacturer’s website). No, I’m lying. Answered:
Please tell me, when the thermal valve is closed, the coolant bypasses the radiator (the coolant flow remains constant) or the thermal valve simply blocks the coolant flow. Thanks in advance for your answer. Yes. The thermostatic head regulates the flow through the radiator through the valve stem. Those. regulates the coolant flow through the radiator. And the constant flow through the system is maintained. Moreover, if all radiators operate to limit flow, then the system resistance increases. And in this case a bypass must be provided.
My task is to modernize the distribution of heating pipes in the apartment in order to ultimately get as few intersections and joints of pipes as possible. There is already one piece of advice to replace my Wishlist with a collector circuit. But I can’t understand why it is believed that water shunted through the bypass (after all, there are very strong suspicions of its presence) will poorly heat the second radiator?
Registration: 03/25/2011 Penza Messages: 7080
12/10/2013 at 16:18
Loki wrote. we have two steel panel radiators Maxterm type 22 (double-row, double-panel) with bottom connection
Loki wrote. have bypasses (nothing was answered about this on the manufacturer’s website)
Bypasses are used only in single-pipe heating systems. And they don't happen inside radiators. There are bottom connection fittings with built-in bypasses.
Draw a general diagram of the heating system in the apartment. Without it, it is unclear whether you have a one-pipe or two-pipe system. Also indicate the brand of radiator bottom connection fittings used.
Loki wrote. Will the second radiator heat up badly?
If the pressure difference on the supply and output lines (supply/return) is sufficient, then the radiators will heat normally, provided that the hydraulics of the entire residential heating system are calculated and rebalanced with adjustment. Because connecting an additional radiator will introduce an imbalance in the operation of the apartment’s heating system.
It is not possible to answer how critical the imbalance will be without carrying out hydraulic calculations.
Hydraulic calculation of heating systems. Heat calculation (calculation of insulation) of houses and apartments.
Sergants. poorly legible photo. But from what I was able to see, I conclude that the system is two-pipe.
It is better to install a floor (in-floor) convector of sufficient power under the window. Then there will be no need for additional radiators.
Sergants wrote. And is it possible to leave the fittings that are in place now?
It is strange that there is a regular ball valve on the return line, instead of a shut-off valve. Then the thermal valve under the blue cap should have presets. If so, then leave it and do not upset the design presets.
Hydraulic calculation of heating systems. Heat calculation (calculation of insulation) of houses and apartments.
How to connect the battery?
Without understanding how to connect heating batteries, without knowing the operating principle of the heating system, you will not be able to properly expand the radiator.
Preparatory work
The first step is to carry out preparatory work. This includes removing the radiator. It is necessary to remove the sections that are planned to be built up.
The battery must be cleaned, rust, dust and dirt removed.
You should inspect the threaded hole that connected the structure to the pipe. There may be growths here. They must be removed using sandpaper. Otherwise, the intersection gasket will not be installed airtight. And this can lead to the heating system leaking.
Attaching sections
Next, the sections are joined. The connected sections are placed tightly against the battery. They make a gasket. Using a radiator wrench, measure the distance to the nipple. The nipple is inserted into the battery to the marked length. Use a pipe wrench to turn the radiator wrench. Then the nipple is wrapped into two opposite sections. Make 3 turns with the radiator wrench. Similar actions are performed with the lower part of the battery.
Next, paronite gaskets and side plugs are taken and installed in the battery. In this case, a pipe wrench is used. The main thing is to tighten it very tightly to create a reliable, airtight structure. The section is attached to the radiator. The remaining sections are connected in a similar manner.
Mounting the radiator to the wall
After all additional sections are attached, the radiator is mounted to the wall. To do this, install hooks at the level of the battery location. The structure is being hung. All joints are fixed using fittings. Tighten with a wrench. All joints are treated with sealant. Recently, special adhesive tapes for pipes have appeared on sale.
Test work
The resulting structure is inserted into the pipe at one end and into the battery at the other. The connections are tightened tightly with a wrench. When installation of the fitting is completed, waterproofing is carried out.
After the assembly of the heating batteries is completed, the system is inspected for defects. If everything is in order, a test run of the coolant is carried out. The first time the water is released under reduced pressure. This allows you to detect where the connection is poor and leaking. If leaks are detected, the water is turned off and work begins to eliminate the problem. The second time the coolant is started under normal pressure.
After you have succeeded in connecting the heating battery, you need to let the radiator run for several hours. And after this time, check the condition of pipes, fittings, batteries.
Other types of connection
There are more profitable options than the bottom connection, which reduce heat loss:
- Diagonal. All experts have long come to the conclusion that this type of connection is ideal regardless of the piping scheme in which it is used. The only system where this type cannot be used is a horizontal bottom single-pipe system. That is, the same Leningrad woman. What is the essence of a diagonal connection? The coolant moves diagonally inside the radiator - from the upper pipe to the lower. It turns out that hot water is evenly distributed throughout the entire internal volume of the device, falling from top to bottom, that is, naturally. And since the speed of water movement is not very high during natural circulation, the heat transfer will be high. Heat loss in this case is only 2%.
- Lateral, or one-sided. This type is very often used in apartment buildings. The connection is made to the side pipes on one side. Experts believe that this type is one of the most effective, but only if the system has coolant circulation under pressure. There are no problems with this in city apartments. And to provide it in a private house, you will have to install a circulation pump.
What is the advantage of one type over others? In fact, correct connection is the key to effective heat transfer and reduced heat loss. But in order to connect the battery correctly, you need to prioritize.
Take, for example, a two-story private house. What to prefer in this case? Here are several options:
Two and one pipe systems
- Install a one-pipe system with side connection.
- Install a two-pipe system with a diagonal connection.
- Use a single-pipe scheme with lower wiring on the first floor and upper wiring on the second.
So you can always find options for connection diagrams. Of course, you will have to take into account some nuances, for example, the location of the premises, the presence of a basement or attic
But in any case, it is important to correctly distribute the radiators among the rooms, taking into account the number of their sections. That is, the power of the heating system will have to be taken into account even with such an issue as the correct connection of radiators
In a one-story private house, connecting the battery correctly will not be very difficult, given the length of the heating circuit. If this is a single-pipe Leningrad circuit, then only a lower connection is possible. If it is a two-pipe scheme, then you can use a collector system or a solar one. Both options are based on the principle of connecting one radiator to two circuits - coolant supply and return. In this case, top pipe distribution is most often used, where distribution along the circuits is carried out in the attic.
By the way, this option is considered optimal both in terms of operation and during the repair process. Each circuit can be disconnected from the system without turning off the latter. To do this, a shut-off valve is installed at the point where the pipes are separated. Exactly the same one is mounted after the radiator on the return pipe. You just have to close both valves to cut off the circuit. After draining the coolant, you can safely carry out repairs. In this case, all other circuits will operate normally.
Features of the option with bottom pipe connection
As a rule, connecting a radiator with a bottom connection is carried out in cases where unpresentable heating pipes need to be hidden in the floor or wall so as not to disturb the interior of the room.
On sale you can find a large number of heating devices in which manufacturers provide a lower supply to the heating radiators. They are available in various sizes and configurations. At the same time, in order not to damage the battery, it is worth looking at the product passport, which describes the connection method for a particular model of equipment. Typically, the battery connection unit has ball valves that allow it to be removed if necessary. Thus, even without experience in such work, using the instructions, you can connect bimetallic heating radiators with a bottom connection.
The circulation of water inside many modern radiators with a bottom connection occurs in the same way as with a diagonal connection. This effect is achieved due to an obstacle located inside the radiator, which ensures the passage of water throughout the heating device. After this, the cooled coolant enters the return circuit.
Please note that in heating systems with natural circulation, it is not advisable to connect radiators from the bottom. However, significant heat losses from such a wiring scheme can be compensated by increasing the thermal power of the batteries.
Useful tips
Many people believe that the radiator connection option is not that important when it comes to heat dissipation. After all, much will depend on the type of heat source chosen. For example, bimetallic heating radiators have higher heat transfer than cast iron ones. But imagine that cast iron devices are installed according to the diagonal principle of coolant movement, and bimetallic ones are installed along the bottom. In the first case, heat loss is 2%, and in the second - 12%. The difference in losses is as much as 10%. For a heating system, this is a fairly high indicator, which will affect not only the indoor temperature, but also the amount of fuel consumed
This is very important for private houses
Today, experts give recommendations regarding increasing the heat transfer of devices. To do this, you can install a reflective panel on the wall behind the radiator, for example, a regular piece of fiberboard trimmed with aluminum foil. But keep in mind that the distance from the wall to the radiator in this case should be at least 1.5 cm.
Equipment price
Approximate calculation of equipment for the heating system of a house with an area of 100 m2.
| Name | quantity | Cost (rubles) |
| Boiler | 1 | 40.000 |
| Chimney | 2 m | 3.000 |
| Shut-off and connecting valves | 1 | 2.000 |
| Boiler room piping equipment | 1 | 2.000 |
| Radiator 10 sections | 6 | 36.000 |
| Radiator mounting kit | 6 | 1.800 |
| Mounting bracket | 24 | 1.000 |
| Pipe (polypropylene) | 60 m | 10.000 |
| Fittings (set) | 1 | 5.000 |
| Total: | 100.800 |
The cost of installation work by a master will cost approximately 50,000 - 60,000 rubles.
How to connect heating radiators
Radiator heating systems come in two types: single-pipe and double-pipe.
Single-pipe requires fewer pipes, but its main drawback: different coolant temperatures at the radiator inlet. It turns out that the one that is closer to the boiler heats up more, the one that is further away is weaker. In long-distance networks, it may happen that very cold coolant reaches the last radiator. This can often be observed on the first floors of high-rise buildings. A single-pipe system is usually used there, and the coolant is supplied from the upper floors down.
The figure shows a horizontal diagram of the serial connection of heating radiators; it is also called “single-pipe” and “Leningrad”. To allow for repairs, shut-off valves are installed on both sides of the heater. By closing them, you can remove, change and repair the radiator without stopping the entire system. A similar scheme is often used when connecting heating batteries in a private home. It is simply installed, and if the radiator is short in length, the heat transfer of each radiator is regulated using needle valves, which can be used to change the intensity of the coolant flow.
A single-pipe system is also called “series connection of heating radiators”
Two-pipe scheme - parallel connection of radiators to the supply. A coolant of the same temperature enters the inlet of each of them, and the cooled water is collected in another pipeline. And although the consumption of pipes (and money) during installation is greater, it is much easier to balance (adjust) the heat output of each heating device.
Two-pipe system - parallel connection of heating devices
What is needed for installation
Installation of heating radiators of any type requires devices and consumables. The set of necessary materials is almost the same, but for cast iron batteries, for example, the plugs are large, and they do not install a Mayevsky valve, but instead, somewhere at the highest point of the system, they install an automatic air vent. But the installation of aluminum and bimetallic heating radiators is absolutely the same.
Steel panel ones also have some differences, but only in terms of hanging - they come with brackets, and on the back panel there are special arms cast from metal, with which the heater clings to the hooks of the brackets.
These are the arms that hook the hooks
Mayevsky crane or automatic air vent
This is a small device for releasing air that may accumulate in the radiator. Placed on the free upper outlet (collector). It must be on every heating device when installing aluminum and bimetallic radiators. The size of this device is significantly smaller than the diameter of the manifold, so you will also need an adapter, but Mayevsky taps usually come complete with adapters, you just need to know the diameter of the manifold (connection dimensions).
Mayevsky crane and method of its installation
In addition to the Mayevsky crane, there are also automatic air vents. They can also be installed on radiators, but they are slightly larger in size and for some reason are only available in a brass or nickel-plated case. Not in white enamel. In general, the picture is unattractive and, although they deflate automatically, they are rarely installed.
This is what a compact automatic air vent looks like (there are more bulky models)
The side-connected radiator has four outputs. Two of them are occupied by the supply and return pipelines, on the third they install a Mayevsky valve. The fourth entrance is closed with a plug. It, like most modern batteries, is most often painted with white enamel and does not spoil the appearance at all.
Where to install the Mayevsky plug and tap for different connection methods
Shut-off valves
You will need two more ball valves or shut-off valves that can be adjusted. They are placed on each battery at the input and output. If these are ordinary ball valves, they are needed so that, if necessary, you can turn off the radiator and remove it (emergency repairs, replacement during the heating season). In this case, even if something happens to the radiator, you will cut it off, and the rest of the system will work. The advantage of this solution is the low price of ball valves, the disadvantage is the impossibility of adjusting heat transfer.
Radiator taps
Almost the same tasks, but with the ability to change the intensity of the coolant flow, are performed by shut-off control valves. They are more expensive, but they also allow you to adjust the heat transfer (make it less), and they look better externally; they are available in straight and angular versions, so the piping itself is more accurate.
If desired, you can install a thermostat on the coolant supply after the ball valve. This is a relatively small device that allows you to change the heat output of a heating device. If the radiator does not heat well, you cannot install them - it will be even worse, since they can only reduce the flow. There are different thermostats for batteries - automatic electronic ones, but more often they use the simplest one - mechanical.
Related materials and tools
You will also need hooks or brackets for hanging on walls. Their number depends on the size of the batteries:
- if there are no more than 8 sections or the length of the radiator is no more than 1.2 m, two mounting points on top and one on the bottom are sufficient;
- For every next 50 cm or 5-6 sections, add one fastener at the top and bottom.
You also need fum tape or linen winding and plumbing paste to seal the joints. You will also need a drill with drills, a level (preferably a level, but a regular bubble one will do), and a number of dowels. You will also need equipment for connecting pipes and fittings, but it depends on the type of pipes. That's all.
Other types of connection
There are more profitable options than the bottom connection, which reduce heat loss:
- Diagonal. All experts have long come to the conclusion that this type of connection is ideal regardless of the piping scheme in which it is used. The only system where this type cannot be used is a horizontal bottom single-pipe system. That is, the same Leningrad woman. What is the essence of a diagonal connection? The coolant moves diagonally inside the radiator - from the upper pipe to the lower. It turns out that hot water is evenly distributed throughout the entire internal volume of the device, falling from top to bottom, that is, naturally. And since the speed of water movement is not very high during natural circulation, the heat transfer will be high. Heat loss in this case is only 2%.
- Lateral, or one-sided. This type is very often used in apartment buildings. The connection is made to the side pipes on one side. Experts believe that this type is one of the most effective, but only if the system has coolant circulation under pressure. There are no problems with this in city apartments. And to provide it in a private house, you will have to install a circulation pump.
What is the advantage of one type over others? In fact, correct connection is the key to effective heat transfer and reduced heat loss. But in order to connect the battery correctly, you need to prioritize.
Take, for example, a two-story private house. What to prefer in this case? Here are several options:
Two and one pipe systems
- Install a one-pipe system with side connection.
- Install a two-pipe system with a diagonal connection.
- Use a single-pipe scheme with lower wiring on the first floor and upper wiring on the second.
So you can always find options for connection diagrams. Of course, you will have to take into account some nuances, for example, the location of the premises, the presence of a basement or attic
But in any case, it is important to correctly distribute the radiators among the rooms, taking into account the number of their sections. That is, the power of the heating system will have to be taken into account even with such an issue as the correct connection of radiators
In a one-story private house, connecting the battery correctly will not be very difficult, given the length of the heating circuit. If this is a single-pipe Leningrad circuit, then only a lower connection is possible. If it is a two-pipe scheme, then you can use a collector system or a solar one. Both options are based on the principle of connecting one radiator to two circuits - coolant supply and return. In this case, top pipe distribution is most often used, where distribution along the circuits is carried out in the attic.
By the way, this option is considered optimal both in terms of operation and during the repair process. Each circuit can be disconnected from the system without turning off the latter. To do this, a shut-off valve is installed at the point where the pipes are separated. Exactly the same one is mounted after the radiator on the return pipe. You just have to close both valves to cut off the circuit. After draining the coolant, you can safely carry out repairs. In this case, all other circuits will operate normally.
What kind of piping can be made from polypropylene pipes
The piping for a home heating system can be very different. The thing is that the consumer is always trying to reduce the amount of consumables, while simultaneously trying to install radiators in all heated rooms.
It should be said right away that these are relics of the past. Unlike expensive metal pipes, polypropylene consumables are much cheaper and easier to install. therefore, it is not worth saving on the length of the pipeline. Choose the type of harness that will bring maximum benefit in your case. The only reasons that may influence the choice of type of harness are the following factors:
- what heating circuit is used (one-pipe system or two-pipe);
- what type of radiator connection you have chosen (diagonal, side or bottom).
As a rule, when using any heating scheme: single-pipe or two-pipe, you can use any type of heating radiator connection.
According to experts, pipeline laying must minimize the number of bends. A smooth highway remains resistant to hydrodynamic loads. The number of zones in which air can accumulate will be reduced in the pipeline.
There are specific features for piping a single-circuit and double-circuit heating system using polypropylene pipes.
- Typically, such a system uses a series connection of radiators;
- A bypass is always installed in front of the battery, connecting the supply pipe and return pipe. During normal operation of the heating system, the bypass is not activated. When carrying out maintenance work or in the event of an emergency, the water supply to the radiator is stopped. The coolant circulates freely through the bypass.
- Both parallel and serial connections of batteries are used;
- Both radiator hoses are connected to different pipes. The upper one is connected to the supply pipe, the lower pipe is connected to the return pipe. Typically, radiators are connected in parallel in two pipe systems, so installing bypasses is not required.
Tying polypropylene pipes with radiators is done in two ways: soldering and using fittings. Radiators are installed and connected using a soldering iron and American-style plumbing wrenches.
Types of pipe routing
Connecting heating radiators in a private house can be done using a single-pipe or two-pipe scheme.
The first method is widely used in multi-storey buildings, in which hot water is first supplied through a supply pipe to the upper floors, after which, after passing through radiators from top to bottom, it enters the heating boiler, gradually cooling. Most often, in such a scheme there is natural circulation of coolant.
The photo shows a single-pipe diagram for connecting a radiator in an apartment with a bypass (jumper)
Its main advantages:
- Low cost and material consumption.
- Relatively easy to install.
- Compatible with underfloor heating systems and various types of radiators.
- Possibility of installation in rooms with different layouts.
- Aesthetic appearance due to the use of only one pipe.
- Difficulty in carrying out hydro- and heat calculations.
- The inability to regulate the heat supply on a separate radiator without affecting the others.
- High level of heat loss.
- Increased coolant pressure is required.
Please note: During operation of a single-pipe heating system, difficulties may arise with the circulation of coolant through the pipeline. However, they can be solved by installing pumping equipment
Installation of heating radiators in a private house with single-pipe wiring using a circulation pump
The two-pipe scheme for connecting heating radiators in a private house is based on the parallel method of connecting heating devices. That is, the branch that supplies the coolant is supplied to the system is in this case not connected with the branch along which it returns, and their connection is made at the end point of the system.
- Possibility of using automatic temperature controllers.
- Ease of maintenance. If necessary, shortcomings and errors made during installation can be corrected without damaging the system.
- Higher cost of installation work.
- Longer installation period compared to single-pipe wiring.
The diagram shows an example of a two-pipe heating distribution
Natural or forced movement of water?
The battery connection option depends on what type of water or antifreeze movement is intended to be used for the operation of the system. There are only 2 options: natural circulation and forced.
The first option involves using physical laws without purchasing and installing additional devices. Suitable when the coolant is water. Any non-freezing agent will circulate worse in the system.
The system consists of a boiler that heats the water, an expansion tank, supply and return pipelines, and batteries. The water, heating up, expands and begins its movement along the riser, visiting the installed radiators in turn. The cooled water from the system flows by gravity back to the boiler.
With this circulation option, the horizontal pipeline is installed with a slight inclination towards the movement of the coolant. This system is self-regulating, because depending on the temperature of the water, its quantity also changes. The circulation pressure increases, allowing the water to heat the room evenly.
With natural circulation, two-pipe and one-pipe schemes with upper wiring, two-pipe with lower wiring are used. Such methods of connecting radiators to the heating system are beneficial for small rooms.
It is important to equip the batteries with air vents to remove excess air or install automatic air vents on the risers. It is best to place the boiler in the basement so that it is lower than the heated room.
The connection diagram for radiators with natural coolant circulation should provide for a slight slope in the direction of water movement
For houses with an area of 100 m2 or more, the coolant circulation system will have to be changed. In this case, you will need a special device that stimulates the movement of water or antifreeze through the pipes. We are talking about installing a circulation pump. Its power depends on the area of the heated room.
The pump is installed on the supply or return pipeline. To remove excess air from the system, you will need to install automatic bleeders at the highest point of the pipeline or use batteries with Mayevsky valves for manual bleeding.
The use of a pump for forced circulation allows the use of antifreeze as a coolant. In this case, you need to install a closed expansion tank so that the fumes do not harm the health of the residents of the house
The circulation pump is used in two- and one-pipe circuits with horizontal and vertical connection systems for heating devices.
Selection of the optimal option
The choice of the appropriate method for connecting a heating radiator in a private home directly determines the uniformity of heating, so this issue should be taken seriously. Each type of connection has its own disadvantages and advantages:
Diagonal connection of a heating radiator - the input is connected to the top hole of the battery, and the return - to the opposite bottom. This scheme most effectively ensures that heat is evenly distributed throughout the radiator. It can be used when it is planned to install equipment with a significant number of sections. The level is 2%.
One-way - the input is connected to the hole located at the top, and the return - to the bottom, located on the same side. This option is suitable for apartments, but is rare in private houses. The pipeline there, as a rule, is single-pipe, located in one of the corners, and only one battery needs to be connected. This method is aesthetic and can be used to save material.
Saddle - the supply pipe is connected to the lower hole, and the outlet pipe is connected to the lower one, located on the opposite side. This scheme for installing heating radiators in private homes is not very common, since it has low efficiency. The level of heat loss in this case is about 15%. It is usually used when the pipeline is hidden in the thickness of the wall. Then you have to remove the bends and connect them to the pipes.
Bottom - entry and exit are performed at one point. This option is optimal when the pipes are hidden under baseboards, hidden in the wall or located in the floor. This heating radiator connection scheme is only suitable for panel or steel devices in private homes. In principle, bimetallic units that are monolithic can also be connected in this way. But it also has a significant drawback - significant heat loss, amounting to about 20%.
Selection of materials
The popularity that polypropylene pipes have gained. associated with a number of their positive qualities:
- Their price is significantly lower than their metal counterparts.
- High durability due to the fact that the plastic does not rust, and there is practically no sediment deposited on it.
- Does not need painting.
However, it should be taken into account that not all types of polypropylene pipes are suitable for heating systems. The fact is that they must have a reinforcing layer that prevents significant thermal expansion of the pipeline.
Reinforced polypropylene pipe
Moreover, it is desirable that the reinforcement layer be aluminum, since fiberglass reinforcement leads to saturation of the coolant with oxygen. This in turn causes rusting of the metal surfaces of boilers and other heating supply elements. Pipes that have aluminum reinforcement and are suitable for heat supply systems are marked PN25.
Note! When choosing pipes, you should pay attention to the uniformity of their wall thickness. To do this you need to look at their cut
As for the diameter, the optimal parameter is 25 mm.
In this case, it is also necessary to purchase fittings, which include:
Single-pipe and two-pipe radiator connection diagram
Water heating structure
All liquid heating systems have a similar set of elements:
- Heating device. Typically this is a boiler. But a wood-burning stove with a water jacket or a fireplace with a heat exchanger can also be built from brick. Any fuel for a heat generator can be used, from electricity to diesel fuel (basically, it all depends on its availability for a particular facility). If it is possible to connect to the main gas, this will be the best option in terms of price/practicality.
- Heating appliances. Radiators (cast iron, aluminum, bimetal) are most often used. In many cases, a fairly good solution would be to create a water-heated floor. You can also heat a private house using convectors, which are powered from a water system.
Warm floors and radiators can “get along” in one heating system without any problems.
The pipeline in the form of a looped circuit serves to transport the coolant. There are many pipe laying schemes; the choice depends on general construction factors and the overall structure of the heating system. Auxiliary equipment. Circulation pumps are used to pump water into pipes. Shut-off and control valves (taps, valves, thermal heads) allow you to balance heat transfer and efficiently distribute heat throughout the house. Expansion tanks are needed to relieve excess pressure if necessary. In closed systems, relief valves are used to control pressure.