It happens that after installation or a long break in operation, the heated floor does not heat well . There may be several reasons for such a malfunction, as well as options for eliminating it, so we will consider the possible versions in order.
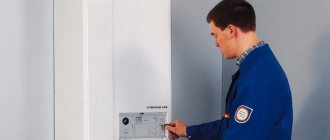
The simplest and most reliable, but at the same time the most expensive way would be to call specialists. They will diagnose the heated floor, identify the cause of the malfunction and eliminate the problem.
It is also possible to analyze the underfloor heating system yourself. Of course, all cases are individual and it is difficult to list every reason for a malfunction in the operation of a heated floor, but among them the most common ones can be identified:
- Incorrect heating cable or insufficient thermal insulation layer. The cable power is selected based on the technical conditions of the room where the heating system will be installed. An incorrect calculation of the power or area of the heated floor, as well as a thin layer of thermal insulation, can cause poor heating of the heated floor. To resolve this problem, you should contact specialists who will check the system and give recommendations on how to fix it. Incorrect calculations are one of the main reasons why electric underfloor heating does not heat well. When purchasing this heating system, you should listen to the advice of specialized consultants.
- Incorrect installation of heated floors. If, when starting the system through the thermostat, the heated floor turns off almost immediately after turning it on, most likely the problem is in the location of the temperature sensor. Often during installation, the sensor is installed adjacent to the heating cable or heating mats, or located too close to them.
- Mechanical damage to the heated floor. It is possible to damage the heating cable during installation, for example when pouring screed or installing the finishing floor covering. To determine if there is a cable fault, you should disconnect the heated floor from the thermostat and measure the resistance of the wires. Compare the obtained indicator with the data given in the operating instructions; the deviation from the norm should not exceed 5%.
- Technical parameters of the electrical network. The reason for weak heating of the heated floor can also be low voltage in the home network. The operation of a heated floor may be ineffective if a cable with an insufficient power density reserve has been selected.
- Interruptions in the operation of the thermostat and heated floor sensor. Often the cause of a cold heated floor is faulty control equipment. It is necessary to check the correct connection of all cables and the functionality of the regulator.
Most “breakdowns” of a heated floor are of the same type and you can identify them by performing a certain sequence of actions. It will take some time and require some additional equipment, but it will save your budget.
To troubleshoot, you will need a MULTIMETER .
First, it is worth excluding the most banal and simple options for the failure of a heated floor, which seem so simple that we do not pay due attention to them. Once again we check the presence of voltage in the network. If the power supply is correct, the light on the thermostat will light up or the heating icon will appear on the display panel. Then you should check the system temperature settings that may have gone wrong.
If the cause of the cold heated floor has not yet been found, then the damage lies in one of three elements of the system: thermostat, temperature sensor, heating cable.
Lack of power
The first step is to make sure that there is power to the heating system. As a rule, the film or heating cable is connected through a thermostat to which voltage is applied. If the indicators on the temperature controller display are lit, then there is power; if the indicators are missing or not lit, you will have to check manually why the heated floor is not heating. You need to take a multimeter and check if there is voltage at the input contacts. We described in detail how to use a multimeter in the corresponding article.
By the way, low voltage in the network is also the reason why the heated floor does not heat up to the required temperature. If 200 volts are supplied to the terminals rather than 220, heating efficiency is reduced by 20%. To solve this problem, you need to install a voltage stabilizer in your house.
The video shows another way to check the regulator:
Checking the thermostat
If there is voltage at the input, you need to make sure that it is normally supplied to the heating cable itself or infrared film. To do this, make sure that no one accidentally touched the settings, because... Perhaps the temperature is simply set to a minimum, as a result of which the heating does not turn on. Also check that the wires are securely connected to the terminals. Poor contact is also the reason why an electric heated floor does not heat or heats up poorly.
Is everything okay with the connection and settings? Measure the voltage at the output of the thermostat (the terminals to which the heating system itself is connected). When enabled, it must comply with the network parameters. If this is not the case, the thermostat will have to be replaced.
You can verify that the thermostat is malfunctioning by connecting the heated floor directly to the network. If the floor covering starts to heat up, then the problem is with the regulator.
This is interesting: Harm from infrared heaters - sharing knowledge
Electrical floor problems
An electric heated floor consists of a heating cable and a thermostat. Therefore, why the system does not work depends on their proper functioning.
If the heated floor stops heating, the heating cable may have been damaged during pouring of the screed or during installation. To check the integrity, you need to disconnect the terminals on the thermostat side and measure the voltage between the heating conductors. The discrepancy with passport data should not exceed 5%.
- If the temperature sensor turns off when the floor heats up weakly, it indicates incorrect installation. The sensor either touches the cable or is close to it. The floor temperature can differ from the set temperature by no more than two degrees. It can be measured using a special thermometer.
- The thermostat or temperature sensor may be faulty. You must first make sure that the terminal connections of the circuit elements are reliable. Then the output voltage is measured, it should be equal to the supply voltage. Having determined the malfunction, the broken unit is replaced.
For such a system, you can repair the heated floor yourself, without resorting to the help of specialists. You only need basic knowledge of electrical engineering and certain measuring instruments.
User manual
All repair work is carried out with the cable power disconnected.
The operating instructions for the heated floor kit are described in detail in the instructions supplied with it. Before starting, you should carefully study the list of requirements provided.
- Work to restore the heated floor, as well as partial replacement of heating cables and thermostats, is carried out only after the supply line is disconnected.
- During operation, there should be no large objects or thick coverings in the serviced area that would interfere with normal heat transfer. Failure to comply with these requirements may result in overheating of the cable and complete failure of the system.
- The floor surface should not be subjected to significant mechanical stress that threatens the condition of the temperature sensor and the heating cable itself (film element).
- If faults or failures are detected in the system, the circuit breaker responsible for supplying electricity is turned off. Immediately after this, contact the service center specialists.
- If you are away from a living space for a long time, when the heated floor is left completely unattended, the electrical power should be removed completely.
Electrical malfunctions
The last important point that should be taken into account when there is a problem with a heated floor is the failure of electrical equipment. This includes all devices and units that have electrical power. The main element in this group is the circulation pump and thermostat, which is installed on the mixing unit. Devices may fail due to a lack of voltage in the electrical network.
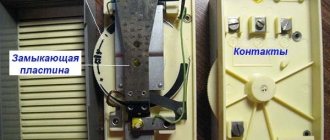
You can determine whether the pump is working or not by the characteristic operating sound that the operating unit makes. You can identify problems with the thermostat as follows:
- When the device operates correctly, the moment of rotation of the rod is clearly visible. In the event of a breakdown, this process does not occur;
- There is no need to repair the thermostat. It is better to buy a new device that will ensure reliable operation of the entire heating system in the future.
Infrared heating failure
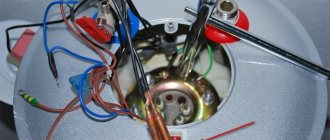
There may also be several reasons why this type of heating does not work. Very often this happens due to poor contact in the electrical circuit. The film is connected to the network using wires that fit to a copper bus running along the entire edge.
The connection is made using a special device in the form of a clamp. The lack of heating is explained by insufficient crimping of the contacts, which resulted in oxidation of the metal, and this in turn led to an open circuit. To correct the situation, it is necessary to replace the contacts and ensure their reliable connection. A malfunction of the thermostat can also be the reason why the heated floor heats poorly and weakly. There may be two options:
- Breaking
- Lack of power
To determine the cause, the necessary voltage measurements should be carried out using the necessary instruments. And it can be cold in the house even despite the heating floor. The reason for this is its improper operation. And it lies in whether the main purpose of the floor is correctly determined - it is installed for main heating or additional heating. Depending on this, you should configure the thermostat, which has two sensors: external and built-in. The first monitors the floor temperature, and the second controls the air readings.
If the infrared film is installed like a regular heated floor, then you should choose an external sensor that will only respond to the floor temperature. It will operate when it cools, not the air in the room. If you want to heat the entire room, you should choose a built-in sensor. In this case, the operating algorithm of the thermostat changes. The sensor, having turned on the heating, will hold it until the air temperature rises to the previously set value. The floor can heat up to 60 degrees. To prevent excessive overheating, experts recommend turning on both sensors. Then the external sensor, operating in cut-off mode, will prevent the floor from becoming too hot. If heating efficiency has become lower in some room, check the current consumed by the heated floor. A deviation of more than 10 percent indicates the failure of several heating elements. In this case, you can increase the temperature on the underfloor heating regulator, because it is impossible to repair the heating tape. It must be replaced.
Reason 1. Lack of thermal insulation
The most common reason why a heated floor does not cope with the functions assigned to it is that you simply forgot to install the thermal insulation properly, or did not install it at all. Often, a regular polyethylene foam backing is used as thermal insulation. And the substrate is simply not intended for thermal insulation of heated floors. Instead, you need to use polystyrene foam 5-10 cm thick.
How to fix it?
Keep one thing in mind. You will already have to overpay for heated floors. But perhaps the situation will be corrected by a higher temperature supply to the heated floor and the use of more powerful heating equipment. But don't overdo it. The maximum temperature should not exceed 70 degrees. And it shouldn't be permanent. Otherwise, the pipe will quickly become unusable.
Where to start troubleshooting
Possible malfunctions in the operation of heated floors and their causes:
- does not turn on (no electricity is supplied, the temperature sensor is broken, the thermostat is broken, the pump does not pump);
- does not heat well (malfunction of temperature sensor, thermostat, incorrect selection of heat pump, high heat loss to the foundation and walls);
- heat is distributed unevenly (errors in choosing the length of the thermal circuit, uneven thermal insulation under the TP pipes, failure of the heating elements);
- unstable pressure on the pump (air in the pipes, leaks).
Expert opinion Sergey Permyakov Heating systems engineer
When diagnosing problems with a water floor, the first step is to look at the temperature on the boiler and the pressure on the pump. By increasing the temperature on the thermostat, monitor whether the heated floors have become hotter or not. If it doesn’t help, then we’ll see if this problem arose immediately (during the first start of the TP) or after some period of operation:
- If immediately, then we check that the pump is selected correctly. When the boiler is used for heating and heating, it can take a lot of heat to the radiators, and the floors do not have enough remaining power.
- If problems arise after some period of operation of the underfloor heating, then we continue to search for the reasons.
Below we will look at all the common cases of breakdowns.
Automatic temperature control of TP
Automatic adjustment of a heated floor can be carried out thermomechanically or electronically using electromechanical actuators that control the operation of shut-off valves.
Thermomechanical control system
It is based on the operation of thermostatic valves or taps with thermal heads that respond to changes in coolant temperature. Various models of such shut-off and control valves are offered today by many manufacturers, for example, Oventrop. However, regardless of the name and type of thermosetting substance used in them (liquid or gas), these are thermomechanical self-regulating mechanisms that are most appropriately installed to control the temperature of one, individual circuit.
The operating principle of thermal valves is simple, which makes them very reliable and fault-tolerant. A copper, brass or bronze core installed in the device body, heated by the passing coolant flow, transfers the temperature to the thermosetting filler. In turn, the thermosetting element, which increases in volume, pushes the core, which, by moving the valve, gradually blocks the circulation of the heated liquid.
The thermostatic valve for heated floors, in addition to being installed on the distribution comb, can be mounted in a separate “unibox” type assembly. Such assemblies also include automatic air vents, which, together with thermostats, are placed in compact boxes (boxes). The use of a “unibox” allows you to adjust the temperature in a separate branch of the TP without being tied to bulky manifold cabinets, which is especially convenient with a small number of circuits.
In addition, thermomechanical floor heating controllers can have remote air sensitive elements. They allow you to configure them to control the flow of coolant not according to its temperature, but according to the air temperature in the rooms. The principle of their operation is the same, only the thermosetting substance is much more sensitive. It is advisable to install an air thermal head for simultaneous control of several circuits in one room, where water underfloor heating is the only source of heating.
Electronic control system
It consists of electronic thermometers, a controller and electric drives (actuators, servos). Electric drive mechanisms can be attached to the mixing heads of conventional control valves (valves) or be part of their design. The change in coolant supply intensity is carried out in accordance with specified threshold values. The measuring medium for the temperature sensors of the automatic floor heating temperature controller can be both the coolant and the air in the premises.
Important! Such control equipment is quite expensive, but at the same time it is capable of providing optimal operating conditions for underfloor heating and maximum energy savings. In addition, electronic regulators allow programming of the TP with binding of its operating modes to different time periods, which guarantees the user maximum thermal comfort.
Turns on but doesn't heat up
The second common failure of a fan heater is that it blows, but does not heat the air. In this case, the cause of the malfunction is most likely the heating element - a spiral or a ceramic heating element. Everything is simple here - use a multimeter to check the resistance in the circuit and if a break occurs somewhere, you need to replace the heating element with a new one. Sometimes it happens that the heater stops heating, because... one of the sections of the spiral is damaged. In this case, you can try to repair the fan heater yourself by connecting a nichrome spiral.
It is also not a rare case that the cause of a breakdown is the same fuse. If the fan heater does not generate heat, check the fuses using the technology provided above.
In addition, the bimetallic thermostat often fails (shown in the photo with a red arrow). To repair, you just need to clean its contacts yourself to a metallic color and heat it yourself with a soldering iron. The thermostat should behave as follows: when heating, the contacts should open the circuit, and when cooling, close again. If the device does not work correctly, try manually closing the temperature control and connecting the heater to the network. If it is working, the coil should be heated.
Damage to the heating cable and heating mat
If you have checked the sensor, thermostat, all contacts and there are no comments on their operation, and the floor still does not heat, then all that remains is to look for damage in the heating cable itself.
An obvious short circuit can be diagnosed with a simple multimeter. But to establish its exact location, unfortunately, one cannot do without special expensive devices.
At the beginning of diagnostics, use a tester to check the resistance between the cable cores. It should be within the factory specifications - from 11 to 700 Ohms, depending on the length.
Therefore, always keep the passport documentation for heated floors. Paste nameplates from cable products there, write down the readings of the initial insulation resistance and core resistance.
Then, if problems arise, it will be easy to determine what kind of cable is laid, its length, and factory resistance. It also doesn’t hurt to take a photo or sketch of the laying areas.
If there is no short circuit between the cores, then the problem is poor insulation, we move on. Check the resistance, again with a tester, between the core and the screen.
Here the readings should tend to infinity - or a unit is displayed on the left side on the current clamp screen. With zero readings, everything is clear - the core somewhere is clearly shorted to the screen.
But if the multimeter shows a resistance of several hundred Ohms or even kOhms, then connect a 2500V megohmmeter and apply increased voltage between the braid and the heating core.
And if at the same time your insulation resistance drops to zero, then this means that the cable is broken and you need to look for the place of damage.
Moreover, at a lower voltage of 500V or 1000V, this may not be recognized.
For new heating cables from quality manufacturers (Devi, Veria, etc.), the resistance must be at least 1 GOhm at a voltage of 2.5 kV.
For example, manufacturers test heating mats at the factory with a voltage of 3 kV and immersion in water.
Sensor and thermostat repair
If, after checking the contacts, the device does not work correctly, it must be replaced. Repairing heated floors in this case will require purchasing a new sensor or thermostat. You won't be able to fix electronics problems on your own.
The faulty sensor (determined by measuring the resistance) is removed from the corrugated pipe. You need to purchase a new device of the same type as was installed previously. If the sensor was immured in the screed (violation of installation technology), the owners can install another thermostat that will respond to fluctuations in air temperature.
If the regulator itself fails, you will have to contact a service center (if the warranty is valid) or purchase a new device.
Having considered how heated floors are repaired, you can eliminate the cause of the malfunction yourself. Following all instructions in the instructions will help you avoid troubles in the future.
System Features
There are two main types of heated floors. These are water and electrical systems. When properly installed and used, they have a high level of reliability. The service life of both pipes can reach 50 years.
Repair of heated floors may be required earlier if the integrity of one of the system elements is compromised. It should also be taken into account that when purchasing any structural elements of insufficiently high quality, the risk of breakdown increases significantly. This applies to both pipes or wires and the control device (thermostat).
In the event of mechanical damage or power surges in the network, various malfunctions may occur. Eliminating them can require a significant investment of time and effort. To avoid this, you must carefully study the instructions of the manufacturer of such equipment. All its points must be strictly followed.
Repair of heated floors if the thermostat malfunctions
Heated floor thermostat
There can be only two reasons for malfunctions of a heated floor: the thermostat, for some reason, does not supply voltage to the heating cable and/or an open circuit in the heating cable. In this article we will look at the first one - the thermostat is not working.
Thermostat.
Read what a thermostat is and how it works here. A thermostat malfunction is easy to diagnose. Usually this can be done by any technically literate person who knows how to use a multimeter.
To diagnose the thermostat, it must be removed.
Removing the floor heating thermostat
IMPORTANT! Before starting work, be sure to turn off the power to the thermostat if it is powered through a separate circuit breaker or turn off the power to the entire apartment by turning off the input switch or unscrewing the plugs
Possible malfunctions of the thermostat and how to deal with them:
If the power is present and correctly phased, but the control lamp or display on the thermostat does not turn on, it means the thermostat has failed. Such a malfunction cannot be corrected under “field” conditions; it is easier to replace the entire thermostat. If the warranty period for the thermostat has not yet expired, you should have it replaced under warranty.
In this case, the initial check consists of setting a higher temperature by turning the thermostat wheel upward or by setting on the display a temperature that is obviously higher than the current room temperature (30-350). If, in this case, the thermostat does not return to operating mode, the thermostat will probably need to be replaced.
The temperature sensor has failed. It is quite possible to replace it yourself, provided that the temperature sensor is initially correctly installed in the corrugated tube leading into the junction box. To do this, you need to first turn off the power, remove the thermostat, disconnect the temperature sensor wires (as a rule, these are the thinnest wires) connected to the corresponding terminals on the rear panel. The terminals are designated by the word “sensor” or “sensor” and can be located separately from the main terminal block. After disconnecting the sensor, you can check its resistance. The resistance of temperature sensors from different manufacturers is different and ranges from 5-15 KOhm (KiloOhm). The electrical resistance of your sensor is indicated in the thermostat data sheet. Please note that some household testers cannot measure electrical resistance greater than 2 kOhm. If the resistance of the temperature sensor corresponds to the rated value, poor contact in the terminals is possible. To check, you can once again carefully connect the sensor wires to the appropriate terminals. The thermostat should work. If this does not happen, the thermostat must be checked at a service center. If the resistance of the sensor differs from the nameplate by more than 20%, the temperature sensor must be replaced. Since the sensor is already disconnected from the thermostat, all you have to do is pull it out of the corrugated tube and replace it with a new one. The new sensor must be placed in a corrugated tube to the same length as the previous one went there.
I draw your attention to the fact that the temperature sensor is an accessory of the thermostat, and not the heated floor, and the nominal resistance of sensors from different manufacturers varies and sensors from one manufacturer may not fit the thermostat of another. Therefore, when purchasing a temperature sensor separately, be sure to specify the name of your thermostat and the manufacturer. If for some reason you were unable to replace the failed temperature sensor yourself, our technician will do it quickly and accurately or suggest other ways to solve the problem.
Heating is not at full strength
Sometimes consumers do not immediately notice that there is something wrong with their floor heater. It's on but doesn't heat well
An electric heated floor, depending on its type, has heating parameters set by the manufacturer.
On average, if the installation was carried out correctly, then for:
- Infrared film floor heating time will be 10-15 minutes;
- heating mats filled with glue will reach the temperature set by the thermostat in 6-8 hours;
- a cable floor “recessed” into a thick screed will take a day to warm up.
If the system took longer or did not reach the specified parameters, the reason for this may be:
- Incorrect installation of the temperature sensor. If it is placed too close to the heating element of the structure, it will cause the thermostat to turn off before the floor covering warms up.
- The sensor itself may fail, so it must be checked without turning off the thermostat.
- The cause may be low voltage, which can be avoided by installing a stabilizer.
- The floor can take a long time to warm up if the heat loss is higher than the system can produce. This can happen if there is no thermal insulation.
- Initially, incorrect calculations can significantly reduce the power of a heated floor.
As practice shows, in order not to wonder in the future how long it takes for an electric heated floor to heat up, you need to make the correct calculations at the stage of its installation and lay the system taking into account all the layers of the “pie”.
Causes of malfunctions
When using a heated floor, problems may arise related to its operation. There are two types of malfunctions - complete loss of heating and the inability to control it. For some breakdowns, you will have to remove the finishing coating and dismantle the screed, and for others, you will have to repair the temperature controller.
The reason for the breakdown of the heated floor may be a malfunction of the thermostat or a cable break.
Before you undertake the repair of warm electric floors, you will need to determine the reason that led to the breakdown. For example, this could be construction work that caused a heating wire to be broken, or a flood that flooded the control unit.
If the heating has completely disappeared, then the presence of voltage is checked on the line supplying electricity to it. Sometimes a breakdown occurs due to a circuit breaker tripping or poor contact.
When the input voltage is present, but there is still no heating, you need to find the cause of the malfunction. It may be hidden in the heating wire or thermostat. To understand what caused the breakdown, you need to disconnect the underfloor heating contacts from the regulator and measure their resistance. For this you will need a multimeter. The resulting resistance value should not differ by more than 10% from that specified by the manufacturer.
A significant deviation from the norm indicates damage to the cable under the tie. It can be caused by an insulation breakdown (when the resistance value decreases) or a cable break (the multimeter will show infinity).
If everything is in order with the resistance and there is voltage at the input, then the breakdown is in the thermostat, which is easiest to check by replacing it. Malfunctions in it also lead to incorrect setting of the heating temperature, but in this case the culprit may also be a broken sensor.
Thermostat failure
A common failure in practice is insufficiently tight contact of the wires in the regulator terminal block. Before removing the thermostat, you should try to tighten these contact points.
Before disconnecting the thermostat, try tightening the contacts, this may be the reason
You can understand that it is the thermostat that is to blame by directly connecting the underfloor heating wires to a 220 volt network. If after this the floor becomes warm, the thermostat will have to be replaced. If you have the appropriate skills, you can try to repair it yourself.
The most common radioelements that fail are key transistors, voltage stabilizers, electrolytic capacitors and relays. Often a breakdown of the mains capacitor also occurs.
Cable damage
Repairing the wire under the screed is a very serious task, since it will have to be dismantled. But in order not to tear off the entire coating, special devices are used to help narrow down the location of the breakdown.
Repairing a broken cable requires dismantling the tie
To repair a broken cable, you will need to prepare:
- thermal imager or hidden wiring detector;
- generator;
- connecting sleeve;
- heat shrink;
- press tongs.
Before determining the location of the damage, the wire laid in the floor is disconnected. High voltage is then applied to the cable through a generator or high-frequency transformer. Next, using a thermal imager, a point with a higher temperature is determined.
Once a place is found, the section of screed located above it is dismantled. The ends of the damaged cable are stripped and connected to each other through a copper sleeve, followed by crimping. After this, the cable connection is protected with electrical tape or heat shrink tubing. Before restoring the screed, the system is turned on and checked for functionality.
Sensor repair
If the sensor malfunctions, you will not have to destroy the floor to replace it, since it is installed in a special protective tube.
The sensor cannot be repaired; it must be replaced with a new one.
To dismantle it, you only need to find the exit of this tube and pull it out by the ends of the wires. But in rare cases, the tube may be embedded in the wall.
The sensor itself cannot be repaired; a new one is purchased instead. If necessary, a wire of the required length is soldered to it, which is installed in place of the old one.
Cable burning and signal generator
To find the exact location of the fault, you need to have specialized devices, which include:
- transformer for burning
- signal generator
- electronic magnetic signal receiver
- thermal imager
The blades don't spin
If the fan heater works, but the fan does not spin, the most likely cause of the malfunction is that the motor has stopped working. What to do in this case? Test the part with a multimeter and check its insides. Perhaps the bearings are simply worn out and should be replaced. We talked about how to use a multimeter in the corresponding article!
Another possible breakdown is severe dust contamination, as a result of which the fan does not spin or often turns off. Try repairing the motor yourself by wiping it with a rag and dropping a little engine oil between the moving and stationary parts. Did not help? We replace the electric motor that has broken down with a new one with the same characteristics.
Broken heating cable core
Well, another common situation is a wire break. This is one of the most unpleasant accidents. It is impossible to burn the cable, there is no short circuit and even a thermal imager is useless here.
Most often, such damage occurs in couplings - initial, connecting or end.
The heating veins there are very thin, and often it is in this place that for some reason they manage to make a turn in the route.
If there is an obvious break, both the multimeter and the megohmmeter will show resistance between the cores close to infinity. But if some unstable contact still remains, then the tester can show quite good data, for example 200-300 Ohms.
But when switched on at 220V, there will be no full heating, and the operating current will be a maximum of several milliamps, instead of the required load of several Amperes.
As a result, the cable will barely warm up, and of course there can be no talk of any normal heating.
Often even burning is useless here. And all that remains is to disassemble the most suspicious places, first of all those tiles under which the couplings are installed.
Theoretically, you can try using methods to search for wiring under the plaster.
In splices, the cable will not be completely shielded. And by applying voltage to the core, you can try to detect the signal where the phase disappears, i.e. right at the break point. But a lot will depend on the depth and specifics of the damage.
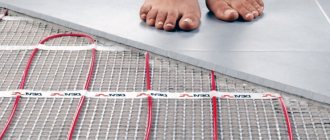
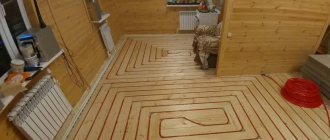
How underfloor heating works - the basic principle
Knowledge of the basic operating principles and design of the system will help you quickly detect a breakdown and eliminate it. The heating system built into the floor structure ensures uniform heating of the surface. The popularity of such a system is ensured by the fact that the heat is distributed along the perimeter of the floor and evenly warms the entire room.
Connecting a water floor
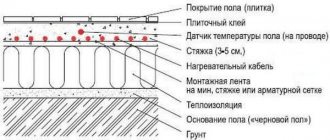
The two most common types of heated floors are water and electric. The principle of operation of the electrical system is that an electric cable is installed in the screed or directly under the finishing, due to the heating of which the floor is heated. The system is controlled using a thermostat. When it overheats, it automatically turns off.
Connection diagram for electric heated floor
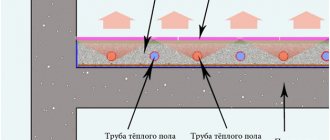
The coolant of a water heated floor is pipes, also mounted in a screed or secured in a “dry” way using ties or staples to a reinforcing mesh, insulation or special mats with bosses. Pipes filled with water are connected to a control system, which regulates the floor temperature.
The principle of laying a water floor
The operating costs of these two types are different - a water floor is more economical, but where its installation is not possible, an electric one is installed. As for installation - electrical wires are cheaper, they are easier to install, they do not create any sounds during operation and do not require additional equipment - for a water floor you will need to install a water pump.
Why can’t you install water heated floors in your apartment?
Liquid coolant systems
Scheme of a heated floor with film.
A water heated floor is essentially a heating system aimed at unloading the overall heating system, compensating for heat losses and maintaining a comfortable temperature of the floor covering. These are universal heating systems, which are presented both in individual versions and in central heating schemes. The coolant in the water system is transported through pipes made of metal-plastic or cross-linked polyethylene. The diameter of the pipes ranges from 8 to 32 mm, they are not subject to corrosion and the accumulation of deposits. The coolant is hot water, and the heat source is a separate boiler or central heating boiler. You can repair such a heating pipeline yourself.
Recently, water-based electric floors with built-in electricity have appeared on the heating market. They are very versatile and can be used under tile, wood, linoleum, laminate and other materials. This floor works perfectly, it will never burn out or freeze, its heating element is located in antifreeze. These systems are characterized by low electrical energy consumption; they can be repaired through an installation box using double-sided couplings, as in water floors.
Heated floor repair: causes of system malfunction
Warm floors are considered the most convenient electric heating of a room. The heat is evenly distributed over the entire floor area and heats the air.
Through an electric cable, current is supplied to the thermostat, which regulates the temperature of the floors, directly to the heating element.
- A heating element. Physical damage caused by a person during initial installation of the system or carrying out repair work with a saw or drill.
- Temperature sensor. The floor temperature will not be regulated and it will not be switched off, which may result in excessive energy consumption.
- Damage to pipes in a warm water floor. Occurs when there are errors in system installation. You must immediately turn off the water.
If the fault cannot be found, you need to check the voltage in the network and the power-on indication. The technical documentation indicates the figure at which the operation of a heated floor is optimal; the deviation can be 5 percent.
The floor “pierces” with electricity
The main reason is poor insulation of the connections of the supply wire and current-carrying strips. All terminals and connections must be inspected.
Violation of the insulation of the supply wire - a problem can arise during long-term operation of the heated floor if the connecting wires are installed incorrectly (especially if they are installed overlapping).
There is a lot of humidity in the room - for example, there was a water leak or moisture somehow got under the finishing coating onto the heated floor. In this case, the connections between the film floor and the supply wire are a “weak” point that must be checked first.
Malfunctions of water heated floors
Water heated floors are pipes laid under a concrete floor screed and connected to a centralized or autonomous water distribution. A water floor system consists of pipes through which hot water flows (metal, copper, plastic, polypropylene and others), mixing units that maintain the desired floor temperature, and distribution manifolds that distribute warm water throughout the system.
There may be several reasons why a water heated floor has stopped heating and, as a rule, these are clogged filters, pump malfunction and system installation errors. Diagnosis of the malfunction is carried out with the system fully switched on using the probing method. If the floor does not heat well in one place or one room, then most likely the coil or distribution units, the collector of this particular room, are faulty.
If heating does not occur throughout the house, then the problem may lie in the filter, the pump, the boiler itself, or even a small amount of water in the distribution tank. In order to accurately determine the place where to open the screed, you must have a plan with the exact location of all components and elements of the heating system, which you will be given after installing the floors.
First of all, check the amount of water in the system. To do this, liquid is added to the expansion tank until it begins to flow out of the drain tube. As practice shows, 20% of cases of problems with the operation of heated floors are associated precisely with this reason.
If heating does not occur in only one room, then the water filter located in the distribution system of that particular room is checked. The cartridge is unscrewed and cleaned. Often you can find rust particles on it that clog the “sieve”. It is not uncommon to have scale on the filter, especially in regions with hard water.
If there is enough water and the filters are clean, but the water pressure is low, then it is necessary to pump the system. Due to the small diameter of the coil (5-10 mm), any incorrect bending of the pipe can lead to the formation of an air lock. To bleed the system, you need to open the air valve and wait until the water completely squeezes out the air from the expansion tank. The fact that the air has completely escaped is indicated by water flowing from the air valve.
After this, the valve is closed and the system is completely filled with water until it begins to flow from the drainage tube. If bleeding does not work, then most likely the pipe coil is clogged somewhere.
After removing air from the system, you need to listen to the operation of the circulation pump. If extraneous noise is heard during its operation (the pump should operate smoothly, without knocking, fluctuations, or vibrations), then it is better to take the pump for diagnostics. It would also be a good idea to check the pressure in the system using a pressure gauge installed after the pump, which normally should be 8 pascals or 0.5 atmospheres. Low pressure may indicate leaking pipes.
To find a leak, you will need to completely fill the system with water (after bleeding), and leave the pump running for two hours. If water does not begin to flow out of the drainage, then pressure testing of the entire system and its individual elements is carried out. To repair a leak, you will need to open the area above the damaged pipe.
Water TP froze
How much does a warm electric floor cost?
A situation where a water heated floor freezes may occur due to an unexpected shutdown of the boiler if gas or electricity is turned off. Short-term outages will not have time to harm the equipment, but if residents are not at home, then in a few days the boiler room will cool down, and then a serious accident is possible.
When the air temperature drops below zero, the elements of the circulation system in the boiler room will be the first to suffer: the water pump, filters, metal and plastic pipes. The heated floor itself cools down very slowly and freezes last. Even a week after the boiler is turned off, the water in the pipes under the screed remains mobile.
Ruptures and leaks should be feared if the TP pipes are made of metal. The thermal circuit made of polyethylene or polypropylene, due to the flexibility of the material, will retain its tightness.
What to do if equipment bursts due to frost:
- Start by heating the boiler room. Heat guns are good for this.
- Replace broken system elements.
- To inspect the boiler, it is better to call specialists from the service center.
- After the equipment in the boiler room has been brought back to normal, you can try to start the heated floor. At the same time, monitor the pressure in the system on the pump pressure gauge. If it falls, look for leaks.
How to protect yourself from freezing underfloor heating:
- Frost-resistant coolant If the house is not for permanent residence and you periodically leave, then it makes sense to install electronics with a GSM module that will monitor the air temperature and notify you via SMS if the room becomes cold.
- If the house is left for the winter, you need to drain the water from the heated floor and blow out the pipes with air.
- Another option to avoid freezing is to fill the heating circuits with antifreeze. But many boiler manufacturers will remove the equipment from warranty if they find out about this. Check with them about this question before adding coolant. For heating systems, you need to use antifreezes designed for them, for example, Fritherm-30 based on propylene glycol.
Insufficient heating of water floors
Here, the main reason for unstable operation is shortcomings made during the installation process. Low performance may be due to incorrect use of the water pump or low boiler power.
Common situations:
- If uneven or insufficient heating is observed, you should make sure that the boiler is working properly. You need to make sure that the taps on the distribution board are open, the toggle switches should be turned along the pipes;
- When the circulation pump is active, it makes a slight noise and vibrates. If upon inspection it is revealed that everything is in order with the power supply, and the floor does not heat up, then there are problems with the pump - it needs to be repaired or replaced;
- The cause of system malfunction may be air penetration into the pipes. Only specialists can get rid of this problem;
- a boiler with insufficient performance is not able to fully service warm water floors; when choosing a heating tank, you should leave a reserve of power or limit heating in unused rooms.
If you feel that in certain areas the surface is warming up more, it means that the vapor barrier layer was installed incorrectly. You will have to open the structure and redo it, otherwise there is a high risk of dampness and mold.
Rules for using a steam iron
The steam iron is a relatively new invention that is loved by many. The principle of its operation is the release of hot steam, which can smooth out wrinkles. Things are ironed in a vertical position.
Before steaming begins, water is poured into the device. It can be distilled water or regular tap water, it all depends on the model. Then, when turned on, the heating element begins to work, heating the liquid to a temperature of 90-100 degrees, and the generator producing steam.
The advantages of this device include:
- Ability to smooth all types of fabric.
- Clothes with decorations (beads, rivets, etc.) can also be easily ironed.
- It is almost impossible to ruin things, since the area of the steam iron does not come into contact with the fabric.
- It is easy to iron large items, such as curtains, sheets, bedspreads.
The fly in the ointment in this jar of honey is the cost of a steam iron. Now it can be purchased for 2500-25000 rubles. This is significantly more expensive than the regular model.
Cable floor failure
There are a large number of probable reasons why the cable floor is not as warm as desired. If the structure was installed almost recently, this negative phenomenon is associated with the wrong choice of cable. Its type, power, and insulation resistance may be unsuitable for a particular floor surface. In foreign networks the voltage is 230 V, and in Russian networks it is 220. If this fact is not taken into account during selection, a reduction in power becomes obvious.
Attention! People who carry out repairs on their own select the wrong wire. To prevent this from happening, you need to seek advice from specialists.
If the parts are selected correctly, unstable floor performance can be caused by poor installation. If the external water thermostat turns off when the heating is low, we can safely say that the temperature sensor was installed incorrectly: it is located very close to the cable or even touches it.
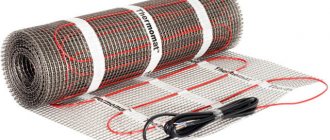
Mat installation process
An additional reason why underfloor heating does not heat is damage from mechanical factors of the cable. In such a situation, make sure it is intact. Sometimes when pouring the screed, the wire is damaged and the heating stops working. To check its integrity, do the following:
- turn off the external water thermostat;
- Disconnect the wire;
- Measure the resistance between the heating cores. Compare the resulting value with the passport details. The possible deviation is 5%. If the results do not match, it means there is damage from mechanical factors.
Sometimes there are situations when the floor stops heating because the temperature sensor has failed or the external water thermostat has failed. First you need to check how tightly the parts are connected to each other. If everything is fine with the connection point, you need to check the voltage at the cable terminal. It must match the supply voltage. If deviations are noted, the devices will need to be changed. If the installation process is done correctly, replacing the heat sensor and thermostat will not cause difficulties.
Floors can be weakly heated even at low voltage. If the power supply to a particular home is unstable, the power may not be enough to heat the entire usable area. In such a situation, it makes sense to use a specialized device - an electrical voltage stabilizer. It will help maintain the mains voltage at the required level.
Advice! If it is likely that the mains voltage will be regularly low, it is worth purchasing a wire with a higher power density from the very beginning.
Cable damage option
Low voltage
Our electrical networks are still far from perfect, so instead of the required 220 V, the outlet may only have 200 V or even less.
This problem is especially relevant in rural areas.
It is clear that under such conditions, the heating cable, with all the desire and effort, will not be able to develop the required power and heat the room to the desired temperature.
There is only one way out in this situation - the cable must be replaced with a more powerful one, and the power of the new heater must be selected based on the lowest voltage. To determine it, you should take measurements with a multimeter in the morning, lunchtime and evening for several days, including weekends. There is no need to be afraid of overheating - if the voltage returns to normal, the cable will simply disconnect more often.
If you decide to install heated floors, you need to choose a system option. Warm floor - water or electric? Comparison of options and tips for choosing.
Read all about choosing an electric heated floor in this topic.
Warm floors in the bathroom require some nuances. You can only install an electric floor in an apartment, so you need to take care of the safety of the system. Read all about installing heated floors under tiles in this article.
Incorrect cable selection, poor thermal insulation
The inability of a heated floor to reach a comfortable temperature may be due to the use of an insufficiently powerful heating cable.
Normally, the heating time to the temperature set on the thermostat is about 30 minutes, after which the system should turn off the heater (the light on the thermostat will go out).
If the cable takes much longer to heat up or does not turn off at all, it means it does not have enough power.
Incorrect power selection is often due to the following: the owner calculates the power of the heating system, including underfloor heating, using a very common, but not very correct method - multiplying the area of the home by 0.1 kW. The resulting figures are so inaccurate that they can easily be equated to “pulled out of thin air.”
In each specific case, specific heat loss during the coldest period of the year can vary greatly, since this value depends on a number of factors:
The calculation methodology can be found in specialized literature or in SNiP dedicated to heating, ventilation and air conditioning.
A significant portion of the heat produced will be used for other purposes - it will go into the ground or into the room below.
Preparation
- We start by checking the presence of electricity in the house and the supply of electricity to the thermostat, i.e. whether the indicator light or panel is lit (for programmable thermostats).
- If, however, there is electricity in the house and it is supplied to the thermostat through which the heated floor is powered, then you need to check the temperature settings. How many times does it happen when children spin the “wheel” out of curiosity, or when a housekeeper inadvertently “accidentally touches” the buttons on the device?
- After making sure that the electricity is flowing, the thermostat is on, the temperature is set correctly, and the floor is still cold, then you need to make an important decision:
- show “who is the boss of the house” and call an electrician. End. All that remains is to prepare the money and wait.
- show “who is the master and unsurpassed master of the house”, identify the malfunction and, heroically eliminating it, receive the admiring look of his beloved wife.
If you are no longer sitting in front of the TV and decide to act on your own, then you will need a screwdriver and a tester (a device that can measure resistance and voltage) or, at worst, a voltage indicator.