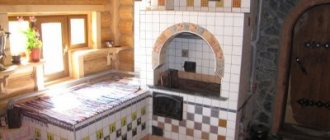
Any house located outside the city cannot do without a heating device. Early spring or late autumn are characterized by cold nights and evenings, and avid summer residents do not want to waste time on daily trips to the city, and therefore often stay overnight in their own house. It should be noted that, unfortunately, not all gardening communities have electricity supply, and not every owner of a plot outside the city can afford to build a brick oven, so you are left with cooking over a fire and freezing at night.
Today there are excellent options for heating and cooking stoves on sale, which are recommended to be installed in the country; this is an excellent solution to all problems. Different models differ in technical characteristics and design and, despite their functionality, really look like objects of art! You can purchase a very simple, affordable stove for heating and preparing simple dishes, or choose an expensive, antique-style, stylish model.
Advantages and disadvantages
A metal stove is a good source of heat.
You can do it yourself if you have some experience, drawings, tools and consumables. However, before making a thematic design, you need to weigh all the pros and cons.
Among the advantages of a metal furnace are:
- Simplicity of design, allowing it to be made by hand;
- Possibility of carrying and transportation;
- Convenient operation;
- Compactness;
- Strength and wear resistance.
By the way, different power tools are used to work with metal:
- Electric drill;
- Bulgarian;
- Welding inverter.
If you don’t have a cutting power tool, you can limit yourself to a hand tool – a hacksaw, a chisel, a hammer. Some craftsmen, instead of welding, connect metal fragments with fasteners - bolts.
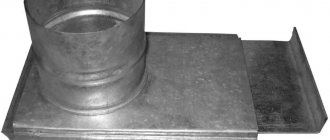
The good news is that any potbelly stove, even a do-it-yourself metal sauna stove, does not require foundation preparation. You just need to install the chimney and provide a path to it.
Being indoors all the time, the stove structure can be susceptible to chemical reactions, perhaps due to the combustion of solid or liquid fuel.
But this does not prevent it from serving for decades. Deformations are also excluded if the metal walls have a thickness of at least 8 mm.
When choosing a suitable design for heating, you need to understand that cast iron does not tolerate shock loads. Therefore, it is better not to drop its stoves during transportation. This, perhaps, is a disadvantage of a certain group of units.
There is also a common disadvantage - fire danger. To reduce the latter to a minimum, it is recommended to install stoves closer to the wall, and their operation must be monitored.
Schemes of heating stoves for a summer residence
The choice of a brick oven depends on the availability of a gas cylinder and electricity.
If gas or electricity is used for cooking, it is enough to build a stove intended only for heating.
If in winter there is no electricity and no gas at your summer cottage, you should choose a wood-burning stove with a cooking floor. When choosing a stove, take into account in which part of the country house the heater will be located.
Drawing of a conventional wood-burning brick oven
The heating stove is built in the middle of the house or against the wall. If there are several rooms in the dacha, the heating structure is built into the openings made in the interior partitions. The main elements of the furnace are:
- firebox;
- ashpit (ashpit);
- smoke channels (vertical or horizontal);
- chimney.
Country heating stoves are made of red (ceramic) refractory bricks. Many craftsmen line the firebox with refractory fireclay bricks.
Photo 1. Approximate drawing of a Dutch heating stove, suitable for a small country house.
Ceramic bricks are laid on several types of mortar. So, a cement-sand mixture is suitable for laying the base, a clay-sand mixture for the body of the stove, and a lime-sand mortar for laying the chimney. The fireclay firebox is placed on a clay-fireclay mortar.
The size of the stove is of great importance for a small house. Compact heating stoves for summer cottages include a Dutch oven (3 x 5, 2 x 4 bricks at the base), a mini-oven (3 x 2 bricks) and similar structures.
As an example, here is a diagram of a small Dutch oven, quite suitable for heating a country house with a kitchen and a room, with a total area of 40-46 square meters.
The walls of the Dutch oven are straight, without niches or decorative masonry. Key design features:
- There are three vertical smoke channels inside the housing.
- The width of the base is 1010 x 510 mm (4 bricks on the long side, 2 on the short side).
- The height of the structure is 2 meters, but the oven can be made 2-3 layers lower or higher.
The oven is built from solid red brick. For construction you will need:
- ceramic bricks - 390 pieces;
- clay-sand masonry mixture - 2-2.5 packages of 20 kg;
- steel pre-furnace sheet (100 x 50 cm);
- cast iron or steel grate (25 x 25 cm);
- firebox door (25 x 21 cm);
- door for the blower (14 x 14 cm);
- valve (13 x 13 cm);
- asbestos sheet (100 x 50 cm).
When carrying out masonry, the home craftsman is recommended to use ready-made designs. Above is a layer-by-layer (ordinal) diagram of the construction of the furnace.
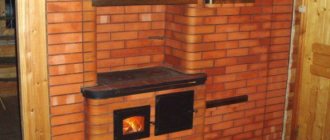
Heating and cooking structure
A small oven with a heating shield and a hob is ideal for a small country house. Key design features:
- The heating panel of the stove is vertical (end), which is also the wall of the chimney.
- The stove stands on extended trench columns, which increases heat transfer.
- The stove does not have a vent, and air for burning wood is supplied through the openings of the combustion door.
- This structure is erected on a solid or columnar foundation.
- The bottom of the combustion chamber is laid out inclined, with a rise towards the chimney pipe.
Reference! The bottom row of masonry can be made continuous, without trenches. The design of the stove allows you to build an oven or hot water tank into the rear part of the firebox.
Main manufacturers of cooking floors
Cast iron slabs are produced by both foreign and domestic companies. Among foreign slabs, the most popular and in demand slabs are brands of Finnish origin - Pisla and HTT.
We can proudly note that domestic manufacturers are not lagging behind and produce products no worse.
Among the range of stove surfaces produced in Russia, NMK, Litkom, and SibStalShar slabs stand out. In addition to the quality characteristics, along with strength and temperature resistance, one can note the aesthetic appearance of the cooking floors. Thanks to the desire to surprise and win over the buyer, manufacturers have done a great job of creating a competitive product of the highest level.
All stoves on the market are divided into two categories: prefabricated and solid cast iron stoves.
Cooking floors "Litkom"
Main advantages:
- Beautiful appearance in an elegant embodiment.
- Thermal stability – resistance to high temperatures up to 1000 °C;
- Environmentally friendly - manufactured using materials that are harmless to the life and health of users.
Below is the range of Litkom stove surfaces
| Name | Bookmark size | Average weight | price, rub. |
A stove with one hole for burners for a cauldron up to 20 liters. P1 – 5 512x512x10 21.3 kg. 3 755.40 Plate with one hole for burners for a cauldron up to 40 l. P1 – 6 600x600x16.5 46.16 kg. 8622.70 Stove stove “Warm Potok” P1–7 413x340x8 9.32 kg. 1229.60 Stove with one hole for burners PS2–3/2 362.5x410x8 10.04 kg. 1,314.98 Solid stove with two holes for burners P2–3 710x410x12 24.56 kg 3140.25 Combined stove with two holes for burners PS2–3 710x410x8 19.98 kg. 2260.11 Stove flooring 410x245x15 10.5 kg. 1,053.92 Stove with one hole for burners for a cauldron up to 20 liters. Art.D–440 640*640*10 54.3 kg. 12526.26
Let's consider two more popular models of stove stoves from the Balezinsky Foundry and Mechanical Plant:
- Single-burner cast iron stove stove P 1–2 (710*410): dimensions 710*410 mm, material – cast iron, price – 2180 rubles.
- Cast iron stove stove PS (710*410): dimensions 710*410 mm, material – cast iron, price – 2260 rubles.
Cast iron stove for P 1-2 stoveCast iron stove for PS stove
Material selection
The main building material is red ceramic brick. It is recommended to take grade 150, which is made from baked clay. This type of brick has standard dimensions: 250x120x65 mm. Now the dimensions have been unified.
It is not recommended to use stone for construction, because there are voids and microcracks inside the material. During the construction of the furnace, each brick must be carefully checked. If you use poor quality material, cracks will begin to appear as the clay solution dries.
Construction of a brick kiln: This is why experts do not recommend buying bad bricks or ones that have already been used. It is worth considering recommendations for choosing masonry mortar. There is no need to dilute the clay mixture yourself, because you can make a mistake in the proportions. You can buy ready-made mortar at any hardware store. Among the large and varied selection are fireclay or clay mixtures.
A little theory
This section of our article is necessary due to the fact that even a professional builder who has never encountered the laying of a furnace may not understand some specific terms and names of structural elements and details. If we talk in general about self-taught home craftsmen, then they definitely need such an “educational education”, otherwise it will be unclear what they are talking about. Let's start with the device of the furnace.
Furnace structure
First, let's look at the terms and elements of the furnace design, since in order to understand the description of the order, you definitely need to know them. Let us list the parts of the furnace and indicate their purpose. The picture below will allow you to see everything clearly.
Heating stove made of bricks
- The foundation serves as the basis for the structure.
- The walls enclose the remaining elements; their outer surface serves to transfer heat to the air in the room. Also, the wall material accumulates thermal energy in order to release it not immediately while the fire is burning, but gradually, maintaining a comfortable microclimate in the room.
- A firebox or firebox, in which fuel burns, hot flue gases are formed, and part of the heat is transferred by radiation to the walls of the furnace. The lower part is called the hearth, the upper part is called the vault.
The main part of the stove is the firebox
The grate, the grate on the hearth, through it air is supplied to the combustion zone and the ash spills into the ash pan.
Grate
- An ash pit or ash pit, a chamber under the firebox for supplying air to the grate and for collecting ash.
- Cleaning - a hatch opening into the smoke channel allows you to remove the soot accumulated in it without disassembling the furnace structure.
- Smoke channels (smoke circulation, in common parlance, passages) - hot gases circulate through them, and energy is transferred by heat transfer to the walls of the furnace.
- Chimney - serves to release gases that have given up most of their heat into the atmosphere.
- The roof is the upper surface of the furnace.
- The hot-air chamber is a cavity in the furnace volume that is not connected with the channels and the firebox.
- Smoke damper is a plate (gate) that blocks the smoke channel, almost always adjustable, i.e. you can partially block the flow of gases.
- Firebox and ash doors.
Convenient door for the blower with a flap for air passage
Shants are beams made of various materials used instead of a foundation. If the stove hangs on them, then its lower surface can also give off heat.
Brickwork order - how to lay it correctly
The quality and durability of the structure depend on how accurately the diagrams and procedures are followed during the construction of a brick heating and cooking furnace.
The first two rows are called the base and are laid out in 2-3 rows.
Then an ash pit is formed. A grate is installed on the top row of the ash pan. It provides air flow to the combustion chamber. Thus, the burnt fuel will fall into the ash pan.
Further, the arrangement of the heating stove includes a combustion chamber. A hob will be placed above it or slightly to the side.
This arrangement of a heating and cooking stove made of brick is traditional and provides maximum ease of use.
Laying out the foundation
It is recommended to build a monolithic foundation under a stove with a hob using one of two methods:
- Pouring - a solution is poured into the prepared pit, which is reinforced with rubble or reinforcing mesh
- Masonry - ceramic bricks or reinforced concrete blocks are laid in the pit
If you compare both options with each other, the first one will not only be better, but also more economically profitable. However, it is possible to build a stove on it only after 1.5-3 weeks. Under no circumstances should a bandage be made between it and the foundation of the house.
It is recommended to build a foundation for heating and cooking stoves with your own hands according to the following instructions:
- First you need to dig a pit, the linear dimensions of which will be 15-25 cm larger than the intended furnace. The depth should be 0.7-1 m
- A cushion of dry sifted sand 10-15 cm thick is poured into the bottom and compacted tightly.
- Then a 20 cm layer of coarse crushed stone is laid, mixed with broken bricks and stones to save money. After sprinkling a little sand, a filtering crushed stone cushion 10 cm thick is again made on top and covered with waterproofing (roofing felt is more often used)
- Next you need to build the formwork, leaving 5-10 cm between it and the edge of the pit for its subsequent dismantling
- A concrete mixture is poured onto the bottom in a layer of about 5 cm, onto which a reinforcing frame is installed.
- Pouring in small portions of 10-15 cm, the mixture is tamped to remove the bubbles accumulated inside. Having reached the extreme mark, the foundation is left to solidify
Projects and drawings of non-standard stoves
Below we provide a description and order of some non-standard stove designs. However, you can independently find drawings of ready-made designs for heating and cooking stoves.
Long burning stove: operating principle
Furnaces of this type are divided into shaft and chamber. They are made of metal or brick, but a brick model will be more difficult to use.
A long-burning shaft stove has wide limits in terms of power settings, but it will be difficult to attach a cooking surface to such a structure, since this will reduce its efficiency. It is better to use it exclusively for heating.
Another issue is the chamber design, which has two-stage combustion. Unlike the first type, the power control limits here will be lower, but the arrangement of the hob will not worsen its performance.
However, it does not necessarily have to be a cast iron stove with burners. Can be cooked in different parts of the oven depending on the heat concentration.
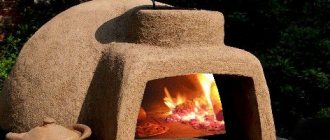
Slow Cooking Oven: Procedure and Application
Such a stove performs exclusively a cooking function; it is actively used by tourists when hiking. It also performs a heating function, since you can warm up next to it, only on such a scale.
This mini-stove is lightweight, easy to light and use raw fuel for operation.
In addition, there is a Soviet-style design that runs on dry fuel and can even prepare concentrate-based soups and other modifications of the mini-stove for mobile cooking.
Features of the use of the bell system
A bell furnace has a structure in which the chamber (hood) is a reservoir into which flue gases enter and exit from below. Under this dome, they linger, burn out completely and give off heat to the furnace.
The peculiarity of the two-bell system is that the internal heat flow is distributed between two hoods and this makes it possible to use the stove as a heating and cooking stove. However, it exists only in projects and procedures; there is no information about its practical application yet.
What should you pay attention to when choosing a stove for your summer house?
It is very important that your heating stove satisfies as many requirements as possible and at the same time consumes as little fuel as possible - firewood. Therefore, before purchasing, you need to pay attention not only to the appearance of the product, but also, first of all, to the characteristics.
We recommend that you write out this list for yourself and go through it, researching the model of stove you are thinking of buying:
- Since not all country houses have a large area, the compactness of the stove is extremely important so that it fits well in the place chosen for it. We must not forget about leading the pipe to the street - it should not bump into a floor beam or roof rafters.
- An important point is the volume of space the stove is designed to heat. Typically the recommended area is indicated in square meters.
- Particular attention is paid to the presence of a hob and its size. It’s more convenient to be able to cook a couple of dishes at the same time.
- The choice of location of the chimney pipe will depend on how it is planned to be discharged outside - through a wall or roof.
- The height of the stove should also be comfortable, so that it is comfortable to stand near the stove while cooking.
- Heating devices are also available with glass doors. Thus, the stove can serve as a fireplace. Such doors will be especially useful if there is no electricity at the dacha, and in the evening hours the stove will not only heat the room, but will also create a kind of cozy lighting for it.
Schemes of brick mini-ovens
Small ovens occupy a small area; the dimensions of their bases range from 50 to 70 centimeters in width and up to 65–100 cm in length. The height of the heating structure is from 1.5 to 2.3 meters. A cooking floor, an oven, and a water heating tank are built into the oven. Stove makers have also developed devices intended only for heating a home.
Small heating structure
This is the simplest heating structure. We will analyze the model in the following sizes:
- base width - 51 cm;
- base length (depth) - 89 cm;
- height - 238 cm.
The mini-stove is installed in the middle of the kitchen or against the wall. The optimal heating area is 20-35 meters. Interior partitions are erected around the stove, which allows heating both the kitchen and the adjacent room.
Inside the device are:
- combustion chamber;
- blower;
- smoke channels leading into the chimney.
The combustion door of the mini-stove (cast iron or glass) is selected depending on the aesthetic preferences of the home owners. A door made of heat-resistant glass, through which you can see how the wood is burning, gives the structure a resemblance to a fireplace. Two smoke valves are installed in the middle and upper parts of the furnace. There is one door for cleaning the channels. To build this model of the device you will need:
- 260 pieces of ceramic bricks;
- 130 pieces of fireclay bricks;
- grate (40x23 cm);
- combustion (30x20 cm) and blower (20x14 cm) doors;
- 2 doors for cleaning holes (20x40 cm);
- metal pre-furnace sheet (50x70 cm);
- two sheets of roofing material measuring 60x100 mm;
- sand and clay (or ready-made clay-sand mixture for masonry), clay-fireclay mixture.
Reference. Masonry mortar increases the volume of the device by the thickness of the joints.
The base and top of the mini-oven are laid with ceramic bricks on a clay-sand mortar. The firebox is made of fireclay bricks on a clay-fireclay mixture.
Three and a half bricks fit on the long side of the base, and 2 standard bricks 25 cm long on the short side. The masonry consists of 35 rows in height.
Small heating and cooking stove
This is a mini-oven model for heating and cooking - a convenient and very compact structure. The optimal area for a heated room at sub-zero temperatures is 20-25 square meters.
The device has the following dimensions:
- base length (depth) - 64 cm;
- base width - 51 cm;
- height - 215 cm.
The structure is being erected in the kitchen. The device includes:
- blower;
- combustion chamber;
- smoke channels leading into the chimney;
- cooking floor;
- niche for the oven.
The cast iron cooking floor has a hole that is closed with a disk and a circle. Solid flooring is also available for sale. In the niche for the oven chamber there is a metal oven or a hot water tank with a tap. If the niche is left free, it is used for drying things. To build a stove you will need:
- 222 pieces of ceramic bricks;
- grate (40x25 cm);
- firebox door (20x20 cm);
- door for the blower (14x14 cm);
- cooking floor (35x38 cm);
- metal oven or hot water tank;
- iron pre-furnace sheet (50x70 cm);
- two doors for cleaning holes (20x14 cm);
- two valves;
- a piece of flat slate;
- steel corner;
- clay, sand or ready-made clay-sand mixture for masonry.
Special characteristics of furnaces that are specific only to some models
Before you go to the store and choose a suitable model for your dacha, it is better to familiarize yourself in advance with the different options for such heating devices in order to know what parameters you need to rely on.
Cast iron stove
Simple, but effective and quite cute
This unit has a simple design, but its main advantage lies in the material from which it is made. Cast iron heats up well, retains heat for a long time and has excellent heat dissipation, while it tolerates temperature changes well. With its compact size, a cast iron stove is capable of heating a room with a volume of 100 to 120 cubic meters. meters. The height of this device is 56, depth 54, width 35.2 centimeters. The stove is ideal for a summer residence, since, despite its simple design, with proper combustion it can retain heat for a long time - from five to eight hours.
The ribbed surface of the cast iron side walls increases heat transfer, and the interesting ornament on the door makes the stove aesthetically attractive. When purchasing such a stove, you need to take into account its weight - it is almost 75 kilograms.
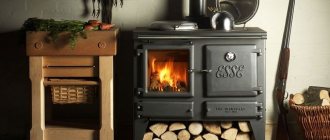
Cooking stove with fireplace function
Combines the functions of both a stove and a fireplace
Another very attractive heating stove option is the Bavaria Optima eco-fireplace, which has an elegant appearance and compact shape. The top panel of the unit is made of cast iron and equipped with a burner, so it is capable of giving off heat for a long time, and makes it possible to cook food or warm water. The fireclay slabs with which the firebox is finished are capable of equalizing the temperatures inside, and thereby extend the life of the device. The oven is equipped with a sealed door with heat-resistant glass, and the transparent screen blowing system does not allow smoke to settle on its inner surface - the glass always remains clean. This option may well serve as a decoration for the room due to its fireplace shape, and in the evenings it will be very comfortable to watch the play of the flames.
The dimensions of this model are as follows: body height 93, depth 47.5, width 42.5 centimeters. The stove can not only decorate a room, but also heat a room with a volume of 160-170 cubic meters. meters. The efficiency of the unit is 78-85%, so the efficiency of the furnace can be considered quite high.
Do you need a water circuit in your dacha?
Cooking oven for increased versatility
The appearance of this stove speaks for itself - it is not as compact as the previous ones, but has a very attractive appearance due to its shape and color scheme. The versatility of the unit allows you to solve many economic problems. In the oven you can cook stews, bake bread or a pie, the stove will never let you down, and the fire will bring comfort and warmth to the house. Since the stove is designed with a water circuit, it will heat not only a separate room, but the entire house. In addition, it is equipped with a secondary combustion chamber protected by fireclay slabs, i.e. heat will come not only from burning wood, but also from the burning gases that they emit during the smoldering process. When panels made of natural stone heat up, they will also give off soft heat to the room and will not allow the body to cool down quickly.
The oven has the following dimensions in centimeters: height - 97; depth - 62; width 86. Such a unit is capable of heating rooms with a total area of 170-175 cubic meters. meters.
Classification of heating and cooking stoves
Furnaces of this type are divided by material. They come in both brick and metal. In addition, there is their classification according to the method of application:
- stationary structures - they are built or placed at the place of use once and for all without the possibility of changing location;
- transportable stoves – can be transported by means of transport in a non-disassembled form;
- mobile structures - have a compact size and can be collapsible. Available for transportation in the luggage compartment, and even in bags. They can work without special equipment.
The cooking surface plays an important role in the functions of the stove. On the one hand, it must be designed so that heat loss is minimal, but, on the other hand, it must heat the dishes as much as possible
The best option for constructing the surface is cast iron. A solid stove will be used to heat food, and cooking and frying will be done on a burner with removable inserts.
Types of cast iron stove surfaces
Regardless of the configuration, all cast iron surfaces perform heat transfer functions well and are suitable for cooking. The difference between a solid and prefabricated slab is the presence of thermal gaps between the elements, which compensate for the expansion of the metal when heated. You can understand the structure of hob surfaces in more detail by reading about each of them separately.
Prefabricated slabs
The prefabricated cooking deck is a structure made of a cast iron surface and several rings that differ in diameter. They are inserted into each other and assembled into a single plane like a puzzle.
All prefabricated stoves can include from one to several burners, and thanks to the ability to remove and put on rings, you can choose the most suitable burner size for each specific cookware.
This type of flooring is more durable and resistant to temperature changes. Due to the presence of gaps between the rings, the metal can expand during heating without deformation or other damage. To provide extra strength, some slabs are produced with additional stiffening ribs on the inside. A significant advantage of this addition is an increase in the temperature of the hob, and thus an increase in the efficiency of the oven in cooking.
Solid slabs
A solid cooktop comes in the form of a single sheet of metal, usually with
one or two burners with a constant diameter. There are also blind stoves that do not have burners.
This design of the stove plate has virtually no thermal gaps, which makes it not as reliable and practical as the previous model. Due to the lack of free space, deformation of the cast iron may occur during heating.
However, an important advantage of solid slabs is ease of installation and reasonable cost compared to prefabricated ones.
The main nuances when installing a cast iron stove:
- When making a furnace, it will be appropriate to compare the difference in the behavior of different materials under the influence of temperature. Metal and brick have different expansions, and during the heating process the oven may collapse. To prevent this from happening, it is necessary to provide gaps between the cast iron slab and the brick surface of up to 5 mm around the entire perimeter. This way you can significantly increase the service life of the furnace.
- The metal plate on the surface of the furnace is fixed with a liquid clay-asbestos solution. To prepare it, clay is mixed with crushed asbestos and by adding water the solution is brought to the correct consistency (liquid sour cream).
- When installing a cast iron stove, be sure to control the process using a level. The largest burner is always located above the firebox.
- To strengthen the structure of the stove, the top row of brickwork should be fixed with a steel angle around the perimeter.
Arrangement of heating and cooking furnaces
In recent years, they have increasingly resorted to using ordering in the construction of heating and cooking stoves. This is due to the widespread use of traditional heating systems in most private homes. A couple of hundred years ago, a well-built stove was a mandatory element for any house in the village, providing warmth and comfort in the house.
With the help of such a unit, it was possible not only to solve heating problems, but also to provide conditions for cooking. At the same time, such a device could also serve as a place to sleep. For this reason, the interest in skilled stove makers who were hired to build stoves is understandable.
What metal to use
Before the manufacture of the furnace, it is imperative to inspect the metal for defects - corrosion, cracks, bulges. If they exist, they must be processed by grinding, welding, and stamping.
The reliability and strength of the stove is given by the material from which it is assembled. Suitable metals for the thematic problem include:
- Ordinary steel;
- Heat-resistant steel;
- Cast iron.
If the stove is made from a ready-made container, then sometimes a can or fire extinguisher acts as the latter. The most durable material is steel. But this indicator (strength) also depends on thickness. If it is 10-18 mm, then the stove will last a long time.
If you have a large amount of cast iron, you will have to make a heavy stove with walls 6-25 mm thick. Despite their enormous weight, the corresponding structures heat up quickly and retain heat for a long time. In other words, cast iron stoves have good efficiency.
Advantages of wood stoves
Wood-burning stoves have many advantages that make these designs popular both in the past and now. Among the advantages of such equipment:
- autonomy; wood-burning appliances do not require a mains connection - heat generation is possible at any time; This is probably the main advantage of such stoves;
- financial savings; firewood in Russia is available to anyone, and those who live in rural areas are doubly lucky - the savings are even more significant;
- the ability to build a stove yourself; this is both a chance to test yourself, and, again, savings, and the reason for the exclusive design; autonomy results in the possibility of absolute adjustment to the characteristics of the room in which the stove will be installed;
- the ability to connect the device to the heating system of the house;
- environmental friendliness of stoves and fuel; both the stove and the firewood are completely safe for health; the materials from which the stoves are made are harmless, and combustion products are completely removed through air draft in the chimney.
A disadvantage of wood-burning equipment is the need for fuel replenishment. But if the stove is of high quality, and, moreover, designed for long-term burning of wood, the frequency of adding fuel is small. In addition, the advantages clearly outweigh the disadvantages.
Arrangement of heating and cooking stoves
Rows 1-2. The first two rows of the heating and cooking stove with your own hands must be laid out with continuous masonry, overlapping the seams. Laying is done from red brick. At the same time, keep an eye on the horizontal, since in the future, mown areas may appear. The angles are checked on each of the rows with a square. To make the work easier, it is recommended to hook up plumb lines.
Row 3. In this row you need to start organizing the ash chamber, lower heating chamber and vertical channels. An opening is left on the front side for the door. Almost the entire stove is laid out using red refractory bricks; fireclay is needed for the ash pan and ash pit.
Row 4. In this row, the laying is carried out similarly to the previous one. Vertical channels must be combined into one.
Row 5. You need to start laying this row towards the right. The ash chamber is finished forming and the door is closed. The latter should be secured with wire. Then you can install the grate. A gap of about 10-15 mm between it and the brick is filled with sand, since the metal will expand when heated.
Row 6. At this stage, it is necessary to begin forming the furnace and oven, leaving an opening for the door on the front side. The U-shaped channel, which was formed earlier, is divided into 3 vertical ones. The chambers must be divided by a wall, which is made of fireclay bricks.
Rows 7-8. The next two rows form the combustion chamber. However, in the eighth, the third channel should be closed.
Row 9. This row is the last for the combustion chamber. Its bricks must be cut at an angle. This is necessary so that the smoke flows smoothly into the chimney and does not linger near the corners.
Row 10. To lay the inside of the tenth row of the heating and cooking furnace with your own hands, you need to prepare fireclay bricks. At this stage, close the oven door. In this case, the bricks are ground down at the same angle as in the previous row, but the partition between the oven and the furnace is no longer installed.
The horizontal level of the brickwork is checked again and a hob is installed. Under it, as well as under the grate, gaps of about 12-18 mm are made to take into account thermal expansion. A metal corner with a side of 45-50 mm is placed flush on the front side.
Row 11. In this row, you need to start forming a chamber above the hob. It is recommended to continue masonry using red brick. You can make another oven if you install a large door for the cooking chamber.
Rows 12-16. From rows 12 to 15, the walls of the cooking chamber continue to be laid out, but in the first row you can combine a pair of channels that are located on the left. Having laid the 16th row, you need to install four corners along.
Row 17. At this stage, cover the cooking chamber with brickwork, leaving a small hole, about half the size of a brick. Steam will be removed through it.
Row 18. The next row is laid out similarly to the previous one, taking into account the dressing. You need to install a metal safety corner on it, which will strengthen the base of the drying chambers. In this case, you should not block the previously left hole.
Rows 19-21. In this row, a pair of drying chambers are formed, equipped with doors, and ventilation from the cooking room. The next two rows will be laid in a similar manner.
Row 22. One of the dryers, preferably smaller in size, must be covered with an iron plate.
Rows 23-25. In the 23rd row you need to install a damper for the cooker exhaust duct. In the 24th row, the first and second vertical channels should be combined. In the 25th row you will have to make a connection between the third channel and the cooker hood.
Row 26. In this row it is necessary to cover the drying chambers with a corner. A reinforcing mesh is laid on top.
Row 27-28. The time has come to completely cover the top of the stove, while slightly expanding the perimeter of the masonry (about 3-5 cm). To remove smoke, you need to leave a 3rd channel, into which all the previous ones will converge. In the 28th row, a small side should be formed, once again increasing the perimeter of the masonry.
Click to enlarge image
Rows 29-last. In the 29th row they return to the previous perimeter. Next, you need to install a valve that blocks the chimney channel and allows you to regulate the overall draft. From the 31st row onwards, a chimney pipe is formed, leading outside.
Video instructions for laying a heating and cooking stove with your own hands
Heating and cooking stoves can be built with your own hands quickly and easily, if you plan and prepare everything in advance. Changes can be made to any of the designs to improve performance. But before you take such a step, you should consult a specialist.
Stove with stove - types
There are many varieties of heating and cooking stoves; every stove maker probably has in stock several tested drawings and diagrams, according to which he carries out the masonry with his own hands. But, one way or another, they are all built on the basis of long-known ones, which are discussed below.
Swedish oven
"Swedish" was originally intended to perform several functions:
- heating;
- cooking;
- drying food and herbs;
- keeping clothes warm.
Its design is thought out to the smallest detail, the oven is equipped with:
- hob;
- oven;
- perfectly heated niche-stoves.
In addition, its smoke channels are designed in such a way that the body of the stove is heated evenly from bottom to top , due to which a stable temperature is maintained in the room.
A distinctive feature of the Swedish stove shown in the photo is the oven. And its function is not limited to baking and baking.
The oven is located next to the firebox and is separated from it by a thin layer of masonry. The firebox arch is formed by a slab located in a niche. Immediately after starting the fire, the cooking surface and the wall between the firebox and the oven warm up well.
In winter, when the furnace is fully loaded, the initial heating of the room occurs by convection currents from the stove and oven, after the end of the fire - due to the heated walls of the furnace.
The cooking surface of the oven does not overheat , since air constantly circulates above it.
In summer, the stove is used mainly for cooking . In this case, intense convection does not occur, since there is no temperature difference, and a small amount of fuel is sufficient for good heating of the stove.
The oven also warms up, creating a high-temperature zone at the exit from the firebox, due to which the flue gases go into the channels completely burnt. The furnace body heats up slightly .
Layout of the Shvedka stove
The diagram and drawings of the masonry of a Swedish-type stove with your own hands are shown in the figure.
To lay a classic “Swedish” with your own hands you need:
- red solid brick grade M 150 - 580 pieces;
- clay-based dry masonry mixture - 200 kg;
- cast iron grate;
- firebox door;
- ash door;
- cast iron stove with two collapsible burners;
- oven welded from sheet metal;
- chimney damper - 2 pcs;
- cleaning - 3 pieces;
- equal-flange steel angle 40 mm - 170 cm;
- steel strip 5x50 mm - 65 cm;
- flat slate 10 mm thick - 1 sheet;
- roofing iron.
Foundation for the "Swedish"
The foundation for the swedish is made solid, from concrete.
Under the foundation it is necessary to make a sand and gravel cushion 15-20 cm thick. The height of the foundation itself is at least 30 cm, with two-layer reinforcement made of rods.
Before laying begins, the foundation is kept for at least 20 days to gain strength.
Level the foundation using a screed with the floor level.
After it dries, it is necessary to thermally insulate the furnace from the concrete, otherwise it will absorb a significant part of the heat.
Thermal insulation is performed as follows:
- An asbestos sheet 3-4 mm thick with dimensions 30 cm larger than the dimensions of the stove on the sides and back and 60 cm on the firebox side is placed on the foundation.
- A heat reflector is placed on the asbestos - foil or thin galvanized sheeting.
- Next is another similar layer of asbestos with the same dimensions.
- A sheet of roofing iron with the same indentations as asbestos.
- On top of the iron is technical felt, impregnated with clay milk according to the size of the furnace.
Do-it-yourself oven: ordering a stove with a hob
On top of the felt, after it has dried, they begin laying the stove according to the order:
The first two rows are solid. They form the base of the oven.
The third and fourth - install the blower door, clean and begin to form the lower part of the smoke circulation and the ash pan.
In row 5, a grate and oven are installed.
In the 6th row they continue to lay out the smoke channels and install a partition between the oven and the combustion chamber.
In the 7th row , place the firebox door and secure it.
In rows 8 and 9, the laying out of channels continues.
Row 10 forms a support for the hob.
To properly install the hob, you must first lay the brick on a dry surface, attach the slab and mark the laying grooves.
Bricks are numbered for ease of laying.
The row is disassembled and, using a grinder, a recess is selected for laying the slab in such a way that there is a gap of 5 mm on all sides.
After which the row is assembled onto a masonry mortar, and the slab itself is placed on a clay-asbestos liquid mortar.
To prepare it, crushed asbestos is introduced into the masonry mortar, diluted to a creamy consistency.
When laying the slab, be sure to check its level. If the burners are of different sizes, the larger one is placed above the firebox, the smaller one - above the oven.
Rules for laying a hob: video
From rows 12 to 16, the walls of the niche above the stove and the smoke ducts are laid out.
on top of the 16th row according to the size of the niche.
In the 17th and 18th rows they lay it with bricks, forming the ceiling of the furnace.
Next, the laying is carried out according to the scheme up to row 30.
In the 30th row they install a valve, after which they begin laying a chimney of the required height.
Small cooking stove - how to fold a stove with a stove
In a country house or summer kitchen, a stove can be installed for only one purpose - cooking.
In this case, there is no need to waste material on smoke circulation.
An excellent model of a cooking stove for the home - drawings with instructions
This multi-functional wood burning stove performs several functions:
- You can cook and fry on the hob,
- in the oven - bake,
- heat water in the built-in water heating tank.
The sketch of the facade shows its elements:
- 1 - firebox;
- 2 - ash pan and ash pit;
- 3 — oven;
- 4 - water tank;
- 5 - cleaning door.
The stove resembles a Swedish stove in design and type of heating, but without smoke ducts.
The heated smoke goes straight into the chimney, so the stove is heated with a small amount of fuel.
The exit to the chimney is located at the rear, which allows you to remove the pipe through the wall yourself, observing fire safety standards.
Such a stove requires no more than 250 bricks , which allows it to be installed on the floor of the house without building a foundation.
In this case, it is also necessary to do thermal insulation, but in the reverse order: lay felt on the floor, soaked in a liquid clay solution, and on it - a sheet of roofing iron. Laying begins on top of the sheet.
Scheme - order:
The first two rows , like the Swedish one, are solid.
In row 3, cleaning is installed.
In 4 and 5 - the ash pan door, forming a smoke circulation and exit to the chimney.
In row 6, the ash pan door is covered, an oven and a water tank are installed.
In the 7th row, a grate is placed at the bottom of the firebox.
From rows 8 to 10, lay out a partition between the firebox and oven, and install the firebox door.
Row 11 - overlap over the firebox door, oven and tank. Also in the 11th row a recess is made for laying the slab.
The top of the stove is covered with a cast iron hob with two burners. They are selected so that the maximum heating element is located above the firebox. Place the slab with a gap of 5 mm on a clay mortar with the addition of asbestos.
Kuznetsov furnaces
A fundamentally new design of furnaces was implemented in Kuznetsov furnaces.
Unlike channel ones, they do not have a complex system of internal passages, and the circulation of gases occurs in cavities - caps.
For this feature, Kuznetsov stoves are called bell stoves.
Among his developments:
- heating;
- cooking;
- sauna stoves;
- stoves for the cottage.
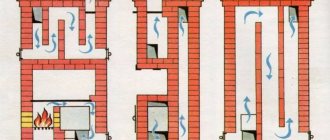
In channel furnaces, hot gases pass through labyrinths of passages, gradually releasing heat. This causes uneven heating and sometimes destruction of the furnace elements.
If the channels are insufficiently long, for example, in sauna stoves, the gases do not have time to cool, as a result, efficiency decreases, and the stove heats the air.
In bell-type structures, heated smoke rises into the bell - a cavity bounded at the top by the ceiling and with an exit at the bottom.
The hot gas at the top of the bell gradually cools, heating the walls of the furnace, and gradually falls down.
The circulation of gases in Kuznetsov bell furnaces is shown in the figure.
For complete heat transfer in Kuznetsov stoves, not one, but two or three hoods are made, and their placement can be either vertical - on top of each other, for example, in sauna stoves, or horizontal - in models equipped with a stove bench.
Heating and cooking stoves, as a rule, imply a vertical arrangement of the hoods.
The hob is located either above the firebox or forms the arch of the lower hood. In the second case, the temperature on it will be more stable.
Procedures for do-it-yourself masonry, as well as photos of the most popular designs of Kuznetsov stoves are presented below.
Heating and cooking stove - diagram with order
Classification of heating and cooking stoves and their projects
Heating and cooking furnaces are divided into the following types of structures:
- stove with a heating shield - this design looks like a kitchen stove, it is convenient to use. As a rule, the body of such a stove includes an oven, from which flue gases are discharged into a smoke channel in the wall, then they are passed through the channels of the heating panel and heat the room;
- heating and cooking stove - includes a cooking niche and a smoke circuit, which is located directly above it.
You can also highlight the following designs of stoves of this type, which can be taken as the basis for a project to build a stove at home:
- The kitchen hearth is an open stove, which is located next to the heating panel. Can be equipped with a vertical smoke circulation system even in permanent residences;
- stoves equipped with a drying cabinet - this project is very well suited for houses in the village used as a permanent home. The cabinet is equipped with an exhaust hood to remove water vapor during drying of food products such as fruits or mushrooms. Ovens with a closed cooking niche are complemented by a hood and a metal door. And the niche itself is used as a drying cabinet. If you liked a project of this design, then the instructions include the algorithm for installing the doors and their manufacturing method;
- stove with a stove bench - the stove bench is heated separately from the firebox of the entire stove; also, depending on the type of room, it can be parallel or perpendicular to the stove. It is installed on a wooden floor, previously covered with felt and iron for the roof;
- corner stoves;
- with two tiers;
- ovens equipped with additional elements for making barbecue and homemade bread.
As you can see, there are quite a lot of options, and even more projects. Below we will look at the main points that relate to the construction of a heating-cooking stove with your own hands from bricks.
Features of cooking ovens
Depending on the model, cooking stoves combine a real oven, stove and oven, differing in fairly compact dimensions. Most cooking stoves are no larger than a standard gas stove. In addition, manufacturers of cooking stoves place great emphasis on the design of this equipment, which makes them a real decoration of the interior. Installing the stove is quite simple and does not take much time, but it should be entrusted to professionals, this will guarantee long and correct operation of the equipment. A modern cooking and heating unit is mobile and, if necessary, transporting it to another place will not be difficult.
Materials for constructing a furnace
To build a functional stove, it is not necessary to use special materials for fireboxes and stoves. Since many materials are produced by local manufacturers. And their quality is practically no different from branded ones. For example, for a regular Swedish stove with a hob with two burners and an oven you will need:
- Regular red brick without perforation, it can definitely be used locally;
- Fire brick;
- Heat-resistant clay for laying the furnace firebox;
- Clay mixture for wall masonry;
- Grate bars, they can also be used domestically produced; their quality is not inferior to foreign models and certainly better than Chinese alloys;
- The door of the firebox and vent made of domestic cast iron is no worse than German or Polish ones; it’s another matter if you install heat-resistant glass instead of cast iron;
- Hob with burners;
- Oven. Nowadays, stainless steel products are highly advertised, but many stove makers recommend experienced metal ones made from ordinary sheet metal;
- Smoke valves, dampers, swivels;
- Steel corner 45x45, steel strip 35-40 mm wide and 3-4 mm thick, soft wire for tying;
- Roofing iron sheet;
- Flat slate – 1 sheet;
- Roll of roofing felt.
Tips for increasing the life of cast iron stoves
To ensure that your stove hob lasts as long as possible, you should follow these simple rules:
- to lay the slab, use liquid cement mortar, maintaining a distance of 5–6 mm from the upper edge of the oven;
- The largest burner should always be located above the firebox;
- the brickwork of the top row must be strengthened with a steel angle;
- Do not forget that there should be gaps of up to 2 mm along the entire perimeter of the slab to prevent deformation and cracking of the metal;
- correctly load the stove for the first time and heat it, gradually warming it up for about 8 hours, and increasing the temperature by 70–80 degrees every hour. For proper heating, you need to start heating with shavings and wood chips, and then add larger firewood. After heating the stove for 8 hours, it must be left to cool until the firewood is completely extinguished.
If the buyer himself is not confident in his competence in installing cast iron slabs, then it is better to seek the help of professionals. Thanks to their special knowledge and many years of experience, they will help you save your time and nerves. This is the case when it is better to give way to a specialist, so that later you do not have to pay for your own inexperience.
And then, when you have at your disposal a beautiful stove with a properly installed cast-iron stove on the surface, you can fully enjoy the warmth and comfort emitted by such a design.