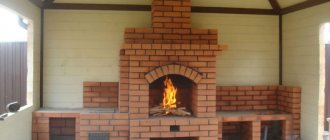
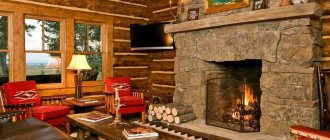
A classic wood-burning fireplace gives a home a unique coziness and charm, but many consider it too expensive, believing that laying a brick fireplace with your own hands is a job for professionals.
DIY brick fireplace
In fact, this task is not so difficult, it is enough to find a suitable drawing or ordering diagram, stock up on materials, and a real fireplace with crackling wood in it will appear in your home.
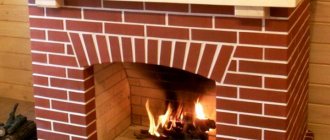
Arrangement of a traditional fireplace
The classic design of a fireplace with a direct chimney that is not built into the wall to which the fireplace is adjacent is the simplest. However, such a structure is outwardly unsightly. You can achieve it to look, albeit not luxuriously, neatly through smooth masonry and subsequent finishing. For laying the body of the fireplace, it is better to use a type of solid ceramic brick, such as facing brick. It has a geometry close to ideal and allows you to make the rows of masonry as even as possible.
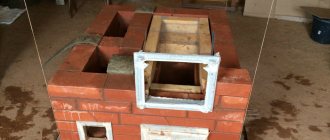
The ordering diagrams do not take into account the foundation, so we will not talk about it. But it is worth noting that its presence is mandatory for heavy brick structures. So, the 1st row of the classic fireplace masonry is made continuous. It plays the role of thermal insulation to protect the foundation from high temperatures. Its necessity is justified by the low heat resistance of cement mortar, the use of which predominates in the construction of foundations.
Starting from the 2nd row, an ash pan and a ash pit are laid, which are necessary to collect solid combustion products and unburned fuel residues, as well as to create draft that stimulates the combustion process. When laying the 3rd row, an ash pit cover is constructed. This row is made almost continuous, with the exception of the channel through which the ash will fall off and air will flow into the firebox.
The 4th row is similar in shape to the 3rd, but will have a different orientation of the bricks. This technique should be used throughout the entire masonry to increase the strength of the structure. Also, at the stage of laying the 4th row, a grate is installed.
Rows 5 through 7 will be identical except for the orientation of the bricks. They form the firebox of the fireplace. From the 8th to the 13th row, the formation of a fireplace tooth occurs, narrowing the space of the firebox upward.
On the 12th – 13th rows, an overlap of the firebox opening is formed. Cast iron corners can be used as supports; this material is less susceptible to thermal expansion than steel.
When laying the 14th - 15th rows, an opening is created on the back wall of the fireplace for installing the door. It serves to clean the internal walls of the fireplace from settling ash. In this regard, the required distance of the fireplace from the wall of the room should be taken into account.
From the 15th to the 16th row, the internal opening is narrowed on the inside of the front wall of the fireplace. Thus, a smoke collector is formed, which passes into the chimney.
From the 17th to the 20th row, a chimney is formed, the cross-sectional area of which is equal to the area of one brick.
A smoke damper is installed between the 20th and 21st rows to regulate the draft in the fireplace.
For laying the body of the fireplace, it is better to use solid-faced ceramic bricks
Digital symbols for figure “b”:
- Chimney damper
- Grate
- Ash pan
- Cast iron corners
- Chimney cleaning hole
Phased construction as a formula for success
Before folding the fireplace, a number of theoretical works should be performed. In general, all work needs to be divided into separate stages. Only by working step by step will you use your efforts productively, because mistakes made can be quickly corrected.
At the first stage, it is necessary to create a project that will present a drawing with dimensions, step-by-step instructions for laying rows and a description of individual additional options (pockets, shelves, etc.).
Calculation of fireplace parameters for a given room is carried out on the basis that all elements are in a certain proportion with the dimensions of the room. Incorrectly selected dimensions may cause the device to malfunction. An overly large fireplace will take up a lot of space, and a small one will not be able to warm the room.
Corner version
Calculation of dimensions
The area of the firebox, or rather its front part, depends on the area of the room. Their ratio is defined as 50/1, respectively. This parameter is the starting one. Knowing it, we find the dimensions of the fireplace opening using the formula: height/width = 2/3. Simple substitutions will give the numerical values of these parameters. One of the important indicators of the efficiency of a fireplace is the depth of its firebox. But in this matter you cannot play it safe by increasing the depth with a margin, as this will lead to heat loss through the chimney. The optimal ratio between the height of the firebox and its depth is the fraction 3/2.
A brick fireplace must be insulated from the floor to avoid spontaneous combustion. This is done using a flooring made of thermal insulating material, but most often the portal design includes a protrusion - a podium.
It differs in the dimensions of the portal on the sides by 30 cm, and in the front by 50 cm. The rear wall mirror is not installed in an arbitrary manner, but according to a certain parameter. So, at a height equal to 1/3 of the entire wall, a protrusion begins to form. It has an inclination of 20° to the plumb line. At the top the mirror forms a smoke tooth. Dimensions must be observed in order to combine these two structures into one and not disrupt traction.
Table with recommended fireplace sizes
The combustion chamber does not have a constant width, since it narrows deeper into the interior. The walls have a rotation of 60° from their original direction. The height of the chimney directly depends on the location of its exit from the roof roof. In the immediate vicinity of the ridge, it should be raised by 0.5 m. When removed, the chimney is erected so that the line connecting the ridge with the edge of the pipe forms an angle of 10° with the horizontal. There is also a rule for the area of the chimney duct. It should be 15 times smaller than the area of the firebox.
Good to know: Adhesive for stoves and fireplaces: heat-resistant, heat-resistant, fireproof
There are already developed projects with all the calculations. To use them, you need to select the area value and get the results.
Construction of the foundation
A brick fireplace, even in its simplest design, has a huge mass that no floor in the house can support. Therefore, first you will have to prepare the foundation.
- Part of the floor is dismantled to dig a pit. Its depth depends on the mass of the fireplace and averages 0.5 m.
- All techniques for pouring foundations for brick buildings are used. The bottom of the pit can be lined with crushed stone and sand, taking care of the waterproofing cushion.
- The foundation is poured with cement mortar to the floor level. There are no strict rules for the use of reinforcing elements, but everyone understands that when building a fireplace, the entire foundation can be divided into 2-3 parts and, for example, re-laid with reinforcing mesh.
- If necessary, formwork is used. The finished structure should harden thoroughly, so do not rush to continue the work, but start preparing a clay solution, which will be useful when laying the fireplace itself.
Foundation construction work
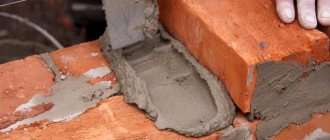
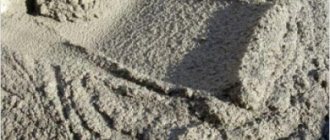
Preparation of the solution
Preparing mortar for masonry is quite difficult. If you don’t have special instruments at hand to determine the fat content of clay, then wise advice from professionals will help.
But in the absence of experience, even these tips can lead to a mistake, then cracks will appear in the masonry, through which smoke will begin to break into the room, and the structure will have to be dismantled. It is much easier to use ready-made compounds. The strength of the folded fireplace will only increase.
However, as information, we will introduce the stages of preparing a good solution:
- To choose the right clay, you need to soak the presented specimens with water. To do this, a ball is rolled and placed in a tank. After several hours, you should squeeze the ball in your hand, turning it into a cake. If ragged cracks begin to form along the edges, it means the clay is not oily enough.
- Clay of suitable fat content is soaked in water for 2-3 days. This will help you crush it later using a mesh. The appearance of large lumps in the oven solution is unacceptable.
- By mixing clay, sand and water, we obtain a mortar for masonry. However, it still needs to be checked for consistency. The solution layer moves horizontally. If there are gaps in the clay mass, then you need to add more water. If the mark from the trowel immediately floats, then, on the contrary, there is a lot of water. It is not difficult to guess that the furrow left by the trowel remains at normal consistency for quite a long time.
Good to know: Designs of brick stoves and fireplaces, how to calculate it yourself, where to get a ready-made solution
Arranging a corner fireplace
The fundamental principles of laying a corner fireplace are no different from those of a traditional fireplace. The same applies to the main structural elements, such as the ash pan, firebox, chimney tooth, smoke collector, chimney and damper. However, this arrangement of the heating structure makes its laying much more complex and requires highly qualified craftsmen. If you still have a firm intention to build a corner fireplace with your own hands, you need to carefully familiarize yourself with the procedure and determine all the nuances of such construction.
The main problem when building a corner fireplace is its complex architecture. For this reason, a significant proportion of the bricks used in masonry must be formed. The arrangement of the corner fireplace below clearly shows the variety of shapes of the bricks used. The molding process is quite labor-intensive. In turn, in the traditional fireplace described above, almost all the bricks are laid in their original form.
The main difficulty when creating a corner fireplace is its complex architecture
However, building a corner fireplace is worth the effort. This design allows you to significantly save space, which allows you to install it even in compact rooms. In addition, the adhesion of the structure to two walls at once makes it possible to increase its efficiency as a heating device.
However, it is worth considering that the location of the fireplace in the corner of the external walls significantly neutralizes this advantage. Also, a corner fireplace outperforms front ones in aesthetic terms. The location of the fireplace in the corner makes it clearly visible from almost all points of the room in which it is installed.
Necessary materials
Brick finishing of fireplaces and stoves
To make a small fireplace you will need:
- Brick. When calculating the amount of material, do not forget to take into account 10% waste and waste;
- Coarse sand. Before use, the sand is sieved and washed to remove small debris;
- Clay. To build a quality fireplace you will need a blue type of clay;
- Several buckets of crushed stone;
- Reinforcement 1 m long and 10 mm in diameter in the amount of 10 pieces.
Tip: before starting construction, draw a masonry diagram on paper. Try to strictly adhere to the dimensions of the brick and room in the drawing. Also, do not forget to take into account the layout of the dacha.
English fireplace arrangement
The design of an English-style fireplace has a number of distinctive features. This type of fireplace is always made with a straight chimney, while other types are often built with a chimney built into a wall niche. Another distinctive feature is the design of the fireplace insert. When viewed from a horizontal plane, it has a trapezoidal shape. In this way, a predominantly frontal direction of thermal radiation is achieved and the efficiency of the fireplace in terms of heating the room in which it is installed increases.
The use of an inclined back wall, the so-called fireplace tooth, in the design of a fireplace originates precisely from classic English fireplaces. Since these fireplaces are predominantly open, the issue of preventing smoke from entering the room in which they are built becomes acute.
The inclined rear wall of the firebox, due to the narrowing of the combustion space upward, can significantly increase the rate of smoke exit. It is this effect that prevents gaseous combustion products from entering the room.
An English fireplace is always made with a straight chimney
In addition to counteracting smoke, the chimney tooth helps to increase the heat transfer efficiency of the fireplace. Due to its inclination, this structural element reflects a significant part of the thermal energy in the direction of the room. If it is absent, this heat will simply go out.
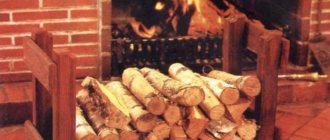
Another distinctive feature of an English fireplace is the absence of a vent and grate. All ash and unburnt coals are removed from it directly through the combustion opening. Therefore, the design of the fireplace provides for the placement of a protective platform below the level of the firebox, which should protrude from the front of the fireplace.
A general recommendation for the construction of all fireplaces is to use fireproof (fireclay) bricks when laying out the internal space of the firebox. Its cost exceeds the cost of a ceramic one, but it will pay off by increasing the service life of the fireplace.
It is also highly recommended not to use bricks that have cavities when constructing heating structures. When exposed to high temperatures, it is prone to rapid destruction.
Video description
This video shows how to make masonry for a fireplace:
After completing work on the fireplace, given its unpresentable appearance, you can finish the outer surface. In this case, various fire-resistant materials are used, for example, ceramics, heat-resistant paint, decorative plaster, tiles (clay tiles with a base, which are a type of tile), artificial and natural stone.
If you need a fireplace with a heating function, you can use the air heating method; in this case, it is recommended to use a cast iron firebox rather than a fireclay firebox. To heat the entire house, you need to install an air duct system distributed throughout the entire residential building. In this case, cold air should be directly directed into the firebox, after which the heated air passes up through the pipes.
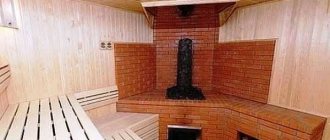
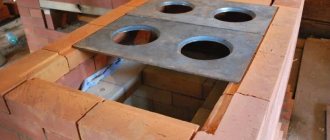
Another heating option from a fireplace is water. At the same time, they also provide for the presence of a hob on the fireplace. Such fireplaces-stoves with a heating function are widely used not only in private homes, but also in bathhouses.
Tools needed to build a fireplace
In order to lay out a fireplace without being distracted by anything during the work process, you should stock up on a set of basic tools and accessories necessary for this, which include:
- Furnace hammer. Consists of a handle and a steel nozzle. On one side of the nozzle there is a butt, on the other there is a spatula-pick. With its help, brick is split and trimmed to give it the required shape. Since this action involves hitting the tool with varying strengths, it is better to stock up on two furnace hammers.
- Trowel. It is a spatula for applying and leveling the solution.
- Level. Used to check the horizontalness of the masonry surface. In some cases, the level can also be adapted for checking vertical surfaces.
- Plumb. If the verticality of the masonry surface cannot be checked with a level, an ordinary thread with a weight, called a plumb line, is used.
- Large capacity. The masonry mortar will be mixed in it.
- Sieve. Sand for mortar needs to be pre-screened.
- Ladder. Laying the top rows requires the craftsman to be on an elevated position.
- Roulette. Construction work inevitably involves length measurements.
An order that reflects the features of a particular heating structure can significantly simplify the masonry process. Having decided on the type of fireplace you want, you just need to find the appropriate ordering diagram, prepare the necessary materials and tools, and you can safely begin construction. True, it is worth taking into account the different levels of complexity of constructing different fireplaces and soberly assessing your level of skill in this area.
Chimney device
To build a chimney, the same clay-sand mortar is used as for laying bricks, with the exception of the area above the roof, for which a cement mixture is used. To improve traction, the inner surface is rubbed and leveled. It is necessary to remember about installing the gate valve. In the place where the chimney is laid through the wooden ceiling, a thickening is created, called “fluff”. On the roof, to protect the roof from the penetration of precipitation, another thickening is made, called “otter”. Underneath it, a collar (apron) is mounted from galvanized steel or roofing waterproofing tape, which closes the gap between the roof covering and the brickwork.
The choice of material for making an apron under the otter thickening depends on the type of roofing material. Either galvanized steel with a polymer or conventional coating, or metallized flexible tapes are used.
When installing a chimney, special attention should be paid to fire safety measures regarding its passage through the roof and wooden floor. From the information provided in the article it is clear that the construction of a fireplace is a rather complex undertaking. This type of work requires preliminary preparation, certain technical knowledge and careful execution. If you do not have confidence in your own abilities, it is advisable to entrust the construction of a brick fireplace to an experienced stove maker.