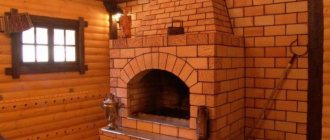
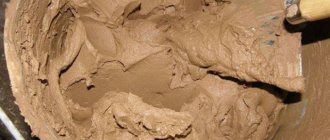
To build a fireplace or stove, classic red brick is most often used; its main advantages are durability, reliability, sufficient density, high heat capacity and fire safety. When performing installation work, a special mortar for laying furnaces is used, which is based on special components. The stability and strength of the entire structure depend on how conscientiously and in what proportion they are mixed. Most often, when constructing furnaces, solutions based on clay, cement or lime are used. The last two materials are a more preferable choice if the master has started building a pedestal for the chimney: cement and lime are more durable and resistant to cracks. To ensure that the future structure is stable, solutions for furnaces are prepared in precise proportions, guaranteeing the required plasticity and optimal density.
Important points
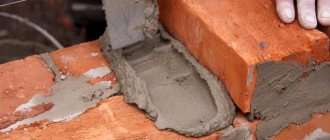
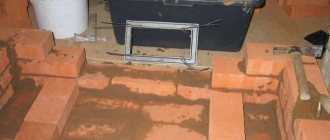
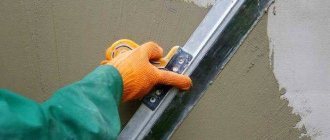
The construction of the furnace takes place in several stages, each of which has its own mortar recipe. First, a foundation is made; work on it requires a reliable concrete solution, which is based on cement. After this, the laying of the furnace itself begins; as a rule, refractory bricks are taken for it, and here you cannot do without masonry mortar. Work on a chimney has its own characteristics: the priority is resistance not to high temperatures, but to atmospheric changes, because its installation is carried out not only indoors. The final stage is coating the oven with a plaster solution, the composition also differs from the previously used mixtures.
Of all the stages listed, the greatest attention should be paid to preparing the mortar for the stove masonry. It must meet the following conditions:
- High heat resistance , expressed in the ability to withstand the influence of open flames and maintain a flat surface even under high temperatures.
- Even heat-resistant bricks adhere well to each other , ensuring a minimum seam thickness.
The most commonly used stove mixtures are clay-based, which have been used by stove makers for several centuries. Other stages of furnace construction are characterized by the use of lime-based solutions, as well as mixed ones - with the addition of cement or cement-sand to lime.
Those who want to prepare a solution for stove masonry with their own hands cannot do without such devices as:
- construction mixer;
- pallet or other similar shaped container;
- measuring bucket;
- shovel;
- sieve;
- putty knife;
- Master OK;
- thermometer;
- scales;
- trowel.
Pipe solution
Lime mass is all that is needed for laying the chimney. Which in turn is divided into three parts:
- Source. Clay and red brick are used for masonry. Since the temperature does not exceed + 400 C;
- Fluff. The peculiarity is the strength of the structure. Therefore, the mortar is used from limestone, and the brick is solid brick. The element itself is a ceiling from the house to the pipe;
- Smoke pipe and fluff. The chimney is located above the roof, so it is affected by both the high temperature of the smoke emitted and weather conditions. In this case, red brick and lime mass are used. The fluff is placed according to the same principle as a chimney.
Clay mixtures by type and consistency
To prepare it, you need to take clay, red or white, combine it with sand and then add water. It is very important to use only high quality components for the mixture: for example, only calibrated sand is suitable. To clean it from fine gravel and various plant impurities, use a sieve. The same is done with clay, achieving its homogeneity. As a rule, the following proportions are used: 1 part sand and clay, or 2 parts sand and 1 clay. The water in the solution should be approximately ¼ of the amount of clay.
The main criterion for the finished mortar is
its level of fat content , which determines the elasticity and astringent properties of the mixture, and therefore the reliability of the future structure.
It is also worth paying attention to the purity of the water used: it is better if there are fewer minerals in it. Otherwise, stains may appear through the plaster in the future, which will be caused by sufficient mineralization of the liquid. The finished mortar for the stove should be moderately greasy: too soft will lead to the fact that the finished masonry may crack; a thin mortar will not provide the structure with sufficient reliability. The ideal mortar for laying a brick stove is sufficiently elastic , guaranteeing the stability of the structure after drying.
Material requirements:
1. Water - must be completely clean, no moldy odors, and, importantly, it must contain a minimum amount of mineral salts. If you have problems with clean water, the column does not work, or well water contains a lot of dirt, take care of the water supply in advance. The calculation is simple: on average, laying 100 bricks will require a little more than one and a half buckets of water. (15-20 liters).
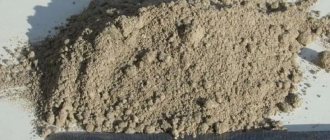
2. Sand - you need to work only with fine sand, which must be carefully sifted. For this we need a sieve. It is convenient to sift fine and clean sand through a fine-mesh sieve (one and a half millimeters).
3. The main component is clay. First of all, we are interested in its adhesive properties and its fat content. The amount of sand that we will add to the solution will depend on this; we will consider this in detail in the next paragraph.
Optimal fat content of clay
To check the fat content of this main component of the masonry mortar, there is an elementary way. You need to take 0.5 liters of clay and mix it with water until the consistency becomes like stiff dough. Then the resulting mass must be thoroughly kneaded and formed into a ball with a diameter of 4–5 cm. When it dries, it must be placed between two planks and squeezed.
If as a result the ball cracks when squeezed halfway, its fat content is high, which means the mixture does not have enough sand. If it disintegrates almost immediately, you need to add clay. In the event that cracks appear when the ball is compressed by a third, the composition of the oven mixture is selected ideally.
To ensure the reliability of the future furnace, the clay solution for laying it must be prepared from thoroughly cleaned components and have normal or high fat content.
The obvious advantage of the solution, the ingredients of which are carefully selected and dosed, is that the masonry will have a neat appearance due to the thin seam. In addition, a stove mixture of normal fat content will provide the structure with sufficient reliability and durability. True, such a solution still has one drawback: such a solution is not resistant to environmental humidity.
Characteristics of solutions and their production
In addition to knowing the characteristics of the individual component materials, it is necessary to have information about what effect is obtained when they are mixed, that is, about the characteristics of the finished solutions, as well as about the technology for their preparation.
Table of consumables for making the most commonly used mortars for laying stoves:
| Name of materials | Clay mortar | Mortar | Cement mortar |
| Material consumption in parts | |||
| Sand | 4 | 2.5 | 3 ÷4 |
| Fireclay clay | 1 | — | — |
| Regular clay | 1 | — | — |
| Lime | — | 1 | — |
| Cement M400 | — | 0.5 | 1 |
Clay-sand mortar
The clay-sand mortar can be called the main one, since it is on it that most of the furnace is laid. This material is the most affordable, even if you have to buy it in the store. But, as a rule, its components can be found literally under your feet, and if you decide to extract clay yourself, then it will cost practically nothing.
Clay-sand stove mortar
Clay mortar interacts well with baked bricks, also made from clay, and has special qualities that are ideal for laying a stove:
- medium strength;
- heat resistance up to 1100 degrees;
- absolute fire resistance;
- maximum gas density, that is, the ability to resist the penetration of gases into the thickness of the substance;
- all the mortar on which the masonry was made, except for the furnace, can be reused;
- The finished mixture of clay-sand mortar is suitable for use for an unlimited time after mixing it, since it can, if necessary, be diluted with water and mixed again.
The disadvantages of this solution include its low moisture resistance, so it is not recommended to use it for constructing a foundation and constructing a chimney.
The proportions of clay and sand for the solution are determined depending on the fat content of the former, using the techniques described above.
Well-infused, soaked clay is thoroughly mixed using a shovel or by trampling, that is, with your feet. The mass should be absolutely homogeneous, without lumps or individual inclusions. While mixing the main ingredient, sifted clean sand is gradually poured into it, and a little water is added as needed. Ultimately, the solution should be plastic and easily slide off a clean and smooth trowel.
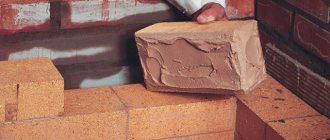
In addition, the mixture must be immediately checked for adhesion - to do this, the solution is applied to the soaked brick in an even layer 5 mm thick, and a second brick is placed on top of it, which is gently pressed. After 30 minutes, you can check how well the adhesion of the two bricks has occurred. If the mortar is of high quality, then the lower brick should remain on the upper one even if the structure is suspended.
Checking the consistency of the mixed solution (from left to right): too dense, too much water, optimal
The correct consistency of the solution is checked as follows:
- A clean trowel soaked in water is lowered into the prepared mixed solution of normal consistency, and if the solution sticks to it, then the clay is too greasy. In this case, you need to add a little sand to the mixture, and then mix it again and run the test again.
- If the solution is made in normal consistency, but after leaving without stirring for some time, water appears on the surface, then the mixture has low fat content, that is, it turned out to be too lean. Such a solution can be corrected by adding fatter or ordinary clay to it, thereby changing the proportions of materials, that is, reducing the amount of sand in its composition.
- If the fat content of the solution is normal, but when you lower a clean trowel into it, the mass does not stick to it at all, then you need to make the mixture more plastic by adding a small amount of fatty clay.
Clay mortar: mixing technology
You need to start by leaving the clay, cleared of impurities, in water for about a day. Then you need to add a little more liquid to it, achieving homogeneity of the mass. The consistency of the mixture for stoves and fireplaces should be similar to thick sour cream. After straining, you need to add sand until the oven mixture becomes viscous. To give the solution strength, you cannot do without cement and salt. The required quantity of these components is 700–750 g and 200 g per bucket, respectively.
Terminology
Sand art uses only three terms to name the solution. It is heat resistant in nature. Those. a solution that can withstand fairly high temperatures. When the oven cools, this mixture does not crack and remains in its original form.
Heat-resistant solution refers to a mass that can withstand temperature fluctuations. It is characterized by a smaller amount of thermal deformation compared to the first option.
The refractory solution took away the advantages of the two above substances. At the same time, the appearance of the stove remains the original design, despite the passage of smoke through the chimney and firebox. Based on this, we can draw a conclusion about the solution that is most suitable for laying a stove. Namely, about the heat-resistant and fire-resistant mixture.
Mortar for stove masonry according to all the rules
As already noted, its ideal consistency should correspond to the thickness of sour cream. If you use oily clay for it, then you need to add 2 parts of sand to 1 part; if it’s normal, the proportion should be equal.
Before starting to lay the stove, it is necessary to check the quality of the resulting stove mixture. To do this, you will need to fasten 2 bricks with mortar, wait about 5 minutes, and then lift the top brick. If the structure does not fall apart after several lifts, the mortar for laying a brick stove is ideal. If this did not happen and the adhesion quickly disintegrated, most likely, lean (non-greasy) clay was used to prepare the solution.
Experienced stove makers also advise increasing the strength of the solution by adding table salt to it (150 g is enough for 10 kg of clay). You can also add M400 cement: 1 kg for the same volume of clay.
When the stage of work on the chimney begins, it would be better to replace the clay mortar with lime-sand mortar: it is more resistant to moisture. To prepare it you need to take 3 parts sand and 1 part lime dough. Alternatively, use 1 part quicklime and 3 parts water.
How to save on masonry materials?
The answer to this question would seem to be quite obvious: it is necessary to make maximum use of available materials, which can be obtained for free right at the site of construction of the furnace. In our case, we can independently obtain the following components: clay, sand and water. But, as practice shows, in reality everything is far from so simple. You can’t just take any water, mix it with the first available sand and clay, and as a result get a good quality mixture for masonry. A number of serious requirements are put forward for each component for creating a stove mortar. Let's learn more about each of them and learn how to select all the necessary components.
How to distinguish high-quality clay suitable for laying a furnace from other minerals?
Quite often, broken clay can be purchased cheaply from local stove makers, but we do not recommend that you take the easy route. Such material is usually heavily contaminated with organic impurities. Subsequently, they will rot and decompose, worsening the consistency of the mixture and the quality of the finished joints. It is much more profitable to find good clay in the surrounding area and dig it yourself. The difficulty lies only in learning to distinguish high-quality deposits from contaminated ones.
Clay is essentially a mixture of aluminum oxide Al2O3 and silicon oxide SiO2 (in simple terms, sand). The main determining parameter for clay is its fat content. In turn, the strength of its structure, plasticity, adhesiveness (ability to stick to other surfaces), hygroscopicity and even gas tightness will directly depend on it. Typically, the fat content of clay containing 62 percent aluminum oxide and 38 percent sand is taken to be 100%, and the fat content of pure sand without impurities is taken as the zero reference point - 0%. To mix the mortar for laying the stove, we will need clay with average fat content, because seams made from material with too high a fat content will crack during drying. “Low-fat”, or as it is also called, “skinny” clay is also not durable.
Clay deposits of various types
Clay has several fossil twins that are often confused with it. However, furnace work with other mineral materials is impossible, so it is important to be able to distinguish them from what we need.
Shale and marl. The material is a brittle rocky rock. It lies in horizontally arranged layers that are visible to the eye and have rounded edges. In addition, if you take a sample of shale and break it, the shale structure will be clearly visible on the resulting section.
Appearance of shale
The greatest difficulty in identification is caused by bentonite, also known as bentonite clay ( bentoclay ). This is a valuable mineral resource, but it is completely unsuitable for use in the furnace business. Sometimes bentonite is found in bright colors, virtually identical in appearance to the clay we need.
Bentonite clay, consisting of sodium-calcium compounds, montmorillonite and other impurities, has found its use in pharmacology, medicine, perfume production, winemaking and even in mining. The uniqueness of this mineral compound lies in its ability to absorb moisture. Bentonite saturated with water can increase in volume by one and a half dozen times without consequences, turning into a gel-like state. But, unfortunately, it does not have the properties of ordinary clay, such as fire resistance, gas tightness and heat resistance. It is quite simple to distinguish benthoclay from the building material we need. It is enough to take a small test sample and place it in a glass filled with water. After a short period of time, bentonite will absorb moisture and noticeably increase in size. After waiting a sufficient period, you will be able to witness the transformation of the sample into a bentonite gel, which looks like a jelly, somewhat similar to jellied meat. Clay in water will not turn into anything like that.
Appearance of bentonite clay
In the figure below you can see a schematic cross-section of the soil structure characteristic of our country. Clay located in the upper layers of the earth is highly contaminated with organic impurities. On top, the main layer of clay deposits is covered with so-called loam - a layer of soil with a significant admixture of alumina and sand. In the diagram, loam is indicated in yellow. Actually, the main layer of clay has uneven fat content: at the top it is minimal and grows as it goes deeper into the soil.
Layout of clay layers
We will determine the fat content of clay using a special test. Raw materials for analysis must be collected after passing through a layer of loam. In this situation - starting from five meters from the surface of the earth.
The clay test itself is very simple: we pick up a lump of material the size of half a fist. We wet our hands with water and begin to knead it like plasticine, gradually giving the sample the shape of a ball.
Test ball rolled from clay
After the ball is ready, we begin to slowly press it with two flat boards on both sides exactly until the first cracks form. If you managed to compress the ball by at least a third of its diameter, then such clay is quite suitable for our tasks. We take about five more kilograms of material in a bucket and take it home for further tests, which we will talk about later.
Testing a clay sample using boards
How to find high-quality water used in mortars for masonry stoves
It is necessary first of all to check the quality indicators of the water that we plan to use to create the stove solution. Only so-called “soft” water, or at least water with medium hardness, is suitable for work. Hardness is measured in units called German degrees. One such degree means that each liter of water being tested contains 20 milligrams of calcium and magnesium salts. Kneading the stove solution can only be done if the water hardness is below ten degrees.
| An experiment that allows you to determine water parameters will require purchasing about 0.2 liters of distilled water from a pharmacy. We also take a piece of laundry soap and crumble it into small pieces. It will be our indicator, since soap neutralizes salts dissolved in water. One gram of standard 72% soap neutralizes about 7.2 milligrams of hardness salts. Until the process of completely softening the water is complete, the soap solution will not foam. This is what will show us how “hard” the water is. | |
| Heat the water and add soap crumbs to it | Heat distilled water to about 75 degrees and carefully dissolve the soap in it. This operation should be performed carefully, avoiding foaming of the mixture. The proportions in which our “indicator” must be added will be as follows:
|
| Draw a soap solution into the syringe | As a result, after everything has cooled, we will get the so-called “titration mixture”. We take about 500 milligrams of the test water using a beaker, and 20 milliliters of the resulting soap solution with a syringe (without a needle). |
| Water with soap dissolved in it | Add the solution drop by drop to the water being tested, stirring it carefully as you do so. First, the soap, interacting with calcium and magnesium salts, will begin to precipitate in the form of characteristic gray flakes. We continue the process until foam with rainbow-colored soap bubbles begins to form. When bubbles appear, we stop adding soap dissolved in the distillate and see how much solution we needed to completely neutralize all the salts. Next, we perform simple calculations and find out the hardness of the water. |
| Example of calculations. | |
| Let's say we used pure 100% soap, 10 milliliters of which contains one gram of soap. This amount of soap in 500 milliliters of tested water should have precipitated 10 milligrams of Mg and Ca salts. This means that one liter of water contains 20 mg of hardness salts, which corresponds to one German degree. And if we spent 80 milliliters of soap titration solution, then the water hardness is 8 degrees and it is also suitable for stove masonry. The main thing is not to cross the hardness limit of 10-11 units. | |
What sand is suitable for laying a stove? Sand preparation
As for sand, there is no need to take samples. Near clay deposits you can always find layers of white quartz sand and yellow sand containing feldspar. The first is suitable for creating any stove structures, and the second can be used in the laying of all elements except the hottest part - the firebox. Remember that preparing sand for use will require a significant amount of water. That is why you should take care in advance to resolve issues regarding uninterrupted water supply.
Sand dug up on your own must first be passed through a sieve with a mesh size of 1-1.5 millimeters. This allows you to get rid of various large debris and obtain the necessary set of fractions. The biggest problem for self-dug sand is organic impurities and various living microorganisms living in it. The sand must be cleaned from them, otherwise the masonry seams may deteriorate over time.
Sifting sand with a sieve
There are many industrial methods for cleaning sand, but they all involve significant energy costs. In order to save money, we will use a simple and accessible washing method for everyone.
To make a cleaning apparatus, we need a piece of pipe 15-20 centimeters in diameter. Its height should be approximately three times its thickness. We fill a third of the volume with sand and supply water from below under high pressure. The power of the water jet must be selected in such a way that the washed sand swirls, but does not flow into the drain located on top. After clean water flows into the drain, wait about ten minutes more and finish the procedure. The first batch of purified sand is ready. All that remains is to dry it.
Scheme of a sand washing apparatus
The method of filtering sand by washing also allows us to remove from it various inclusions of alumina that we do not need.
Proportions of mortar for laying a stove, how much sand, water and clay should there be?
An important step in preparing a construction kiln mortar is to determine the optimal proportion between sand and clay. After we bring home the clay sample selected according to the algorithm outlined above, it is necessary to divide it in two. We set aside the first half, and divide the second again into five identical pieces. We place each of them inside a separate bowl and add water (hardness up to 11 German degrees), about a quarter of the volume of the clay itself.
Next, we leave the clay to liquefy in the water. Typically, this process takes approximately 24 hours. After a day, stir it thoroughly and pass it through a sieve with a mesh size of three millimeters to sift out large lumps.
Clay dissolving in water
Place the container with the strained solution back to settle. When a cloudy slurry (the so-called “sludge”) appears on the surface of the solution after settling, remove it by pouring it onto the ground.
That's it, now you can start adding sand to each container with prepared clay. This must be done in the following proportions:
- First container - do not add sand;
- The second is one part sand to four parts clay;
- Third - two parts sand to four parts clay;
- Fourth – 3 parts sand and four parts clay;
- Fifth - sand and clay are added in equal quantities.
Adding sand to each container must be done gradually, in small portions, in several approaches (optimally - no less than three and no more than seven). Everything needs to be mixed very thoroughly. Do not rush to add the next portion of sand before the previous one has completely and evenly dissolved in the mixture. A well-mixed clay-sand solution is quite easy to identify: just try rubbing it between your fingers. If the roughness of individual grains of sand is not felt, then everything is done correctly.
Add sand to the clay
The next step in preparing the clay-sand mortar will be the production of prototypes. We take clay in each of the five containers and alternately do:
- Two bundles of approximately 35 centimeters in length and a centimeter and a half in diameter;
- We fashion a ball with a diameter of five centimeters;
- A round clay cake with a thickness of 12-15 millimeters and a radius of 7.5-8.5 centimeters.
As a result, we will have exactly 20 samples on hand that need to be marked and left to dry inside the building. For normal drying, samples should not be exposed to drafts or direct sunlight. Usually the ropes dry out in a couple of days, but cakes and balls can take up to two dozen days. If the ball does not wrinkle and the cake no longer bends in half, it means the material has completely dried.
Clay ball and cake
When the samples are ready for testing, we proceed to the next classic experiment, which allows us to determine the fat content of the clay solution. To do this, wrap a clay rope around the handle of the shovel, then tear it apart and observe the results:
- The greasy clay, indicated in Figure G (from the German “greesy” - greasy) will practically not crack, and when the rope is torn in half, the break point will have teardrop-shaped ends.
- Clay of normal fat content (marked as N) will have a cracked top dried layer and, after breaking the rope, its thickness at the point of separation will be approximately a fifth of its original thickness. These are the samples we need to select.
- Dry (lean) clay, designated as L (from the German “Lean” - lean), will be marked by the maximum number of deep cracks and, when broken, will have the largest area where the pieces of the rope separate.
As a rule, after selection, several (usually 2 or 3) seemingly suitable samples remain.
Determination of clay fat content
Dried balls and cakes will help us carry out the final “clay casting”. We drop samples from a height of a meter above the bare floor. The most durable of them will indicate the required consistency of sand and clay. If, after falling from a meter, all samples remain intact, we begin to gradually increase the height until we can determine the strongest of them.
Checking a clay-sand mortar using a flat cake as an example
Checking the quality of a clay-sand mortar using a ball as an example
The next step in preparing the mortar for laying the stove will be to calculate the required ratio of water to the proportion of sand in the mixture. The physical limits within which a clay mixture will have normal fat content are quite wide. Our main task, since we are building the stove for ourselves, is to make the strongest possible structure, with excellent gas tightness of the connecting seam material.
First of all, we sift the clay remaining during the test sampling. Press the clay through a fine mesh sieve so that it mixes evenly with the sand. Add the required amount of prepared washed sand. We learned the proportions of sand and clay earlier thanks to experiments. We start adding water and gradually mix the solution. Remember that the water must meet the hardness parameters that we talked about earlier.
Next, we take a trowel in our hands and make a depression on the surface of the mixed solution.
The mark from the trowel (trowel) will help determine the readiness of the solution
- A tearing hollow indicates that there is not enough water (Fig. 1)
- If the hollow immediately behind the trowel begins to float, it means you have overdone it with water (Fig. 2). Let the solution settle and remove the sludge into a separate bowl. The difference in volume between the filled water and the squeezed out sludge will show us the required optimal proportion.
- If you immediately guessed the required amount of water, the trowel will leave a clear, clearly visible, even trace with highlighted edges on the surface of the mixed solution (Fig. 3).
Proportions and proper preparation of clay mortar, testing for strength
The so-called cross test will allow you to find out whether our clay solution will be sufficiently strong and have the required degree of adhesiveness. This final test will show how accurate the results of all our preparatory checks on the material were and how well we cleaned the constituent components of the oven mixture.
To test, we need a couple of bricks, one of which we place flat on the ground and cover its largest plane (the so-called “bed”) with a thin layer of prepared test clay mortar. Place a second brick on top and, tapping it with a trowel, let the mixture dry for about ten minutes . After this, we grab the brick located on top with our fingers and pull it up. Having raised it to a certain height, we shake the structure by weight: if the bottom brick does not come off, it means that all the preparatory work was carried out carefully and we correctly calculated all the proportions of the clay mortar.
If you still do not understand the individual details of preparing mortar for laying a stove, we recommend that you watch this video:
Proper preparation of mortar for laying a stove: video tutorial
Cement as a base for mortar
To build a furnace foundation, the solution must be selected in such a way as to ensure reliability and stability of the structure, and cement is best suited for these purposes . This mixture is also suitable for the construction of that part of the chimney that will rise above the roof. The composition of the solution is cement, sand and water. Most often, the proportions used are: 1 part M300 or M400 cement and 3 parts sand. The components must be mixed well and diluted with water until the consistency of sour cream. The resulting mixture for laying stoves should be moveable, but not flow off the bayonet of the shovel if it is located at an angle of 45 degrees.
For the foundation and bottom of the combustion chamber, you will need a stove mixture with good heat resistance. Here is its composition: for 1 part of portlant cement M300 or M400 take 0.3–0.5 parts of fireclay sand and 2 each of finely sifted sand and crushed stone (gravel is also suitable).
No. 7. Ready-made mixtures for laying stoves
Those who are afraid that they will not be able to cope with the selection of clay and proportions can opt for ready-made mixtures for ovens . They are sold dry , and their preparation consists of adding water and mixing thoroughly. Everything is very simple and quick, but experienced stove makers still advise you to take the trouble and prepare a clay solution with your own hands.
Ready-made dry mixes for ovens are:
- simple , consisting only of clay and sand. This is the most economical and optimal option;
- improved with the addition of plasticizers and lingosulfates, which increase the strength and fire resistance of the solution, increase resistance to sudden changes in temperature and humidity;
- heat-resistant mixtures containing clay and fireclay filler. Such compositions can withstand up to 13000C and are suitable for laying the combustion chamber.
If the mixture contains cement, then it is better to refuse the purchase. how much ready-made mixture will be needed to lay 100 bricks, since the same composition from one manufacturer can vary greatly from batch to batch and even from bag to bag. As for manufacturers , the stores offer mixtures from a number of domestic ones, “Plitonit”, “Pechnik”, Termix , from Borovichevsky, Kostroma and Yaroslavl brick factories.
Several more options for preparing the solution
Let's consider several more options for preparing clay mortar. Our goal is to find a solution that will not crack when it hardens, will have minimal shrinkage, and will not crumble when the oven heats up too much. And of course, the main task is to firmly hold the bricks in the masonry.
4.1 Time-consuming method:
It will take more than a day. 24 hours before preparing the solution, the clay is filled with a small amount of water. This is necessary so that it softens. After a day, water is added again, enough so that all the impurities float to the surface, and the heavy fractions settle to the bottom. Then the solution is filtered, sand is added and the solution is prepared using the technology already given.
4.2 Method requiring large muscle efforts:
Clay without impurities is filled with water by a quarter (by volume), sand is added and kneaded with hands. The goal is to obtain a homogeneous mass. The process is tedious and time-consuming.
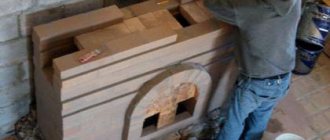
4.3 Constructive method:
A pyramid is made of three vertical boxes, each of which is equipped with grids and shutters. Clay is loaded into the upper tier. Pour the composition with a large amount of clean water and stir. The damper is opened and the solution flows through the mesh into the middle tier. Stir again and transfer to the bottom drawer. Here the required amount of sand is added, and the solution is periodically checked for readiness.
What tools will you need?
Before you start preparing solutions, you need to select a tool:
- a kneading oar (a specially hewn board with a handle);
- shovel;
- container for mixing the solution (a wooden trough or barrel, or a metal container);
- 5-6 buckets;
- trowel, which determines plasticity;
- a pair of metal sieves with 3x1.5 mm cells;
After the tool is prepared, you will need to prepare the components for the solution.
How to find sand
Sand is sold packaged or in bulk, already sorted into fractions. But it is possible to obtain it yourself and use it for stove mortar. So, white quartz sand is perfect for laying any areas of the stove; yellow sand cannot be used for the firebox.
On a note. If you decide to buy sand, then it is better to take the mountain or lake version; such a building material is best suited for constructing a furnace and will bind the components of the solution well.
It is recommended to make the seams of the stove masonry about 2-3 mm. Therefore, sand is suitable with a fraction no larger than 1.6-1.8 mm. Craftsmen purchase sand of different grains. It is believed that it grips better.
Where can you dig up sand yourself? In abandoned quarries, ravines, river shallows, along steep river banks. The purest sand is not at a depth of one meter or one and a half meters. Otherwise, you will have to wash it for a long time.
If the sand has foreign inclusions, it needs to be cleaned. To do this, sand is poured into a trough and filled with ordinary water. After this, the mixture is thoroughly shaken. The turbidity and dirt that floats out are drained. And so on until the water is clear. For sifting, take a metal construction sieve with cells of 1x1.5 mm.
How to determine the plasticity of clay
To understand how to properly dilute clay for laying a stove, clay samples must be placed in various containers. Add water gradually to obtain a plastic solution that does not stick to your hands, resembling well-kneaded dough. Each sample is marked with a serial number.
Then proceed as follows:
- the first sample is left in its original form;
- 10 percent sand is added to the second sample;
- for the third sample - 25 percent;
- by the fourth - 75 percent;
- to the fifth - the same amount as the volume of clay.
Sand is introduced gradually, in portions, stirring after each addition. When a lot of sand is added, you need to increase the volume of water.
Before soaking clay for laying a stove, you need to determine its quality. As samples, 2-3 balls with a diameter of 50 mm are made from each sample, as well as cakes 20-30 mm thick. Then they should be dried in a place where there is no draft. After ten days have passed, the cakes and balls need to be checked to understand where the best composition is. To do this, each ball is dropped from a meter height onto the floor. It should not break or crumble when compressed. Dried samples should not have large cracks. For the experiments to be successful, it is necessary to prepare several balls of each type of clay to be sure.
There are two more ways. First, each sample is rolled into balls 50 mm in diameter. They are placed under a press, the role of which is performed by two planks. If, after compression, the ball shrinks twice and small cracks appear, the clay is plastic. If shrinkage occurs only by a third of the diameter, cracks will be noticeable; this is clay with medium plasticity. Skinny clay will shrink only one quarter or less, or it will simply crumble.
The next method is with flagella up to 20 mm thick and 250 mm long. They need to be stretched one by one and bent around a wooden rolling pin or a shovel handle (50 mm in diameter). Skinny clay will not withstand the test; the flagellum will immediately break without stretching. With an average degree of plasticity, the flagellum will begin to tear, and the stretching segment will become 20 percent less in thickness. The folds of the “sausage” will crack. The plastic clay will not break off, but will smoothly bend around the handle.
Furnace mortars are made from clay, which has average plasticity. It is not difficult to determine the amount of solution required; its volume is a tenth of the volume of the oven.
Ready-made formulations
Ready-made compositions for laying stoves have one advantage. The process of preparing the mixture does not take much time and does not cause big problems. The master only needs to add the required amount of water to the dry mixture, and then thoroughly mix. Factory-made formulations already contain plasticizers. Therefore, after preparation it can be used immediately. In order for the seam to have high properties in terms of strength when used and at the same time be sufficiently elastic, the following is recommended:
- Mixing the composition must be done using a mixer. When mixing is done manually, too much water is added to the mixture, which extremely negatively affects the properties of the solution. It is unacceptable to re-knead after the mixture has hardened;
- To prepare a mortar for laying a brick chimney, you must purchase a special mortar. You can find the corresponding markings on the bag;
- when preparing the solution, it is necessary to mix as much clay as can be spent in one hour of work;
- Work on laying stoves must be carried out indoors at a temperature of at least 10 degrees;
- solutions intended for laying stoves contain a plasticizer, which prevents them from drying out quickly. Drying occurs evenly, so the integrity of the seam is not damaged. No cracks appear on its surface. After completion of the furnace laying work, the furnace should be fired only after three days have passed after the end of the process. In this case, heating must be performed at a temperature of 300 degrees for no more than an hour;
- no earlier than 4 weeks after the start of intensive use of the furnace, it is necessary to carry out lining. For this you can use fireclay mortar;
- After the first heating of the structure is carried out, efflorescence may appear on the surface of the seams. In order to remove these streaks, you must use a damp cloth. It should be used after the oven has cooled down.