Home Model range PLEN
Film electric heater PLEN
can be used as main or additional heating in rooms with a ceiling height of no more than 5 meters. It is installed on the ceiling at the rate of 70-80% of the total heated area of the room and provides the required temperature.
Ceiling PLEN is presented in three width categories: 0.35 m, 0.51 m and 0.65 m and with a protection class. Price 1 sq. m. = 1,500 rub .
About PLEN in a nutshell
The abbreviation PLEN stands for film radiant electric heater. Heating is carried out by converting electrical energy into infrared radiation. The system itself is a kind of cake made of non-conducting polymer films and resistors placed between them.
When an electric current passes through resistors, they heat up, transfer heat to a distributing surface made of a composition with high thermal conductivity, and it emits infrared waves with a length of 9-12 microns. The radiation hits the opposite surface, which absorbs radiant energy and releases heat. Manufacturers use solar energy as an example, offering you to heat yourself with your own Sun. What do we really have, and if we get together, how will we install the PLEN with our own hands?
Adviсe
The decision to install a particular heating system in a private home should be made carefully, since few people decide to redo the entire property. If there are problems with the gas supply, then you can choose an alternative - PLEN heating.
Laying PLEN on the floor
It is easy to install it yourself, but do not forget about the choice of finish. And also correctly calculate the required power and location of the thermostat. During operation, you will appreciate all the benefits of “warm film” in your home.
How it works
- You install the system and connect it to the power supply.
- Flowing through the resistive elements located between the PLEN films, electrical energy is converted into thermal energy. Due to direct contact with aluminum foil, which covers the entire plane of the film, heat exchange is ensured and then heat distribution throughout the entire substrate.
- Proper placement of resistive elements has a beneficial effect on creating a layer at different points of which almost the same temperature is maintained.
- A surface heated to a temperature of 40-45 °C becomes a source of infrared radiation in the mid-wave range.
- Reaching the opposite surface (in our case, the floor), the radiation is absorbed and releases heat.
- Thus, we get a heating surface with a relatively low temperature, uniformly heated and warming up the heavy lower layers of air and then throughout the entire room.
Technical characteristics of PLEN
For clarity, we summarize the technical characteristics declared by the manufacturer in a small table.
Properties of PLEN in numbers
| Indicator name | Declared data |
| Material | Heater – special alloy, insulation – three-layer PET, reflector – aluminum |
| Weight 1 sq. meters | 550 g |
| Thickness | 0.4 mm |
| Maximum heating temperature | 45 °C |
| Specific power consumption | 150 or 175 W/m2 |
| Efficiency | 98% |
| Life time | More than 50 years |
The film varies in power density: 100-150 W/m2. The choice is determined by the height of the ceiling - the higher it is, the more power is needed, because... Some of the radiation will be scattered in the air without reaching the target. Manufacturers' recommendations are as follows:
- at a height of up to 3 m – 125 W/m2;
- at a height of 3-4.5 m – 150 W/m2
However, height is not the only factor. The choice is influenced by climate features - much depends on the average temperature in winter. Accordingly, the colder it is, the greater the power density of the film.
Advantages and disadvantages
We will not list all the advantages of PLEN, which you can already familiarize yourself with on the manufacturer’s official website. Down with all this advertising tinsel! Let's just figure out whether it is realistic to use such heating in a private house or apartment and what it can actually turn out to be.
- Dimensions.
We have already given the technical characteristics of the film above, and it is difficult to argue with the fact that such a heating system is compact in size. It takes up virtually no space and can be mounted on any surface. But most often it is the floor or ceiling. - Installation.
We will deal with this issue below when we describe the independent installation of the film, but now we can say that the process is simple and does not require special knowledge. Considering the insignificant mass of the film, work can be carried out even without assistants. The timing depends on the area of the room, but usually when working on 70-80 square meters it takes 2-3 days. - Low inertia of the heating system.
Unlike traditional heating options, it becomes possible to quickly change the microclimate, in which the temperature in a single room can quickly change depending on the set parameters. - Fire safety.
Turning a blind eye to the possibility of a short circuit with all the ensuing consequences, in all other cases PLEN is one of the safest options. After all, the material heats up to a maximum of 45 degrees.
We will not include automation in the list of advantages, because... All modern systems are distinguished by the possibility of fine tuning. We also did not include “economy” and “low cost” in this list, because in this case they would have betrayed their soul. After all, heating with electricity, no matter in what form it occurs, was and remains the most expensive. The same applies to the cost of the film itself - there are cheaper options. Gains in energy consumption may be due to fine tuning of the system operation. And, of course, we have no right to use the service life of PLEN as an example, because There are no real buyers yet who would use this type of heating for any long time.
There are also some disadvantages:
- Finishing.
The manufacturer's website states that the film can be hidden under any finishing material that does not contain metals. Let's say we hide PLEN under the clapboard at the dacha. And we get a cake with several heating surfaces: heat will flow from the resistive elements to the foil, and from it to the lining. The lining will not even be a secondary, but a tertiary source of infrared radiation, which means that the efficiency of such heating may raise some questions, because the entire plane will heat up. Yes, this is not bad if we are talking about a warm floor, but what is the point of a warm ceiling? The manufacturer limits the use of finishing by providing tables with thermal resistance values for various coatings, thereby actually confirming our concerns regarding the drop in PLEN heating efficiency when decorating it. It is for this reason that lattice structures (end-to-end, with a total coverage area of about 50%) are used as decoration, which better transmit infrared radiation. - Design.
We figured out that the film does its job better if it is not covered with anything (at least this is the case with the ceiling). However, you can leave it like this only at some enterprise, for example, in the same wood drying chamber.
Approximate prices
You can endlessly look for the advantages and disadvantages of the system, but today, when a crisis is once again raging in the country, it’s time to think about the price.
Let's move on to the price list! How much does PLEN cost?
| Name | Square | approximate cost |
| PLEN No. 1 “Premium” for the ceiling, IP-67* | 1 sq. m | 1200-1300 rub. |
| PLEN No. 1 “Economy” for the ceiling, IP-54** | 1 sq. m | 1100-1200 rub. |
| PLEN No. 2 for heated floors, IP-67 | 1 sq. m | 1000-1100 rub. |
| PLEN for saunas, for industrial processes, IP-67 | 1 sq. m | 1300-1400 rub. |
| PLEN No. 3 (universal) | 0.51×1.2 m | 1100-1200 rub. |
| PLEN No. 4 (universal) | 0.51×1.5 m | 1300-1400 rub. |
| PLEN No. 5 (portable sauna) | not specified | RUB 12,000.00 |
* – IP-67 – degree of protection of the shell from dust (full) and can withstand short-term immersion in water to a depth of 1 m. ** – IP54 – degree of protection from dust (partial, incoming dust does not affect the operation of the device) and protection from incoming water splashes
From Brazil to Vietnam
Economical and environmentally friendly heating systems based on the Plen film electric heater, created in the capital of the Southern Urals, turned out to be the only heat sources suitable for peasants on the tea plantations of high mountain Vietnam to bring the famous product to marketable condition.
Without “Plans”, poultry farmers in Brazil cannot imagine modern production. Poultry farms there are built open. Only the roof and ceiling - no walls. But the delicate bird growth does not always withstand the sharp changes in day and night temperatures common in this Latin American country. But since they began to install “warm floor” heating systems there, based on the same Ural “Plans”, the mass mortality of chickens has become a thing of the past.
Related news
The technology for producing a new alloy was developed by young RUSAL scientists
Residents of North America, Western Europe and Australia who know how to value comfort, as well as every dollar or euro, have been equipping their apartments and cottages with heating systems from Russia for the second decade. Their durability, reliability and low cost of operation are only part of the reasons why picky and sophisticated customers choose Plans.
Heaters - like the sun - emit thermal infrared rays, which heat the walls, ceilings and all objects in the room, and they, in turn, give off soft heat to the air. The air temperature in the room is 2–3 degrees lower than that of surrounding structures and objects, that is, convection is secondary. Fungi and mold have no chance.
“This problem is no less relevant for most republics and regions of Russia,” said Sergei Glukhov, director of Chelyabinsk Innovation, the copyright holder and manufacturer of unique heating systems. —
“Plans” effectively deal with a previously intractable problem. Literally on the eve of our meeting, we received a letter from the Republic of Dagestan, from the head of Makhachkala. Company representatives are invited to the presentation of our products. We are talking about the massive use of our technologies for heating kindergartens, schools and other social institutions of the republic.”
Do-it-yourself installation of PLEN
The film can be attached to any surface, but the traditional solution involves installation to the ceiling or floor. In general, the simplified technology looks like this:
- creating an intermediate protective layer of thermal insulation. The task is simple - to direct thermal energy in the right direction, because... There is no particular point in heating the floor material. For these purposes, the manufacturer recommends using thermal insulation with a thermal resistance of 0.05 m2C/W - any insulation will be suitable for this brand;
- PLEN fastening to the base. To the sheathing or directly onto the thermal insulation, with the front side facing inward. For installation, use staples and a stapler or self-tapping screws;
- electric installation work;
- flooring or decorative layer
The choice of installation location is of great importance. Pay attention to areas above doors, windows and ventilation outlets, as... they are the main structures through which heat is lost. Of course, provided that all other parts of the house are fully insulated. Depending on climatic conditions, 60-80% of the floor or ceiling area is allocated for PLEN. For example, with an average annual temperature of less than -7 ° C, the area is increased to 80 percent or more. If the average temperature over the year does not fall below +3 °C, then you can install the film in the amount of 50-60% of the room area.
And a few more important notes:
- Examination. To avoid unpleasant consequences, before installing the film, you should check the integrity of its heating elements. This must be done using a tester. Usually the percentage of defects is small, but improper transportation and storage can make adjustments.
- Scheme. To optimize the wiring diagram, you need to remember that the contact terminals should be directed towards the panel.
- Fasteners Each PLEN sheet has mounting zones (fields) that are used for fastening to the base. Violating the integrity of the film outside these fields is not recommended.
Ceiling installation
Let us immediately note that the authors of this article consider the installation of PLEN on the ceiling, when used for heating residential premises, to be somewhat untenable - the same effect can be achieved when installing a “warm floor” structure. Another thing is in production, etc. But it will be... After all, it is this that we will consider in more detail;)
How much do you love high ceilings? If you are ready to sacrifice only 15 cm, then the film will need to be attached directly to the insulation. If you have the opportunity to exceed this level, then the installation will be carried out on a sheathing, between the slats of which thermal insulation material will be laid.
We will assume that the base is properly prepared, which means it does not require additional repairs, leveling, etc. Below, as an example, we will use the option of working in a house made of rounded logs. What do we need first? We will use a material such as isolon as reflective thermal insulation. We will also need a construction stapler, a utility knife and so-called aluminum tape, which we will use to glue all the joints to avoid additional heat loss through the ceiling.
Pre-measure sections of the ceiling and cut the isolon to the required size. Then, using a stapler, the material is attached to the ceiling. The seams between the individual sheets are carefully sealed with tape.
Excess isolon is not a problem - it can be cut off with a stationery knife. It's much worse if you cut the pieces too small. In this case, you will have to dodge and seal the resulting voids with strips of thermal insulation. Remember, more seams mean less insulation.
The next stage concerns the direct installation of PLEN heating with your own hands. To do this, we need the heating film itself, a soldering iron and its accessories (solder and soldering acid), an insulation stripping tool, connecting wires, a temperature regulator, a modular contactor and a plastic box.
In increments of approximately 30 cm, the heating film is attached using a stapler within the mounting fields. The wires are brought out to one side and temporarily left free.
Subsequently, for aesthetic reasons and for safety, it is better to hide the wires in a PVC box. It is better to secure it in the desired position at this stage, before soldering - it is more convenient and simpler. Using a screwdriver, we make small holes, insert wires through them, and only after that fix the box to the ceiling.
At the next stage, we need to reliably solder the wires from the PLEN. From here the main tool will be a soldering iron, the main materials are acid and solder. Please note that for convenience, we demonstrate the work in “tabletop” conditions. You will have to be in a not very comfortable position, under the ceiling.
Carefully expose the wires, it is advisable not to damage any of the wires. Divide the wires into two equal parts approximately 2 cm long.
A similar operation must be performed with the other wire. Next, the wires need to be twisted as shown in the photo below. This will ensure maximum contact between the cores.
As a result, we get two paired connections. They need to be twisted together.
We cut off the excess part, about a third, and start soldering. Pre-degrease the surfaces with acid.
And we solder... It is convenient to use a piece of plastic insulation removed from a thicker wire as insulation. We select the size so that the insulation is twice the length of the junction.
All that remains is to securely secure the electrical insulation. For these purposes, using the same soldering iron, we carefully heat the plastic. In this case, the polymer changes in size, which ensures its tight fit to the junction. One connection is ready. We do the same when we need to connect the next two wires in series.
As a result, the result of the work will look as shown in the photo below.
However, the wires will need to be connected not only in series, but also with a branch. For these purposes, we expose the future attachment point without damaging the integrity of the cores. About 1 cm of such a section will be enough. Using a slotted screwdriver, we divide the bundle of cores into two approximately equal parts.
You will get a circle into which you need to insert the bare end of the connected wire.
Now you need to wrap the free end of the wire around the previously formed circuit, degrease the contact point and reliably solder the connection.
The final stage is the creation of an insulating layer according to the same principle as before. As a result, we should end up with something like what is shown in the photos below.
The two main wires are pulled along the ceiling plinth towards the electrical panel. All that’s left to do is hide it from prying eyes under the lid of a plastic box.
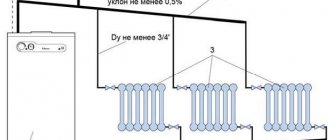
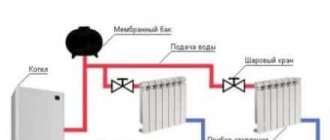
Connection diagrams for PLEN heaters
The following work involves connecting wires to the panel via a modular contactor. At this stage, connect the thermostat. Without further ado, here are several possible diagrams for connecting heaters through a modular contactor.
The type of electrical input depends on the total power of the entire load. If this value does not exceed 5 kW, then a single-phase input is suitable; for larger values, a three-phase input should be used. Control equipment is selected in accordance with the following recommendations: a reserve of 15-20% of the required current and the use of machines with an electromagnetic splitter.
The thermostat must be mounted at a height of 1.5 m. Mounting is carried out on a layer of thermal insulation (cut to fit the area of the regulator). In our case, the result of the work looks like in the photo below. If the film is left in this form, then its appearance will be disharmonious with the authentic interior design of a wooden house. I'll have to decorate with something...
When choosing a decor, make sure that the thermal resistance of the material does not exceed the maximum values. So, when using a film for 125 W/m2, it should not exceed 0.16 m2*K/W, for 150 W/m2 - no more than 0.13 0.16 m2*K/W. It’s better not to use solid coatings, but to do it like grandma’s in the video below.
Floor installation
To create a “warm floor” system, a modification of the PLEN-2 film is used. Used in conjunction with the main heating system. The installation area is determined depending on the size of the living areas of the residents. The DIY installation sequence looks something like this:
- check the film with a multimeter;
- preparing the floor for work. The subfloor must have a flat horizontal plane, be durable and not sag under the weight of residents and interior items. Needless to say, before installation it must be thoroughly cleaned of any debris;
- layout diagram. PLEN will be mounted with some indentations depending on the location of the furniture, because there is zero feasibility of installing such heating underneath it;
- floor insulation. They use the same material such as isolon - any reflective insulation will do. The material is fixed using staples and a stapler, the joints between the sheets of thermal insulation are closed with special aluminum tape;
- working with film. The leads of the wires from the PLEN are oriented towards the baseboards in accordance with the location of the power wire. The film itself can be fixed to the insulation with staples (within the mounting fields) or tape;
- installation of a thermostat with a temperature sensor. There are two options: use a remote sensor and mount it at a height of 30 cm from the floor, or build it directly into the floor (place it in the corrugation on the transparent area of the film). Connection to the panel is carried out similarly to work with the ceiling