The problem of heating and preparing hot food always remains one of the most important criteria in the construction of a house and ancillary premises for housing. That is why we will now figure out how to build a stove for a summer kitchen and do it ourselves, because not everywhere it is possible to use gas for heating and a hob.
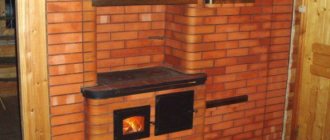
Summer kitchen under construction with stove
What to consider when choosing a stove
When choosing a hob, you should focus on your own needs and capabilities. What dishes do you plan to cook in the summer kitchen? In what volumes and with what frequency? For some cooks, a miniature assistant is enough, while others need a full-fledged oven complex. There are plenty to choose from today!
Fuel is the main determining factor
The presence on the site of the possibility of running main gas into the summer kitchen is a huge advantage, allowing you to install a functional gas stove and not worry about constantly searching for fuel. If the gas pipeline runs far, you can purchase equipment that runs on bottled gas. The advantages of gas are the quick readiness of the stove for use, easy adjustment of the flame intensity and oven temperature.
Electric cookers can also act as a stove for the kitchen, placed in a gazebo or a separate room. Their advantage is simplicity and ease of use. On sale you can find compact mobile stoves that will not be difficult to take to city housing for the winter.
A solid fuel stove for the kitchen does not depend on the availability of communications and can be installed even on a site in a deep forest. Affordable firewood and inexpensive coal are suitable as fuel. The aroma of dishes cooked over fire and coals will excite the appetite of not only household members, but also the closest neighbors.
Combination stoves are very convenient, combining the ability to use wood and gas or coal and electricity. Having such equipment at your disposal, you can choose the most suitable cooking method and save time.
Buy or build
A huge selection of factory models inclines in favor of buying a finished stove. On sale you can find stoves for summer kitchens of any size and type. The materials used for their production are steel, cast iron, and refractory mixtures. In factory products, the design of the firebox is carefully thought out, leaking flue gases and cases of fire are excluded.
When installing factory equipment, installation difficulties rarely arise. Metal devices are relatively lightweight and can be installed without an additional foundation. Fireplaces made from fireproof mixtures are not afraid of moisture and can easily spend the winter in an unheated house or on the street.
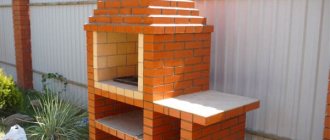
Brick and stone hearths look solid and are equally suitable for both open gazebos and closed pavilions. Laying a furnace complex to order or with your own hands allows you not to limit yourself to strict limits, but to choose a multifunctional design that combines all the necessary modules.
Building a miniature stove yourself will cost less than buying a ready-made model with similar functions. The brick structure will last longer than metal, it is not afraid of moisture and does not burn out during operation.
Stove options for summer kitchens
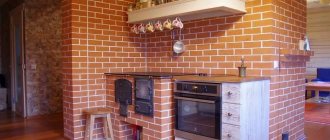
A kitchen stove with oven is a convenient stove, ideal for both a gazebo and a separate house. For a summer kitchen, you can choose a budget two-burner stove with oven or an option with four burners and a grill. There are compact tabletop and standard floor-standing models on sale, powered by gas and electricity, and the simplest wood-burning kitchen stove is easy to build from brick with your own hands.
If a separate kitchen is used not only in summer, but also during cold weather, it makes sense to pay attention to a heating and cooking stove. These devices are usually equipped with two fireboxes and operate in two modes: winter and summer
In winter, the fireplace will not only heat up the stove, but also warm the room, and in summer it will not emit intense heat, like a standard heating stove.
A barbecue oven is most often installed in open-type summer kitchens. Classic barbecues allow you to cook food on the grill. Models with expanded equipment, called barbecue complexes, in addition to the grate, include oven modules for preparing shish kebab, pilaf, pies, and smoked meats. The complex includes modules for pizza, hobs, Russian stoves, and ovens.
A gas grill, complemented by an oven and side burners, is an excellent choice not only for personal use, but also for a small cafe. Based on this modern equipment, functional modules of summer kitchens are produced, equipped with sinks and cabinets. The same series includes compact portable and built-in gas grills. Gas grills can be installed in open and closed kitchens.
Fireclay brick or cellular concrete
To make a structure of this type, it is better to purchase aerated concrete or refractory brick. These materials are able to withstand high temperatures, do not burn out under constant heating, and retain heat inside the device for a long time.
The purchase of aerated concrete will significantly save financial costs. But after laying it, the stove must be lined so that the heat inside is retained as long as possible.
It should be noted that refractory bricks have a number of advantages:
- moisture resistance;
- there is no need to carry out facing work;
- long service life;
- external aesthetics.
But the cost of brickwork will be much more expensive than aerated concrete.
When designing a product, it can be supplemented with the functions of a smokehouse, barbecue, kebab maker, or a compact heating and cooking structure can be developed without any accessories.
Riddles about delicious things-2
Text:
I was green and small, Then I became scarlet. In the sun I turned black, And now I am ripe.
Answer: Cherry
* * *
The green house is a bit cramped: narrow, long, smooth. Round kids are sitting side by side in the house. In the fall, trouble came - the smooth house cracked, the round kids galloped in all directions.
Answer: Peas
* * *
In the hot sun the dried out leaves burst from the pods...
Answer: Peas
* * *
The cramped house split into two halves, and beads and pellets fell into the palms.
Answer: Peas
* * *
In the green tent, the Koloboks sleep sweetly. There are a lot of round crumbs! What is this?
Answer: Peas
* * *
Small stove with red coals.
Answer: Garnet
* * *
The berry tastes good, But go ahead and pick it: The bush with thorns is like a hedgehog, That’s what it’s called...
Answer: Blackberry
* * *
It shakes on the table, And it’s called….
Answer: Jelly
* * *
There are a lot of thin stems in the sun on the stumps. Each thin stem holds a scarlet light. Unbend the stems - Collect the lights.
Answer: Strawberry
* * *
In a forest clearing Tatyanka is showing off - Scarlet sundress, White specks.
Answer: Strawberry
* * *
I am a drop of summer on a thin leg, They weave boxes and baskets for me.
Answer: strawberries
* * *
Red, juicy, fragrant, Grows low, close to the ground.
Answer: strawberries
* * *
Egorka stands in a red skullcap, and whoever passes by will bend down.
Answer: Strawberry
* * *
I am a drop of summer on a thin leg. They weave boxes and baskets for me. Whoever loves me is happy to bow. And my native land gave me a name.
Answer: Strawberry
* * *
In haymaking it is bitter, And in frost it is sweet, What kind of berry?
Answer: Kalina
* * *
What kind of trotter is this? Fell on its side? Well-fed, lettuce-like. That's right, kids...
Answer: Zucchini
* * *
The green fat woman put on a lot of skirts. She stands like a ballerina, a cape made of leaves.
Answer: Cabbage
* * *
The lady is scattered in the garden, dressed in noisy silks. We are preparing tubs for her and half a bag of coarse salt.
Answer: Cabbage
* * *
What's that squeak? What kind of crunch is this? What kind of bush is this? How can I be without a crunch, If I...
Answer: Cabbage
* * *
Not sewn, not cut, But all in scars. Seventy clothes, And all without fasteners.
Answer: Cabbage
* * *
2
Rating:
Interesting
| Eighth month The child distinguishes between light and dark. He responds better to low sounds—to daddy's voice. The ability to focus your gaze appears. The skin is almost completely formed, and the layer of subcutaneous fat is becoming thicker. The amount of cheese-like lubricant is reduced. Vellus hair (lanugo) on the body disappears. Sun… |
Riddles for children
- Riddles about nature
- Riddles about animals
- Riddles about plants
- Riddles about time/seasons
- Riddles about school
- Riddles about the house
- Riddles about work/hobbies
- Riddles about man
- Riddles about delicious things
- Riddles about the road
- Riddles about toys
- Riddles about fairy tales
- Riddles about technology
- Riddles about transport
- Riddles about color
- Other riddles
Poems for children
- Poems about kindergarten
- Poems about school
- Educational poems
- Instructive poems.
- Poems about family
- Poems about animals
- Poems about friendship
- Poems about nature.
- Riddles in verse
- Poems for the holidays
- Happy Birthday Poems
- funny poems
- Agniya Barto. Children's poems.
- Korney Chukovsky. Children's poems
- K. Avdeenko. Children's poems
Preparing the base
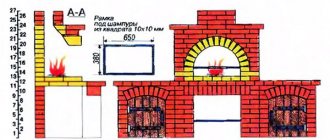
Figure 3. Basic calculations and requirements for a fireplace.
A barbecue oven is a heavy structure, like any fireplace, so it needs a solid foundation. It is necessary to make a small foundation.
- To create a solid base for the stove, it is necessary to remove the turf, remove all debris and roots from an area of 1.5 x 1.5 m and a depth of 15 cm and install wooden formwork 20 cm high.
- Prepare the concrete mixture. You can use a ready-made dry mixture by simply adding water according to the instructions on the package. Fill the area where the stove will stand with this solution, approximately 8-10 cm, lay 3 pieces of reinforcement at a distance of 30 cm from each other. Fill it all with concrete mixture for another 8-10 cm. Smooth the surface of the solution.
Some tips
It would be nice to make the stove base a slight slope of 1.2-1.3 cm (the front wall of the base relative to the back). This slope will help rainwater flow freely without becoming trapped, and your BBQ oven base will last longer. Now just give the base you created 48 hours to harden.
While your base is curing, you can head to the store to purchase the things you need to make your own barbecue, namely the firebox and grill. you should purchase them before you start laying them: you need to be sure that they will match the size of your stove or fireplace.
The procedure for laying a furnace
Preparing the area
The selected location is cleaned and thoroughly compacted. But if the soil is soft, and especially if something has previously grown on it, then it is advisable to build a small pit. For what?
After compacting the bottom, material of small (and solid) fractions is poured onto it - pebbles, crushed stone, expanded clay. The layer is leveled and compacted.
Waterproofing
Often in articles on this topic you can find advice on laying roofing felt. They say it's the cheapest material. The author strongly does not recommend using it. The fact is that even under the most comfortable conditions, the service life of roofing felt is no more than 4 years. Of course, it’s not a shame to replace it - the price is low. But what about a brick oven? After all, you can’t move her from her place!
"Substrate"
Its purpose is to compensate for possible soil movements. It is enough to pour, level and compact the sand in a layer of 100 - 150 mm.
Masonry
The order diagram shows everything well, so there are only individual explanations for the rows.
1 (item 1). The first row determines the correct geometry of the entire structure
Therefore, the main attention is to level it. This device must be mounted on a rail long enough to allow you to check any of the sides + diagonals
At this stage, the blower (its door) is installed. It can be temporarily secured with wire.
2 – the same red brick is used for it.
3 – masonry is carried out with fireclay samples. A grate is placed on top.
4 – bricks are placed on edge. The peculiarity is that on the back wall the bricks do not “sit” on the mortar (that’s why they are called “kick out”). In addition, they should protrude slightly beyond the perimeter (so that you can grab them with your fingers). Inside there is 1 more brick, which serves as the wall of the chimney (see picture below).
The firebox door is immediately attached. You can prop it up, for example, with bricks. They are placed on top of each other from behind.
5 – bricks are laid flat.
6 – again on the edge.
7 – flat. The rear wall is made of 2 pieces, on the edge.
8 – if laid correctly, the row is located above the firebox door. Feature - to deflect the flame of the hearth towards the center, it is laid out with an offset (in the lower left figure, section A - A). This is necessary to ensure maximum heating of the burner and efficient use of fuel.
9 - in fact, for the furnace itself it is the last. To seal the junction of the hob with the brick, a cord (asbestos) is laid. It must first be slightly moistened.
10 – pipe formation begins from here.
As can be seen in the figure, the pipe goes up with expansion, and its center of gravity shifts. This needs to be taken into account. As an option, lay out a couple more rows and place a knee of their iron.
11 – the valve is installed.
Next - according to the diagram.
After finishing the work, it is necessary to clean the chimney, since during the construction of the pipe, clay residues will accumulate at the bottom, which will fall when the bricks are coated with mortar. To gain access inside, it is enough to remove the “knockout” bricks from the installation site.
Dear reader has already understood all the advantages of this model. There is no need to prepare a place for storing building materials/materials and invite professional stove makers. Everything can be done with your own hands, with minimal financial costs and without assistants. Moreover, even without experience, it is quite possible to complete such construction in 1 day.
Useful tips
- During the first time after starting to operate the stove, it is advisable to heat it less intensively. This is due to the fact that in some places the solution may not dry completely. If you immediately heat it to maximum, there is a risk of cracks appearing in the masonry. Therefore, in the first days it is advisable to use wood chips, tree branches, dead wood, and so on as fuel.
- If the finishing of the stove is limited to whitewashing, then blue and milk should be added to the solution.
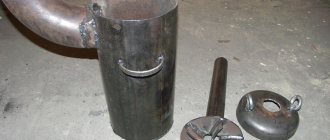
How to build a fireplace barbecue from metal
The fireplace can be built from metal. The product consists of compartments for fuel and a smokehouse. The latter has grates in which you can place smoked products. To be able to regulate the supply of smoke, the design includes a chimney damper.
This fireplace is made from steel sheets 1 mm thick. For the stove and the bottom of the ash pan you will need sheets 2 mm thick.
Diagram of a metal barbecue-smokehouse.
To lighten the load on the bottom of the ash pit, it makes sense to make a pedestal from gas blocks and bricks. You can also make a stand from other materials.
In order to build a fireplace from metal, you need to prepare parts according to patterns. The finished elements are connected with steel angles. To avoid coal falling out of the ash pan onto the floor, you need to monitor the tightness of the wall joints. If necessary, you will need to connect the unjoined areas using a welding machine.
You need to assemble the grill in the correct sequence. This is the only way the structure will last a long time.
A type of fireplace of this type is a smaller version of the Russian stove. Using this design you can bake baked goods, fry and stew food. To do this, the fireplace must be heated for 2 hours, after which the ash and coals must be removed. To smoke food, you need to leave the coals and add dry sawdust.
If it is not possible to equip a complex fireplace-barbecue, you can use a propane cylinder. The structure is made as follows:
- The balloon is filled with water.
- Holes are cut.
- The outlet is welded.
- A damper is installed at the junction of the pipe and the outlet. The hinges are mounted and sealed with a lid.
- Stands are being built.
Building a fireplace barbecue is quite simple if you follow the manufacturing technology and have the necessary elements.
Creating the base for the oven
A stove for a summer kitchen needs a quality foundation
In this case, it doesn’t matter what type of stove we are talking about, be it outdoor garden stoves or stoves for indoor spaces, which must be installed on a foundation, especially if the weight of the stove structure is more than 750 kg. Carefully select a place to install the stove, fence it off with cast-offs and get started
First you need to prepare a place for the foundation. The planning of the site for the foundation must be done very carefully.
The foundation should be approximately 10-15 cm larger than the dimensions of the stove; at the site where the foundation is installed, we remove the soil, going about 40-50 cm deep. We pour a layer of sand about 15-20 cm into the recess. In this case, the sand cushion should be well compacted, so prepare for it 6-8 bags of sifted sand (fraction 0.7 - 0.9 mm).
For your information! To compact sand, take a small log and screw a wooden strip perpendicular to it; this device is very convenient to work with.
Next, you need to lay the crushed stone cushion with your own hands. You will need about a 30 cm layer, but it is better to save crushed stone by first adding a 20 cm layer of construction waste (concrete chips, broken bricks), and then pour a layer of crushed stone on top (about 10 cm). We pour a concrete foundation on top of the crushed stone. The foundation for the furnace must be laid out so that its level reaches the level of the floor; for this reason, the thickness of the sand and crushed stone cushion may vary.
We install the stove ourselves
After waiting for the foundation to dry well and harden, we begin to lay the stove with our own hands. Before laying the first layer of bricks, you need to isolate the masonry from the foundation. To do this, we lay roofing material on the foundation, a layer of plastic film on top, and then do the following.
- We lay the first brick row with our own hands. The row is laid dry directly on the film, onto which we first sprinkle a little sand. In this case, only the joints between the bricks can be coated with the mortar.
- A Russian or any other stove cannot do without a blower, so we need to install a door for it. We apply a small layer of mortar to the first row of bricks, determine where to install the door, wrap the door with asbestos cord, install it and fasten it with wire so that it does not fall out.
- We lay the second and subsequent rows of bricks on the mortar as usual, but we bring the rows to the ash pit, not forgetting to check the angle.
- Next we lay the grate bars. Do not forget that the massive grate is made of cast iron; when heated, it will expand, for this reason you should not wall it up in the masonry, otherwise the Russian stove will be torn. The grate bars are placed on pre-prepared small ledges with a gap.
- We lay the next, fifth row with our own hands on the edge, but the next row can be laid again as usual - flat.
- We again place the seventh row on its edge, while we determine the installation location and install the fire door with our own hands. We fasten it in the same way as the door for the blower.
- We lay the eighth row, starting it flat with quarters of brick (three quarters will be needed).
- We lay the ninth row on the edge, and place a cast-iron hob on top. Then the tenth and eleventh rows will come, where we will begin to form the combustion pipe.
- On the eleventh row we install a valve, having previously coated it well with clay and wrapped it with a cord containing asbestos.
- Next, we narrow the structure by laying out a brick chimney.
- We install the mini grill and the work can be considered completed. If you are interested not only in building a stove, but also an entire summer kitchen, you can read the publication entitled How to build a summer kitchen in your country house with your own hands.
Important! When laying out a brick chimney, make sure that the center of gravity of the structure does not shift to the side; use a building level and a laser level more often. So, we have described in general terms how outdoor or conventional stoves are built in the country
The principle of laying brick kilns, whether ordinary or mini, is the same. The main thing is to carefully monitor the corners, masonry seams and do everything according to the pre-prepared project
So, we have described in general terms how outdoor or conventional stoves are built in the country. The principle of laying brick kilns, whether ordinary or mini, is the same. The main thing is to carefully monitor the corners, masonry joints and do everything according to the pre-prepared project.
https://tutknow.ru/building/uchastok/10828-pech-dlya-letney-kuhni-svoimi-rukami.html
https://teploguru.ru/pechi/varochnaya-pech-dlya-letnej-kuxni.html
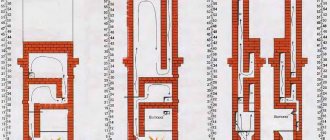
Orders
A barbecue oven, especially an oven complex, requires proper ordering. The “fault” is the presence of a chimney and the need to adjust the draft. In this design, it is practically no different from a fireplace or a Russian stove, and calculating the order from scratch is not so easy. But you don’t have to do this yourself - there are quite a lot of designs for stoves of any size and functionality on the Internet:
- Small oven:
- Barbecue with woodpiles:
- BBQ oven with cauldron:
How to build a stove for a summer kitchen on your own
Unlike heating stove equipment, wood-burning kitchen stoves do not have smoke ducts. The gases generated during fuel combustion are directed under the hob and then discharged into the pipe. The diagram of simplified cooking stoves includes only a firebox and a stove with burners. More complex models are equipped with an oven and a water heating box that provides the kitchen with hot water. The simplified design greatly facilitates the work and is suitable for beginners trying their hand at the stove business for the first time.
General recommendations and rules
You can build a small kitchen oven with your own hands in one day, using proven ordering diagrams from professionals. In order not to be disappointed with the result, you must follow the general rules that are the same for all households.
- The construction of a brick kiln begins with the foundation - the base area must exceed the size of the building so that there is a margin of at least five centimeters on each side. To fill the foundation, prepare a dense and well-compacted base of sand and crushed stone. This point is especially important for loose soils. In some cases, you can get by with a brick foundation.
- A layer of waterproofing is laid on the foundation - this protects the masonry from moisture and premature destruction. As waterproofing, you can use a sheet of roofing felt or other rolled material.
- To build a kitchen stove, you need to take fire-resistant fireclay bricks. As a last resort, it is allowed to use ordinary red brick for masonry in areas not in contact with fire, but different bricks cannot be laid in the same dressing - this can lead to cracks due to different temperature deformations.
- The first row is always laid dry, without using mortar. The bricks should be pressed as tightly as possible to each other, if necessary, filing adjacent sides with a grinder.
- Subsequent rows are placed in a dressing, strictly following the pattern and not forgetting to control the process by level.
- For masonry, use clay-based solutions or factory-made heat-resistant mixtures, diluted according to the manufacturer's instructions.
- A metal sheet of steel is placed under the firebox - the bottom of the future ash pit.
- The grate cannot be walled up with mortar - it must lie freely on special ledges.
- The doors are secured with steel wire, its ends being walled into the brickwork.
Simple kitchen stove with oven: sequential masonry scheme
To build this compact brick kitchen stove with oven, you will need 175 bricks and about 50 liters of heat-resistant mortar. In addition, you need to prepare materials:
- doors: combustion door 250*210 mm, blower 130*140 mm, cleaning 130*140 mm;
- steel sheets 500*700 (pre-furnace) mm and 1020*640 (for the stove);
- valve 130*130 mm;
- grate 250*180 mm;
- eight steel corners for strapping 30*30*4 mm;
- metal tape made of steel 25*15 mm;
- construction felt or other material for thermal insulation;
- cast iron hob measuring 530*180 mm;
- finished oven (metal cabinet with parameters 350*350*450 mm).
For those who do not have time to build a stove for a summer kitchen with their own hands or lack experience, but do not want to be content with simple options, we recommend turning to professional stove makers. Our craftsmen will quickly calculate the parameters of your kitchen fireplace and make your dreams come true.
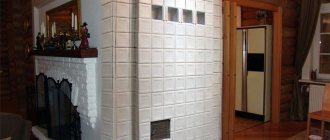
Improved heater options
Many Russian masters were involved in the modernization of the classic stove - I. Kuznetsov, I. Podgorodnikov, A Emshanov, A. Batsulin. The essence of the changes is as follows: the details of the old design were taken as a basis - the vaulted furnace, the bend and the high above the mouth. New functional elements were added to them:
- Instead of a hearth, a hob is placed, and a small flood is arranged below. A parallel summer passage shaft is laid out, connected at the top with the main smoke collector.
- Hot gases from the additional firebox are directed through smoke circulations made in the lower part - the stove. Then the combustion products are discharged into a common pipe.
- At the end or on the sides of the furnace, vertical channels are installed, again leading to the lower zone under the firebox, then into the chimney.
- The channels from the firebox go into the attached heating panel and out through a combined pipe.
- The firebox is made from the bottom of the furnace and communicates with it through a grate installed in the hearth (bottom) of the main firebox. Gas ducts from the furnace penetrate the furnace and converge into a vertical shaft leading into the chimney.
Another example - vertical passages are arranged in the side wall, forming a heating shield
We tried to clearly describe common concepts; there are many more existing options. The purpose of the changes is to improve heat transfer and functionality of the basic design. If desired, a water circuit register or an oven is mounted inside the flues (the cabinet is placed next to the firebox).
Now we will analyze the updated options in detail using specific examples - with drawings and procedures.
We will prepare everything you need
If you want to build a specific stove model, you will have to select the material for it and make the calculations yourself. As part of this publication, we decided to give as an example the construction of a universal oven made of refractory bricks with a barbecue, barbecue and grill. This stove will be stylized like a Russian one. What materials do we need for this?
- Fire-resistant brick – 750 pcs.
- Four hundredth cement - 12 bags of 25 kg each.
- Sifted sand – 18 bags of 50 kg each.
- Mixture for laying a brick oven - 26 bags of 25 kg each.
- Crushed stone, brick and concrete chips - 12 bags of 50 kg each.
- Cast iron blower doors - 3 pcs.
- Cast iron grates - 2 pcs.
- Cast iron stove valve - 1 pc.
- Fire doors - 2 pcs.
- Grill.
- Steel barbecue grill.
- Steel doors for cleaning - 2 pcs.
- Cast iron hob.
- Roll of roofing felt.
Important! You need to think in advance about the mortar on which you will lay the brick. We followed a simple and expensive path - we bought a ready-made mixture for masonry
But you can save money and prepare the solution yourself, but this is a long and labor-intensive process.
We've sorted out the materials
Please note that this is only a basic list; during the construction process, some other little things may be required, for example, steel wire to hold the blower doors, but you can easily figure these out yourself; we will not focus on these points. Now here is a list of tools we will need:
- Master OK;
- pick for splitting bricks;
- Bulgarian;
- trough;
- household concrete mixer;
- shovel, bucket;
- mallet;
- construction and laser level;
- tape measure and construction cord.
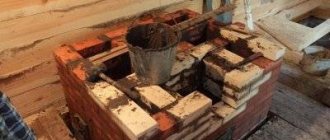
Nuances of furnace laying
An experienced stove maker, having thought carefully, can list thousands of nuances of laying a brick stove. Let's start with the fact that a brick oven can have dozens of designs, each of which has its own nuances. Preparation of the foundation has its own nuances; in general, each stage of the furnace construction work has a lot of features. We will not list all these features in one paragraph, but we will try to cover at least the main ones.
- If you have already built a garage, house or other outdoor buildings with your own hands from brick, remember that you need to lay the stove in a completely different way. The masonry method, foundation preparation, mortar and much more differ.
- The foundation of the furnace must be well prepared, its thickness should not be less than 0.5 meters.
- Between the foundation and the masonry it is necessary to lay a waterproofing material, ideally also thermal insulation.
- The base of the furnace is laid out from even, perfectly fitted bricks without mortar.
- All corners of the oven must be perfectly straight, use a building and laser level more often, and also level the bricks.
- Before laying, do not forget to wash the refractory bricks, and if you are laying ordinary red bricks with your own hands, then you also need to soak them for half a minute in a basin of water.
- If you decide to lay two different types of bricks in one dressing with your own hands, this may subsequently lead to the oven bursting due to the temperature difference.
- If you decide to lay a brick with your own hands on a clay mortar, then carefully select clay of normal fat content, with a minimal admixture of organic matter. It is best to ask an experienced stove maker to prepare the clay solution, since it is quite difficult to do it yourself.
- If you are laying sawn or chipped bricks, never place the sawn part inside the stove, as this part is much less durable.
Note! The blower door and other cast iron elements cannot be installed close to the brickwork. When heated, cast iron expands greatly, and it will simply tear apart the brickwork.
Variety of gazebos
Gazebos on the site can be of absolutely any shape and design. These include light sheds with mobile barbecues, solid structures with a whole barbecue complex, and closed rooms with a stove-fireplace, where you can comfortably stay even in winter. The decision on choosing a gazebo design is made by the owners, taking into account the available free space, other buildings on the territory and the landscape design of the site.
Incredible avant-garde design of a gazebo equipped with a modern stove
Pergola with fireplace-stove, surrounded by thickets of plants and flowers
Building materials for the construction of gazebos can also be different, depending on the financial capabilities of the owners and the chosen design option:
The most common material is wood, which allows the gazebo to fit into any landscape. Wood makes excellent open gazebos, similar to pergolas, where a stove is placed against one of the walls. Wood is considered the most affordable and easy-to-use material, but one of its properties is flammability, and therefore it cannot be used for all work on building a gazebo with a stove. To protect wooden structures, the material is pre-treated with special non-flammable mixtures.
Traditionally, gazebos are made of wood - a noble and durable material
A large gazebo with a Russian stove, barbecue, stove and other components is usually built of brick or stone, however, such a large structure will require an appropriate area. In small areas such large objects will look out of place.
Richly decorated stone gazebo, which has an oven and grill
To “lighten” the structure, you can build a forged gazebo, which consists of supports and a low fence, as well as a canopy made of wood, plastic or aluminum.
Lightweight aluminum structure of the gazebo, which includes a grill