When I, at the age of 45, began to look for a dacha for myself, my son said: “Well, that’s it, my mother was drawn to the earth.” No matter how city dwellers we are, sooner or later there comes a time when peasant genes persistently begin to knock on our crown. Either these are memories of a cloudless childhood with their grandmother in the village, or indeed the call of the earth, but by the age of 40-45, many are trying to acquire a country house or revive their parents’ dacha.
Of course, the first thing every city resident does is build a house. Only after the first year of construction does he realize that he wants to relax now: with his family, friends, even without a bathhouse and garden for now, but with a barbecue. And it would be nice to feed the builders hot food, maybe they will work faster then. At the same time, everyone remembers that the grandmother had a stove at the end of the garden, where she burned unnecessary garbage, cooked food for the piglets or corn for all the children from the street when it began to ripen. Luxurious outdoor stove complexes are shown on the Internet and on TV. What's stopping you from doing the same? After all, stoves in the garden are so convenient. Moreover, ordinary garden stoves made of brick are not a house; you can build them yourself.
Garden stove
A garden stove is usually . In private housing construction in America and Europe, it is customary to have a small green area for relaxation in the backyard of the house, where equipment for cooking meat in the fresh air is installed. There will be a small dining group where you can gather with your family or receive friends.
Our traditions are a little different from all European ones in that for us just barbecue is boring. We have absorbed the traditions and culinary preferences of all the peoples of our country, so in addition to meat fried on the grill, we need to be able to cook pilaf in a cauldron, lula kebab on skewers, smoke fish, and, as expected, bake pies. This is probably why our garden stoves very often include:
- Russian stove;
- barbecue;
- smokehouse;
- oven under the cauldron.
Do-it-yourself outdoor stoves are usually closed on one side with a wall, for better heat retention, and for protection from prying eyes on our six hundred square meters of garden.
How to make a Russian summer stove out of brick for outdoor cooking
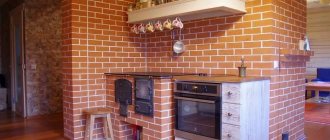
The Russian summer oven is suitable for cooking dishes from any cuisine in the world. You can bake bread, pies, flatbreads, pita bread, and Italian pizza in it. The outdoor oven is also intended for cooking fish and meat dishes. A Russian stove outdoors can retain heat for a long time. Its main disadvantages are its large size and irrationally high fuel consumption, which also increases because such a stove takes a lot of time to heat up. It is recommended to heat an outdoor stove for cooking only with hardwood wood.
A classic outdoor cooking oven has no smoke ducts. The improved Russian stove additionally has a heating panel with smoke channels and a stove.
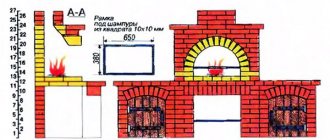
An outdoor Russian stove on the street under a canopy is placed on a base - an oven. Above is the furnace furnace and hearth.
Wood is burned in the crucible and food is prepared. The hearth contains the mouth of the furnace for the exit of flue gases from the furnace. Above the mouth there is a furnace smoke collector, and above it there is a chimney. The walls of the inclined chimney serve as a second gas threshold.
The choice of size of the firebox depends on the purpose of the stove.
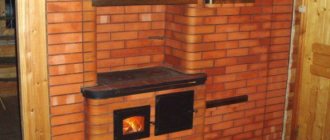
When building a Russian stove outdoors with your own hands, its outer walls should be lined with thermal insulation to reduce heat loss.
To do this, you can use vermiculite with clay or expanded clay and basalt wool. You can cook in such a stove even in the cold season at temperatures down to -10° C, but much more firewood will be required. Look at the photo of the stove on the street - options for its arrangement are demonstrated:
Project
Before starting construction, you need to decide what exactly needs to be built: if the house has a full-fledged kitchen, and it has a normal oven, then it will be more convenient for your housewives to bake pies and buns there. In this case, there may be no need for a Russian stove. If you are not supposed to smoke fish or poultry, then there is no need for a smokehouse.
At first we want everything, but approach the choice of project realistically : it is likely that, having tried it once, you will never use either a Russian stove or a smokehouse again. By the way, you can make a small oven under the cauldron next to the firebox to cook something in a cast iron pot or bake it. It will take up much less space, but will perform the same functions.
It’s worth looking at as many photos of ready-made garden stoves as possible on the Internet or interior magazines, assessing their dimensions and deciding whether you can afford a large complex or should limit yourself to a small one that combines a barbecue (barbecue), a stove with two or one burner (one of them under the cauldron) and a work table with a sink. Read the description of the selected DIY garden stove project.
The next step will be choosing a construction site . Usually they try to place the stove closer to the house, in this case you need to take into account where the smoke will go from it. There should also be no trees, wooden buildings, garages or rooms with flammable materials nearby.
After this, you need to do the ordering on the Internet or with the help of an experienced stove maker. These are drawings showing in detail how bricks should be laid in each row.
Several options for garden stoves
Recommendations for using a small stove
In order for the stove to be useful and save money, it is necessary to monitor its condition. Even a minor crack increases the loss of efficiency. For better heating, use only dry wood for kindling. Be sure to close the view.
Major cleaning of soot is carried out once - in the summer; in winter, minor cleaning is done, but at least 3-4 times per season. Accumulated soot reduces the heat output of the device. If the viewer, valves or door are faulty, you cannot light the stove, because they control the draft and help carbon monoxide evaporate.
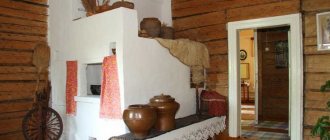
Despite all the nuances in the construction and operation of a mini-oven, it acts as an excellent heating device and can compete with modern gadgets in the speed and delicacy of preparing many dishes. It’s not for nothing that our ancestors considered the stove to be the soul of the house and placed the structure in the middle of the hut.
Not even a few centuries passed before she returned to us, only in a slightly different form. But its small size is not the main thing, because in terms of its functions and the wonderful atmosphere that is created in every home, the device is very similar to the good old Russian stove.
Materials
Considering that the oven will be located in the open air, the choice of materials should be approached very responsibly. It is best to use refractory fireclay brick, but if the complex is large, then it is possible to use solid red brick . When purchasing a brick, check its dimensions. It is important that it matches the dimensions of the brick in the project.
It has always been believed that for laying bricks it is better to use clay with the addition of sand. The amount of sand depends on the clay and here you need to look at the condition of the mixture. The clay must first be soaked in water for 2-3 days, then knead it well with your feet, adding a little sand. The solution is considered the most suitable if the bun made from it, falling from a height of 1 meter, does not crack or crumble, but simply flattens.
For the generation under 30, this is the same as the rocket fuel formula for my mother. Therefore, we leave the clay in a basin for the children to enjoy, and we ourselves buy in the store a special building mixture for outdoor stoves or just stoves, if there is a canopy over it.
Calculation of basic parameters
Before choosing a working design for a heating device, it is necessary to make a preliminary calculation according to the parameters of a particular room. The most accurate method is to determine the dimensions based on the heat output of the furnace. In order not to go into complex calculations, for well-insulated houses they use a simplified calculation scheme proposed by I.V. Kuznetsov. This method uses the average thermal power removed from one square meter of the surface of the unit (TMEP). For a conventional firebox, take the value 0.5 kW/sq. m, and if intensive heating is necessary, which occurs during severe cold weather - up to 0.76 kW/sq. m.
In principle, these values are enough to select a suitable project from those that can be found in the public domain. If the available options are not suitable for any reason, then you will need to calculate the parameters of the main elements of the furnace and design your own design.
Firebox
The dimensions of the firebox are determined based on the maximum volume of the fuel fill. In this case, the amount of combustible materials is calculated using their calorific value and specific gravity, focusing on the required power. The volume of the firebox should be 2–3 times larger than the obtained value, which will allow the stove to be reheated at extremely low temperatures. When calculating the size of the combustion chamber, it is necessary to take into account that the maximum filling should not exceed 2/3 of the volume of the combustion chamber. In addition, the dimensions of the firebox and all its components must be adjusted to the size of the bricks used for laying the stove. In your calculations, you can use special tables designed taking into account the need to heat rooms of various sizes.
Calculation table for the main elements of a brick kiln
Ash pan
The height of the ash pan depends on the type of fuel used. For low-ash combustible materials such as coal or peat briquettes, this value is taken equal to 1/3 of the height of the firebox. If the stove is heated with wood or pellets, then the height of the ash chamber must be reduced to 1/5.
Chimney
When calculating the chimney, it should be taken into account that the place of its installation must comply with SNiP
Unlike gas heating equipment, wood stoves do not require much draft, so the best shape for the smoke channel would be a rectangle. When calculating the chimney, it is taken into account that the cross-section of the blower should not exceed the area of its flue, and all values are adjusted to the dimensions of a standard brick. Since accurate design requires operating with a lot of data and parameters, it is best to use one of the special programs. However, for the most common cases (no kinks in the smoke channel, vertical stroke, rectangular cross-section, height from 4 to 12 m), you can use average values for furnaces with a power of up to 14 kW:
- Less than 3.5 kW - 140x140 mm.
- 5 – 5.2 kW – 140x200 mm.
- From 5.2 to 7.2 kW - 140x270 mm.
- From 7.2 to 10.5 kW - 200x200 kW.
- 5 – 14 kW – 200x270 mm.
To calculate the amount of material required, it is best to use special tables. Below is one of them.
Calculation of the number of bricks
Foundation
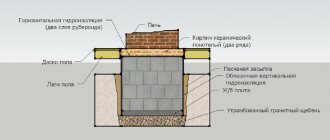
Under a large complex, you will have to make a reliable foundation , with a depth below the freezing point of the soil (it is different for each region, you can check it with familiar builders). The foundation must be reinforced. On soils with heaving soils, it should have a trapezoidal shape.
If the garden stove is small, then an ordinary slab 10-15 cm thick is sufficient. To construct it, the fertile layer is removed, a hole 40-60 cm deep is dug, 10-15 cm of sand is filled in, compacted, after 30-40 cm of gravel. The formwork is being exposed. Reinforcing mesh is placed in it and everything is filled with concrete. It is better if the foundation is 50-100 mm above ground level.
Features of operation
The operation of a brick kiln in a country house has its own characteristics:
- The fresh masonry of the stove must dry. This will take at least two weeks;
- the first firebox should be using paper, wood chips and no more than 15–20% of the total amount of fuel material;
- To determine whether the oven is completely dry, you need to pay attention to the internal damper. The absence of condensation will indicate readiness for normal operation;
- flammable materials cannot be used as fuel material;
- before kindling, it is necessary to open the vent, and after it, ventilate the room;
- you cannot light the stove if there is no draft;
- If cracks appear on the walls of the furnace, they must be repaired with mortar.
A metal stove has its own nuances during operation:
- the metal body of the stove should be equipped with legs so that there is minimal contact with the floor;
- Wall surfaces must be insulated from heat and sparks. For this, metal sheets, thick foil and other non-flammable materials are used;
- During the combustion of the combustion material, a coating of soot forms on the walls of the furnace, which reduces heat transfer. In this regard, the internal and external surfaces of the structure must be cleaned. This is easy to do with the help of special scrapers, brushes and ruffs;
- during operation, the metal becomes very hot, which, if you are careless, can get burned;
- firewood and other combustion material must be stored at a distance of at least 40–50 cm from the ash pan and the door to the combustion chamber;
- Open containers with water should not be left above or near a hot stove. Moisture that gets on a hot stove will instantly turn into hot steam, which can cause burns.
Video: stove for a country house or for a garage
Laying a garden stove with your own hands
We lay a layer of waterproofing on top of the foundation and install the first row, according to the order. We check each row with a level to ensure it is horizontal and all angles using a plumb line. The seams between the bricks must be filled with mortar. After this, he lays out row by row, strictly in accordance with the order.
When installing the doors and slabs, we carefully cover each of them with basalt wool or wrap it with asbestos-cement cord. This is necessary so that, when expanding from heat, the metal door does not burst apart the brickwork.
Possible problems
During construction, several mistakes can be made.
Connection of foundations - due to different loads, differences in subsidence are possible, which is why the furnace may warp in the future.
If you take river sand instead of quarry sand, the masonry mortar will not be strong enough due to the smoothness of the sand grains and their poor adhesion.
Hewn and cut bricks collapse faster, so when laying it you should try to install it with the cut side inside the seam.
When laying a chimney, it is necessary to use a special plug so that the mortar does not remain on the internal walls, and the surface of the masonry is cleaned of mortar every 4-5 rows.
If you do not make a cleaning hole in those places where the chimney changes direction, soot will accumulate in it. When installing dampers and doors, we must not forget about the property of metal to expand - masonry cannot be done without a small gap.
These and other mistakes can be avoided if you consult with an experienced craftsman before starting work.
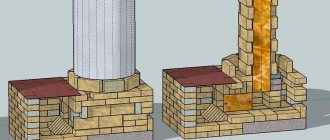
Chimney installation
The operation of the entire garden stove depends on a correctly installed chimney. The easiest way to make a chimney without errors is to use a modular system. Having collected a sufficient number of modules, you only need to assemble them like a construction set and cover the outside with bricks. It is important that the modules fit tightly together and are firmly connected with clamps or heat-resistant sealant.
There are several rules for installing a chimney:
- Installation must begin from the stove;
- The parts must fit tightly together without forming gaps or cracks;
- Good access must be provided to all parts of the chimney so that in case of blockage, the chimney can be cleaned;
- The joints of the modules should not be in the ceiling.
Types of stoves, which option is better to choose for self-production
To heat the premises of a country house, use:
- buleryan;
- brick;
- metal stoves;
- on used oil;
- long burning stoves.
Brick
Brick stoves for cottages have a simple design. It is easy to find suitable material for its construction. However, this heat source will require a heavy base in the form of a concrete slab, so it is rarely found as a heating structure in a small room in a country house.
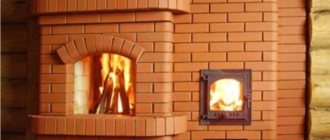
Heater-cooking oven
Buleryan
The Buleryan heating device is a source of high heat output, which uses wood chips, small firewood and peat as fuel material. Despite its high performance, this device is expensive and requires special knowledge during installation.
Small and efficient heat source
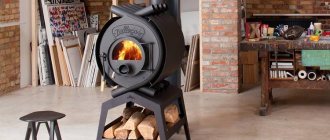
Potbelly stove
A potbelly stove is usually small in size. This heating device allows you to create heat by burning wood. The potbelly stove is very popular due to its simple installation, reasonable price, simplicity of design and the ability to make this stove yourself.
Frequently encountered stove
On used oil
This type of stove is often used by dacha owners. This option is very convenient, since many of them have vehicles, and when servicing a car, there is always fuel oil and other liquid fuel left over. In addition, this stove is safe to use, since the fuel burns completely inside the structure.
Dual heat source design
Long burning "bubafonya"
When installing a long-burning stove, the room in the country house will be heated for a long time. It is not difficult to build such a stove yourself. All you need is skills in handling a welding machine.
The design saves fuel material
Considering the cost and performance of these heating devices, a brick option and a long-burning stove are most suitable for a summer residence. The cost of materials, production time and functionality of these heat sources make them the most popular among owners of summer cottages.
When making these stove options yourself, you will need skills in handling a welding machine and experience in bricklaying.
It should be noted that a big role in good heating of a country house is played not only by the functionality of the selected stove, but also by high-quality insulation of the walls of the building.
The stove for a summer residence is often modernized, so that not only firewood and sawdust, but also waste oil are used as fuel material.
Finishing
After the work with the brick is completed, you can inspect the brickwork again and open the seams additionally. Typically, DIY garden stoves are not plastered or lined with stone. If desired, this can be done if the design idea requires it or when a modern building is very different from the surrounding environment of the old dacha. Next to a small whitewashed house, a plastered stove decorated with paintings or tiles will look more harmonious. A stove in the depths of the garden, lined with natural stone, will look original, but if it stands on a lightweight foundation, this should not be done.
Choosing the optimal location
The location of the stove for a garden house must be approached with the utmost seriousness, since not only effective heat transfer, but also your safety from fire depends on it. Of course, ideally in the old days, and even now, the place where the stove will stand was planned before the construction of the house began.
Here are the basic requirements for determining a place for the stove:
- The room where you plan to install a wood-burning stove must be at least 16 sq.m.
- The stove must be installed on a reliable foundation, which means there should be no floor beams under it. The chimney should exit in a place where there are no ceilings.
- Construction near the outer wall is not advisable, because precious heat will be given to the street. Therefore, it is better to locate it in the center of the house; the chimney will exit in the area of the ridge, and the height of the pipe will be smaller. For wooden houses, central placement is recommended for fire safety reasons.
Now let's talk about the features of choosing a place for the stove. The best option to ensure good heat transfer is to place the stove so that all walls can come into contact with the air inside the home. The rooms should not be large, then you cannot do without additional heat sources.
Therefore, ideally, it should be placed in the opening of the partition between the rooms, and the firebox would go out in the kitchen or hallway area. On the one hand, the kitchen also becomes warm with the ability to cook, and on the other hand, the living spaces are freed from garbage.
When installing a multifunctional stove in large rooms, it should again be placed in the center of the room. The stove turns into a place of concentration of comfort that gives a home. It turns out something similar to a studio apartment, with an open layout, where the stove becomes a space divider.
Welcome to visit
After completing the construction of the stove, you can invite guests, but for this you need to arrange a recreation area around it. the area around the stove with tiles . If the dining table is not located in the gazebo, then it is worth considering what the patio will be like: laid out from the same tiles or made from decking boards. You can also make tables and benches yourself. Photos and detailed descriptions of the works can be found in large quantities on the Internet. The base columns for benches and tables can be made from leftover bricks, because after building a garden stove out of brick yourself, this will not cause much difficulty.
Folded strictly according to the design, in accordance with the order and using high-quality materials, the stove will serve faithfully for many years, gathering all your family and friends at your hospitable table. Many people make stoves in the garden with their own hands; there is no need to be afraid of difficulties.
Types of garden stoves
Recommendations for choosing purchased structures
The key indicator in purchasing a ready-made kitchen stove is the type of fuel on which it will operate.
The factory-produced summer stove has several design options.
- If you have gas nearby, you should consider purchasing a gas stove with oven. Its heating temperature is adjustable. The device is ready for use at any time and does not require the cost of searching for fuel.
- A cheaper solution would be to buy an electric stove. Easy to use and convenient to transport.
- In the absence of communications, an excellent wood-burning option is a solid fuel stove. Suitable for the most remote summer cottages.
- Universal stoves allow you to use several types of fuel, which significantly saves time on cooking.
It is worth noting that factory models have a number of advantages in operation:
- a large selection of finished products of various sizes and colors; metal alloys and refractory mixtures are used as materials;
- the device’s operating scheme reduces the risk of fire and smoke leakage to a minimum;
- designs are light in weight.
- quick assembly and installation.
However, a DIY project for a closed or open summer kitchen with a stove will allow you to take into account the characteristics of the site, the wishes of the owner and save money. In addition, step-by-step construction instructions have now been developed for furnaces of varying complexity.
Budget options could be:
- Russian stove for a cauldron;
- two-burner stove with oven;
- barbecue oven with grill.
It is important to remember that when creating a furnace, you need to accurately draw up a drawing in order to take into account the nuances of construction, the amount of material required and the amount of work