In ancient times, Russian stoves stood in every peasant house. Such heating equipment certainly has many advantages. However, unfortunately, the Russian stove also has two rather serious drawbacks. Firstly, such equipment is not particularly economical. A lot of firewood needs to be prepared for a stove of this type. Secondly, during operation, such heating structures, unfortunately, warm up quite poorly below. Accordingly, the floor of the house remains cold. And the lower crowns begin to rot due to moisture condensation in the log house.
An alternative to the Russian stove
In ancient times, peasants, of course, knew about all these shortcomings of the most popular heating equipment in villages. However, the Russian stove always had more advantages than disadvantages. Therefore, it remained popular for a long time and no alternatives were sought. In addition, in ancient times there was much more firewood, as well as forests, than there is now. Accordingly, there was no particular need to save fuel and extend the service life of log houses.
We started thinking about replacing the Russian stove with a more economical model in Russia only after the revolution, during times of impoverishment of the population, general hunger, etc. In 1929, a special model of the Russian stove began to gain popularity in our country - the “teplushka”. This heating design was invented by the domestic engineer Podgorodnikov. To improve the Russian stove, he simply directed the gases from the cooking chamber downwards.
Subsequently, Podgorodnikov developed several types of hotbeds, differing in size, efficiency and location of the fireboxes. All these models made it possible, among other things, to select the operating mode and heating of individual parts.
Materials for laying the furnace
The fireclay core of the furnace is laid using Plitonit Ogneupor mortar. The external masonry of the brick kiln is made of cement-clay mortar: cement: fireclay clay: sand = 1: 2: 7. Consumption of materials for laying a stove without a pipe:
- Red brick…………..1070 pcs.
- Fireclay brick……………400 pcs.
- Wedge brick Ш-47……..40 pcs.
- Plitonite Ou, 20 kg……………5 mshk.
The first rows of the outer masonry of the furnace. Openings for blower and cleaning doors. The size of the stove in plan is 5.5 x 5.5 bricks or 1.4 x 1.4 m. To prevent heat loss, trenches are installed in the foundation under the stove.
Turning up the overflow channel and starting to lay the firebox of the furnace. The firebox belongs to the internal circuit and is separated from the external masonry by spacers made of basalt cardboard.
The lining of the walls of the lower heating chamber (inner fireclay core) is separated from the outer masonry of the furnace by basalt cardboard.
Heat storage columns on which to rest under the stoves. On this row they are connected for subsequent laying of the furnace hearth.
Beam covering of the fire door opening.
Bottom of the furnace, second row. The bottom of the furnace is laid in two rows. On the sides there are openings for the passage of flue gases into the lower heating chamber. The stove hearth is laid with red brick for aesthetic reasons.
The internal lining of the firebox is separated by basalt cardboard.
The stove, hearth and firebox are finished. The bricks of the external masonry of the pillar are laid on edge in order to combine the levels of the internal and external masonry. The firebox lining is narrowed at the hearth level to increase its area. The transfer channel remains single-layer, but this is not critical, because the temperature in it will not rise above 300-350 C. If desired, it can be sanitized with a stainless insert of rectangular or oval cross-section.
Masonry of the furnace of the Russian Teplushka stove. Spoon fireclay masonry rests only on the inner masonry. The firebox lining is not clamped.
A hole for the passage of gases into the lower chamber. Transition from edge-on masonry to spoon masonry.
The arch of the mouth of the furnace, the heels of the arch and the tightening bandage. In previous versions of Teplushki, the heels of the vault were released from the outer walls of the masonry.
The furnace roof is made of sh-47 wedge brick. Basalt cardboard is laid at the ends of the vault to seal and compensate for longitudinal expansion.
Russian teplushka stove: assembled fireclay core.
View from the adjacent room.
Concrete is poured on top of the furnace roof for the heat capacity. Basalt cardboard is laid along the inner perimeter of the masonry - this will make the filling independent and prevent the walls from expanding.
The concrete is poured, the solution must be very thick so that it does not wet the basalt cardboard gaskets and does not spread under its own weight. Those. so that there is a gap between the concrete and the masonry.
Furnace lining. Grooves are made under the tie bars. In the background, the templates were circled for laying the vault, the heel bricks and the first bricks of the vault.
Furnace lining, the hearth window is blocked at the corner.
Covering the furnace. To increase rigidity, the corners are connected in pairs; when installing them, a gap is left for linear expansion. The far wall of the smoke collector rests on the corner L100.
Upper heating chamber. Its design can be different and depends on the location of the pipe. Valves will be installed on this row.
The stove is folded. how to heat the Russian Teplushka stove here.
The chimney in the attic floor is equipped with an additional valve.
19.01.2012
Author: A. Batsulin
Design Features
The main feature of Podgorodnikov’s heated vehicles is that they always have 2 chambers. The lower one is called the heating room, and the upper one is called the “crucible”. At the bottom of the “Teplushka” there is a water-heating box and pillars.
The fuel in such stoves is burned in a specially configured firebox located in the side wall. This part of the heating structure has a grate and a vent. However, there is no overlap in the firebox of such a stove. Gases from firewood in this type of equipment rise into the furnace and heat it, and then descend into the lower chamber. Next, the cooled smoke goes into the chimney.
If the house is warm, the owners have the opportunity to open a special damper when cooking. In this case, the gases will immediately go into the pipe. They will not get into the oven and it will remain cold.
Complete list and quantity of building materials
- Red brick - 1600 pieces
- Fireclay bricks 250 pieces
- Valves of two types - 5 pieces
- Flap for the furnace
- Hob - 1 piece
- Grate – 5 pieces
- Doors for the firebox and ash pan - 4 pieces
- Steel angle and strip
- Clay 100 kg
- Sand
For masonry you also need fireclay clay.
Order and features of construction
The heated vehicles are laid using almost standard technology. The method of their construction is practically no different from the method of constructing a Russian stove. In any case, exclusively heat-resistant building materials are used for masonry of such structures. The order of the stove of Podgorodnikov’s heated vehicle may look, for example, as follows.
In addition to fireclay bricks and a heat-resistant clay-cement mixture, before starting to lay such a furnace, they purchase a grate, doors for two cleanings and a firebox, a water-heating box made of galvanized steel, etc. In any case, laying a heated stove is technologically a rather complicated procedure. Only a master who already has some experience in constructing stoves, including Russian ones, should take on this work.
Such furnaces are built on a solid foundation with waterproofing. In this case, the first row of masonry is made continuous. Further construction is carried out according to the chosen order.
Ordering, baking with your own hands
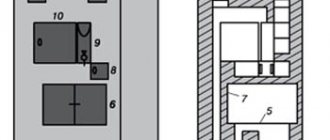
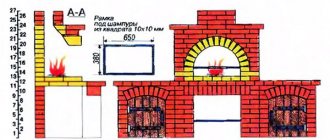
Scheme of the arrangement of the stove-heater layout
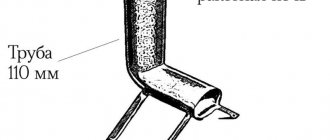
This do-it-yourself stove laying scheme is slightly different from the laying of a conventional Russian stove; smoke channels are installed to remove gas above the furnace. The size of the oven itself is two meters by one meter and 20 centimeters. The pipe is attached to the left wall.
At the very beginning, it is necessary to correctly install the foundation of the furnace. It is carried out using good cement mortar, brought to the floor level, leveled with a lath and bricks are laid out in order. All excess solution is removed with a trowel and rubbed with a rag. Carefully check the diagonals and accurately measure the sides. After this, sand is poured into the created rectangular container. The right corner is for the base of the pipe. This is how the first row of the order is placed with your own hands.
Second row . The masonry itself is installed with bandaging of the seams, and this must be done in each direction.
Third row. When laying this row, be sure to form an ash pan. The depth of the ash pan is small, about 350 mm, and the height is 65 mm. A solid wall is laid out for the pipe.
Fourth row . Here you need to form a ledge, which is similar to any Russian stove. To clean the stove, an opening is made in the pipe; its width is about 120 mm.
It is also necessary to install a pass; it will protect the firebox, and the smoke will escape through the gas outlet. We lay out the flooding.
Install the grate and ash pan, and prepare to install the fire door.
Fifth row . A brick is installed above the ash pit and firmly fixed above the opening. The brick should rest against the walls and be prepared for the installation of the grate.
Sixth row . When installing the grate, be sure to leave a gap for the expansion of the metal grate, it is about 5 mm.
Seventh row . Start laying the walls with your own hands and prepare a place to install the door. A pass is also installed in the firebox, which will limit the fire from going into the chimney. The height of the pass can be limited to two or three bricks. Trimming the edge of the brick will help create better conditions for hot air to escape into the pipe.
In the sixth row of masonry, work begins with laying the gas duct. All corners of the bricks are cramped to improve aerodynamics.
The eighth, ninth and tenth rows are preparation for installing the cooking floor.
In the ninth row, the installation of the valve is being prepared.
Tenth row . The chimney is blocked here. The stove is completely installed, now you need to install and strengthen the door, lay a steel strip along the top of the stove. The next row of bricks can be laid along this strip.
The convenience of this stove is also that you can use the stove in the summer; it will not heat the room with two valves closed. Only the plate valve remains open. You can get more information about building a Russian stove at the dacha by following the link.
Reviews about hot stoves
Owners of country houses with stove heating speak very well of almost all of Podgorodnikov’s models. Of course, such furnaces are quite complex in construction. However, they are also very convenient to use. There is no need to prepare too much firewood for this type of equipment. It’s easy to cook food in heated containers, and they heat the house perfectly.
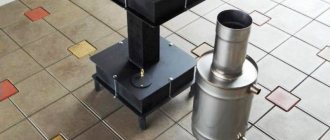
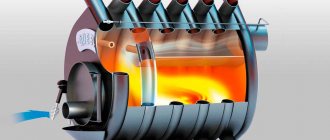
In addition to brick, today there are also metal stoves with the same name on sale. Modern steel heated vehicles have also earned excellent reviews from the owners of country houses. The efficiency of such models is high and in terms of wood consumption, like brick stoves, they are considered economical.
Application of the Kuznetsov furnace
Over many years of inventive activity, I.V. Kuznetsov has developed about 150 models of furnaces, designed for use in all areas of human activity without exception where heat generation is required. According to the type of specialization, “blacksmithing” is:
- heating;
- cooking;
- heating and cooking;
- baths
- outdoor, intended for smoking food, barbecuing and grilling;
- fireplaces with an open firebox, allowing you to admire the flames.
Examples of the Kuznetsov furnace
Interesting Facts
At the moment, there are simply a huge number of modifications of the heating stoves of Podgorodnikov and other engineers. And each of these models has its own highlight. For example, in Teplushka-15, the most popular model today, the shelf in front of the furnace is also a stove. The result is a stove, behind the cooking surface of which there is a chamber covered by a damper.
The left firebox in this model is intended for using the stove, and the right one is for heating. At the same time, the gas circulation in Teplushka-15 is organized in such a way that the smoke warms up the entire structure of the stove, no matter how it is used. The dimensions of this model are quite large. However, drawings of a smaller copy of Teplushka-15 have also been developed.
The efficiency of stoves of this type is higher than Russian ones. It may be considered interesting that Podgorodnikov managed to achieve such a result only because he guessed to use the theory of free movement of gases when developing his models. Previously, all attempts by other engineers to improve the Russian stove ended in failure.
Advantages and disadvantages of the design
- The stove cooks, fries, and heats water using a heating and cooking plate.
- The stove quickly warms up the room using a heating and cooking plate.
- In the furnace of a Russian oven you can bake bread, stew, bake, fry, and, if desired, make barbecue and cook healthy food.
- On the couch you can warm up, sleep, dry clothes and shoes.
- The stove shelf (cast iron cooking surface) can also become a place for a barbecue or smokehouse, since smoke from coals or smoking can easily leave the house through the smoke collector and chimney.
- The stove is suitable for permanent residence. If used regularly as a home heater, the stove will delight you with its efficiency. It’s not for nothing that her second name is housekeeper.
- During the implementation of the furnace, some improvements and changes were made.
How to cook
The heating stove heats the premises, thus very efficiently. Such structures heat up quickly and take a long time to cool down. Heats, as already mentioned, are considered quite convenient in terms of cooking. But of course, you need to use the oven in this way correctly. It is believed that you should start cooking, stewing or frying in the chamber or on the stove of a hotpot only when it is well heated and only coals remain in the combustion chamber.
As in a conventional Russian oven, all dishes can be placed in the oven of such equipment at the same time. Their subsequent preparation will therefore proceed synchronously. However, it is recommended to bake bread separately in modern Russian Podgorodnikov ovens, as in the middle of the last century. In this case, it will turn out especially tasty and aromatic.
What kind of building is this?
Kuznetsov’s devices were created more than 50 years ago and to date, more than 150 variants of various projects have been developed, each with its own characteristics and purpose. Main varieties:
- Cooking. This type of device is used for cooking. Mostly cast iron stoves are installed in such ovens, on which the entire cooking process is carried out.
- Bread room with oven. Cooking types of buildings are often combined with a bread machine.
- Heating. A two-bell stove for a home using the Kuznetsov system is an excellent alternative to gas or electric heating. Provided that it is properly installed and fired, it can heat a room even in severe frosts.
- Bathhouses. Kuznetsov stoves for baths are the most popular among other types. Most of these buildings, which can be found in almost every country house or dacha, are built according to Kuznetsov’s designs.
- Fireplaces with water circuit. Useful devices for everyday life. People who want to equip their home with hot water by firing a stove will certainly build a structure with a water boiler. The Kuznetsov bell stove with a water heating boiler is widely used in villages.
- Russian two-story. Wood-burning fireplaces with a stove bench have not lost their relevance, so they are actively used in everyday life.
In practice, several types of stoves are often combined into one model.
Brief biography of the creator
Hot stoves have been used to heat country houses for almost 100 years. Their creator I. S. Podgorodnikov was born in the city of Mogilev (Belarus), in 1886, into the family of a mechanic. After graduating from a real school, he entered the Technological Institute in St. Petersburg. After receiving a higher education diploma, Podgorodnikov got a job at the Putilov Shipyard.
During the revolution, the engineer tried to emigrate to Europe. It was difficult to do this then. To leave Russia, Podgorodnikov decided to walk to Crimea and try to board a ship. However, on the way, the engineer was detained by Red Army soldiers on suspicion of being a Denikin spy. Having found out that Podgorodnikov had nothing to do with the whites, he was simply taken out onto the road and released.
After this, Podgorodnikov changed his mind about traveling to Europe at risk to his life. Not believing his release, he went to Crimea, where he later married and got a job as a technician at a paper factory.
Even during his wanderings around the Central and southern parts of Russia for the purpose of emigration, Podgorodnikov drew attention to some imperfections of Russian stoves popular among peasants at that time. As an analytical person, he began to think about how to eliminate the shortcomings of such equipment.
Subsequently, Podgorodnikov shared his findings on this issue with Grum-Grzhimailo, an outstanding metallurgical engineer. Soon after this, he received an invitation to join one of the Moscow design institutes. Subsequently, Podgorodnikov’s main professional activity was the design of metal furnaces. However, in his free time he still continued to make bricks. The result of his efforts ultimately became a convenient and economical heating stove. Subsequently, it was this, essentially handicraft, model that won the enormous sympathy of the common people.
Preparatory work
First of all, you need to choose a place to build a furnace. The easiest way to do this is before building a house - then both the stove and the building are designed together so that three or at least two rooms are heated. With a ready-made house, the situation is more complicated. In this case, they tend to build the stove into an interior partition, since installing it into a load-bearing wall requires complex calculations and dangerous, time-consuming work (part of the wall will have to be dismantled, keeping the load from being blocked by a system of lintels and columns).
You can, of course, limit yourself to a simple wall-mounted arrangement, but then only one room will be heated.
A reinforced concrete foundation must be built at the selected location. Its dimensions must exceed the dimensions of the oven by at least 100 mm on each side. It is not allowed to combine the foundation of the furnace with the foundation of the building - both structures give different settlements and one of the foundations will pull the other along with it, causing it to skew.
A reinforced concrete foundation must be installed under the furnace.
The depth of the foundation depends on the bearing capacity of the soil, the depth of its freezing, and the method of operation of the building (periodically/continuously). Typically, in buildings with year-round habitation of people located on stable ground, the foundation is deepened by 400–600 mm. Crushed stone should be poured onto the bottom of the excavation as a reinforcing layer, and a sand cushion should be placed on top of it.
Then everything is done using traditional technology - they install the formwork, fix the reinforcement frame and fill it with concrete. You should proceed to the construction of the furnace only after the concrete has fully matured and gained sufficient strength - this usually takes about a month.
Before laying the 1st row, waterproofing of two layers of roofing felt or roofing felt must be laid on top of the foundation. The contours of the future furnace are drawn on it with chalk - this will make it easier to navigate.