How to install a surface pump in a well
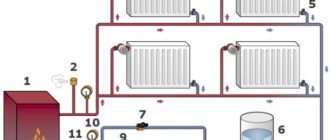
The instructions indicate that surface pumps can be installed in a well if its depth is up to 20 meters. In this case, water flows to the distribution points directly from the well. The connection diagram for a surface pump to a well includes the following equipment:
- A centrifugal pump that lifts water and supplies it to the house.
- The hydraulic accumulator softens the hydraulic shock. It consists of two parts separated by a membrane.
- The electric motor is connected to the pump and pressure switch.
- The pressure switch controls its level in the system. If there is a strong drop in pressure, the relay starts the motor, and if there is too much pressure, it turns it off.
- The pressure gauge is used to determine the value and regulate pressure.
- Water intake system with check valve.
- The main connects the pump and the water intake.
Installation diagram of a surface pump for a well
When installing a surface pump or station, you need to adhere to some rules that will ensure proper operation of the equipment:
- Stable water suction is ensured by close proximity to the well.
- The room must be ventilated, warm and dry.
- The location should not be cramped. During operation, preventive and repair work will be required.
- The room must absorb noise emitted by pumping equipment.
Suitable installation locations may include:
- The room is inside the house, but with poor sound insulation this will be a big disadvantage of the installation.
- Basement. In the absence of heating and insulation of floors and walls, additional funds must be spent on their preparation.
- Special well. But here it is difficult to maintain the required level of pressure and repair work is difficult.
- Caisson. The basic rule is the correct depth of the special installation site.
Tip: To install a pumping station for a well, it is best to arrange a separate room.
Connecting the pumping station
Selecting equipment and installation location is only half the battle. You also need to correctly connect everything into the system - the water source, the station and the consumers. The exact connection diagram of the pumping station depends on the selected location. But in any case there is:
- A suction pipeline that is lowered into a well or well. He goes to the pumping station.
- The station itself.
- Pipeline going to consumers.
All this is true, only the strapping patterns will change depending on the circumstances. Let's look at the most common cases.
Water supply from a well for permanent residence
If the station is installed in a house or in a caisson somewhere on the way to the house, the connection diagram is the same. A filter (most often a regular mesh filter) is installed on the supply pipeline lowered into a well or borehole, a check valve is installed after it, and then the pipe goes. Why a filter is understandable - for protection against mechanical impurities. A check valve is needed so that when the pump is turned off, water does not flow back under its own weight. Then the pump will turn on less often (it will last longer).
Installation diagram of a pumping station in a house
The pipe is led out through the wall of the well at a depth just below the freezing level of the soil. Then it goes into a trench at the same depth. When laying a trench, it must be made straight - the fewer turns, the lower the pressure drop, which means that water can be pumped from a greater depth.
To be sure, you can insulate the pipeline (lay polystyrene foam sheets on top, and then cover it with sand, and then with soil).
Option of passage not through the foundation - heating and serious insulation are required
At the entrance to the house, the supply pipe passes through the foundation (the passage place is also insulated); in the house it can already rise to the installation site of the pumping station.
This method of installing a pumping station is good because if everything is done correctly, the system works without problems. The inconvenience is that it is necessary to dig trenches, as well as to remove/introduce the pipeline through the walls, and also that when a leak occurs, it is difficult to localize the damage. To minimize the chances of a leak, take proven quality pipes and lay a whole piece without joints. If there is a connection, it is advisable to make an inspection well.
Detailed diagram of the piping of the pumping station when connected to a well or borehole
There is also a way to reduce the volume of excavation work: lay the pipeline higher, but insulate it well and additionally use a heating cable. This may be the only way out if the groundwater level is high on the site.
There is another important point - the well cover must be insulated, as well as the outside rings to the freezing depth. It’s just that the section of the pipeline from the water surface to the outlet into the wall should not freeze. This is why insulation measures are required.
Connecting the pumping station to the water supply
Often a pumping station is installed to increase the pressure in the water supply system during a centralized water supply. In this case, a water pipe is connected to the station input (also through a filter and check valve), and the output goes to consumers.
Connection diagram of the pumping station to the water supply system
It is advisable to install a shut-off valve (ball valve) at the entrance so that, if necessary, you can turn off your system (for repairs, for example). The second shut-off valve - in front of the pumping station - is needed to repair the pipeline or the equipment itself. Then it also makes sense to install a ball valve at the outlet - so that, if necessary, cut off consumers and not drain water from the pipes.
Well connection
If the suction depth of the pumping station for the well is sufficient, the connection is no different. Is it just that the pipeline comes out at the place where the casing ends. A caisson pit is usually installed here, and a pumping station can also be installed here.
Installation of a pumping station: connection diagram to a well
As in all previous schemes, a filter and check valve are installed at the end of the pipe. At the inlet you can install a filler tap through a tee. You will need it the first time you start.
The main difference between this installation method is that the pipeline to the house actually runs along the surface or is buried to a shallow depth (not everyone has a pit below the freezing depth). If the pumping station is installed at the dacha, it’s okay; the equipment is usually removed for the winter. But if the water supply is planned to be used in winter, it must be heated (with a heating cable) and insulated. Otherwise it won't work.
https://youtube.com/watch?v=_d3RXbFArls
Features of installing a well pump
Advice: The device should be installed below the water level in the well, but more than one meter from the “well supply” hole. In this case, the pump will be safe from the penetration of soil or sand particles into it and the possibility of overheating.
To install the pump in a well you will need:
- Plastic pipe. The element is lowered into the well along with the device, and during operation water will rise through it.
- Cable for insurance.
- Cable for connecting the motor.
Tip: Before installing a well pump, you need to thoroughly clean the installation site: pump out water from the well until the sand and silt completely disappear. To protect the pump from water hammer, it is necessary to install a check valve on the equipment.
You can install a well pump only after checking and adjusting the pressure that has established in the pressure tank. Its value should be 0.9 part of the switching pressure. Constantly pumped water cools the engine, which provides it with protection from overheating, and therefore premature failure. Regardless of the type of equipment selected, during installation of a well pump, it is necessary to check the operating point under different modes. To do this you need:
- Measure the design value of the water supply flow by measuring the filling rate of the volume.
- Take the pressure reading.
- Determine what current consumption is.
Moreover, if even one indicator is higher than the factory data, it will be necessary to close the valve, this will create additional resistance and will contribute to the correct establishment of the operating point.
Electrical diagram for connecting a pump for a well
Optional equipment
The direct scheme for connecting the unit to the network without the use of auxiliary equipment looks quite simple and is carried out by connecting pumping equipment to the contact group. However, this connection diagram may not be used in all cases. Moreover, most often the connection of a submersible well pump is done using automation. This makes it easier to maintain the water supply system and improves its performance characteristics. As a rule, the list of used automation includes the following elements:
- electric starters;
- intermediate relay (switches);
- pressure and liquid level control sensor;
- hydraulic tank
Purpose of automation
Thanks to the use of automation when installing well-type pumping equipment, it is possible to achieve automatic operation of the water supply system. The fundamental element of this system is a contactor with an open contact group. Power conductors are supplied to the contactor input, and a well pump is connected to the output.
In such a connection scheme, a hydraulic accumulator must be used, which is supplemented with a check valve. A pressure switch is installed next to the hydraulic tank, without which it is impossible to imagine the automation of pumping equipment. The relay controls the contact group and ensures the start and stop of pumping equipment when the pressure increases or decreases to a predetermined level in the water supply system.
Automation for a well pump works according to the following principle:
- When the pressure in the system drops to the set minimum, the relay sends a signal to turn on the pumping equipment. At this moment, the contacts of the working group are closed, and the power supply to the pump is turned on.
- As the system is filled with water, the pressure in the hydraulic tank gradually increases.
- When the pressure reaches the set maximum, the relay sends a signal to the contactor. As a result, the contacts open the circuit and the pumping equipment is automatically disconnected from power.
For water supply systems that work with significant volumes of liquid, it is not electric automation that is more suitable, but float sensors that automatically control the water level in the storage tank - the hydraulic tank. In principle, this connection diagram for pumping equipment does not differ from systems using automation. The only difference is that instead of a pressure switch, a level sensor is installed here.
Purpose of the hydraulic accumulator
The operating principle of the submersible unit involves starting it when the pressure in the water supply system decreases. However, frequent opening and closing of taps in the house will lead to frequent starts and stops of pumping equipment. Since even when the tap is open, the pump creates a fairly strong pressure, the unit can automatically turn off. As a result of this mode of operation, pumping equipment will quickly wear out and fail. To protect the engine from frequent starting due to pressure changes, the pump unit is connected through a hydraulic tank.
A hydraulic accumulator is a sealed steel container with a rubber bulb inside. The wall of the bulb, like a membrane, divides the tank cavity into two chambers: inside the first chamber (bulb) there is water, and in the second chamber (in the space between the walls of the bulb and the body) air is pumped. The pump pumps water into the bulb until the air pressure balances the water pressure. If you open any tap in the system, air will push water into the pipes.
Some hydraulic accumulators are made in the form of a container divided into two parts by a rubber membrane, and not with a bulb in the middle. In one part of the tank there is air, in the other - water is pumped. Their operating principle is the same. The volume of the hydraulic tank depends on the number of residents in the house and water consumption. For an average country house, a tank with a volume of 100 liters is sufficient.
The main purpose of the hydraulic tank:
- it maintains the pressure in the system at the required level;
- a certain amount of water is stored in the tank;
- The hydraulic accumulator reliably protects the water supply system from water hammer.
Relay selection
When choosing a hydraulic relay, you are guided by its range in the water supply; the standard value is 1.5 - 3 bar. When connecting using a pressure gauge, adjust it using the adjusting screws. Do the same with the dry-running relay, setting it to turn off the power when the pressure in the line is less than 1.5 bar. If a private house has a high number of floors, then to supply water with the required pressure to the upper floors, the relay is additionally adjusted, increasing the upper and lower response thresholds.
For example, if the height of the rise to the upper floors is 5 meters (1 bar corresponds to 10 meters of vertical water column), then 0.5 bar is added to the upper and lower response limits and the resulting response range is from 2 to 3.5 bar . The brand chosen for water supply at home must have the appropriate pressure range according to the passport.
Rice. 8 Pumping units with floats and electrolytic sensors
Types and depths of wells
The depth of immersion of the pump into the well largely depends on its parameters; when drilling, three main types are distinguished: Abyssinian, on sand, and artesian.
Abyssinian well
Abyssinian is the most affordable option from a financial point of view; its depth rarely exceeds 10 meters; the intake is carried out from the first aquifer (upper water). Drilling the Abyssinian is often done with your own hands using homemade drills; usually its channel pipe has a small diameter of 1.5 - 3 inches and is designed for water intake with a surface electric or manual mechanical pump.
The pipes lowered into the Abyssinian are equipped with a needle-shaped filter at the end; due to its light weight, it is located directly in the aquifer without sinking to the sandy muddy bottom - thanks to this, the water in the Abyssinian does not have sand and clay impurities. Although the Abyssinian spring has fairly clean water, the well is rarely used to provide a constant water supply to a residential building - its flow rate is too small.
Well in the sand
If water-bearing strata are not found at a shallow depth in the area, a sand well is drilled until water is found, the depth of which lies in the range from 15 to 60 m with an average of about 30 meters. This type is most common in individual water supply; when drilling, a column of plastic or steel pipes with a diameter of 100–160 mm is lowered into the shaft, which, due to its high weight, rests on the bottom of the water-bearing formation.
A perforated water filter is installed at the end of the column to purify water from sand and clay particles, but in many cases this is not enough and additional elements are installed in the pipeline that filter the water (sand, coarse and fine filters).
The use of pumping equipment for intake must take this factor into account (a large number of sand particles), so modifications are usually chosen for working with contaminated water. A well on sand, unlike an Abyssinian, has a higher flow rate and, most importantly, is suitable for water supply to an individual residential building, although its service life is short (depending on the size of the sand fractions) and averages about 5 years.
Rice. 2 Types of wells for installing a submersible pump
Artesian well
When searching for sources of artesian water, drilling is carried out to an aquifer with a calcareous bottom, while the depth of the borehole channel during domestic drilling can reach up to 200 m, and in industrial sources a threshold of about 300 m or more is considered normal. During installation, the casing with a special filter for large particles rests on a solid limestone bottom, which is free of clay and sand. Thanks to this, water from great depths is crystal clear and the only drawback is its high iron content. The deeper the aquifer is, the greater the pressure exerted on it by the higher layers of the earth - as a result, artesian springs have the highest flow rate and a constant static level.
Connecting the pumping station
Selecting equipment and installation location is only half the battle. You also need to correctly connect everything into the system - the water source, the station and the consumers. The exact connection diagram of the pumping station depends on the selected location. But in any case there is:
- A suction pipeline that is lowered into a well or well. He goes to the pumping station.
- The station itself.
- Pipeline going to consumers.
All this is true, only the strapping patterns will change depending on the circumstances. Let's look at the most common cases.
Water supply from a well for permanent residence
If the station is installed in a house or in a caisson somewhere on the way to the house, the connection diagram is the same. A filter (most often a regular mesh filter) is installed on the supply pipeline lowered into a well or borehole, a check valve is installed after it, and then the pipe goes. Why a filter is understandable - for protection against mechanical impurities. A check valve is needed so that when the pump is turned off, water does not flow back under its own weight. Then the pump will turn on less often (it will last longer).
Installation diagram of a pumping station in a house
The pipe is led out through the wall of the well at a depth just below the freezing level of the soil. Then it goes into a trench at the same depth. When laying a trench, it must be made straight - the fewer turns, the lower the pressure drop, which means that water can be pumped from a greater depth.
To be sure, you can insulate the pipeline (lay polystyrene foam sheets on top, and then cover it with sand, and then with soil).
Option of passage not through the foundation - heating and serious insulation are required
At the entrance to the house, the supply pipe passes through the foundation (the passage place is also insulated); in the house it can already rise to the installation site of the pumping station.
This method of installing a pumping station is good because if everything is done correctly, the system works without problems. The inconvenience is that it is necessary to dig trenches, as well as to remove/introduce the pipeline through the walls, and also that when a leak occurs, it is difficult to localize the damage. To minimize the chances of a leak, take proven quality pipes and lay a whole piece without joints. If there is a connection, it is advisable to make an inspection well.
Detailed diagram of the piping of the pumping station when connected to a well or borehole
There is also a way to reduce the volume of excavation work: lay the pipeline higher, but insulate it well and additionally use a heating cable. This may be the only way out if the groundwater level is high on the site.
There is another important point - the well cover must be insulated, as well as the outside rings to the freezing depth. It’s just that the section of the pipeline from the water surface to the outlet into the wall should not freeze. This is why insulation measures are required.
Connecting the pumping station to the water supply
Often a pumping station is installed to increase the pressure in the water supply system during a centralized water supply. In this case, a water pipe is connected to the station input (also through a filter and check valve), and the output goes to consumers.
Connection diagram of the pumping station to the water supply system
It is advisable to install a shut-off valve (ball valve) at the entrance so that, if necessary, you can turn off your system (for repairs, for example). The second shut-off valve - in front of the pumping station - is needed to repair the pipeline or the equipment itself. Then it also makes sense to install a ball valve at the outlet - so that, if necessary, cut off consumers and not drain water from the pipes.
Well connection
If the suction depth of the pumping station for the well is sufficient, the connection is no different. Is it just that the pipeline comes out at the place where the casing ends. A caisson pit is usually installed here, and a pumping station can also be installed here.
Installation of a pumping station: connection diagram to a well
As in all previous schemes, a filter and check valve are installed at the end of the pipe. At the inlet you can install a filler tap through a tee. You will need it the first time you start.
The main difference between this installation method is that the pipeline to the house actually runs along the surface or is buried to a shallow depth (not everyone has a pit below the freezing depth). If the pumping station is installed at the dacha, it’s okay; the equipment is usually removed for the winter. But if the water supply is planned to be used in winter, it must be heated (with a heating cable) and insulated. Otherwise it won't work.
https://youtube.com/watch?v=_d3RXbFArls
WINTER OPTION WITH INSTALLATION OF METAL CAISSON
A caisson is an underground metal structure (chamber) located directly above the well, welded hermetically to the casing, and performs several functions:
- Protects the wellhead from flooding and pollution by flood waters.
- Protects the system from freezing and makes it possible to operate the well all year round, and not just in the warm season.
- Makes it possible to place equipment (battery tank, control unit and cable and pipe distribution) directly above the well, in the absence of a special room in the house.
- Provides convenient access to equipment for inspection, repair or maintenance.
| When constructing a turnkey well, the caisson neck cover is at least 5 centimeters above the ground. | When constructing a well in winter, the caisson neck is additionally insulated. | When constructing a turnkey well, all water-lifting equipment is installed in the caisson. |
WINTER OPTION WITH INSTALLATION OF WELL ADAPTER
The cost of installing a water well according to the “winter option” can be reduced by refusing to install a caisson, “replacing” it with a well adapter, which is installed on the casing and allows you to bring the water pipe below the freezing level.
However, the downhole adapter has many disadvantages (complexity of installation on a two-pipe well, difficulties with lifting a pump located at a depth of 60 m, extreme difficulty in installing a pumping unit at a depth of over 60 m, etc.).
Another inconvenience is the need to place a hydraulic storage tank and automatic control in the house. Having weighed all the pros and cons, the conclusion does not allow us to talk about the advantage of the downhole adapter (except for the price) over the caisson.
| The downhole adapter is installed at a depth of 1.8 meters, and the well cover covers the casing. | To construct a well without a caisson, a well adapter and a well cap are used. | To set up a turnkey well, you need a high-quality well adapter and cap. |
SUMMER OPTION FOR WATERING AN AREA WITH INSTALLATION OF A WELL CAP
If you are going to use the well exclusively for summer irrigation, then the option for its arrangement will be the least labor-intensive and, accordingly, the cheapest.
After all, you only need to install a pump with a water-lifting pipe and a well head.
If desired, you can install compact automation that allows you to control the well pump depending on the water intake, without using bulky hydraulic storage tanks.
| Summer arrangement of a well for irrigation. | Summer construction of a water well. | Summer well construction. |
| Summer well construction without a caisson. | Summer well construction price. | Summer well construction on a turnkey basis. |
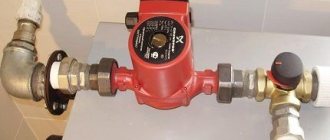
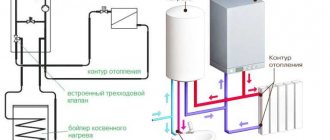
Why install a circulation pump
If you are faced with problems of uneven heating of the heating system around the house, you can solve it in two ways:
- Replace all heating pipes by installing larger diameter pipes;
- Or install a circulation pump in the system.
Obviously, installing a circulation pump is much cheaper and more practical than replacing pipes. By installing a circulation pump into the system, you can solve several problems:
- The heating of heating devices will be more uniform;
- The heating system circuit will expand significantly;
- The pump will eliminate the problem of air locks.
The pump will make it easier to shower and use other plumbing fixtures at home at the same time. By the way, you can always buy cheap shower cabins. Moscow is full of surprises and the TM Titan online store is one of them.
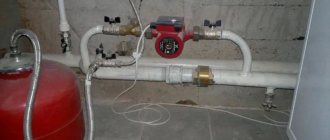
It is worth noting that to install a circulation pump in a ready-made heating system, you do not have to do complex installation work. Insertion technology is used.
Prices for installation of pumping equipment
Below are typical estimates for the installation of pumping equipment (installation of a caisson or well adapter, well pump and automation) at various pump installation depths: from 20 meters to 100 meters in increments of 10 meters.
The cost of installing a well pump, caisson and automation includes transportation costs up to 30 kilometers from the Moscow Ring Road.
Price table for well construction
| Pump installation depth | Construction of an artesian well | |||||
| With caisson | With borehole adapter | |||||
| rub. | rub. | rub. | rub. | rub. | rub. | |
| 20 meters | 83180 | 87975 | 117240 | 57800 | 62595 | 100560 |
| 30 meters | 88180 | 93125 | 120240 | 62800 | 67745 | 103560 |
| 40 meters | 91080 | 96025 | 127713 | 65700 | 70645 | 111033 |
| 50 meters | 96230 | 100725 | 140919 | 70850 | 75345 | 124239 |
| 60 meters | 102530 | 107025 | 150609 | 77150 | 81645 | 133929 |
| 70 meters | 107230 | 115425 | 153859 | — | — | — |
| 80 meters | 110130 | 118325 | 158873 | — | — | — |
| 90 meters | — | 121225 | 162123 | — | — | — |
| 100 meters | — | 124125 | 165373 | — | — | — |
Installation of a submersible electric pump for installation in a well
To install a submersible electric pump in a well, work is performed in the following order:
- Screws a plastic adapter coupling into the outlet of the unit to connect the pressure pipeline. If there is no built-in check valve, install your own, mounting it first at the outlet of the electric pump, then screw on the fitting for connecting HDPE pipes.
- They attach a pipe to the pump and fix it with a plastic cuff, thread a cable through the ears of the housing and connect its ends at the outlet using two special clamps, the free end is screwed to the main cable with electrical tape.
- Connect the power cable, cable and pressure hose together using electrical tape or zip ties in 1 meter increments, making sure that the power cord is secured without tension.
- The electric pump is lowered into the well to a predetermined depth. To do this, measure and cut the pressure pipe to the required length, insert it into the head, to which the cable is tied.
- After a dive, you can immediately check the operation of the electric pump without connecting to the pipeline, if the liquid supply corresponds to the passport data, connect the entire water line and then monitor and regulate the operation of the equipment with automatic devices.
Rice. 8 Preparing the downhole electric pump for immersion
To connect a well pump to a water supply system, devices are used that automate its operation, prevent frequent startup and reduce the load on the line. They can be independently assembled in one module, installed in a living space, or left in a caisson pit with a borehole head.
Purpose of the pump for heating
Previously, circulation pumps were used only in centralized heating systems, and for private housing construction the natural movement of the coolant caused by temperature differences was the norm.
Now forced circulation is used everywhere thanks to the emergence of compact and inexpensive models designed to service the heating networks of small houses and cottages.
With the advent of circulation pumps, the number of circuit solutions has expanded. It became possible to lay long highways of varying complexity, while the dependence on slope practically disappeared
Due to the increase in the speed of movement of the coolant in the pipeline, thermal energy flows faster to the heating radiators, and accordingly, the rooms are warmed up faster. The load on the boiler has decreased because the water is also heated faster.
The need to install bulky and inconvenient large-diameter pipelines has disappeared; contours have become easier to camouflage under floor coverings or be buried in walls.
It has become possible to install a “warm floor” system on any floor of a private house, which operates effectively only at a certain pressure in the network
The main disadvantage of pumps for heating systems is their dependence on electricity. If the power supply is intermittent or there is a risk of a complete power outage for some period, it is necessary to install a backup power generator or at least an uninterruptible power supply.
The remaining disadvantages relate to the designs and functionality of various types of devices. For example, monoblock units and devices with a dry rotor are noisier and require constant maintenance, while a pump with a wet rotor is demanding on the quality of the coolant and has a pressure limitation.
Connecting a deep-well pump to a water supply system
When installing an individual water supply system, even at the stage of drilling operations, you should know the diameter and material of the pipeline, the depth of the water line, the operating pressure in the system for which the equipment is designed. When installing and turning on the water supply, follow the following recommendations:
When using a plumbing system in winter, you will have to take measures to protect it from the cold. Typically, pipes are laid underground and they must exit from the well head, so a caisson pit will be needed to install and maintain the equipment. To make it more convenient and reduce the depth, the water line is insulated and heated with an electric cable.
Rice. 6 Assembling a pumping station with your own hands - main steps
- When determining the immersion depth of the electric pump, set the dynamic level with the equipment turned on and suspend the unit 2 meters below the set mark; the minimum distance to the bottom for deep models is 1 meter.
- When using sand wells, it is necessary to install sand filters or rough cleaning filters in the water line in front of the equipment.
- Electric pumps change their pumping efficiency when the supply voltage changes, so for stable operation it is better to purchase a voltage stabilizer and connect the equipment to it.
- For ease of operation and maintenance, the pumping station is often assembled with your own hands. A pressure gauge and pressure switch are mounted on the hydraulic accumulator using a standard five-inlet fitting, but since there is no pipe for attaching the dry-running relay, it will have to be installed on an additional tee.
- Often electric pumps have a short power cable, not long enough to connect to the mains. It is extended by soldering a similar one with further insulation of the connection point with a heat-shrink sleeve.
- The presence of coarse and fine filters in the water supply system is mandatory. They must be placed before the automatic control system, otherwise the ingress of sand and dirt will lead to their incorrect operation and breakdown.
Rice. 7 Placement of automatic equipment in a caisson pit
Connection sequence
Connection to a well and borehole
First, let's look at how to properly connect a pumping station to a well or well.
In this case, we will pay attention specifically to the two-pipe connection diagram, since it is more complex. We work in this order:
- First, we assemble the ejector with our own hands. As a rule, this is a monolithic unit made of cast iron, which has three outlets.
- We install a coarse filter made of propylene mesh at the lower outlet of the ejector.
- There is a plastic socket at the top of the cast iron structure. You need to put a squeegee of the required length with a diameter of 32 mm on it.
- Next, you need to assemble a squeegee to fit the diameter of the pipeline. Usually two parts with adapters are enough for this.
- A bronze coupling is installed at the outlet of this outlet. With its help, the transition to the polyethylene pipe will be made.
- Next, trenches are dug from the hydraulic structure to the house below the freezing point of the soil.
- Water pipes are laid in the trenches.
- A cap is installed at the exit of the well casing. If you can't find it, you can use a knee with a smooth angle.
- To connect the ejector to the water supply pipeline, couplings are used.
- Before lowering the second end of the pipe, it must be passed through the elbow at a right angle.
- Polyurethane foam is used to seal the space. After this, the pipe can be connected to an adapter (angular), and it, in turn, must be connected to the outer part of the water supply.
- Now you can lower the ejector into the well. In this case, the immersion depth must be determined in advance, taking into account the elevation of the top of the casing pipe.
- The head is fixed to the casing using reinforced sanitary tape.
Features of connecting to the water supply
If there are centralized water supply networks near your home, then the pumping station can be connected to them. Typically, the need for such a connection arises when the pressure in the system is too low, which does not allow the heating equipment to function efficiently and correctly. This situation can arise for several reasons:
- the hydrogeological conditions of the area have changed;
- outdated equipment is used;
- As the number of residents has increased, water consumption needs have become greater.
To connect to the central water supply you need to perform the following sequence of actions:
- The place where the pipeline will be disconnected is selected in advance. After stopping the water supply, the water supply is divided into two parts.
- So the part that comes from the city highway is connected to the storage tank.
- The liquid from this tank must flow through pipes to the pumping unit. A pipeline leading to a residential building is connected to the outlet from the pump.
- Next, the electrical wiring is laid and connected.
- After this, you can perform a test run, configure and adjust the equipment.
The main thing in setting up a pumping unit is to select the correct pressure in the system. To adjust the equipment, a small amount of water (about 2 liters) is poured into a special hole on the pump unit. Now you need to open the tap and measure the pressure in the system at which the pump turns off and on.
If the pressure at which the unit operates does not fall within the specified limits, it is necessary to adjust the device. It's very easy to do this:
- The cover on the pressure switch opens.
- To adjust the device shut-off pressure, use a screw marked “DR”. It needs to be twisted towards decreasing or increasing depending on the results.
- To adjust the switching pressure, you need to turn the screw marked “P”.
- After adjustment, the cover on the relay is put in place.
Also, do not forget that the long-term and proper operation of pumping equipment is affected by the composition of the water, namely various admixtures of sand and clay. To protect the equipment from impurities, a filter is installed at the suction inlet of the station.
Installing a pump in a well
An important point when carrying out water supply work for a country house is the proper installation of the pump in the well. If the equipment is installed correctly, this is a guarantee of its long and uninterrupted operation.
Despite the fact that there is nothing complicated in installing a pump in a well, there are also some nuances that should be taken into account before starting work.
Important criteria when selecting water supply equipment
If the water supply equipment was selected incorrectly, installing a well pump can be a rather difficult task. The parameters that must be taken into account when choosing pumping equipment include the following:
- Dynamic and static level of a water artesian well. You can find this information in the installation passport. If you do not have such data, for example, due to the loss of documents, do not panic - this information is restored experimentally;
- To calculate the required volume of water that must be provided by the installed equipment, count the number of water consumption points. These include a sink, bathtub, shower, toilet, washing machine, dishwasher, etc.;
- Distance between the house and the water trunk.
What are the dangers of unqualified installation of a pump in a well?
If errors were made during the installation of downhole equipment or low-quality materials were used, this can cause a number of negative consequences. There are often cases when work performed by non-professionals leads to breaks in water-lifting products, the impossibility of dismantling when replacement is necessary, as well as premature breakdowns of pumps.
The first two scenarios, when the old equipment cannot be removed from the well, jeopardize the possibility of its subsequent use. Because of this, all the work has to be done anew: they drill another well, install a new caisson, since using the old one is impractical, and install new equipment.
Types of pumps for wells and their functions
Pumps for supplying water from a well can be immersed in narrow wells to great depths or mounted on the surface. The operating principle of the device and its installation is as follows:
- Its main elements are impellers mounted on one shaft.
- Their rotation occurs in diffusers, which ensures the movement of liquid.
- After the fluid passes through all the wheels, it exits the device through a special discharge valve.
- Fluid movement occurs due to pressure differences, which are summed up across all impellers.
There are several types of such equipment:
- Centrifugal. Such a pump allows the supply of clean water without large contaminants.
- Auger. This is the most common device, capable of pumping liquid with an admixture of particles per cubic meter of no more than 300 grams.
- Vortex. Transfers only water purified from contaminants.
Despite the differences, all types of pumps serve to perform similar functions:
- Supply groundwater to private houses and cottages.
- Participate in the organization of irrigation systems.
- Pump liquid into tanks and containers.
- Provide comprehensive water supply in automatic mode.
When choosing a pump for a site, the following criteria are taken into account:
- Initial equipment dimensions. They need to be taken into account to ensure certain technological tolerances when placing the pump in the well.
- Power of the electricity source. Borehole pumps are manufactured single- and three-phase.
- Device power. This parameter must be determined in advance based on the calculated pressure and water consumption.
- Pump cost. In this case, it is necessary to choose the right price-quality ratio of equipment.
Types of household pumps
Pumps for wells are divided into submersible and surface. Such units have some advantages over others:
- Large water intake depth, which is inaccessible to any other type of pump.
- Ease of installation.
- No rubbing parts.
- Low noise level.
- Long service life.
The photo shows the types of submersible borehole pumps.
Submersible Well Pumps
Advice: It is very important to ensure that the equipment is properly and correctly arranged and to use only high-quality materials. Violation of installation technology or the use of poor materials can lead to:
Violation of installation technology or the use of poor materials can lead to:
- Pump breakage.
- Its premature failure.
- When dismantling, it is impossible to lift the pump.
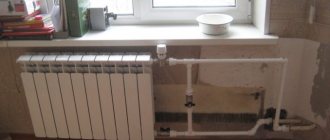
Connection diagram of a pumping station to a well at the dacha
The pumping station can be placed inside the well, if there is space for this; in addition, utility rooms are often allocated for it in the house itself or in the room
Pay attention to the depth at which the pipeline will be located. The pipe must not only be insulated, but also placed below the freezing depth of the soil so that the water in it does not freeze during the cold season
In order for the system to work correctly, you need to choose not only the type of pump, but also the depth at which it will operate. The deeper the water source and the farther it is from the building, the more powerful the pump itself should be. There should be a filter at the end of the pipe; it is located between the pipe and the pump, protecting the latter from debris getting into the mechanism.
It is usually written on the devices what depth they are designed for, but it is worth taking a more powerful one, since the calculation is carried out only from the bottom of the well to its surface, without taking into account the distance to the building. It is easy to calculate: 1 meter of vertical pipe location is 10 meters of its horizontal location, since it is easier to supply water in this plane.
Depending on the type and power of the pump, the pressure may be stronger or weaker. It can also be calculated. On average, the pump provides 1.5 atmospheres, but this is not enough pressure for the normal operation of the same washing machine or hydromassage; the water heater may require a higher temperature.
In order to control pressure, the equipment is equipped with a barometer. Depending on the pressure parameter, the size of the storage tank is calculated. The productivity of the station also plays an important role. This parameter indicates how many cubic meters per minute the pump is capable of delivering. You need to calculate based on peak water consumption, that is, when all the taps in the house are open or several consumer electrical appliances are running. In order to calculate which pumping station for a well is suitable, you need to know the productivity. To do this, you need to add up the number of water supply points.
From the point of view of power supply, it is more convenient to use those systems that are powered from a 22 Volt network. Some stations operate on 380 V phases, but such motors are not always convenient, because a three-phase connection is not available in every home. The power of a household station may vary, on average it is 500-2000 W. Based on this parameter, RCDs and other devices that will work together with the station are selected. To prevent the structure from overheating, many manufacturers install automation that will turn off the pumps in the event of an emergency load. The protection also works if there is no water in the source when power surges occur.
How to calculate the volume of a hydraulic accumulator?
The size of the tank determines how often the pump motor will turn on. The larger it is, the less frequently the installation operates, which allows you to save on electricity and increase the service life of the system. A hydraulic accumulator that is too large takes up a lot of space, so a medium-sized one is usually used. It holds 24 liters. This is enough for a small house inhabited by a family of three.
Trailer operation of hydraulic accumulator expansion tank
If up to 5 people live in a house, then it is better to install the tank at 50 liters; accordingly, if there are more than 6 people, it should be at least 100 liters. It is worth noting that the standard tanks of many stations hold 2 liters; such a hydraulic tank can only cope with water hammer and maintaining the required pressure; it is better not to save money and immediately replace it with a larger one. It is the number of water users in the house that will determine which pumping station to choose for the dacha.
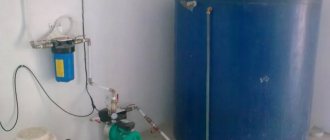
Water purification
Do not forget that water from a well, even if it is suitable for drinking, may have impurities, for example, sand, small stones, and various debris may get into it, which can be gotten rid of by using a special water purification system. The most commonly used filters are filters. They are placed outside to make them easy to change. They can have different fractions and purify water to varying degrees. At the output, deep fine filters are used.
Models
- Gilex.
- Vortex.
- Ergus.
- Bison
- Gardena.
- Wilo SE.
- Karcher.
- Pedrollo.
- Grundfos.
- Wilo.
- Poplar.
- Unipump.
- Aquario.
- Aquarius.
- Biral.
- SFA.
- Vortex.
- Waterstry.
- Zota.
- Belamos.
- Pedrollo.
Before choosing a pumping station for a summer house with a well, it would not be superfluous to find out how things are with servicing the products of the selected manufacturer, and whether there are nearby dealers who can provide spare parts.
Recommendations for choosing a pump for a well
Among the various types of pumping equipment used for pumping water from a well or well, submersible devices are the most popular. This popularity is explained by a number of advantages of submersible pumps, which include:
- no noise during operation;
- the ability to ensure uninterrupted water supply from a serviced well;
- ease of installation;
- the ability to provide water supply from wells of considerable depth;
- compact dimensions;
- no need for additional cooling of the drive motor;
- anti-corrosion properties of the materials from which the body is made.
When choosing such a device, you should pay attention to such parameters as:
- the total demand of water intake points for water, which the selected pump must provide;
- characteristics of the well from which water is to be pumped (diameter and depth);
- geological data of the area where the well was drilled (depth at which groundwater is located, soil type, etc.);
- the presence of a power source at the site where it is planned to install pumping equipment.
The main technical characteristics by which pumping equipment is selected are:
- the performance of the device, which characterizes how much liquid it is capable of pumping per unit of time;
- pressure (this parameter, measured in meters of water column, indicates to what height and distance the pump is capable of transporting liquid through the pipeline system).
This approach when choosing pumping equipment will give you the opportunity to further modernize your pumping station if the need arises.
Installing deep-well pumps, as a rule, does not cause any particular difficulties; it can be done even without experience in carrying out such procedures. When operating submersible pumps, as well as any other type of pumping equipment, one should not forget about their regular maintenance, which will significantly extend the life of their trouble-free use.
Procedure for installing a water pressure system
The location of the devices must provide access for maintenance and control of the operating mode. It is imperative to provide for the ease of replacement of non-working parts. Take care in advance about protection from precipitation and freezing. To connect the submersible pump to the electrical network, you must use a special cable marked VPP or KVV. The insulation of these wires is designed to last for a long time in water, without loss of flexibility and insulating properties. The imported analogue is labeled AQUA RN8.
We recommend connecting the well pump to electricity through an RCD, which is necessary to monitor the insulation of the included devices and cable. After all, a problem identified and resolved in time means a saved budget and nerves for the head of the family.
To install the pump and run water through the pipes we will need:
- the water-lifting unit itself;
- special tank - hydraulic accumulator;
- pressure switch, selected for the capacity of the hydraulic accumulator tank;
- American coupling for connecting the pressure switch to the hydraulic accumulator;
- collet coupling, for changing from size to size;
- brass adapters;
- fittings, plastic pipes, FUM tape.
As a rule, the installation and connection of a submersible pump begins with tying up the hydraulic accumulator and installing equipment on it. All stages of assembly are presented in order in the photo:
The first stage is the preparation process. In the second photo, we use FUM tape to wind the threaded connection. Next, we install the “American” connection, which allows for simple assembly and disassembly in the future. The fourth and fifth pictures show the installation of a pressure switch and pressure gauge for visual monitoring of the process in the system. After this stage, the process of installing an outgoing bend from a PVC pipe to a tee with sensors is demonstrated. The eighth and ninth photos show the installation of the collet clamp and the water supply pressure pipe. The tenth picture shows the installed group connected to the water supply. Well, the last steps are opening and connecting to the relay block.
If your system consists of one automation unit, a pressure sensor, then the terminals of this device will indicate the input “LINE” and the output “MOTOR”. That is, the input from the “LINE” socket and the connection of the “MOTOR” submersible pump. More advanced automation consists of an electronic unit.
The pump start control unit ensures an uninterrupted supply of water to the system, protecting the engine from running dry, reacting to the presence and level of water around the pump. The unit produces a smooth start and smooth stop, extending the engine's service life, and monitors its operating mode.
Control unit diagram:
Dry running is the operation of the engine without a sufficient amount of water or without it, which causes overheating of the working windings of the engine, destruction of the insulation, and failure of the motor. This is because water in deep-well pumps plays the role of a coolant, because... passes through it and cools the case.
Finally, we recommend watching videos that clearly demonstrate the technology for assembling a water pressure increasing system, as well as the process of installing a submersible pump in a well:
So we have provided step-by-step instructions for connecting a submersible pump to the network and water supply system. As you can see, it’s not too difficult to do everything yourself, the main thing is to have a suitable installation diagram at hand, and also to know some of the nuances that we talked about in this article!
It will be interesting to read:
- Heating of water pipes with cable
- Economical heating system for a private home
- Connection diagram for a pump with a float
How to Determine the Required Source Depth
The borehole pump must be installed at a certain depth of the water source. When using a well as a source of water supply, the static and dynamic levels of the location of the pumped liquid medium in it are taken into account. The static level is understood as the distance at which the surface of water, in a calm state, is located from the surface of the earth. At the dynamic level, water is in the well after it begins to be pumped out.
Dynamics of a water column in a well
In order for submersible pumping equipment to function effectively and be cooled efficiently by the liquid medium it pumps, it should be located in the well at a level at least 30 cm below the dynamic level. If the thickness of the water layer allows, then it will be better if the deep pump is installed at a level located 2–3 m below the dynamic level. It should be taken into account that the pump installed in the well should be located at a distance of at least 1–2 m from its bottom.
What is well automation?
Automatic control systems include electronics (pressure switch, idle speed, flow), pressure gauge, accumulator or modules in which these elements are combined - all of them are responsible for the optimal functioning of the water main.
In the water supply line, automation performs the following role:
- Controls the electric pump, turning it off as the line fills. In high-tech systems, instead of turning it off, it is used to adjust the rotation speed of the electric motor.
- Protects the water main from water hammer and helps create some water reserves in the event of equipment breakdown or power outage.
- Includes protective devices for the pump that interrupt the flow of electrical current to it in the event of a lack of water at the source.
Rice. 2 Example of a borehole water intake source
Recommendations for pump placement and positioning
When calculating to what depth to immerse the pump in the well and the location of the pump in the well, it is useful to follow the following recommendations:
- The electric pump should not come into contact with the walls of the column, so it is hung strictly in the center of the head.
- When the electric pump is lowered into a well in sand below the dynamic level, it is better to make the distance from the surface of the water a little more than recommended, for example, 5 meters. This will help to avoid the unpleasant consequences of a situation when, during operation, the source silts up, its flow rate and, accordingly, the dynamic threshold decreases. In order to lower the electric pump deeper in the future, you will have to lengthen or change the water pipe and cable cut to fit the head - this will lead to unjustified financial expenses.
- If, according to the parameters of the well, the electric pump must be located in the bottom area, it is better to use screw types - they cope better with pumping contaminated water, and replacing their simple parts is cheaper.
Rice. 9 Lowering the pump into the well
When placing an electric pump in a well, it is advisable to use such characteristics as dynamic and static level. Lowering the pumping equipment slightly below the dynamic mark contributes to less load on the body and working mechanism of the unit, the intake of cleaner water from the source, saves materials and simplifies maintenance.
Basic installation and connection diagrams
The most common schemes are:
- Diagram of direct connection of the device to the supply pipeline.
- Scheme with a storage tank.
Direct connection involves placing the station between the water intake and the in-house pipeline. Water is directly sucked from the well and supplied to the consumer. With this installation scheme, the equipment is located in a heated room - in the basement or basement. This is due to the fear of low temperatures. Freezing of water inside the device can cause its failure.
However, in regions with relatively mild winters, it is possible to place a water pumping station directly at the top of the well. To do this, a well buried in the ground is built above it, which is insulated to prevent the water inside the pipeline from freezing. If necessary, it is possible to use an electric heating wire. We will discuss all aspects of choosing an installation location in more detail below.
The connection diagram for a station with a storage tank looks slightly different. Water from the source is not supplied directly to the in-house system, but to a special volumetric storage tank. The pumping station itself is located between the storage tank and the internal pipeline. Water is pumped to the water collection points by the station pump from the storage tank.
Thus, in this scheme two pumps are used:
- A deep-well pump pumping water into the storage tank.
- A pumping station that supplies water from a storage tank to the water supply system.
The advantage of the scheme with a storage tank is the presence of a sufficiently large amount of water in it. The volume of the tank can be several hundred liters, and even cubic meters, and the average volume of the station’s damper tank is 20-50 liters. Also, a similar version of the water supply system is suitable for artesian wells, when one way or another it is necessary to use a deep pump.