Before you start building any type of stove yourself, we recommend that you understand the principle of operation and the features of its design.
Kuznetsov stoves are created in the image of an ordinary Russian stove, but their fundamental difference is in a completely new use of hot gases. In Kuznetsov furnaces, gases move not due to draft, but due to their own gravity. This movement of air is called the free movement of gases, due to which the highest quality heating of the room occurs. In addition, laying Kuznetsov stoves (or arranging them) is not at all difficult.
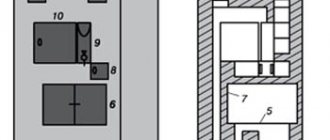
Diagram of the location of the stove in the house. To carry out a full range of work, the following materials and tools will be required:
- red stove brick;
- fireclay brick;
- fireclay clay;
- purified sand;
- grate bars, valve, ash door, wire, steel angle;
- trowel (trowel);
- bushhammer;
- plumb line;
- level 1.5 m;
- Bulgarian;
- abrasive;
- landing block;
- nylon cord;
- electric drill;
- mixer.
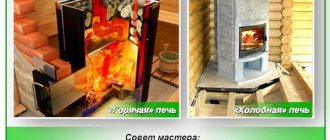
When starting the construction of such a furnace, it is necessary to determine the purposes for which it is being created. Heating of the room can be carried out by bell-type stoves without any additional functions. And if you also need to cook food, you need to build a cooking and heating stove that will not only heat, but also feed. Its design, in addition to the firebox, includes a built-in stove and oven.
One property of all bell-type furnaces is associated with this feature. Ignorance of it leads not only to savings, but also to loss of up to 20% of heat.
Kinds
According to their purpose and design features, blacksmiths can be divided into several types:
- Heating. The devices are designed for efficient and safe heating of premises.
- Cooking. Used for cooking. This includes ovens for baking bread and bakery products.
- Bathhouses. The Kuznetsov bathhouse stove is designed for simultaneous heating of the main bathhouse premises. Such devices have high heat transfer with minimal fuel consumption.
- Street. A stove complex consisting of a grill or barbecue for outdoor cooking.
- Fireplace. The equipment is used as a decorative element of the interior or as an additional heating option. Some fireplace stoves are equipped with special loungers for a pleasant leisure time.
The most popular are complex devices that are distinguished by their multitasking. A striking example is the Kuznetsov heating and cooking stove, which is intended both for heating residential premises and for preparing food.
Despite their functional features, all stoves operate on the same principle - effective distribution of heated gases in the bell into separate streams.
It is noteworthy that stove hoods can be equipped with additional equipment - electric heaters, hot water tanks, steam generators, oven and stove.
A competently designed and constructed Kuznetsov sauna stove will provide reliable heating in all functional rooms: steam room, washing room, dressing room, rest room. In addition, it will allow you to quickly heat water, accumulate hot steam and purify the air.
Varieties for different purposes
Igor Kuznetsov and his team have created a large number of universal and specialized models. Some are intended only for heating rooms, others are supplemented with elements for cooking or heating water. Fireplaces are a separate area.
Drawings of options tested in practice are collected on the inventor's website. For convenience, the structures are assigned alphanumeric designations.
Heating
Kuznetsov's heating stove for a two-story house allows you to save on fuel.
Various dome layout options make it possible to construct designs for heating one- and two-story houses.
Heating models are abbreviated as OIK (heating models by I. Kuznetsov). You can find options with a firebox located inside the room or in the utility room.
For variety and to give the desired qualities, there are stoves supplemented with warm beds (OIK -6 bed. AND OIK 19 bed.) and seats (OIK-7s).
Some products have built-in ovens. In this case, the letter D is added to the code designation, for example, OIK-5D.
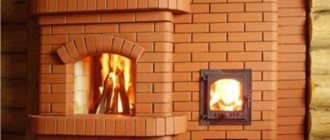
Heating stoves also include stoves with a built-in fireplace.
Models RTIC (Russian heated heater by I. Kuznetsov) are needed for heating large rooms. They are massive and need a strong foundation.
Options with fireplace
Model with a fireplace
Fireplaces, in addition to their heating function, serve as interior decoration. In this case, the firebox is open, the fire can be observed visually. The stoves are equipped with a firebox for conventional heating, which can be located on the facade, on the right, left side, or behind.
For construction, they choose an option in which it is convenient to service the stove from a utility room or hallway - you do not have to carry firewood into the living room. Working with waste (ash) also does not imply inevitable dirt in the room when cleaning the ash pan and the vent from the hallway.
Options for OIK-K have been developed with couches, built-in ovens and a corner fireplace.
Boilers
To organize a water heating circuit, options have been developed with the designation KIK (I. Kuznetsov boiler). A steel heat exchanger is built into the second dome. Water circulates through the system due to an electric pump.
Models are designed for power of 16, 17, 34 and 64 kW. The first option (16 kW) is equipped with a hob.
Heating and cooking
A heating and cooking model is a structure that completely exhausts the fuel resource.
Universal heating and cooking stoves are designed for homes with year-round occupancy. The model has built-in hobs and ovens, shelves for heating food and water.
The firebox can be located on the front or side, which allows you to choose an option for any interior design.
Installation of a bed is available as an option. For large rooms, elongated fireboxes are made, which allows the use of large-caliber firewood. They burn longer and you will have to add fuel less often.
The size of the hob depends on the composition of the family. For 2–3 people, choose a reduced surface, which saves fuel.
For the bath
I. Kuznetsov singled out sauna stoves as a separate area. There are three varieties: BIC, BIC BC and BIC PC. The abbreviation BIC corresponds to the purpose, and additional symbols indicate that the structure is equipped with a fireplace.
For different layouts, models are chosen that differ in the location of the firebox and fireplace - in the steam room, relaxation room or in the dressing room.
Tools and materials used
To carry out the work, you will need a grinder with discs for cutting bricks, a hammer drill or a drill equipped with a mixing attachment for mixing the mortar.
The following materials must be delivered to the construction site:
- Two types of bricks - fireclay (with fire-resistant qualities) and ordinary clay, grade M150.
- Brick volumes are determined by a specialist according to the drawing.
- High-quality clay - about a hundredweight.
- Sifted sand, in an amount twice as much as clay.
The two above components can be replaced with an already prepared mixture, which can be purchased at a hardware store. This option is more convenient and requires less time and effort to prepare the solution.
You will also need various metal products:
- firebox and ash doors;
- valve;
- fire pit;
- steel wire;
- corners.
Practical steps
In this article we will only touch on the basics of practical masonry. To help you understand the issue in more detail, familiarizing yourself with the videos that are available in abundance on the Internet.
For example, here:
If you want to understand the issue comprehensively and get to work “fully armed,” we recommend purchasing a textbook on stove laying. For example, Simakov V.G. "Stoves, fireplaces, barbecues." Moscow, EKSMO, 2011.
On the website of I.V. Kuznetsov, in the section bell furnaces, drawings (called orders) for furnaces of any purpose, power and configuration are available for review and downloading without restrictions.
Materials
If you plan to install a stove according to one of the existing projects, then you should receive two documents for it: a specification that lists all the necessary materials in the option: name of material / brand / required quantity / average price on the market. The last point must be clarified on the date of the decision to lay the furnace.
As a rule, regardless of the chosen option for the future bell furnace, for its construction you will need to purchase:
- Fireproof mastic (special dry mixture for laying fireclay bricks);
- Refractory brick (fireclay);
- Ceramic single solid brick (from M150 and above);
- Materials for preparing masonry mortars: cement, clay, sand;
- Multilayer plywood sheets for formwork;
- Steel sheet for the floor in front of the fire door;
- Rebar and reinforcing wire;
- Steel corner;
- Planed wooden beam;
- Stove fittings (latches, doors, views);
- Metallized foil;
- Hob (if the stove is a heating and cooking stove);
- Grate.
Tool
To be able to perform any technological operation in the process of manufacturing a brick bell furnace, the master will need:
- An electric drill with a special attachment, or a construction mixer;
- Circular saw;
- Bulgarian;
- Wire cutters and pliers;
- Trowels (trowel);
- Shovel;
- Level (preferably laser).
For a professional stove maker this list is much longer. Only the main tool is listed here.
Ideally, the laying of the stove should be taken care of at the stage of building a house. It is much simpler, cheaper and more effective.
However, modern technologies make it possible to fit a stove into a finished house. Such work requires more time and expense, as well as additional calculations.
In conclusion of this article, we offer you a photo report on the laying of Kuznetsov’s two-bell heating and cooking stove. With the application of orders and vertical sections.
Good luck!
Online consultation
Basics
Most of the advantages of Kuznetsov furnaces come from the principle of free passage of gases. Let us explain again with an example.
Let's imagine a stove with a complex system of smoke ducts: an ethermark, a four-five-turn Dutch oven. In this cramped labyrinth, strong turbulence will inevitably arise. Have you heard the furnace humming? This is only a minor manifestation of the vortex energy raging within her. And there’s nowhere to get it from except from the fuel stash. If the channels are long and narrow enough, then at first glance there is nothing terrible here: the vortices, by the time they reach the pipe, will dissipate, cooling, and will still give their energy to the body of the furnace, and it to the room. But in reality, nuances appear, which will be discussed later in the text. Because of them, the efficiency of a channel furnace over 60% is an exceptional rarity.
In a channel stove, while it is being heated, a huge flow of energy rushes about, and only a small part of it can be used for heating or heating water without disturbing its operation. Such a furnace is somewhat similar to a nuclear reactor. Don’t be alarmed, just because of the synergy, i.e. along the paths of energy circulation in it. A nuclear reactor has to be loaded with tens of times more fuel than is necessary to ensure the design energy output. Otherwise, the neutrons will simply fly out without having time to meet the uranium atoms ready to receive them. In a channel furnace, hot vortices, without having time to cool, will fly out into the chimney or, conversely, will cool down immediately, producing smoke and soot.
But the Kuznetsovkas (details below) are closer in synergy to the thermonuclear reactors of the future. “Thermonylus” sounds scary, but this is only due to its association with the hydrogen bomb. In fact, fusion reactors are quite safe.
Why? Because they generate exactly as much energy as the consumer needs, and the technological power reserve required for rarefied plasma is scanty. If suddenly the chamber of a tokamak or stellarator suddenly completely collapses, the plasma will be completely emitted (there are no heavy atoms in it) and will cool down before it reaches the walls of the room. The repairmen will curse - maybe the duty department is sharpening their laces - but after 5 minutes. will be able to blunt to elimination without protective equipment.
So what do Kuznetsov furnaces have in common with thermonuclear reactors? The fact that the energy of the flue gases, thanks to the principle of free passage, does not rotate many times in the flow until it is pushed into the body of the furnace, but saturates it immediately. And now she has nowhere to go from there except into the room and/or the water heating register.
What kind of building is this?
Kuznetsov’s devices were created more than 50 years ago and to date, more than 150 variants of various projects have been developed, each with its own characteristics and purpose. Main varieties:
- Cooking. This type of device is used for cooking. Mostly cast iron stoves are installed in such ovens, on which the entire cooking process is carried out.
- Bread room with oven. Cooking types of buildings are often combined with a bread machine.
- Heating. A two-bell stove for a home using the Kuznetsov system is an excellent alternative to gas or electric heating. Provided that it is properly installed and fired, it can heat a room even in severe frosts.
- Bathhouses. Kuznetsov stoves for baths are the most popular among other types. Most of these buildings, which can be found in almost every country house or dacha, are built according to Kuznetsov’s designs.
- Fireplaces with water circuit. Useful devices for everyday life. People who want to equip their home with hot water by firing a stove will certainly build a structure with a water boiler. The Kuznetsov bell stove with a water heating boiler is widely used in villages.
- Russian two-story. Wood-burning fireplaces with a stove bench have not lost their relevance, so they are actively used in everyday life.
Characteristics
Kuznetsov's bell-type stoves have a number of distinctive characteristics and advantages that set them apart from the main competitors in the market of heating equipment for home and bathhouses.
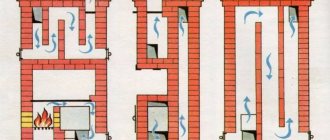
The operating principle of such a device is quite simple: the lower level (tier) and the firebox are a single structure - a cap, which is designed to effectively move gases formed during fuel combustion. In this case, the accumulation of light gases occurs at the top of the bell, and heavy gases at the bottom. Gases with an average heating temperature are concentrated in the middle.
“Kuznetsovka” made of brick provides for long-term retention of heated air inside the hood for effective accumulation of heat indoors, and then the rapid removal of combustion waste through the chimney.
A special feature of the furnace is maintaining the maximum combustion temperature. In addition, the Kuznetsov stove has a high efficiency, which is several times higher than that of a classic Russian stove.
The specific advantages of such furnaces are as follows:
- High efficiency – up to 94%.
- High temperature combustion of fuel material.
- Fast accumulation and long-term heat retention.
- Low level of soot deposition.
- Easy to care for and unpretentious.
- Low material consumption with high thermal output.
- Possibility of additional installation of a circuit for hot water supply.
- Increased draft with small chimney sizes.
- Attractive design and a wide choice of structural forms. An improved option is the Kuznetsov two-bell stove, which can be designed for any type of room.
- Fast distribution of thrust between channels in automatic mode.
What is the difference
The main feature of the group of stoves invented by Kuznetsov is the absence of extended smoke channels with many turns and bends. To make the most of the heat from burning fuel, duct stoves have a system of passages through which hot smoke heats the bricks. In this case, the oven heats up unevenly at different levels, which can lead to cracking of the masonry. In addition, there is a need for regular cleaning of narrow places and corners.
Kuznetsov's stoves for home and bathhouses do not have this drawback. In them, hot gases from the firebox enter the so-called hood - an internal space limited at the top by the ceiling and having an outlet at the bottom. The heated smoke rises to the very top of the hood, where it lingers until it begins to cool. As they cool, they gradually fall down along the walls of the bell, and a new portion of smoke takes their place.
The cooled smoke exits through the channel into the chimney or into another hood, depending on the design and purpose of the stove. Gradually, as it passes through cascades of hoods, the flue gases cool to a temperature of 120-150 degrees. The temperature of the gases at one level of each cap is the same, which avoids uneven expansion of the brick.
Orders of Kuznetsov furnaces
The construction of a Kuznetsov furnace does not require special knowledge and skills. If your hands are sharpened for the simplest tool, it is enough to follow the order and a few simple rules to successfully build the structure. The order is simply a system of drawings and instructions that describe the process of laying out the stove step by step, down to each row of bricks individually. Why such precision? The fact is that Kuznetsov spent decades trying to ensure that the design worked perfectly, and if you miss any little detail, the stove will not work correctly. Here is a sample order:
This is interesting: Cast iron heating radiators (batteries) - overview of technical characteristics
Recommendations for masonry
For laying the shield, only medium-fat clay with admixtures of sand is used
To fold a brick panel for a metal stove in a bathhouse or house, you need to follow the recommendations:
- The solution should only be clay-based. Cement cannot be used.
- During laying, you must immediately remove any remaining mixture from the inside of the structure.
- Construction must begin with the installation of the foundation. It must be separate, not connected to the foundation of the house. First, the brick is laid dry to check the horizontal position. After checking all the parameters, the foundation is secured with mortar.
- To limit the draft of smoke, you need to install a gate valve at the top of the structure.
The first two rows are laid out blank, there are no smoke channels in them. This is necessary in accordance with fire safety requirements.
Order
Doors should be installed on the brick panel for cleaning the channels from soot
The order of the bell-type heating shield is as follows:
- Rows from the first to the third are laid out in the standard way. In the third row, it is necessary to leave an empty space in which the fire door will be installed.
- On the fourth and fifth rows, a vent and a door for cleaning are mounted, and two plugs are installed here.
- In the sixth row, they begin to gradually reduce the number of channels, and a heating tank is installed.
- The seventh row is intended for mounting the grille. In order for it to be securely fixed, you need to cut off all the bricks that may interfere. The channel is closed to allow two further branches to be made.
- The eighth row is designed for installing two doors.
- On the ninth and tenth, a steel strip tab is placed.
- The next stage is the execution of door overlaps. On top they should be lubricated with a clay solution.
- A cast iron stove is installed on the twelfth row.
- On the sixteenth tier, you need to cut off the bricks in the area of the right corner, and on the nineteenth, a valve is installed.
- The twenty-second row is reserved for mounting the shield and samovar.
- To expand on the thirty-first row, the bricks are cut together, and at the next stage a ventilation grill is installed.
Masonry: ordering and step-by-step instructions
The sequence of work looks like this:
Lay out the 1st row of 20 bricks, which should be an ideal rectangle with a strictly horizontal surface.
First row diagram
“Rectangularity” is checked by measuring the diagonals - they must be equal. In the absence of experience, the row must first be laid out without mortar and only then, when everything has been adjusted and checked, the mortar must be applied. The thickness of the seams should be 5 mm.
Advice. To make the stove look more attractive, install rounded bricks in the corners. You don’t have to cut them yourself—such blocks are sold ready-made.
In the 2nd row, the first (lower) hood and the blower chamber originate. The two halves of the brick are laid without mortar and slightly pushed out. When the masonry is completed, these bricks will need to be removed, which will make it possible to clean the base of the cap from splashes of mortar and brick fragments. After cleaning, the halves are finally placed on the solution.
Second row diagram
When the 2nd row is laid out (14 bricks are required), install the blower door on it, supporting it with several bricks. The door frame must be wrapped with asbestos cord, which will act simultaneously as a seal and expansion joint. It is fixed in the brickwork by means of wire, which is placed in the seams.
It is recommended to use wire to reinforce the walls of the furnace, placing it in the seams of every second row.
Having laid out the 3rd row according to the diagram (the bricks included in it should tightly fix the blower door), proceed to laying the 4th. Here, in addition to ceramic bricks, fireclay bricks are used - we begin to lay out the side and rear walls of the firebox.
Third row diagram
The blower door is covered with hewn ceramic bricks looking outwards, and hewn fireclay bricks looking inwards. They must be separated by a thermal gap of 5 mm. It can be arranged in the following way: a spacer of corrugated cardboard is placed between the bricks - it has just the required thickness; When kindled, the cardboard will burn out and a gap will form on its own. Temperature gaps must be provided wherever fireclay bricks are adjacent to ceramic bricks.
Fourth row diagram
In row No. 5, the fireclay bricks forming the side walls of the firebox are slightly shifted so that the bricks of the 4th row located underneath them form a shelf 10–15 mm wide for the grate. The bricks should be moved apart so that there is a gap of 5 mm between them and the grating, which is necessary for the free expansion of the heated metal.
Fifth row diagram
The brick forming the front wall should be cut at an angle.
In the same row, the formation of a vertical channel connecting both caps begins.
When the row is laid out, you should install the grate in its place, filling the gap between it and the bricks with sand.
Installation of grate bars
In parallel with laying the 6th row, you need to install and fix the fire door. Direct contact of its frame with the brick is not allowed - it is necessary to lay an asbestos cord as a gasket. The door frame can be fixed with wire from below, but a more reliable element is required from above - the wire will quickly burn out. Instead, a steel strip is used.
Sixth row: installation of the combustion door
When laying row No. 7 on the side of the brick that forms the back wall of the firebox, a gap of 20–30 mm wide is left. This is the beginning of a dry weld.
Seventh row diagram
Having laid out row No. 8 according to the diagram, proceed to laying the 9th row. At this stage, a channel is formed connecting the firebox with the lower hood. Lilac color indicates bricks in the side walls of the firebox, the upper edges of which should be 10 mm below the plane of the row. An asbestos strip 10 mm thick will need to be laid on the left wall so that it is flush with the plane of the row.
Eighth row diagram
Pay attention to how the fire door is blocked: the bricks are cut at an angle to create a “lock-on” masonry.
Ninth row diagram
When laying out the 10th row, you should remember that ceramic bricks must be laid without mortar on the asbestos lining (it covers the fireclay bricks in the firebox wall).
Tenth row of order
It is necessary to make a cutout for the hob in the ceramic bricks surrounding the firebox. Its dimensions should be such that there is a temperature gap of 5 mm around the slab, that is, the bricks will need to be trimmed by about 10 mm. And in the contact area of the hob with fireclay bricks, it is necessary to leave a gap of 10 mm. These bricks, cut at an angle, are located in the front and to the right (indicated in orange).
If the slab is equipped with stiffening ribs at the bottom, it is necessary to additionally cut grooves in the brick so that the slab is supported on the brick along the entire edge. It is installed immediately after laying the row - on an asbestos cord soaked in clay solution. The gaps between the slab and bricks are filled with sand.
Near No. 11 the walls of the cooking chamber begin. A door for it is also installed here, the frame of which must be wrapped with asbestos cord. For fixation, you can again use wire.
Eleventh row diagram
Rows 12, 13 and 14 do not need comments - we simply lay them out in order.
After laying the bricks of the 15th row, the cooking chamber is covered with a steel sheet 3 mm thick and 600x550 mm in size with a cutout for the exhaust duct. The top of the sheet is reinforced with 4 pieces of angle and a steel strip. The steel ceiling prevents various small debris from getting into the food, which could fall into it from the brickwork.
Installing the hob
In the bricks of the 16th row, framing the exhaust and front vertical ducts, cutouts are made for valves, taking into account a 5 mm temperature gap.
Scheme of the 16th row
When the row is laid out, the valves are installed in place.
Installation of valves
After the 17th row, the formation of the upper cap begins (18th row). Here, too, it is necessary to leave the slightly extended halves without mortar; by removing them, it will be possible to clean the base of the cap from the mortar and various debris that fell during the laying process. After cleaning, the removed bricks are coated with mortar and finally installed in their place.
The eighteenth row of the order is the beginning of the formation of the cap
Rows 19 to 27 are laid out in order.
In the 28th row the main chimney damper is installed. Under it, cutouts should be made in the bricks with a depth of 10 mm (indicated in lilac) and such a width that a temperature gap of 5 mm remains around the valve body.
Scheme of the 28th row
The valve must be installed immediately after laying out the row, and it is laid on the solution.
Installation of a chimney damper
In rows No. 29 and 30 the furnace is closed, and in row No. 31 a mounted pipe begins with a smoke exhaust channel into the brick (270x140 mm).
Formation of the casing pipe
The finished oven must be thoroughly dried. To do this, it is kept for some time with the doors and valves fully open. Things will go faster if you hang a light bulb with a power of 200–400 W in the firebox. It will provide not only heat, but also a stable convective flow, which will remove all moisture in a short time.
The first fire should be done with a small portion of fuel - the fire must first harden the walls of the firebox.
You should not start finishing the stove before it has fully worked for the first season - the decorative coating may be damaged during shrinkage processes.
Types of structures
The hoods inside the stove can be positioned in different ways, so there are many types of stoves. You can build a stove with your own hands for two-story houses, and both floors will be heated equally. You can even make a building with a bench (this type of heating is convection) or you can put a heat exchanger inside. This type of design is called a boiler and is marked KIK.
There is a type of building in the shape of a fireplace; they are usually built in houses outside the city. Heating gas stoves are designated IOK, and if they have a stove bench, the letter “L” is added. If such designs also have an oven, then the letter “D” is indicated.
Real Russian Kuznetsov bell-type stoves are marked RTIC, there are about 10 models, two of them have stove benches. Such stoves are most often built in baths. But it’s difficult to install a massive brick stove there, so many people choose a metal structure for baths. Sauna stoves are marked BIK; Kuznetsov designed them so that they were small-sized, looked presentable and took up a small area.
Heating a polycarbonate greenhouse with an infrared heater
Operating principle of Kuznetsov bell furnaces: ordering
The operating principle of Kuznetsov furnaces is not complicated. When building a furnace, it is necessary to carry out all work according to drawings, diagrams and, of course, use procedures.
All Kuznetsov bell furnaces operate on the principle of separating combustion products. This principle lies in the fact that the gas generated as a result of fuel combustion is divided into two streams: cold and hot. The movement of gases inside the furnace design is very well thought out. Hot air is retained in the oven and retains heat for a long time. Cold air quickly flies into the chimney through a specially made recess. A furnace operating on this principle is called a bell-type (dome) furnace. Inside such a furnace, the hearth is combined with its lower part and forms something like a hood. It then acts as a gas separator into two streams. The flow of hot air rises and is retained in the hood, thus concentrating heat.
Advantages of Kuznetsov stoves:
- Cost-effective;
- Long-term heat retention;
- Slight soot formation;
- No need for frequent cleaning;
- A choice of different shapes and designs is possible.
The high efficiency rate (95%) of Kuznetsov furnaces is the result of a fundamentally new development and design features. For comparison, a traditional Russian stove has an efficiency of 25-40%. If Kuznetsov stoves have disadvantages, then they are few, and they are lost against the background of their advantages.
Advantages and disadvantages
The wide popularity of Kuznetsov stoves and the deep respect that people knowledgeable in the stove business have for them are due to a number of advantages:
- The efficiency of “blacksmiths” exceeds 80%, and for some models it can reach 95%.
- Furnaces operate at high temperatures, but at the same time they do without materials and technologies available only in factory conditions.
- The high-temperature mode allows you to heat the stove even with the most waste and low-quality fuel.
- Again, due to the high combustion temperature, the fuel is oxidized almost completely, so soot is formed in minimal quantities. The oven may not require cleaning for several years.
- The design of the furnace ensures very uniform heat transfer between the fireboxes, while less material is used than in construction using traditional technology.
- In furnaces equipped with a heat exchanger, heat for heating water is taken from the flue gases, and not from the firebox, so the “blacksmith” can easily perform the function of a boiler without deteriorating performance.
- The operating principle of the stove provides good draft, so there is no need to build a high chimney.
- “Kuznetsovka” is very plastic both in terms of design and design. That is, it can easily be adjusted to any room without compromising performance and efficiency.
- The stove is designed in such a way that after firing, its chimney does not need to be blocked with a view. Carbon monoxide poisoning is completely excluded.
- The design assumes uniform heat distribution in the furnace body, so cracks do not develop in the masonry due to local deformations.
What can you say about the disadvantages? Technically there are none, but there are still some things to consider. The Kuznetsov furnace cannot have massive walls - this would negate many of its advantages. But at the same time it is subject to fairly high thermal loads. Therefore, this unit must be carefully calculated and verified at the development stage and built just as carefully, with scrupulous compliance with all technology requirements. At the slightest deviation from the technical regulations, the “blacksmithing” will turn out to be very short-lived.
You can even build a Russian stove with your own hands if you follow the detailed instructions. You will find them in our next article: .
Preparatory work
First of all, you need to choose a place to build a furnace. The easiest way to do this is before building a house - then both the stove and the building are designed together so that three or at least two rooms are heated. With a ready-made house, the situation is more complicated. In this case, they tend to build the stove into an interior partition, since installing it into a load-bearing wall requires complex calculations and dangerous, time-consuming work (part of the wall will have to be dismantled, keeping the load from being blocked by a system of lintels and columns).
You can, of course, limit yourself to a simple wall-mounted arrangement, but then only one room will be heated.
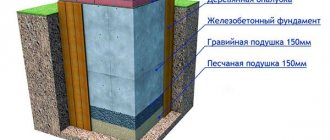
A reinforced concrete foundation must be built at the selected location. Its dimensions must exceed the dimensions of the oven by at least 100 mm on each side. It is not allowed to combine the foundation of the furnace with the foundation of the building - both structures give different settlements and one of the foundations will pull the other along with it, causing it to skew.
A reinforced concrete foundation must be installed under the furnace.
The depth of the foundation depends on the bearing capacity of the soil, the depth of its freezing, and the method of operation of the building (periodically/continuously). Typically, in buildings with year-round habitation of people located on stable ground, the foundation is deepened by 400–600 mm. Crushed stone should be poured onto the bottom of the excavation as a reinforcing layer, and a sand cushion should be placed on top of it.
Then everything is done using traditional technology - they install the formwork, fix the reinforcement frame and fill it with concrete. You should proceed to the construction of the furnace only after the concrete has fully matured and gained sufficient strength - this usually takes about a month.
Types of Kuznetsov furnaces
The design gained enormous value due to its amazing versatility. The Kuznetsov stove, drawings of which are presented in more than 150 options, can be used in any room as efficiently as possible. Each of the drawings takes into account the characteristics of the room for a specific purpose, which is why the stove operates with such high efficiency for a certain type of building.
There is no point in listing all Kuznetsov furnaces, here are just some of the options that are most in demand:
- bread ovens for cooking, combined with cooking surfaces;
- sauna stoves;
- outdoor stoves;
- fireplace stoves;
- heating stoves.
This is not a complete list of specialized Kuznetsov furnaces. It is possible to create combined types, which is very convenient if you use them in everyday life in small areas.
Operation in various modes
In summer mode, Kuznetsov’s stove turns from a heating and cooking stove into a cooking stove. To do this, it is enough to open a special valve (it is called the summer valve), after which the flue gases will enter the chimney directly, bypassing the caps. Accordingly, only the hob will be subject to heating.
The temperature inside the cooking chamber can be regulated by a valve installed on the exhaust duct extending from it. By closing the valve and the chamber door, it can easily be turned into an oven. For ease of use, shelves for baking sheets can be fixed in the walls.
If you need to quickly warm up the room or dry out, open the door of the cooking chamber. At the same time, the temperature on the burners remains high enough for cooking.
What can such a strange chimney provide?
- Stratification of smoke gases by temperature directly after the combustion chamber.
- In the path of gases, you can install not one, but two or three caps at once. As a result, the smoke will give off more heat, and the structure itself will consist of several zones with a permanent temperature.
- The hood is located next to the firebox and smoky gases that have not yet given up their heat enter it. As a result, ash, carbon monoxide and volatile hydrocarbons, which in a conventional stove are carried away by the chimney, burn out under the hood in this design. This leads to increased heat transfer and minimizes the amount of soot in the chimney.
- Thanks to natural convection, combustion products are physically unable to leave the stove before they give up all the heat.
- The heat exchanger in the Kuznetsov furnace, unlike other types of construction, is located in the hood, that is, outside the combustion chamber. It cannot in any way affect the temperature of the fire and, as a result, does not reduce efficiency.
Now - directly to the construction process.
Design and principle of operation
The inventor I.V. Kuznetsov used a bell-type furnace, known for its efficiency, as a basis.
This is what a bell furnace looks like - a prototype of Kuznetsov’s model
The high efficiency of such furnaces is due to the nature of the movement of flue gases. If in channel stoves they are drawn into the chimney, often without having time to give off heat to the brick mass, then in bell-type stoves they swirl under the roof of the bell for a long time until they cool down. Only then do they fall down to the outlet, from where they then enter the chimney. The bell filled with gases simultaneously plays the role of a view: cold air from the chimney cannot penetrate into it, just as water cannot fill an inverted diving bell. This effect is called gas view.
The inventor worked with a complicated version of such a furnace, which had two hoods.
Diagram of a two-bell model
Scheme of a two-bell furnace
As you can see, the hoods are connected in series, that is, heat from the flue gases is removed in a two-stage manner. Previously, the construction of stoves with such a design was not very willingly undertaken - not only because of the complexity, but also some undesirable features. So, for example, the draft in the second bell can easily break the gas plug in the first, negating the effect of the “gas view”.
The master dealt with this drawback in the following way. The furnace was equipped with so-called downstream channels, laid to bypass the heat-accumulating parts of the array. While the flame is burning in the firebox, the convective flow it creates ensures that the draft operates as usual. When the fuel is consumed and convection stops, the draft will redistribute itself in such a way that the cold air flow will follow through the downstream channels, and not through the heated body of the furnace.
This solution not only compensated for the instability of the gas coil, but also turned out to be more reliable: a plug formed by gases can be pulled out by a strong gust of wind, while in the Kuznetsov furnace, the draft is redirected away from the hot mass under any conditions. In addition, thanks to the presence of downstream channels, there is no need to arrange room ventilation.
We strengthen the structure with wire
https://youtube.com/watch?v=vXFx1VcDXKQ
Every third row should be laid with metal wire; this is a small but necessary detail that will make the structure reliable. Iron components must be inserted into the masonry with a gap of 0.5 cm, and the resulting void must be filled with fire-resistant wool.
To make a Kuznetsov sauna stove with your own hands, it is not necessary to have masonry skills. If you have a diagram and drawings, if you work carefully, everything will definitely work out. To find the scheme, just go to Kuznetsov’s website, there is information available to everyone that anyone can use.
If you have experience with masonry, then there will be no problems, the main thing is to follow the instructions.
Recommendations for self-construction
If you decide to build a stove according to one of Kuznetsov’s plans with your own hands, get ready for careful and scrupulous work. On the diagrams you will find a graphic representation of each row, but before starting laying you need to become familiar with the features of the technique, in particular:
- selection and pre-processing of bricks;
- purchase of metal parts (plates, dampers, doors, valves);
- determining the most suitable location;
- preparation of the base and foundation;
- possibility of installing a chimney, etc.
Fireclay refractory brick (Sh-5, ShB-8) is recognized as the best material for the internal masonry of “smiths”, and ceramics (M-150) for external decoration. To strengthen brick walls, metal elements (rebar, wire) are used. In order for the stove to function with maximum heat output, experienced craftsmen hone not only their skills, but also every brick - literally. They polish every detail, which is why projects completed by professionals look flawless.
Fireclay brick masonry
Having the author's order in hand, we recommend not to experiment, but to follow the designated order. Deviations from the diagram do not guarantee complete heat transfer.
Furnace foundation
As with every brick structure, it is necessary to prepare the foundation for the furnace in advance. If this is not done when building a house, the process can be labor-intensive. But you can’t get around it, because the structure turns out to be quite heavy and neither the cement screed nor the floor joists can withstand it. So, to prevent the furnace structure from cracking in the future, the construction of the foundation must follow the following rules:
Fig.1. Scheme of the furnace arrangement.
- The base of the furnace should not be connected to the common foundation, otherwise it will cause deformation of the structure and lead to cracks or even complete rupture.
- If the furnace structure is planned to be located near a wall, then the furnace foundation being built should not touch the main one and should be located at a distance of no more than 5 cm. The resulting gap after the concrete has hardened is filled with sand.
- It is necessary to maintain correspondence between the climatic zone of soil freezing and the depth of the excavated pit.
- It is necessary to isolate the foundation from moisture with a sand cushion placed at the bottom of the pit, and after hardening, wrap it with roofing felt or other waterproofing material.
- It is necessary to reinforce the concrete part of the foundation with a metal frame made of reinforcing bars.
After completing this stage, the process of constructing the furnace begins. For anyone who has at least once encountered such work, it will not be difficult to master the technology of bricklaying using the example of the Kuznetsov fireplace, modern models of which are very diverse and fit perfectly into the interior.
Basic rules for creating a heating stove
- To make Kuznetsov stoves, the ordering (masonry diagrams) should be printed in advance.
- The refractory shell located inside the furnace must be free on all sides, since the brick expands during the heating process.
- Internal refractory masonry when using fireclay bricks is always done on edge. If the bricks are made of clay, on the inner walls and on the posts, they are laid at the discretion of the stove-maker.
- To strengthen the bond, a wire is laid every two brick rows.
- When a Kuznetsov stove is created, the ordering of brick stoves for a home provides that various elements (for example, doors) are installed in such a way that there is room for expansion. A special gasket is placed between the brick and the metal element.
- After completing the construction of a brick structure, it should be treated with a fire-resistant compound.
- The first kindling begins at a minimum temperature and is then gradually increased.
Safety
The main requirement for any type of oven is its safety. In addition to the fact that the use of a constant open fire in the house always sharply increases the risk of fire, the combustion of any type of fuel produces carbon dioxide, which is extremely dangerous for humans, which, if the design is defective or improperly used, leads to carbon dioxide poisoning.
Therefore, if the owner of the house does not have stove construction skills, the construction of the stove should be entrusted to a master, despite the high cost of this work. Only a specialist will be able to lay bricks in the stove correctly with minimal gaps and correctly install the chimney and pipe, taking into account all possible nuances of its operation, including the prevailing wind direction.
What is needed to build Kuznetsov stoves
To lay it according to all the rules, it is important to strictly follow the diagram. Experts advise first to do a “rehearsal” of this process by laying out the structure “dry”, without using cement mortar.
When calculating the main parameters, it should be taken into account that the concrete base must be 10 centimeters larger than the dimensions of the furnace on all sides. The pit is dug to a depth of approximately 40 to 60 centimeters.
Today, more than 150 diagrams – drawings with designs of Kuznetsov furnaces – are available for public viewing on the Internet. To build any of these models, you need to stock up on the necessary materials and tools. For example, to build an OVIK-9 oven, which has a cooking chamber with a 2-burner stove and steel doors, and is also equipped with a separate exhaust duct, the following materials are needed in a certain quantity.
- Red brick – approximately 450 pieces.
- Fire-resistant brick of the SHA-8 brand for the firebox – 22 pieces.
- Doors: for a DT-3 firebox with a size of 210*250mm and for a blower (WPC) with a size of 140*250mm.
- Grate, size 250*252 mm.
- Cooktop (stove) with 2 burners measuring 586*336 mm.
- Doors for the cooking furnace size 510*340 mm – 2 pieces.
- Valves: for the firebox – 130*130 mm, for the chimney pipe – 130*250 mm, “summer” valve – size 130*130 mm.
- Metal corner 36*36*4*600 mm and metal strip 40*4*600 mm.
- Metal sheet 600*550*3 mm.
- Pre-ceiling metal sheet 500*700*3 mm. You can also use ceramic tiles or other material with fire-resistant properties instead.
As for the tools, for the work process you will need a trowel, a plumb line, a building level, a container for mortar, spatulas, a construction angle, a hammer drill, an angle grinder and a mixer attachment.
What will be needed for construction
Let us immediately note that it is better not to use used bricks to build a furnace. Constant temperature changes are not the most suitable conditions for its operation, and if you take a material with fatigue stresses, it is possible that after a couple of years the walls of the furnace will simply begin to crumble into dust. So, what will you need to prepare to implement our project:
- solid red clay brick M 150 in the amount of 754 pcs. – for laying the body of the heating device and chimney;
- sand, 150 kg;
- fine clay, 130 kg;
- refractory brick - 63 pcs., which will be needed to equip the core of the furnace; Fireclay bricks of the Sh-5 and ShB-8 brands are most often found on sale. In our case, it is better to take the latter, since its dimensions fully correspond to the dimensions of the red brick.
- blower door, 1 pc.;
- combustion door, 1 piece;
- doors for cleaning channels, 6 pcs.;
- grate, 1 piece (minimum size 250x375 mm, which can be assembled from separate grates);
- steel wire for tying rows;
- metal corner;
- chimney damper, 1 piece;
- asbestos cord or basalt sealant - for sealing the installation sites of cast iron castings.
If you have ever done brickwork, you should know what you will need:
- trowel (trowel);
- container for preparing the solution;
- building level;
- plumb line and cord;
- bushhammer;
- mixer for mixing the mixture (you can use an attachment for an electric drill or prepare the solution manually);
- roulette;
- pencil.
If during the construction process it is necessary to trim bricks for the front side of the stove, then this work is best done using a grinder with an installed cutting disc for stone and concrete.
Stove with bench
The stove with a stove bench is especially popular among our people. This design is also possible for bell-type furnaces. They heat themselves with wood. Such models are used mainly in dachas or country houses. All stoves with benches consist of the following elements:
- heating oven;
- bed;
- hob;
- oven;
- ash pan;
- woodcutter;
- place for kitchen utensils.
As with any stove structure, such models require a separate foundation. First, the base of the furnace is built. It consists of several brick rows aligned horizontally. They must have right angles. You should also maintain a distance from the rows of the base to the wall of the room of approximately 15 cm (more is possible). Then a vent and air vents are installed, thanks to which the air heated in the firebox rises up, is evenly distributed throughout the entire structure of the stove and optimally heats the stove bench.
At the level of 8–9 rows, overlaps should be laid on the bench and firebox. After this, you need to continue laying brick rows for the oven and hob according to the order. It is mandatory to lay a row separating the latter from the wall of the room.
The next stage: laying out the jumpers. In the oven area, you need to use regular or figured masonry in the shape of an arch or wedge for this purpose, and it is advisable to install metal corners and a decorative shelf above the stove casing. Subsequent brick rows connect all the chimneys together. Windows are made on the walls, and a summer house is placed near the oven (it can be used in the summer season). Those located higher will warm the room in winter.
The pipes are mounted higher and have a square cross-section. It is recommended to lay 2.5 bricks. Those floors that are laid in the area where the chimney is located should be insulated in several layers with basalt slabs.
It is advisable to cover the outer surface of the chimney with silicate brick, since it is characterized by resistance to temperature fluctuations and climatic precipitation. After its erection, all available fittings are installed on the stove.
For example, you can not limit yourself to simple brickwork (although it looks quite solid), but paint the structure with heat-resistant paint and decorate it with ornaments and designs. This model will look beautiful in any interior. In financial terms, the finishing will be more expensive, the higher the quality of the tiles used for it. And tiles serve not only an aesthetic function - they retain heat well. And these elements are unpretentious in care. If you can’t do the finishing yourself, professional craftsmen can come to the rescue.
Calculation of dome heating devices
Without going into complex thermodynamic calculations, we will present the simplest method for calculating a bell-type furnace, which is used not by theorists, but by real stove makers with extensive experience and dozens of successfully operating heating appliances to their credit.
If you plan to take one of the existing structures as a basis, then you will need to calculate the heat loss of the room. To do this, determine its volume based on the dimensions of the external surfaces of the walls and ceilings. To make your task easier, you can measure the internal dimensions and add to them twice the wall thickness. Having obtained the cubic capacity of the room, multiply its value by 21 - the average value of heat losses for 1 cubic meter of total volume. The furnace power should be 15–20% more than the obtained values.
Dome stove designed for heating a two-story house
Now as for the case when, for some reason, none of the found projects suits you. There is only one way out - to create a heating device yourself, based on the general principles of constructing bell-type furnaces and methods for determining their internal dimensions using the method of proportions. All that is required for this is to correctly determine the external dimensions of the heating unit. The calculation method in this case is also not complicated. First of all, the resulting heat loss value must be divided by 300 - the thermal power that can be removed from 1 square meter. m of the outer walls of the furnace. In this case, only active surfaces are taken into account, that is, those that are directly involved in heat exchange. In this way, the area of the walls located above the grate is obtained. By adding the quadrature of the remaining parts of the furnace to them, the total area of the solid fuel heat generator is obtained. Its height and width are determined according to the relationships of the design taken as an example.
Sometimes situations arise when the resulting unit is too bulky. It doesn’t matter - it can be easily reduced by 25–30%, if we assume that the stove will be heated in the morning and evening.
When making a stove more compact, you should know that a double firebox will never provide double heat transfer. The maximum that can be achieved is an increase in thermal energy by 40–50%. So aesthetes and perfectionists will have to come to terms with the loss in efficiency of the heating device.
As for the dry seam, it is made with a width of 2–3 cm, and the lower value is taken during the construction of units that are used daily, and the upper value is taken during the construction of “weekend stoves,” that is, installed in dachas, hunting lodges, etc. .