DIY false fireplace made of cardboard
Once you imagined that you were sitting by a cozy fireplace with a cup of coffee, Christmas is approaching, you are planning how to decorate the mantel for the winter holidays and... you realize that you don’t have a fireplace. This is no good. An apartment in a high-rise building and lack of finances are not an excuse. To make a false fireplace with your own hands, you only need desire. Believe it or not, faux fireplaces are actually quite simple and often very inexpensive. DIY raised fireplace ideas , descriptions, and links to instructions you'll want to install in your home today! Each fireplace has its own personality and unique charm. There are a lot of ideas for false fireplaces that can be made relatively quickly and inexpensively. Although this is a small selection, we hope that these ideas will inspire you in some way. Right now is the perfect time to do such a project; you still have time to make a false fireplace for the New Year and Christmas! Here you will find the simplest examples of false fireplaces made from boxes , usually these are interesting projects for children for the winter holidays. There are also models of homemade fireplaces made from plasterboard , wood, plywood, chipboard, papier-mâché and other materials.
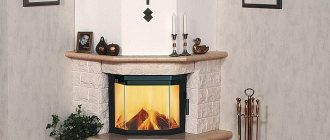
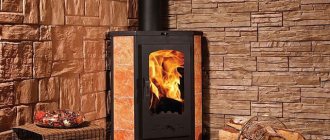
No. 5. Polyurethane false fireplace
This modern material has won the recognition of many designers and ordinary consumers. This is not surprising, because in addition to its attractive appearance, it can bend and take on various shapes. You can easily find in stores or on the Internet many offers for the sale of polyurethane portals Moreover, their variety will allow you not only to choose the required size, but also the style of execution. Models are presented both in the form of strict, straight lines, and with a richer finish that imitates stucco elements and even wood carvings.
In general, you won’t have any difficulty making a choice.
Installing it is also not difficult. You just need to stick it to the wall using a special adhesive solution in the desired location. Next, you can paint the surface of the portal or add special luxury to individual elements by applying gold, bronze or silver powder.
In addition to a solid portal, you can imitate it using various moldings or semi-columns made of the same material, as if marking the hearth area, but not so clearly. Of course, this option is less realistic, but in some interiors it will be quite appropriate. Especially in rooms with limited free space that you want to diversify a little.
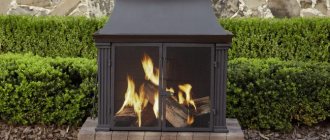
No. 3. False fireplace made of foam plastic
Another quick and easy way to make a false fireplace is to use foam sheets. They can be purchased at any hardware store. It is better to buy sheets 100 mm thick. You can also use shipping foam that was left over from a purchased refrigerator, TV, washing machine or other equipment. If you are not planning to move, then you are unlikely to need it, but in terms of density, it is much superior to the finishing option. Draw a drawing and figure out whether the available amount of material is enough for you. In addition, you must have:
- adhesive solution;
- mixing container;
- putty knife;
- level;
- hacksaw;
- painting mesh:
- priming;
- finishing putty.
To avoid crumbling and uneven edges when cutting parts, use a fine hacksaw. Due to the large thickness and density, it is unlikely that it will be possible to simply cut off a fragment with a knife. It’s also not worth breaking off half-cut elements; if a crack forms, such a piece can no longer be used. We will glue the elements to the wall and to each other using a special solution for foam plastic.
It is very important to buy a mixture specifically for installing this material. Due to the very slippery surface, which is practically devoid of absorbent properties, another type of composition may simply not glue the elements together. The wall, floor and ends of the foam that will come into contact with them must first be primed and allowed to dry. Knead the mixture strictly following the instructions.
Start installation from the side parts. The solution is applied to the wall and floor, following the previously made markings. Then they lean the foam. Before the solution has set, use a level to check whether it is level and adjust position if necessary This is how all the details are gradually connected. After the frame has dried, it is necessary to plaster its surface and prepare it for subsequent decoration. This may not be necessary if you plan to glue decorative foam bricks.
The surface of the foam is very difficult to putty. To facilitate this process and ensure the required level of adhesion, it is necessary to cover the entire surface with a painting mesh. If the edges are uneven and torn, use a corner. The process of applying putty is similar to that described in the previous version. After complete drying, the false fireplace made of foam is ready for decorative cladding. If you like this manufacturing option, keep in mind that in the future the structure made from this material should not be used as a location for pots with house plants, various equipment and other heavy objects. Decorative items only.
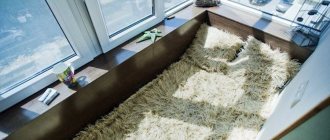
Initial preparation stage and size selection
To make a false fireplace with your own hands, you do not need to have any special design or construction skills. It is enough to clearly imagine the desired image of the future fireplace and choose the material with which it will be easiest and fastest for you to work. Any work must begin with a sketch and drawing. Yes, these are two completely different things. After all, the sketch reflects only the appearance with all kinds of decor. And the drawing already specifies the dimensions, based on which you can calculate the required amount of material. In order to draw a working drawing, you need to decide on the dimensions of the composition. Be careful at this stage.
The dimensions of the false fireplace should be proportional to the room in which it will be located. that is too large in a small room will look cumbersome and take away the space even more. But a small fireplace in a spacious room will simply be lost from sight. Also, it should not interfere with free movement around the room. The optimal width should not exceed 1/3 of the wall to which the structure will be attached.
How to make a drawing and choose the right parameters
Simple design drawing
The drawing makes it easier to cut materials and helps to keep the dimensions correctly. It is best to find a ready-made drawing on the Internet and, after making your measurements, adjust it as required.
- First of all, decide on the location of the stove
- Select material for production
- Confirm the size of the portal and niche for the firebox
- Draw a detailed diagram, all figured components are transferred to paper in expanded form
- Don’t forget that for a bio-fireplace you need to leave space inside the niche for the fuel tank, and for an electric fireplace or 3D frame, provide an outlet
If you plan to purchase a bio or electric fireplace, the portal parameters are adjusted to the device.
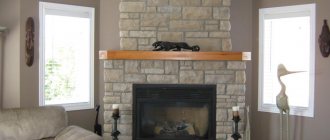
False fireplace in the living room interior
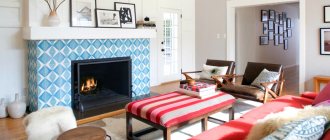
Due to the fact that a false fireplace is absolutely safe from a fire safety point of view, it can be placed in any room. Even in the children's room. The exception is structures equipped with candles or electrical elements. If you really want and have space, you can install a fireplace in the dining room. But many are inclined to believe that the living room is still the most appropriate room for this. Just imagine how you sit in the evening, after a hard day at work, in your favorite chair with a cup of delicious coffee or a glass of wine, and enjoy the view of a burning fire. And all this in an ordinary apartment...
A feeling of calm, harmony and peace immediately comes.
Even without simulating fire, this element will create an indescribable feeling of comfort that will be appreciated by all your guests and family members.
Your living room will become their favorite place to meet and celebrate, because it is in this room that all friendly gatherings and warm family evenings are held. The article was written for the site.
Tags: fireplace
Where is the best place to install the fireplace?
Before starting work, you need to decide on the type of structure. She may be:
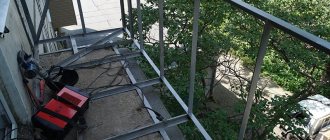
- Stationary. A frame made of wooden blocks or metal profiles is attached to the wall. This allows you to make narrow and tall elements. They take up minimal space, but the process of moving products to a new location is very labor-intensive.
- Attached. Requires a broader, fundamental basis. At the same time, he can move freely to any point in the apartment. And if necessary, it can easily be transported to another house.
The location of the portal for a decorative fireplace is chosen based on aesthetic preferences and practical benefits.
- On a free wall. An improvised hearth can serve as an independent decoration. Visually complements the interior if placed under the mirror. The upper part serves as a shelf for hygiene items. Stationary models are used instead of a TV stand.
- In the corner. Most often, with this arrangement, heating risers are closed. The structure is made up to the ceiling, and for stability it is permanently attached to the wall. It is important to leave access to threaded pipe connections that require regular maintenance.
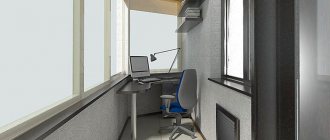
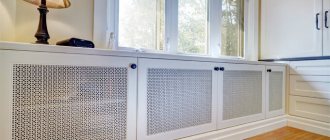
- In front of the radiator. It is very difficult to decorate a radiator on a blank end wall with furniture. It's easier to decorate it. In this case, the hearth must be attached. To maintain the circulation of warm air, a convection grill is inserted into the improvised firebox or lid.
Necessary materials:
- 11 wooden blocks 244 cm x 5 cm x 10 cm
- 1 wooden block measuring 305 cm x 5 cm x 15 cm
- Faux brick panel measuring 122 cm x 244 cm
- 2 MDF panels measuring 122 cm x 244 cm and thickness 1.3 cm
- 1 chipboard panel measuring 122 cm x 244 cm and thickness 0.6 cm
- Wooden plank measuring 244 cm x 1.9 cm x 1.9 cm
- Screws 3.8 cm long
- Screwdriver
- Screws 7.6 cm long
- Screws 2.5 cm long
- Drill
- Drill
- Wood glue
- Paint and putty
- Brush and spatula
- Saw
- Sander
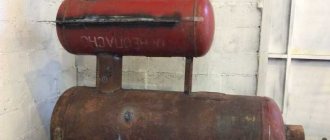
No. 6. False fireplace made of brick
This option allows you to achieve the most realistic appearance . But at the same time, it requires much more effort and costs than in previous options. Facing bricks are used for masonry. The only nuance of this method is the weight of the finished structure, especially if it has considerable dimensions. Therefore, before starting work, assess the condition of your floors. If you are sure that they can easily withstand a considerable load, feel free to get down to business. You will need:
- N pieces of bricks;
- mixture for brickwork;
- Master OK;
- primer;
- container for mixing the solution;
- drill whisk.
To solve the main problem , how many bricks are needed, you need a drawing with all dimensions. Knowing the size of one brick, you can easily navigate the total quantity in the store. In any case, the seller will always help you. The laying will not be difficult.
The main thing is to check the straightness of each row.
To give yourself a guideline, mark the floor and wall. This will help avoid distortions. Mix the solution strictly following the instructions and maintain the agreed proportions. Otherwise, your masonry may “crawl” and all your work will go down the drain. To achieve a more homogeneous mixture, use a whisk-style drill attachment. Do not spread the solution in a thin layer, but do not apply it in heaps either. It is necessary to maintain the same thickness, distributing the mixture evenly. A little advice - do not lay it on the entire surface of the brick, leave about 1 cm free on each edge.
When you lay the brick on top, you need to knock it a little so that it sticks well. In this case, the solution will definitely protrude and stain the bottom row. If you follow our advice, you will be able to avoid this, and the seams will turn out smooth and neat. Do not forget that the finished mixture has the necessary properties only for a certain period of time. Usually it is 60-120 minutes, read details . Therefore, you should not be distracted while working. Checkerboard laying looks most impressive, but in this case you cannot avoid the need for cutting. A grinder and a diamond wheel will help you cope with this. Don't forget about personal protective equipment. A stone fireplace will need to be covered with a lid on top. The finished brick portal does not require external finishing.
Conclusion
Making a decorative plywood fireplace does not require large financial costs and a lot of time. At the same time, this product can radically change the perception of the interior for the better. In addition, in this way you can hide any defect in the room, for example, an old radiator, which is expensive to replace.
The video in this article contains additional information on the topic discussed. If some aspects of making the portal are not completely clear to you, you can ask questions in the comments, and we will be happy to answer them.
No. 1. Raised fireplace made of cardboard boxes
Having a large amount of cardboard or small cardboard boxes from shoes or small appliances, you can very easily “build” a real fireplace. In addition to cardboard, you will need:
- a lot of wood glue;
- masking tape;
- roulette;
- scissors or stationery knife;
- something heavy as a press;
- something writing.
The beauty of this method lies not only in its ridiculous cost, but in the fact that the creation process can be carried out in a playful way, in which your children will happily take part. Moreover, there is no need to drill anything, and there is nothing to spoil. So, let's begin.
For the first time, we recommend using simpler forms to make the portal. Moreover, such a false fireplace can be used as a disposable one. For example, make it for the New Year and conduct a small family photo session against its background. You will get a lot of positive and memorable moments, surprise your friends and loved ones and make the most unusual decoration from the most ordinary materials.
If you have a large box from large equipment, then you need to carefully unfold it and make a pattern. To do this, draw out the dimensions of the back and side walls on its surface. You should end up with a rectangle that needs to be folded into the letter P. The sides need to be made voluminous. To do this, they should be folded as shown in the figure.
If one box is not enough, don't despair.
Glue small boxes together to form a frame. If necessary, place a press on the joint. All edges and joints at the end must be taped with masking tape and secured with glue. After the structure has completely dried, it can be painted using spray paints, covered with foam bricks, or decorated in any other way. Remember that this is a decorative, very fragile structure.
No. 2. False fireplace made of plasterboard
the cost of the finished also plays an important role . Let's start with the most affordable material, not counting cardboard, - drywall. It is a pleasure to work with it due to the fact that it is very easy to cut out parts of any configuration. And the installation of such elements is very simple. To build a medium-sized fireplace, one sheet of gypsum board is enough for you, because its dimensions are 1200x2500 mm. It is better to use a wall type, which has a thickness of 12.5 mm. To work you will need:
- gypsum board sheet or trimmings;
- profile or wooden planks;
- roulette;
- level;
- stationery knife;
- putty knife;
- finishing putty;
- primer;
- perforated corner,
- painting mesh;
- screwdriver and drywall screws.
In order to most accurately imagine how much space the fireplace you have shown in the drawing will take up, mark the installation location on the wall and transfer the external dimensions to it. Move to the opposite wall and evaluate the result. You may need to reduce or increase the size a little, or change the location. At this stage, you can still make all sorts of amendments. Only after you are completely satisfied with the dimensions and space, proceed to cutting out the parts and attaching the frame, taking into account changes, if any.
- basis For frame there may be remnants of a special profile for drywall or even wooden planks. According to the markings, screw the first elements to the wall with self-tapping screws. It is not recommended to use nails - threaded connections are much more reliable. If the size of the fireplace is quite large, for its stability and reliability, make additional mounting points on the floor. Use horizontal jumpers to give designs rigidity. In case of attaching profiles to a concrete base, first simply attach it to the wall and drill a hole together with it. After this, insert the dowel and secure it with self-tapping screws. The evenness of each element is required control the building level.
- After the frame is ready, transfer the dimensions of all the walls onto the gypsum board sheet, trying to place them as close as possible to reduce waste. For cutting, you can use either a regular stationery knife or a jigsaw. True, the latter will create a lot of dust and the cardboard at the edges may wrinkle and tear if you move too quickly. All details needed previously try on and refine the edges with sandpaper as necessary. When you are sure that all the elements fit perfectly into the frame, you can start to their consolidation.
- Be careful, tightening the screws. When installed correctly, their cap should be buried in the surface of the drywall to a depth of approximately 1 mm. This will greatly facilitate the cladding process in the future. Recommended distance between fasteners – 10-15 cm.
- After covering it is necessary hide all joints and unevenness. Finishing putty is best suited for this. The surfaces must first be primed. If the wall does not consist of a single piece, then the joints between the fragments must be cover with masking tape. All corners should be leveled using perforated corners, and then the first layer of mortar should be applied. The putty should be distributed uniform thin layer. After it has dried, the unevenness and sagging must be cleaned with sandpaper or a special metal mesh. Prime again to remove dust and apply the finishing coat of putty again.
At this stage, the construction of a false fireplace made of plasterboard is considered completed. Then there is only one small matter left to do - the decor of its surface, which we will talk about a little later.
Maximum realism
This type of fireplace involves a plausible reproduction of absolutely all elements of the fireplace, imitating the real design. Therefore, it is necessary to respect the actual dimensions of ordinary classic fireplaces and create the effect of a real flame.
To do this, electric fireplaces or electronic photo frames with video images of flames are installed inside the portal. This option is the most expensive, but the most realistic.
No. 4. False fireplace made of chipboard or old furniture
Another very suitable type of material for creating an artificial hearth is particle board. You can use both regular sanded chipboard and laminated chipboard. The choice is based on how the finished product will look. If you want to imitate a wooden fireplace, then, of course, it is better to give preference to chipboard. Work should begin, as in the first option, from the drawing. In this case, it is necessary not only in order to more realistically imagine the dimensions, but also so that in the place where you will purchase the chipboard sheet, you can immediately saw it into the necessary fragments. This is very convenient both in terms of easy transportation and during assembly. At home, all you have to do is fasten all the elements together using self-tapping screws.
The main difference between a false fireplace made of chipboard and a structure made of plasterboard is its mobility. It is not necessary to firmly attach it to the wall to achieve stability. By arranging a small base stand for it, you will make a completely independent structure, changing the location of which will not be difficult. And if desired, it can even be equipped with small wheels. With the proper skills, you can cut the sheet yourself. If you use laminated chipboard, you must also purchase a decorative edge that will hide the ends and make them more neat. By the way, you can also use old shelves or cabinets to make a “wooden” fireplace. And small doors can even serve as side walls. It will cost much less. The finished product must be removed from dust and sawdust and rubbed with furniture polish. A fireplace made of ordinary chipboard must be subject to further decoration.
Finishing a false fireplace
Now it’s time for the most creative stage, which consists of giving the frame the desired appearance. There are a great many options for covering a fireplace. In order for the choice to be successful, it is necessary to remember that a real fireplace consists of four main elements - a portal, a lid, a firebox and a back wall. Let's consider ways to finish each element separately.
Decorating the portal
Depending on the style of the room, you can use the following techniques:
- The easiest way is painting. The advantage of this method lies in its low cost, speed of execution and the ability to choose absolutely any shade.
- The most realistic method is cladding with decorative sandstone, gypsum or foam bricks. They are glued to a special mixture. To maintain uniform seams, use plastic crosses for laying tiles. The larger the portal, the wider they should be. After installation, the bricks can be painted in the desired color.
- Wooden panels will also be very appropriate for decorating false fireplaces in a classic style. To protect the surface, it is first opened with varnish.
- Decorative elements made of gypsum or polyurethane stucco look great on plain, smooth portals. They immediately become elegant and presentable.
- You can use decorative mosaic or even tiled tiles small sizes. You can lay out a specific pattern. In principle, any facing materials can be used. Even wallpaper it in the color of the wall and create the feeling that it was squeezed out of the wall. If only the design style did not contradict the interior rooms.
What to use for lining the lid
Sturdy structures, such as plasterboard or real brick:
- Can be covered with a piece of real wood, opened with varnish or a slab of artificial stone
- You can use a piece of plywood or chipboard as a base and line it with porcelain stoneware.
More fragile structures should not be heavily loaded.
- You can decorate the lid with small pebbles. To do this, apply a thin layer of adhesive mixture to a piece of plywood and drown the pebbles in it. After drying, open with varnish.
- There are remnants of laminate after renovation - great! Feel free to use it for the final element of the design.
- You can use the same material as for constructing a false fireplace. To do this, simply paint the lid in a color or highlight it with a contrasting shade.
What to place in the firebox and how to decorate the back wall
If you decide to use an electric fireplace, then the depth of the niche for it should be at least 40 cm and have an outlet. In all other cases, a depth of 20 cm is sufficient. The following elements can be placed the firebox
- Candles that will help create a very warm atmosphere and perfectly imitate the lights of a real flame. For a more harmonious composition, use candles of different heights and diameters.
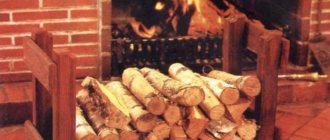
- Real logs stacked on top of each other will create the feeling that you are about to light a real fire.
- Large river pebbles mixed with multi-colored decorative stones.
- You can place a diode strip with a yellow spectrum of light on the floor, cover it with plexiglass or regular glass, and sprinkle the same pebbles or glass balls on top. The effect of a slight glow will be created, like from hot coals.
- anything at all , but leave this space free by simply placing a decorative wrought-iron grille in front of the fireplace.
- You can even put vases with flowers, various figurines or small pillows.
The back wall can be:
- A continuation of the portal and look the same;
- Lined with decorative bricks, which will give it more realism;
- Have a drawing that depicts fire;
- Covered with mirror panels or a piece of real mirrors This technique will help visually deepen the niche.
What to put inside
No matter how beautiful the fireplace portal may be, without fire, or at least its imitation, it has an unfinished appearance. There are several options:
- Buy an electric fireplace and build a frame around it. Not a bad option, especially since it also performs a heating function (due to the built-in fan heater). But it requires a fairly substantial amount. Especially if there are options such as imitation of firewood crackling and LED backlighting.
Electric fireplace - simple, but expensive - Place candles inside. Such fireplaces are even called candle fireplaces. When making a portal for such a fire source, it can be made shallow - 15-20 cm - this is more than enough.
The candle fireplace is definitely decorative. No functional load - Bio-fireplace (also called eco-fireplace). This is a small glass structure in which special biofuel burns without smoke or soot. It is absolutely safe and very decorative. It is still a living fire, albeit without smell or sound. Its downside is the price. For some models, it is comparable to the cost of installing a brick one, with the only difference being that a bio-fireplace does not require a permit.
The bio-fireplace can be placed in the made portal - Make something that looks like fire using red, warm white and yellow LED bulbs.