Who seeks will always find.
All the news, hurry up to visit us.
New on the site
- How long can the suction line be?
How to test a pump on a bench.
Latest reviews
- Senovad : Hello, Sergey. I'm sorry, but, as a rule, in such cases.
- Sergey : They drilled a hole in a well 4m deep (the water was high, in .
- Senovad : HOW? How.
- Edward : Help me choose a septic tank.
- Senovad : Hello, Andrey. First. Frankly speaking, what .
About the site
I created this site to tell you about my mistakes, to share my experience, my knowledge, my past, present and future projects, my ideas - not only about plumbing. Do not judge strictly. Here I am also learning, and mistakes are inevitable. Ask, I will definitely answer. Share your experience, it will be interesting to everyone.
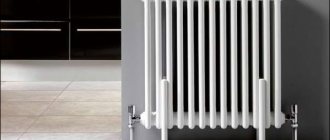
Radiator cap: types, installation, choice of trim
What types of radiator plugs are there? How to identify a product with a left or right thread? How does a radiator cap with an automatic air vent work? How to seal these fittings, and with what piping elements to connect them? Let's figure it out.
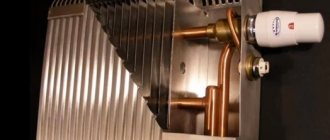
Set of plugs and fittings for connecting an aluminum radiator.
Classification
Plugs for heating radiators can be divided into groups according to several criteria.
Material
As a rule, it corresponds to the radiator material:
- For a cast iron battery, a cast iron radiator plug is used;
- For sectional steel and bimetallic radiators, steel pipe fittings are purchased.
However: for aluminum batteries, with rare exceptions, not aluminum, but the same steel products are used. The aluminum plug is too easily damaged when screwing in and installing the trim; in particular, 1/2-inch diameter threads cut into aluminum can be stripped with very little force.
Steel fitting for aluminum and bimetallic batteries.
Thread
It can be right-handed (screwed in clockwise) or left-handed. As a rule, the left plug for a cast iron radiator and the steel plug made in Russia for aluminum/steel/bimetallic devices are marked with the letter “L”.
If there is no marking, it is not difficult to identify the type of thread: it is enough to trace one of its threads over a couple of turns.
Functions
With a blind plug, everything is simple and clear: its only function is to plug the threads of the end section.
The pass-through radiator plug is used to connect the insulation and/or piping elements to the heating device. In fact, it is an adapter for a thread of a smaller diameter. The thread on the section depends on the material of the heating device:
| Battery Type | Thread size |
| Cast iron | DN32 (1 1/4 inches) |
| Aluminum, bimetallic | DN25 (1 inch) |
The diameter of the thread connected to the passage plug can also be different:
| Battery Type | Thread size |
| Cast iron | DU15, DU20, DU25 |
| Aluminum, bimetallic | DU15, DU20 |
Cast iron plug for liner with diameter DN20.
It’s curious: when connecting a 25 mm diameter line to a cast iron battery, not a drilled plug is used, but an ordinary cast iron adapter DU25-DU32.
In some cases, the harness or liner may not use through-hole plugs for connection, but directly the thread of the end section manifold.
When is this practiced?
- When connecting cast iron batteries to the filling gap in a system with natural circulation. The maximum filling diameter is important here - it affects the hydraulic resistance of the circuit; therefore, the DN32 pipe is screwed directly into the sections.
- When installing a welded flush valve. These products are also, as a rule, made to fit the thread size of the sections themselves.
- When installing the air vent. Many manufacturers produce Mayevsky taps and automatic air vents for DU25 threads.
What are the advantages of cast iron batteries?
- Durability. After installation, the service life can reach 50 years.
- Reliability. During operation they do not require any intervention or maintenance other than painting.
- High heat dissipation. One section of the radiator produces 140 W of thermal power.
- Resistance to water hammer. This is a common occurrence during startup and testing of heating systems by utilities. Cast iron has high strength, so it can withstand any load without problems.
- Good heat retention coefficient. An hour after switching off, the battery is able to retain about 30% of the heat.
- Rust resistance. Cast iron does not rust easily, so it can be seen not only in heating systems, but also as a material used in sewage systems.
Despite all its advantages, cast iron is fragile - take this into account when dismantling. Batteries should be carried and unloaded carefully, and try not to throw them.
Calculation of the required number of sections
Determination of the required power of heating devices is carried out in accordance with the recommendations of SP 60.13330.2010 (old SNiP 41-01-2003). The following are included in the calculation:
- characteristics of the room - area, ceiling height;
- the location of the room relative to the overall building volume of the house and the cardinal directions;
- parameters of external and internal air;
- degree of thermal insulation of walls, attic;
- type and number of windows installed;
- glazing area;
- features of heating systems - insertion diagram, degree of openness;
- power of one section depending on the type of radiator.
This is a rather complex technique using many coefficients, which in practice is replaced by simpler methods.
One of them is to determine the required heat transfer based on an approximate norm of 100 W per square meter of area.
Example:
- To heat a room of 30 sq.m. you need to spend 30x100=3000 W.
- If it is planned to install a bimetallic radiator with an interaxial size of 350 mm, the heat transfer of 1 section is determined from the technical data sheet or table - 136 W.
- To find the number of sections, the required power is divided by unit 3000/136=22.
According to this calculation, 22 sections will be required to heat the room with bimetallic radiators. A more accurate result can be obtained by using an online calculator. You need to enter your data in the fields and select the radiator model. The answer will be calculated in a few seconds.
In this example, the online program gave 3 different answers at different outside temperatures:
- if the average outside temperature in winter is -10°, 16 sections are required;
- at -20° - 25;
- at -30° - 34.
The conclusion suggests itself - the calculation must be carried out as carefully as possible, since the difference in the results is significant. If the excess radiators are compensated by thermostats, then if there is a shortage, you will need to use the boiler at maximum power. It is possible that the room will be cold even at high coolant temperatures.
Replacing and installing batteries
Advice: having decided on the type of design, it is better to start by purchasing the batteries themselves. The fact is that such things as a plug for a cast iron radiator, a Mayevsky tap, brackets for suspension and other accessories are often included with the product.
Dismantling an old radiator
If your cast iron battery does not heat well enough, and for some reason you do not want to replace it with a new one, you can give it preventive maintenance, clean it, rinse it, repaint it, and it will last just as long.
Disassembling cast iron heating radiators is not a difficult task, but requires care.
- Initially, you should make sure that the water is drained from the system; in this case, you should not rely on your own knowledge; it is better to contact a mechanic. Since even in summer, water may not be drained unless absolutely necessary;
- Next, the instructions instruct you to disconnect the unit from the system. If there is a threaded connection, then everything is simple, take a gas wrench and unscrew it. In the absence of one, you will have to use a grinder, and then remove the structure from the canopies;
- In order to carry out major preventive maintenance, it is necessary to disassemble the “accordion” into sections. Direct disassembly of cast iron heating radiators begins with unscrewing all side plugs. There is one nuance here, so that the fragile metal does not burst, the plugs must first be heated with a blowtorch;
- Be careful when unscrewing. The thread of a cast iron radiator can be right or left;
Section connection diagram.
- The problem of how to determine the thread direction in cast iron radiators is easily solved among professionals. A right-hand thread is cut on the right side of the section, respectively, on the left side there will be a left-hand thread;
Advice: since it can be difficult for an amateur to determine the threads on a cast iron radiator, especially when unscrewing the plugs, pay attention to the plugs themselves. Under the layer of paint they must have the letter “P” or “L”. Which means right or left hand thread.
- After unscrewing the plugs, you have access to the inside. In general, the sections are connected by nipples; they resemble pieces of pipe with different types of threads at both ends. On the inside there are grooves in the nipple for the radiator key. The photo shows such a key and a screwing diagram;
Radiator key diagram.
- But, as a rule, in old batteries the grooves for the radiator key are already rusted and even after heating, it is impossible to unscrew the nipple. This is where an ordinary grinder comes into play; the old nipples are simply cut. After which their remains are sprayed with a rust remover and carefully knocked out of the thread with a chisel;
- When your cast iron “accordion” is disassembled into sections, its interior is washed with water under high pressure. The paint on top can be peeled off using a drill attachment or a grinder with a metal brush attachment;
Assembly and installation of a new battery
Advice: if there are old iron pipes in the apartment, then it is better to immediately change them to plastic, and it will interfere with the neighbors, above and below. A few meters of pipe with fittings will cost pennies, and soldering them is quite simple.
As already mentioned, the sections in such radiators are assembled using nipples. Before connecting, wrap sealing tape onto the threads. Old masters prefer to seal with hemp and oil paint, but this requires skill.
Nipple with multi-directional thread.
The instructions are something like this:
- The radiator key is inserted into the section, a nipple with fum tape is put on it, after which both sections are connected and the nipple is screwed in;
- Do not forget to first put a rubber gasket on it, it will serve as a seal between the sections;
- You need to tighten it with reasonable force so that the metal does not burst.
Connecting cast iron heating radiators to the system can be side, bottom or diagonal, but whatever option you choose, it is better to install shut-off ball valves at the inlet and outlet and mount a bypass. This way, you will always have the opportunity to replace the radiator without turning off the system and draining the water.
Connection with valves and bypass.
Special fasteners must be used for cast iron heating radiators. If the brackets that come with the kit do not suit you, then when choosing from the catalog, you should pay attention only to brackets or floor stands marked “reinforced”; they are designed to bear the weight of cast iron structures.
Important: for 6 – 8 sections, 1 bracket is installed at the bottom in the center and 2 brackets at the top. With an increase of 5 cells, an additional canopy is added at the top and bottom.
Battery installation diagram.
The video in this article shows the technology for installing radiators.
Troubleshooting methods
Now let's look at what and how you can seal the leak if the above cases are not suitable or do not help for some reason. The main ways to solve the problem if the battery is leaking are the following:
- Cold welding
- Application of a cement-plaster cast
- Using table salt
- Thermo- and moisture-resistant adhesives
Cold welding
There are highly durable and easy-to-use 2-component epoxy resin adhesives. A certain variation of cold welding has been created for each metal, but there are also universal options. For example, you can buy a repair rod to seal cracks, seal holes and eliminate leaks in cast iron, steel and bimetallic radiators.
Before covering the leak, you will have to dry and degrease the surface. If necessary, remove corrosion with a brush or sandpaper. After this, apply cold weld according to the instructions on the package.
Filling made of cement and gypsum
If there is no cold welding, and a cast iron or other battery is leaking heavily, what should you do in this case? Use a cement-plaster cast. You will need a bandage, plaster or cement. Dilute the dry mixture to a creamy consistency, soak a bandage in it and wrap it around the area where the cold or hot battery is leaking. Make several layers to form a strong bandage. If it is not possible to drain the coolant, replace the cement with alabaster or gypsum. It is recommended to apply 1-2 layers of bandage soaked in cement mixture on top.
Table salt
The simplest way to remove a radiator leak at home without the help of a professional is to use table salt. The product is suitable for leaking threaded connections. Soak a first aid bandage in water and roll in salt, then wrap it around the leaking area. When the salt dries, the hole will be securely closed. A cement bandage is applied on top for reliability.
Installation of a cast iron battery
In order for the work to be carried out efficiently and the batteries to last for many years, you need to adhere to the following sequence of actions:
- The heating circuit must be turned off and the supply of coolant to the apartment must be stopped.
- The new radiator is hung on brackets with a building level checking its horizontal and vertical position.
- The plugs are unscrewed from the heating device.
- If the side connection scheme is applied to a single-pipe circuit, a bypass with a valve is first installed and connected. If the heating system is two-pipe, drains with taps are used.
How to disassemble a new cast iron radiator
Cases when new plumbing equipment fails are not uncommon. The reasons for the failure are various. As a rule, this is either a factory defect or a non-professional assembly of the elements of the heating structure. There are other reasons that require you to remove and disassemble a new cast-iron heating radiator yourself. One of these is the need to increase or decrease, sometimes this happens, the number of battery sections.
It doesn’t matter what problem prompted you to disassemble the heating plumbing fixture, but the sequence of repair actions is the same. First, the cast iron structure must be disconnected from the communications and removed from the hooks of the clamps.
Before carrying out such activities, it is necessary to completely drain the liquid from the heating system of a residential building. By the way, it is advisable to immediately drain the water from the heating radiator, a little, by lifting one of the sides. This way you will significantly reduce the weight of the structure and avoid many side incidents. Like, liquid getting on the floor, with the ensuing consequences.
Due to the heavy weight of the plumbing fixture, repair work is best carried out with an assistant. You must understand that during disassembly and assembly of a cast iron heating radiator, you will have to lift and tilt the structure more than once. Therefore, physical assistance will be very helpful. This approach will make the repair process much easier for you and make it less dangerous.
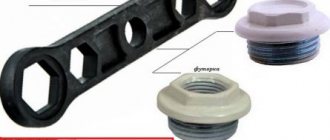
Next, we lay the removed cast iron radiator flat on a previously prepared platform, face up. This could be a wooden board or pallet. Then, using an adjustable wrench, unscrew the plugs and fittings. Futorki - hollow nuts, with internal and external threads, which are intended for connecting heating pipes to a heating product.
How to disconnect a section of a cast iron battery
Now, it's time to find out how to properly disconnect a section of a cast iron radiator. To do this, we need a special plumbing tool - a radiator wrench. You won’t find similar plumbing equipment in a store, but you can make it yourself, rent it, from a specialized service center or from a familiar plumber. The tool is specific and individual, it is a homemade device. As a rule, it is not possible to encounter two identical radiator keys. Their only similarity is the rectangular tip, 40 by 24 mm. Typically, such a tip is welded to fittings or a pipe with a diameter of 15-20 mm and a length of 60-80 centimeters. On the other hand, they make a special eyelet so that it is possible to insert, for a lever, a pry bar or a long crank.
What needs to be determined before unwinding the structure
Before unscrewing the structure, it is necessary to determine the direction of the thread of the nipple nut. Typically, it corresponds to the thread direction of the plugs and fittings. But there are exceptions. So, you need to approach disassembling a cast iron heating radiator with full responsibility and not rush to immediately use physical force if something goes wrong. Also, on modern heating products, sometimes you can find markings that indicate exactly which thread is: L - left, R - right.
Nipple nut
Once you have decided on the thread direction of the nipple nut, you can confidently begin disassembling the cast iron battery. If you need to unscrew the outer sections, then determining the required connecting nut will not be difficult. With segments that are in the middle or even closer, it is not much more difficult, but still possible. To do this, we measure the distance to them by placing a radiator key on top of the structure. We mark, on the fittings or pipe of the key, with chalk or a marker, the place to which you need to insert the radiator key, inside the product, in order to unscrew the sections. Next, we insert the homemade tool to the previously noted distance, turning it slightly. Such translational rotations will allow the tool to pass other nipple nuts along the way and reach the desired hole.
Having reached the desired nipple nut, fix the tip of the radiator wrench in it. Then, on the other side of the plumbing fixture, insert a long wrench or pry bar into the eyelet. Next, using little physical effort, unscrew the lower and upper nipple nuts half a turn. We perform the same actions on the other side of the battery. And so on until the sections are completely separated. The sequence of unscrewing the nuts will completely avoid distortion and tension of the metal, which, being fragile cast iron, is very dangerous.
designation on the drawing, application, differences from the right
Connecting parts and assemblies in mechanisms using screw threads is one of the oldest common types of fasteners. This ingenious invention of mankind has helped in solving many technical problems since antiquity. Individual structural parts to perform certain functions cannot be brought into action without interconnection. Nowadays, it is impossible to imagine the operation of mechanisms without threaded connections, which are versatile and reliable and can be assembled and disassembled.
For fastening products using screws, bolts, nuts, studs and other elements, right-hand threads are mainly used. This threaded connection is observed when screwing in screws and self-tapping screws. However, if there is a possibility of the part being unscrewed from the rotating shaft, non-standard left-hand threads are used in industry.
Differences between left-handed and right-handed threads
One of the main characteristics of a screw connection is the direction of the thread when the parts rotate. The full operation of the mechanism and the integrity of any structure depend on the quality of the connections, which are considered a responsible and important element.
In mechanics, there are two main types of fastening products. With standard threads, the lines of threads are removed clockwise towards the viewer. With a left-hand thread, the protrusions on the screw approach it from the left, moving counterclockwise.
Thus, the direction of rotation of the turns (helix) on the screw makes it possible to distinguish a right-handed thread from a left-handed one. On hexagon bolts, studs, nuts and fittings, left-hand threads are marked with the letter L.
How to distinguish right-hand threads in fasteners?
There are simple ways in which someone ignorant of mechanics can determine the type of threaded connection. For visual identification, you need to place the pin, screw or bolt in front of you with the chamfer up on the palm of your hand so that the spiral with turns looks at the observer.
Right hand threads run clockwise from the end of the helix to the right. If the direction of the turns (spiral) is to the left, then the part is twisted to the left counterclockwise.
Areas of use
Left-handed threads are used in mechanical engineering to secure parts to a shaft rotating to the right. If the nut is tightened in the direction of rotation of the shaft, then it will be tightened under the influence of the rotational force. When tightened in the opposite direction, the nut will come loose. The connection using left-handed fasteners prevents the possibility of unscrewing during operation of the mechanism.
In which areas are left-handed threads used?
To prevent connections from loosening
Here are simple examples when the use of such non-standard fasteners is necessary:
- In units and parts that rotate to the right, the parts may unwind when the mechanism operates. The powerful rotational force of the mechanism unscrews the nut, therefore, to prevent unwinding, left-handed fasteners are used in the direction of shaft rotation.
- The nipple of the radiators of the heating system is equipped with multi-directional threads. The coupling, when twisted with a special wrench, causes the rubber gasket in the radiator sections to tighten.
- The wheels of GAZ, MAZ, ZIL trucks use left-hand mounts.
- The drill chuck with the drill rotates to the right. To prevent loosening of the connection of parts, the chuck is attached to the shaft with a left-hand thread.
- Home fan blades.
- The gearbox transmits torque from the engine to the blades of the brush cutter.
- Bicycle pedals.
- Fastening the cutter to the shaft, discs of grinding machines.
- Some details in miter saws and circular saws.
In tension structures
Let's imagine this picture: housewives hang wet laundry on a line to dry. The rope begins to sag from constant use. The tension for the laundry has to be adjusted frequently. In such cases, bolts with double-sided threading are used here. One side of the bolt goes to the right and the other goes to the left. That is, in this case, the left-hand thread is used to adjust the degree of tension.
Designation on the drawing of a left-hand thread
The principle of operation can be represented as follows: a right-hand thread is cut at one end of the nut, and a left-hand thread at the other, and the bolts are screwed in. When the nut is rotated in one direction, it lengthens, and in the other direction, it shortens.
The use of left-handed fastening in tie-down structures is a prime example.
Such a device used in rigging work - a lanyard is a type of screw tie. This design features a pair of load-handling elements. One of them has a standard thread, the other, respectively, a left-hand thread. When the structure rotates during operation, the element body rotates, the tie is weakened, and a change in the direction of rotation leads to loading (tension). That is, when rotating, the parts of the mechanism move away from each other or move closer together.
Masts on ships are installed by pulling cables.
To protect against dangerous activities
Some operations require careful monitoring of work equipment to protect against increased hazards. In the gas industry, the reducer valve of a compressed propane cylinder is equipped with a left-hand thread, and the oxygen cylinder is equipped with a right-hand thread. Therefore, it is not possible to attach a propane tank to an oxygen tank. Using this method helps reduce the likelihood of dire consequences.
In branding
To protect against the use of counterfeit parts in the automotive industry, manufacturers resort for commercial purposes to the marketing ploy of using left-hand cutting, from which their products acquire uniqueness and individuality.
This idea ensures that customers will only buy spare parts for repair or replacement from the official manufacturer.
If you find an error, please select a piece of text and press Ctrl+Enter.
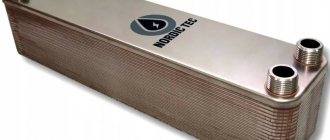
Accessories for heating radiators. Installation and features
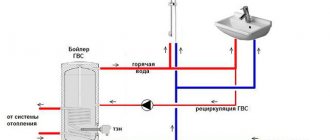
The principle of connecting different types of heating batteries is almost the same, but they differ in the equipment used for this. Accessories for radiators are offered for sale individually, as well as in sets, which contain all the products required to connect one battery.
Popular types of heating radiators
In the vast majority of apartments and houses you can find 4 types of heating batteries:
- Cast iron.
- Aluminum.
- Bimetallic.
- Steel.
There are also plastic and copper radiators, but they are practically not used. Each type of popular battery type has its own specific performance characteristics and connection method. The only exceptions are aluminum and bimetallic radiators, the connection principle of which is identical, as are the components used for this.
Cast iron batteries
Heating radiators of this type have been widely used in the past due to their high resistance to corrosion and oxidation. Despite their massiveness and high cost, they are still relevant today. The fact is that in central heating systems the circulating coolant is too contaminated, so batteries made of other materials wear out in just a couple of years.
What is the secret of popularity
- Let's start with the fact that such units are considered perhaps the most durable . Most reputable manufacturers confidently offer a 50-year warranty. And this is quite justified, for example, in Tsarskoe Selo, a radiator installed 110 years ago is still functioning;
Important: there is an opinion that the cast iron radiator now is worse than in Soviet times. This is only partly true. It all depends on the quality of the product and the manufacturer. If the battery is cast in accordance with domestic or European GOST standards, then there is nothing to be afraid of. But when purchasing units from Chinese or Turkish “masters”, a person is essentially taking a pig in a poke.
Standard MS 140.
- Cast iron, although a brittle metal according to its characteristics, is still quite durable . The working pressure for such a battery is 8 – 12 atmospheres, plus during short-term surges or water hammer, it can withstand a load of up to 20 atmospheres. If we take into account the fact that in the urban network the pressure rarely exceeds 6 - 8 atmospheres, and the average water hammer force is 15 - 20 atmospheres, then the safety margin is obvious;
- Such batteries are present both in the budget segment of the market and in luxury goods . The fact is that the price of the classic MS-140 is perhaps the lowest. At the same time, the cost of artistic thick-walled casting can sometimes be several times higher than the price of good bimetal;
- Adherents of modern materials forget about the quality of the coolant in our urban networks . This harsh “cocktail” can destroy many newfangled models. While cast iron is completely resistant to all chemical attacks and neutral to corrosion, it simply does not rust;
Design of modern cast iron batteries.
- Thanks to the large diameter of the battery channels, any debris slips through it, practically without stopping , which is very important for urban high-rise buildings with old pipework;
- As you know, cast iron has a high heat capacity . The battery takes a long time to gain temperature, but also maintains it for a long time. In case of interruptions in heating, this unit will give off heat for several hours after switching off;
Battery connection options.
- Technically, installing a cast iron heating radiator with your own hands is not very difficult . With a tool and a couple of assistants for support, the job can be completed within a day;
- Another important advantage is the fact that components for cast iron heating radiators can be found in any hardware store and the price for them is quite reasonable;
Characteristics of modern cast iron radiators.
We seem to have figured out the reasons for the nationwide popularity.
Now let's talk about the pitfalls of these heating devices:
- The first reason why many people refuse cast iron is the serious weight of the structure. Judge for yourself, a standard section weighs about 7 kg; on average, 7 – 10 sections are installed per room. As a result, we have from 50 to 70 kg of empty structure; when filling, another 1 - 1.5 kg is added to each section. In addition to installation problems, not every wall can support such a unit;
- The minimum volume of coolant in one cell is about 1 liter. For modern competitors this figure is 3–5 times less. And as you know, the more liquid, the more energy is required to heat it and maintain temperature. Plus, it is very difficult to quickly regulate the temperature in such systems, due to their high inertia;
Data of the classic cast iron radiator MS 140.
- The area of such structures, compared to modern analogues, is somewhat smaller, and accordingly the heat transfer is lower;
- Reproaches regarding the unattractive design are unfounded; to some extent they can be addressed to the widespread MS-140. As for figured casting, their beauty leaves them far behind their modern counterparts;
Dismantling an old cast iron radiator
Dismantling an old cast iron heating radiator can sometimes become a very labor-intensive process and not always a justified solution. The further fate of the device, the effectiveness and feasibility of repairs depend on how susceptible the structure is to corrosion and all kinds of deposits and deposits. Therefore, before starting to repair equipment, it is necessary to thoroughly examine the old cast-iron heating radiator. In short, carry out a complete audit of the plumbing product.
Disassembled cast iron battery
As a rule, to disassemble an old cast iron heating radiator with your own hands, you will need the following tools:
- Gas burner or blowtorch;
- “Bulgarian”, with a circle on metal;
- Hacksaw for metal;
- Chisel and bit;
- Heavy hammer or medium sledgehammer.
Where to disassemble an old heating battery
It is better to disassemble the old heating battery outdoors. The most acceptable option is to go outside, placing a cast iron radiator on something wooden. Before you begin disassembling the old product, it is advisable to rinse it thoroughly with water. Afterwards, you can try to repeat all the repair steps, as with a new one. If an attempt to disassemble and unscrew the tightening nipple nuts is unsuccessful, which is quite likely, then additional measures are taken:
Heat the junction of the cast iron radiator sections
- Heat the junction of the sections. For this, a blowtorch or gas torch is usually used. The cast iron structure, at the junction of the sections, needs to be heated well in a circle. Then, while it’s still hot, try to rip off the nipple nut. If it was not possible to unscrew the spruce immediately, as a rule, they do several heating-cooling cycles. When working with fire and hot metal, you should not neglect safety precautions. For repair work, use thick protective gloves. If this method does not help, then the use of radical measures to influence the metal usually helps to radically change the created impasse.
- Saw the joint connecting the sections. The most effective and quick way to perform such an action is with the help of a grinder. At the same time, you need to cut carefully. The main thing is not to overdo it. It is better to cut with short breaks, rather than in one go. This way you can avoid the appearance of cracks and chips. Using a hacksaw for metal will help 100% avoid all negative consequences, but will require a lot of time and effort.
- Break, broken section. When heating and sawing a heating structure seems like a bad idea, you can simply break the unnecessary element of the product with a heavy hammer or sledgehammer. You need to start pounding from the middle of the section and gradually move towards the joints. But still, disassembling the heating battery, slowly and carefully, is a more acceptable option. A split in a non-working section can inadvertently damage one of the adjacent sections of equipment.
Causes of breakdowns
As in the case of the sleigh in the famous saying, the heating system should be prepared for the new season in the summer.
The main causes of problems are:
- Low heating of the aluminum battery when there is no air in it.
- Noises and knocking are heard in the system.
- The aluminum radiator was found to be leaking.
- Plaque appeared at the joints of system elements.
In houses with autonomous heating, these problems can be easily identified by running the system at maximum operating mode. Higher pressure will show the integrity of the structure and allow you to see possible defects in it. In houses with centralized heating, it will not be possible to carry out such work on your own, but you can submit a request to the management service that their specialists have carried out the necessary work.
If during testing the system showed its best side, but problems began at the height of the season, then emergency dismantling of the radiator is required.
To do this you need to do the following:
- The shut-off devices are closed, as is the riser (the media must first be drained from it).
- A container for draining the coolant is installed under the bottom connection.
- Unscrew the lower ball valve so that the water (antifreeze) remaining in the battery drains out.
- The top valve is also unscrewed and the battery is removed from the brackets.
If the question arises of how to repair an aluminum heating radiator if it does not heat, then you should look for the reason for this condition of the device:
- The first thing you need to do is bleed the air from the system and wait until the batteries warm up.
- If nothing has changed, then you will have to dismantle the radiator and check for the possibility of clogging . Sectional aluminum radiators do not hold much coolant. By pouring water into the removed heater, you can calculate whether its quantity corresponds to the parameter stated in the data sheet. If not, then it is not necessary to repair the aluminum heating radiator, but to flush it , for which you should pass water under high pressure through the structure until it brightens.
- If the flow of water did not “cope” with the task, then you will need knowledge of how to disassemble an aluminum heating radiator into sections and do the same work with each element separately . Sometimes, when very dirty, a brush (not metal) is required to rid the battery of thick dirt.
Sometimes the only way to return the batteries to a hot state is to replace the aluminum radiator section or extend them. With the lateral type of connection this will not be difficult, whereas with the bottom or diagonal method you will have to increase or shorten the length of the pipe.
How to disassemble a cast iron heating radiator?
To disassemble the radiator, remove it and place it horizontally on the floor. It is not difficult to disassemble a new radiator using a plumbing radiator wrench. It is only important to correctly determine the direction of the thread.
A radiator key is a homemade device, which is a working rectangular tip measuring 40 by 24 mm, welded to a long reinforcement rod. On the other side there is an eye for a lever.
The key is inserted into the nipple nut and using a lever, the nut is torn off in the direction of the thread. First, a revolution is made from above, then from below - and so on in turn. To disconnect the old battery, you need to warm up the connection with a hair dryer.
Assembling a cast iron heating radiator
Before assembly, first of all, it is necessary to clean the threads of all sections from traces of packing material and jute. To do this, you can use a wire brush, kerosene and rags.
The quality of the thread must be checked by testing new nipples and plugs. The assembly procedure is shown in the diagram.
Before assembly, each glass is treated with Tsiatim or graphite, wrapped in jute tow and screwed into the body of the register by one thread.
You only need to collect it on the table
Install the o-ring on top, the next battery register and align along the axis. After which you can turn it with a key. If the thread “does not work,” then it is better to disassemble it and try to determine the cause. Assembly is performed with minimal effort.