Today, a variety of heating devices are used in greenhouses, differing both in design features and type of fuel. They run on electricity, gas and solid fuel. You can make a good stove for a greenhouse with your own hands, or you can purchase a ready-made model - here everyone is determined by their capabilities and planned budget. But those who are sure are right: a greenhouse is not a house, and therefore there is no point in investing a lot of money in heating it - the idea simply will not pay off. Therefore, consider the popular options below on how to make a good stove with your own hands - they are a huge success among gardeners and are practically in no way inferior to expensive industrial models. In this article we will look in detail at the manufacture of the most popular types of stoves for greenhouses.
- 2 Option No. 2. Standard greenhouse stove using wood chips and wood
- 3 Option No. 3. Making a sawdust stove is profitable!
- 4 Option No. 4. A stove with a heat exchanger - for warm watering!
- 5 Option No. 5. Greenhouse buleryan - nothing complicated!
Features of modern products - a hidden threat
What is the reason? I think, first of all, in the recent publications on the pages of newspapers and magazines, as well as on television screens, about what modern sellers of “healthy” products feed us. As it turned out, for the most part, all these beautiful and appetizing delicacies do not always bring the desired benefits to the human body, and in some cases they can cause serious harm to the body, even death. In addition, it is much more pleasant to see vegetables and berries on your table that were picked just a few minutes ago from the garden, without pesticides or other chemical additives. The benefits of such products are undeniable.
Oven - solution to the problem
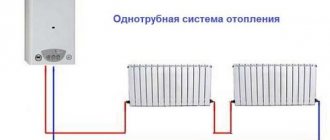
Many areas of our country, due to climatic conditions, are not predisposed to growing heat-loving plants. The latter simply do not have time to mature. But you can grow excellent vegetables all year round in your greenhouse plot. How? The answer is simple - use a greenhouse stove.
Stoves for heating greenhouses allow you to harvest crops all year round, even in areas with a cold climate.
Expensive doesn't mean impossible
Understanding that a stove for a greenhouse requires the use of energy resources and their high cost, we want to devote this article to the question of how to make a stove for a greenhouse using fuel with your own hands, the purchase of which involves minimal costs, and in some cases will not cost you at all no costs. Do-it-yourself greenhouse stoves should be economical, easy to operate and use available fuel.
Fuel - take a look around
Unreal? You are wrong. So where to start? If you already have a small greenhouse on your site, it’s time to take care of its heating. First of all, you need to decide on the type of fuel that your stove will use to heat the greenhouse. Option one: there are woodworking companies near you. This is not uncommon in our northern regions. The main waste from such enterprises is wood chips and sawdust. This means that it is most profitable to build a stove using sawdust with your own hands.
Sawdust - simple and long lasting
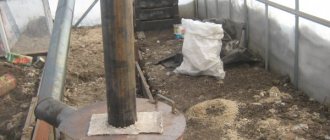
But heating a greenhouse in cold weather requires constant operation of the stove. This means that we will need to build a stove that, while heating the greenhouse around the clock, will consume a minimum amount of fuel and with one or two refills. In other words, you will need a stove for a long-burning greenhouse. The picture shows a stove burning sawdust.
Sawdust stove diagram
Almost anyone can make this long-burning stove with their own hands in literally one day. At the same time, the stove perfectly heats the greenhouse room.
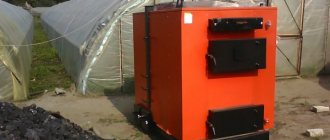
Factors for choosing a solid fuel boiler
Before equipping a room with a boiler, you should consider some points:
- Climate zone. Since the greenhouse is heated in the winter months, it is necessary to consider the statistics of previous years and clarify the average temperature in each month. This will allow you to see the extremes of temperature fluctuations and select the most profitable option for the boiler and fuel.
- Greenhouse material. If the main light-transmitting material is a simple film, then the plants will not survive extreme cold, no matter how actively the boiler works. If glass or polycarbonate is used, then the chances of getting a harvest are much greater.
- Fuel availability. If the nearest coal mine is hundreds of kilometers away, then using coal as the main fuel can be economically expensive. In addition to the cost of the product itself, logistics costs will come on top, and the price may be higher than that of gas and electricity.
- Room area. A large greenhouse (approximately 400 sq. m.) will require either one powerful boiler or two. If the partitions are transparent, then it is better to take two devices to optimally maintain the temperature on the outskirts.
Not all trash is trash
How does a long-burning stove work and what is it made of? You can make such a stove with your own hands from any available material:
- Sheet steel
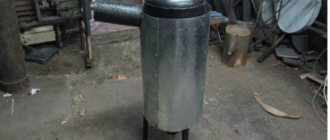
- Propane tank
- Large diameter pipes
- Old metal barrel
A simple barrel - why not bake?
As can be seen from the figure, a homemade long-burning stove is a container with a lid separated by a metal partition dividing it into two parts. At the bottom, the legs are welded and a door is installed. A piece of pipe is welded in the upper part, acting as a chimney. We did not specifically indicate the dimensions, since everything depends on the containers and materials used. Let's say you are using 200 liter drums. You will need:
- Metal barrel 200 l – 2 pieces
- Pipe section 159 mm
- Lengths of reinforcement or steel strip
We build a stove - we cut, drill, cook
Let's start production. In principle, you can use one barrel, just having two barrels will greatly simplify the manufacturing process.
- Cut out the top of the first barrel . In the place indicated in the figure, cut a hole and weld the chimney pipe.
- In the bottom, strictly in the middle, cut a hole with a diameter of 100 mm . That's all for now with this barrel.
- We mark the second barrel . To do this, install it vertically and mark 250 mm from the bottom.
- After this, the barrel must be cut into two parts .
- is cut in the lower part for storing firewood and a door is installed. It can be made from any available material.
- Legs made of reinforcement or steel strip by welding Here you can improvise.
Final assembly
We have a stove itself for heating the greenhouse with a chimney and a separate firebox with legs and a door.
- We connect them as shown in the figure and weld them. Try to make a quality seam.
- All that remains is to make the lid .
- You can make it from the remains of the barrel from which we made the firebox.
- That's it, the oven is ready. All that remains is to install it in the greenhouse and connect it to the chimney.
We will not dwell on the chimney in detail; our resource describes in some detail the various types of chimneys.
Seed preparation
Let's start by preparing our seeds for sowing.
Tomato seeds are usually small. They remain similar for up to 10 years. First of all, you need to start disinfecting the seeds. Prepare the following solution: 0.3-0.5% solution of potassium permanganate (3-5 g per liter of water). And put the seeds in a gauze cloth, wrap the gauze, and put it in the solution for 0.5 hours. This is how the seeds are disinfected and all surface infection is killed. After this, we wash the seeds in running water, and then we can do as we please. You can germinate seeds in any growth stimulants; for this we use either aloe juice or wood ash. After that washing under running water, we can keep the seeds in wood ash for half a day. Leave until the seeds germinate, and then proceed to sowing.
We plant in containers with a depth of at least 4-5 cm, we can sow tomatoes directly in the pot. We prepare the soil for preparing and growing seedlings very carefully. It is better to put 100-120 grams per bucket of soil. dolomite flour, 50 grams of any complex fertilizer or 1 tbsp. superphosphate and 1 tbsp. potassium nitrate or potassium sulfate. Mix everything thoroughly, pour water on it so that the soil is always moist. And after that we start sowing.
Charging the Furnace - Requires Skill
We will also need a special device for “charging the stove.” The figure shows how the compaction cone is structured. It can be made from wood or any other available material.
The main thing is that its lower part fits freely into the central hole of the partition separating the stove and the firebox. It will be enough if the cone enters the hole to a depth of 15 - 20 mm. The top of the cone should have a diameter of 150 mm. Now you can refuel the oven. To do this, remove the lid and insert the cone into the hole, thereby blocking it. We gradually load sawdust into the oven, compacting it well. It is necessary to load two-thirds of the oven volume.
Sawdust stove - launch
When the sawdust is loaded and compacted, remove the cone . A cone-shaped hole formed in the sawdust. We put a small amount of wood chips into the firebox and set them on fire. They have one task - to set fire to sawdust. Due to the draft passing through the hole in the sawdust, they quickly flare up; you can splash a little kerosene or diesel fuel at the very beginning, or you can do without them. When the sawdust starts to burn, you can close the lid. As you can see, we only needed the firebox for ignition; the rest of the time, the entire combustion process will take place inside the stove.
Sand seal - simple and effective
The oven started working. If you have doubts about the tightness of the lid, you can install a simple sand seal, as shown in the figure.
Sand gate
But if the chimney is correctly selected and the draft is good, there should be no smoke from under the lid. Using the door you can adjust the draft.
Pyrolysis couldn’t be easier
Depending on the size of your stove, it will heat the greenhouse for several hours. So, for example, a similar stove made from a propane cylinder can operate without refueling for 8 to 10 hours. As for the 200-liter barrel, the operating time without refueling reaches more than 30 hours. It all depends on the adjustable draft and ambient temperature. The duration of operation of a pyrolysis furnace is determined by the use, in addition to burning sawdust, of burning gases emitted by sawdust. This is a kind of simplest version of a pyrolysis oven.
But the most interesting thing is this:
- If you do not have two barrels, you can make this stove without a firebox .
- Just place the barrel on the legs, weld the chimney, cut the bottom hole, fill with sawdust, close the lid and you are ready to start.
Of course, it won’t be very convenient to light it, but the stove will work just as well. just need kerosene, diesel fuel or a little used oil to light it. The draft can be adjusted using a damper installed in the chimney pipe.
Video description
About the stove after two years of use in the following video:
- Multifunctionality. Modern models delight with thoughtful functionality. There are options that can switch to another fuel (coal or wood waste). Many models can be used not only for heating, but also for cooking or heating water.
- Safety. Properly installed (according to SNiP rules) stoves comply with all safety standards, regardless of design and material of manufacture. Many units have the ability to regulate the combustion or afterburning of gases.
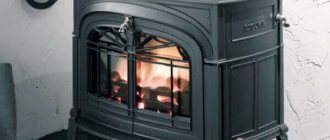
- Appearance. A wood-burning stove can become a decoration for your home. Manufacturers offer options for interiors decorated in any style. You can purchase a model in a modern, strict and rational design, or in a national design, using spectacular details (even hand-painted tiles).
Tiles resistant to high temperaturesSource versace-promo.ru
Many people consider the disadvantages of wood heating:
- Features of brick kilns. Such structures are famous for their ability to retain heat for a long time, which is ideal for a house in which they live permanently (or for a long time). For houses where they spend 1-2 days, the metal option is more suitable.
- Size. A bulky stove will take up a lot of precious space in a small house; a small one may not cope with heating if its capabilities are not designed for spacious housing.
- Difficulty in ensuring security. An open flame is not only beautiful, but also carries an increased risk of fire and therefore requires constant attention. Installing the stove on a prepared base and protecting it with metal foxes does not seem like a fairly safe option to everyone.
Wood stove for heating a house with a dedicated place for firewoodSource illinoisnow.org
- Fuel. The firewood must be of proper quality (dry), otherwise the stove will not last long. An improper firebox also increases costs.
- Additional problems. Not everyone is ready to put up with the fact that firewood takes up too much space, and the stove needs regular (too frequent) cleaning. In some cases, a wood-burning stove becomes not an economical option at all (if the owners have forgotten that not only firewood costs money, but also its delivery).
Recycling plus heating
Stoves for heating greenhouses can use other types of fuel. For example, if you use a furnace that runs on used motor oil , then you are unlikely to have a problem purchasing this type of fuel. Many enterprises and service stations will be happy to get rid of working hours. Let's look at a waste oil furnace. Of course, it is more difficult to manufacture , but everything will be more than justified when using it. Homemade stoves for greenhouses using this type of fuel never lack it in areas with a wide network of service stations and enterprises using trucks.
Operation of the furnace during mining
The figure shows a diagram of this furnace. becomes red hot during operation . You can successfully cook food on it.
Scheme of the furnace in production
We provide precise drawings describing the materials for the manufacture of this furnace. You can use a stainless steel chimney pipe.
Drawings and dimensions of the furnace during development
Chimney – vertical only
Let’s make a reservation right away that this stove does not involve the use of horizontal sections of the chimney. In other words, we choose a chimney for this stove that is strictly vertical.
There is only one requirement - safety!
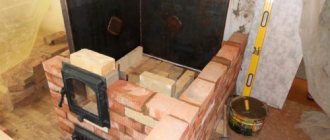
Currently, we have considered only two options for heating stoves for greenhouses. But there are many more options, just like Kuznetsov’s bell-type stove for greenhouses , or the miracle stove for greenhouses and heating garages and boxes with the funny name “Bubafonya”. We understand perfectly well that long-burning stoves for greenhouses are currently in great demand among the population, and we will try to write more than once about economical stoves for greenhouses on the pages of our Internet resource. When making stoves for a greenhouse with your own hands, regardless of whether they are made of metal or a stove for a brick greenhouse, always remember that a stove is, first of all, a serious and fire-hazardous unit . Therefore, it is worth doing all the work competently and efficiently.
Source of the article: https://sdelaikamin.ru/pech-dlya-teplicy/pech-dlya-teplicy-svoimi-rukami-128
Furnace in operation - start-up and principle of operation
This oven works as follows:
- Used oil is poured into the container through the filler hole , 2 - 3 l
- Light a paper wick and light the fuel
- Cover the hole with a flap so that there remains a hole with a diameter of 10 - 20 mm
- After the fuel ignites, adjust the degree of its combustion using the damper
- After 5 - 6 minutes the oven will heat up and enter operating mode
- regulate the furnace power using the damper by adding fuel into the filling hole
When adjusting the furnace power, note the time during which your furnace operates on a certain amount of fuel. With the help of simple calculations, you can achieve a result in which you will have to add fuel to the stove tank a minimum number of times.
After all, it is not the fuel itself that burns, but the vapors formed during heating. In this oven you can use:
- Waste oil
- Heavy oil products that cannot be regenerated
Combustion in this furnace occurs in an optimal mode, in which minimal emissions of harmful substances occur into the atmosphere.
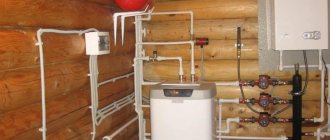
- If you go even further and install a water or air jacket on your stove, then this stove can be connected to a water heating system , the power is quite enough.
- As for the greenhouse, heating with this stove will allow you to receive heat practically for nothing , spending time on delivering used oil.
Agree with the nearest organization or service station, and prepare several barrels on the site for fuel for the heating stove for greenhouses. Your greenhouse will always be provided with free heat, and the service station will be glad to get rid of harmful petroleum products.