The supply of vegetables from distant southern countries in winter provided the shelves with tomatoes, cucumbers, herbs, eggplants and other exotic agricultural products. The first euphoria from such abundance did not last long: buyers quickly realized that for the beautiful appearance of vegetables they had to pay a high price - their health.
Agricultural chemistry and genetic modifications make it possible to produce products that can withstand long-term transportation and long-term storage, reaching the shelves in perfect condition. More and more buyers are consciously abandoning overseas products in favor of greenhouse vegetables and fruits.
About induction
An induction boiler has absolutely no advantages over conventional ones equipped with heating elements.
All the talk about this is the fantasy of marketers and sellers with the goal of selling their product to gullible customers. The percentage of electricity converted into thermal form is almost the same for all types of heating devices. Do not equate boilers with kitchen stoves - indeed, an induction surface is more economical than steel “pancakes”, there are no losses in heat transfer through the surface of the stove to the dishes, the heating spot exactly matches the size of the pan, the tightness of the seal does not matter. In heating boilers, the coolant is immediately heated; there are no intermediate elements. There are no advantages, the efficiency of the boilers is the same. The rest of the “arguments” regarding reliability and safety are also made up. Disadvantages: increased winding wear due to interturn short circuits, increased insulation aging, vibration when heating, labor-intensive repairs. Induction heating systems are by no means new; they have been used in industry for more than 70 years, but only a few domestic Kulibins offer their use for heating buildings
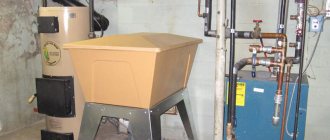
Electric boiler on heating elements, fully equipped, adequately controlled
Types of heating boilers
There are several types of boilers that can be used to heat a greenhouse.
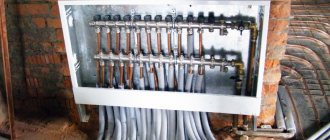
Gas. How to connect registers correctly?
A gas boiler consists of various components, in particular a steel or cast iron heat exchanger, an atmospheric burner (sometimes), a control system, a water circulation pump, an expansion tank and a safety valve.
Photo 2. Gas boiler for heating a greenhouse. The device is quite large and is often located outside the greenhouse.
The device operates on the basis of natural or liquefied gas, is unpretentious to water quality and can be installed anywhere in the greenhouse.
Technical characteristics of the greenhouse boiler:
- Efficiency minimum 93%;
- power - from 40 kW;
- the volume of water in the boiler is at least 6 liters;
- device height is about a meter;
- width - 54-60 cm;
- length - 90 cm;
- gas consumption - minimum 5.0 kb. m/hour.
After turning on the boiler, the water flowing through it is heated in the heat exchanger to the required temperature and supplied to the system circuit by a pump. This is a single-circuit option that is used only for heating. To heat the greenhouse and supply hot water, double-circuit devices with a built-in hot water heating circuit are used. Mostly single-circuit models are used for greenhouses. Smoke is removed through a specially equipped chimney or through a steel pipe.
In order to connect the register to the water circuit, you need to find out where the hot water will be supplied and where the cold water will go. Next, holes are made at the ends of the register for threaded couplings, to which fittings are then attached that connect the heat exchanger to the water circuit. An air vent is welded on the opposite side of the supply. It can be located at the end, but it is better for the valve to be at the top.
Since the register is heavy, it is necessary to provide reliable fastenings. There are two ways to place the heat exchanger: wall-mounted and floor-mounted.
In order to install the register on the floor, you need to make legs, and also additionally fix the device against the wall.
Also, do not forget that the distance from the surface of the register to the walls and floor should be about 25 centimeters.
Advantages: the gas boiler is unpretentious in maintenance and does not require constant human intervention. It heats up instantly and ensures even heat distribution inside the greenhouse.
Disadvantages: high price for models for heating a large area, costs for gas supply, need to coordinate the connection of the boiler.
Heat accumulation using bottles and water containers
A folk method, simple and no less ingenious. Bottles with water are placed with their necks in the soil, the cork is not tightly closed. During the day, water is heated by the sun and, under pressure, little by little penetrates the soil, moistening it and protecting plants from sunburn.
At the same time, condensation forms on the walls of the greenhouse at night, which additionally moistens the soil, and wet walls transmit heat less well. Water needs to be added every 3 days: the lower the ambient temperature, the more bottles need to be placed inside the greenhouse or greenhouse. The bottles should be placed evenly between the bushes throughout the free space. Small bottles should be preferred as they heat up faster. Do not forget that when using bottles in greenhouses, for better heating, an additional layer under the main film is required - a cover made of non-woven material is best.
It also makes sense to use water accumulators - basins, buckets or barrels of water accumulate heat during the day and release it into the greenhouse at night.
Electric boilers
Electrical systems are used to heat the air and soil. Most often, an electric boiler is purchased to heat large greenhouses in which plants that require light and temperature grow. An electric boiler allows you to accurately set the temperature that should be maintained inside the greenhouse and use electricity to additionally illuminate the plantings.
Types of electric boilers:
- The simplest convectors will be an excellent choice for a polycarbonate greenhouse. The heating coil, through which air flows, uses little energy, but cools quickly and is not suitable for heating the soil;
- Heaters are distinguished by the fact that air circulates through the heating coil forcibly and in large volumes. The heater is equipped with a thermal fan, and the heated air goes not only into the space inside the greenhouse, but also into pipes laid underground and along the walls;
- Heating cables are laid in the soil and heat it, and this, in turn, increases the air temperature;
- Water for hydronic heating is also heated using electricity. This system is used both to heat the soil and to increase the overall temperature in the greenhouse. This heating option is recommended for use in large rooms, since electric boilers for water heating are usually sold as powerful ones, intended for farms and private homes. An alternative option is to make a wall-mounted greenhouse and install heating to it from the common boiler of a private house.
An alternative way to heat a greenhouse using electricity is to use IR heaters. These devices are shaped like regular ceiling lights, but they emit bright light that heats the objects it hits rather than the air. Infrared heaters work from the mains, and they can be used in greenhouses of any size and type. The only drawback of this heating option is the high cost of the device and the small area on which the light falls. Attaching an IR ceiling heater with your own hands is no more difficult than hanging and connecting a regular lamp.
A separate category of heating systems for greenhouses is combined boilers. They usually operate on two types of fuel at once, for example, gas and solid fuel or gas and electricity. Such complex systems are used to save one of the resources or for greater security. For example, at night electricity may cost less than during the day, and not every summer resident will decide to leave a boiler running on gas or coal for several days. Additionally, combined systems come in handy in areas where power outages occur frequently.
Choosing the most suitable boiler for heating a greenhouse is a difficult task. Its decision depends not only on the size and conditions of use of the greenhouse, but also on the preferences of the gardener. Some people choose simple gas stoves, while others choose a complex and expensive long-burning system. But in any case, installing a convector allows you to increase productivity and extend the time of use of the greenhouse by at least twice.
The right choice of IR equipment for a greenhouse
We’ve sorted out the issue, but you probably have a question about how to choose this equipment for your greenhouse?
Types of Equipment and How to Use Them
Available IR equipment is of two types:
- Light
- Longwave
Lighting equipment
During operation, the light units heat up the emitter increased; it can reach a temperature of 600˚C. Such systems are best used in large greenhouses.
Long wave equipment
Unlike light ones, the emitter of long-wave units does not heat up to such temperatures. Therefore, these units are well suited for small-area greenhouses, for example the “Rainbow” model; for a garden plot it will be just right.
Choosing an energy carrier
Earlier in our article we mentioned that IR heaters allow you to save energy, knowledgeable people understand what we are talking about. Those unfamiliar with these devices probably think that we meant electricity.
This is not so, when we said energy carriers, we meant various energy carriers. Not many people know that there are IR heaters that run on gas, liquid fuel and, of course, electricity.
This circumstance allows you to select units suitable for a specific area and the possibility of using one or another type of energy carrier. You will figure this out for yourself; choose what is more convenient for you.
Placing heaters inside the greenhouse
IR heaters on the ceiling.
We have selected the heaters, and now move on to placing them inside the greenhouse.
- The advantage of these heaters is that they can be installed without the help of specialists. Of course, you will need some knowledge and experience in their correct placement, but we will help you with this.
It is important that in order to minimize heat loss in the greenhouse, heaters must be placed closer to the doors and windows.
Power for cold areas
Heaters installed closer to the windows.
- When choosing units that will be located in these coldest zones, you should choose units with a power of 500 watts.
- It should be remembered that the distance from the unit to the nearest plant should not be less than 1000 mm.
Distances and dimensions for placement - installation methods
IR heaters with ceiling mounting are very convenient. These devices are very convenient to use over seedling planting sites.
Many people will ask what distance should be between such a heater and the seedlings. In this case, everything must be done experimentally; it is done like this:
- Hang the heater at least 1000 mm from the seedlings
- After the plants grow, the heater can be raised a little higher, at the distance of the grown plants.
There are times when it is impossible to fix the heater to the ceiling; the design features of the greenhouse do not allow it; in this case, the heater must be fixed to a rigid, fixed structure.
- IR heaters are installed at intervals of 1500 – 3000 mm.
- In this case, the height of the greenhouse plays a role; the higher the device is located, the larger the area it heats.
- When choosing the height of the heater, it is important to remember one more circumstance: the higher the heater is, the larger the area it heats and at the same time the less heat gets to the plant.
- Therefore, observe moderation in everything. Based not on saving on the number of heating devices, but on the comfort of the plant.
Location of smaller units
We considered the issue of the location of high-power units. The next step is to consider the use of lower power heaters, 250 watts.
Simple human logic dictates that heaters of a given power must be placed at intervals of no more than 1500 mm. The placement height, as in the first case, is done experimentally.
Installation method
- Heaters of lower power do not require special fastenings and can be hung on a regular wire.
- By increasing or decreasing the length of the wire, you can successfully adjust the height of the device.
Tips for saving energy
You can use a few tips to save on energy and at the same time increase the efficiency of these devices; this is to arrange them in a checkerboard pattern. In this case, the number of zones remaining without heating is significantly reduced.
- This recommendation is effective when you need to heat the entire area evenly.
- If you need to maintain a certain temperature regime strictly in certain areas, then heaters must be placed directly above these zones.
The main disadvantages of the IR heating system
Like any other devices and units, IR heaters also have their disadvantages; not mentioning them means providing our readers with not entirely reliable information, which we cannot afford.
- The main disadvantage of these devices can be considered their high cost.
- This circumstance sometimes scares away potential buyers of these products.
But we can say the following: with long-term operation of this equipment, all costs for its acquisition are ultimately justified.
- There are many criticisms and complaints about the short service life of these devices.
- In this case, we can say the following: the whole point is not in the device itself, which is truly a heating model worthy of your attention, but in the quality of the product itself.
This circumstance can be directly attributed to the integrity of the manufacturers.
Our advice is to choose your devices very carefully. The low price of the product offered is the first sign to think about whether you are purchasing a quality product.
Types of boilers for heating greenhouses
The main criteria for choosing a suitable boiler model for heating a greenhouse are its cost, the need for monitoring on an ongoing basis, efficiency indicators and availability:
- Solid fuel boilers. Firewood, sawdust or special briquettes are used as fuel material. Efficiency = 75%.
- Liquid fuel models. Gasoline, kerosene or diesel fuel are used as fuel. Efficiency = about 96%.
- Gas boilers. This includes devices running on natural or liquefied gas. Efficiency = max 98%.
- Electric boilers. Power source - electrical grid, solar panels or wind turbines. Efficiency is 95-97%.
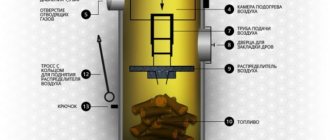
Operation of a solid fuel boiler
The appearance of a solid fuel generator is similar to a stove, but the difference is that the functional state is ensured by the gas released during the combustion process.
The photo shows a solid fuel boiler for a greenhouse
The boiler design has several sections. One of the sections is designed to accommodate fuel. The combustion process is ensured by the supply of oxygen through the lower air supply system.
The pressurization system has an adjustable damper; when the fuel has burned sufficiently, the damper is closed, after which the flow of oxygen is reduced to a minimum. Due to the absence of air, a chemical process begins to occur and pyrolysis gas
. It enters the second compartment, where heat is generated.
Pyrolysis boilers are one of the most economical models for heating greenhouses with a small area. Thus, the recommended amount of fuel per 100 m2 of space is only 11 kg/day.
Heating a greenhouse with a pyrolysis boiler has another positive quality:
Possibility of heating not only air, but also water. This makes it possible to develop several options for the greenhouse heating system (for example, install radiators around the perimeter or place pipes under the fertile layer). Also, when using a pyrolysis boiler, the amount of smoke becomes less than 95%, and the fumes are collected in a special compartment and do not poison the atmosphere with harmful emissions.
The disadvantage of a pyrolysis boiler is its high cost.
Gas and liquid fuel boilers
Gas can be supplied to such boilers either stationary (natural gas) or mobile - that is, fuel is supplied from an installed cylinder, which requires periodic replacement.
Gas flows through the pipes
An important point when heating a greenhouse using a gas boiler is the mandatory presence of ventilation.
This is necessary to ensure normal conditions for plants and greenhouse workers, since carbon dioxide produced during the combustion process is extremely dangerous in both cases. The same situation applies to the use of liquid fuel boiler models. However, it will not be difficult to convert a gas boiler into an oil boiler and vice versa. You just have to change the burner to another one with a nozzle of a suitable diameter.
Electric boilers - their advantages and features
The use of electric heating boilers for greenhouses is allowed only if it is not possible to install another type of installation.
This is due to the cost of electricity and the availability of alternative energy sources. The only possible exception would be the use of heat accumulators. Such projects are participants in a multi-tariff electricity consumption plan and allow saving up to 60% of energy costs. At the same time, the heating, ventilation and heating system is fully automated.
The video clip shows how you can heat a greenhouse with a converted boiler (from a mine boiler to a pyrosine boiler). When the temperature outside the window is minus 21 degrees, the greenhouse warms up to + 25 degrees. Interestingly, the heat generator is literally assembled from scrap metal. We recommend watching it.
We hope that the article was useful to you. If it's not difficult, please click on the social networking buttons below.
Insulating a polycarbonate greenhouse in winter
Before deciding how to heat the greenhouse in winter (with electricity, gas or from the boiler room), you need to take care of insulating the foundation and soil. Otherwise, all the kilowatts of electricity used and cubic meters of pumped gas or water will be wasted; the heat will escape through the soil.
Insulation from cold winds
If a heated polycarbonate greenhouse with your own hands is still only in plans, then start by choosing the right location
Pay special attention to the wind rose. Gusty and strong wind currents lead to the destruction of the greenhouse, and if the structure survives, then considerable heat losses are possible
If this is not possible, then place the greenhouse from north to south. This is done in such a way that there is a main wall on the north side of the structure. Ideally, it should be adjacent to a brick extension (maybe block or paving). In this case, the entrance is through the extension, and the opposite southern wall is made solid. Due to this arrangement, when a person enters the planting area, the possibility of cold winter air reaching the plants is eliminated.
In addition, you can place a boiler or stove in the extension; they will not have any negative impact on the plants. And the polycarbonate chimney will not harm the polycarbonate, since hot chimneys are discharged to the north side. If the heating in the greenhouse is electric, then a distribution panel is located in the extension. Another advantage of such a vestibule is that many people equip small storage rooms in it.
Foundation and insulation of the blind area
Heating a polycarbonate greenhouse in winter largely depends on the foundation. Novice summer residents incorrectly believe that they can simply mount the structure on the pins included in the kit, or install it on the ground. This cannot be done in any way, because without a foundation the greenhouse will be blown away by a gust of wind and moved around the site. But even if this does not happen, a greenhouse built simply on the ground may become warped due to the soft soil. As a result, cracks will appear under the base through which cold will flow in.
This design will guarantee that the soil and roots of plants planted in the greenhouse will not freeze during severe frosts. First, a foundation is installed from a concrete mixture (crushed stone, sand and cement) or ready-made blocks (even used concrete curbs will do). Next to the foundation, the top layer of soil is removed to a depth of 0.5 m and a blind area is erected:
- At the first stage, wooden formwork (from boards) is installed.
- Next, a leveling sand layer is poured.
- Then polystyrene is laid as insulation.
- Now a reinforcing mesh (from reinforcement) is installed and filled with concrete mortar.
Sometimes they use not a concrete blind area, but a cobblestone one, which is laid directly on top of the sand layer.
Soil insulation
No less attention is paid to soil insulation. The main goal of the event is to protect the upper heated fertile layer from the lower, colder one. If you properly insulate the soil, you will have to spend less money on additional heating. A common option for soil insulation consists of the following steps:
- In the place where the beds will be, pits are dug to a depth of 0.6 - 0.7 m.
- Lay a uniform sand layer (5 cm thick).
- Insulation (slabs) is placed on the sand; it must be combined as tightly as possible at the joints.
- The next layer is drainage (10 cm). For it you can use crushed stone, expanded clay, pebbles, pieces of broken brick. In addition to insulation, the second main function of this layer is to prevent stagnation of moisture in the soil. Drainage also creates a kind of protection for polystyrene, because when digging up the top layer of earth, you can touch and damage the insulation.
- The last layer is fertile soil.
The easiest way to insulate the soil in greenhouses is to raise or arrange so-called warm beds.
They turn out to be raised above ground level by about 35-40 cm. Date: September 25, 2022
About the efficiency of various electric heating systems
As for heating with electricity, direct heating systems are more economical: fan heaters, convectors, heating cables and heated film floors. The lower efficiency of a water system with an electric boiler is explained by losses in the delivery of coolant: overcoming the hydraulic resistance of the liquid, the operation of the circulation pump. Warm floors have the best performance due to optimal temperature distribution. How to ensure their safe operation in a greenhouse is a separate issue. But the difference between different types of electric heating is small, we are talking about only a few percent.
https://vasha-teplitsa.ru/wp-content/uploads/2014/05/banya18430.jpg — It’s quite possible to create a warm floor using a heating cable in a greenhouse. It can be protected from possible damage by a strong mesh laid on top.
How to choose boilers for greenhouses - advice from farmers
When choosing between solid fuel, electric, coal, or steam boilers, you need to take into account the area of the greenhouse, financial capabilities, type of covering and types of plants grown.
Recommendations from experienced farmers will help you navigate and make the right decision:
- If there is a gas pipeline on the site, it is more profitable to install a gas boiler. This statement is true for buildings of any size.
- For year-round heating of areas over 50 square meters. m and if you have available firewood, it is better to choose a solid fuel unit with long combustion. The costs of purchase and installation will pay off within two to three years. Payback in small greenhouses (15-20 sq. m) is about 10 years.
- When heating is turned on seasonally (in early spring), it is advisable to use a low-power hanging electric boiler without a chimney outlet. However, during severe frosts they are not effective, since they heat the air above, but the soil remains cold - this is fraught with freezing of plants.
Homemade solid fuel stove
Some gardeners consider direct combustion solid fuel models like potbelly stoves to be the optimal heating boilers for small greenhouses. The efficiency of the system can be significantly increased by connecting a water circuit and installing a pump for pumping coolant.
Features of using the oven
Long-burning stoves are an improved version of the Russian stove, economically consuming a wide variety of solid fuels (firewood, old furniture, sawdust, pine cones, various garbage, coal). They were actively used during the Civil War and the Great Patriotic War, when even ordinary firewood was in short supply and boiler houses were idle.
In them, the fuel burns from top to bottom, and as it burns out, the fire sinks lower and lower. This increases the burning time and releases more heat. The fuel in such furnaces slowly smolders at high temperatures and burns out to the end (pyrolysis). This process is regulated by the supply of air through a vent or blower.
Did you know? Americans attribute the invention of the potbelly stove to the famous American politician Benjamin Franklin. In the USA, such stoves are called “fat bellies”.
At the beginning of work, the stove is heated well. Otherwise, the combustion process may stop. The chimney in these structures must be straight and have no bends, since it will need to be periodically cleaned of soot, and it must be accessible for such work.
Such devices should be used when constant control is possible, because firewood needs to be periodically added to them. It is good to make a foundation for them and cover them with brickwork.
The stove should not be placed close to flammable or unprepared materials, since metal parts become very hot and can cause ignition. The firewood used should not be damp.
Gas heating boilers
Boilers using gas as fuel are considered the most convenient and economical. Installing them with your own hands is not difficult, and even the largest buildings can be heated using such a system.
Gas boilers can be:
- Single-circuit, designed to heat only air or soil;
- Double-circuit, capable of warming both the soil and the air to the required level.
For small rooms that are not used in winter, or those built in regions where there is no frost, a single-circuit gas stove will be sufficient, which will warm the soil or warm the air, extending the life of the greenhouse. Double-circuit systems are useful in large, capital buildings, in which the cultivation of fresh herbs does not stop all year round. If the greenhouse uses a double-circuit gas boiler, then one pipe, through which smoke from fuel combustion flows, is laid underground, and the second, with hot air, is laid along the top and walls of the greenhouse.
Depending on the size of the room, a direct draft or forced draft boiler can be installed in the greenhouse. The first type is based on air circulation inside the greenhouse itself, and the second is on the forced drawing in of air from outside and, accordingly, increasing the volume of air flow.
Infrared gas heaters are an excellent option for quickly raising and maintaining temperature for a short time if the main heating system in the greenhouse fails. The device consists of two parts - an infrared heater, with tubes in which gas burns, reflectors, and a small gas cylinder. Inside the tubes of the device, fuel burns and is converted into infrared radiation, which heats the soil, plants and walls of the greenhouse. It is irrational to constantly use such a device due to the relatively small power and fuel reserve, but in case of frost, turning on a gas IR heater will help save plants from the cold.
Gas boilers are considered the most popular in their class. Fuel for them is cheap and easy to buy, the system does not depend on the supply of electricity and does not consume it, and such a boiler can be installed even in a small greenhouse. But at the same time, the boiler is not considered fireproof, like any gas appliances, it has large dimensions and requires the installation of a chimney.
With the help of gas, not only air, but also water can be heated. Water in water boilers and heating systems is often heated with this type of fuel.
Installation of heating systems
Having decided on the choice of heating system, you can proceed to installation work. Below we will look at how to make heating in a greenhouse.
Water system
There are two ways to make water heating. Let's look at the first one.
As a heater, you can use an old fire extinguisher, the top of which is cut off. At the bottom you need to install an electric heater with a power of 1 kW, for example, from an electric samovar.
Then the electric heater is filled with water, and two water pipes are connected to the fire extinguisher using nuts and rubber seals.
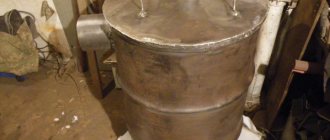
Now let's look at the second method, which requires a 40-liter boiler and a 2 kW electric heater.
The operating principle is as follows: the water, gradually heating up, rises through the pipe into the expansion tank, then passes through a pipeline located along the perimeter of the greenhouse structure at a slope.
The boiler can be a large-diameter pipe, to the end of which the bottom must be welded.
The expansion tank can be made from pipe scraps. Tank volume – no more than 30 liters. In order to connect the boiler and riser, you need to weld couplings on both sides of the tank.
You also need to make a hole in the tank through which water will be added.
The boiler must be grounded, for which a three-core wire of at least 500 V is used. Two wires are intended for the heater phase, one for the boiler.
The key point of water heating is the ability to use solid fuel boilers, which can be located in the greenhouse or in another separate room.
Video:
If boilers are placed separately, a significant portion of the heat coming directly from the boiler is lost.
Such boilers are economical and fireproof; they are often used in industrial greenhouses.
Air system
Organizing air heating for a greenhouse is not difficult.
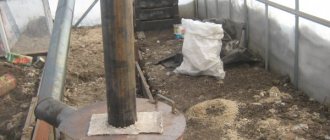
To do this, you will need a metal pipe with a diameter of 55 cm and a length of 2 m, one end of which is inserted into the greenhouse, and a fire is built under the other.
It is the constant maintenance of the fire that is a big disadvantage.
Due to the fire, the air in the pipe is quickly heated, which penetrates into the structure.
Heating with solar batteries
For this system, you need to make a solar battery, the power of which is calculated in advance.
To do this, you need to dig a hole 13-14 cm deep in the greenhouse and cover it with thermal insulation material, for example, polystyrene or other material with good thermal insulation properties.
Then you need to lay polyethylene for waterproofing, and cover it with wet sand on top. Finally, the hole is filled in on the ground.
Video:
Such a system will provide round-the-clock heating of the greenhouse, but still cannot be the main method of heating due to the small number of sunny days.
Furnace system
To build a stove, the vestibule of the greenhouse must be lined with bricks, and the chimney must be laid along the entire length of the structure. The location of the stove should be 30 cm from the end of the greenhouse.
There is another way to construct a furnace. The calculation for it is as follows: you need a barrel with a volume of at least 3 cubic meters, in which you need to make holes for the chimney and stove. The oven base is then inserted into the hole.
Now you need to remove the chimney from the container and place a 5.5 m high pipe on it outside the greenhouse.
Video:
Then an expansion tank is installed on the barrel, and heating must be made from a profile pipe by welding and the pipes must be laid on the ground in increments of one meter.
If you follow the instructions, there will be no difficulties during installation of the stove.
Thus, you can do any greenhouse heating with your own hands, having projects in front of you to work on. The main thing is to strictly follow the instructions and observe safety precautions.
About alternatives
There are, of course, alternatives:
Use other, less expensive types of fuel. If you have a resource base, solid fuels will be the cheapest: firewood, coal. Pellets make sense only if the plant for their production is located nearby. They are inexpensive, unlike other types of solid fuel, they allow you to fully automate the combustion process, but due to their low volumetric weight, delivery costs a pretty penny. The winning option is to find a source of supply of used technical oils. Natural gas is convenient and relatively inexpensive, but it looks like your yard is not gasified. Liquefied gas is unprofitable, especially taking into account the installation of a gas tank. Heating with petroleum heating oil (oil) is on the verge of profitability. Diesel fuel will definitely not pay for itself; you will end up at a serious disadvantage.
A wood stove is a troublesome, but the cheapest and most effective way to heat a greenhouse. For a more even distribution of heat, there is a fan nearby
Use renewable heat sources. A heat pump is unlikely to justify itself; operation is extremely cheap, but the equipment itself is very expensive. In many European countries, the state subsidizes such installations; we do not have such a practice.
Heat pump - environmentally friendly, economical to operate, but very expensive to install
It makes sense to pay attention to the heating system of Ivanov’s vegetarian garden, which you can read about in the series of popular science books “Smart Garden” by Kurdyumov or on his website: https://kurdyumov.ru/knigi/teplica/teplica08.php. This cannot be said to be very effective, but still some kind of savings
Setting up a small greenhouse using all the elements of Ivanov’s solar vegetarian plant hardly makes sense. Solar panels and automatic gate control are unlikely to pay for themselves. But the location of the greenhouse on the southern slope, the blank insulated northern wall and the ground heat exchanger are sound ideas. And the gates can be turned manually. Thanks to the constant movement of air, the flow of which is created by fans, heat is accumulated in the ground during the day, and energy is released back at night. This solution will not increase the average daily temperature in the greenhouse, but will help level out the difference between daytime and nighttime temperatures. You can also use containers filled with stones or water as a heat exchanger
Ivanov's vegetarian device
If the greenhouse has not yet been built, it is worth using rational construction solutions that reduce heat loss and allow for more efficient use of solar radiation: correctly orient the greenhouse towards the sunny side; attach it to the south side of the house; make the northern side blank, insulate it well and line the inside with reflective material, foil; partially buried in the ground; provide for the possibility of installing an additional layer of greenhouse film during the cold period, etc.
A set of simple measures used during construction will reduce greenhouse heating costs by 1.5-2 times
Partial (0.5-1.5 m) deepening of the greenhouse into the ground is justified. Sunlight penetrates in sufficient quantities through the roof, the walls should be well insulated and lined with foil
The photo clearly shows additional rolls of film rolled up to the ridge of the greenhouse, which are unrolled in cold weather.
Use traditional methods of heating greenhouses, for example, a mixture of manure and straw laid in the fall lasts all winter, releasing a lot of heat.
Electrical system PLEN
Heaters PLEN.
I would like to add a little about this heating system, since not everyone is familiar with it.
- The operating principle of PLEN heaters is constructed as follows. Infrared radiation does not heat the air in the greenhouse itself, but the structure and the soil to which it is directed.
- The heat from the heating of the structure and soil warms the air inside the greenhouse.
- In other words, this system works on a principle very similar to solar heating.
Advantage of IR heaters
Scheme of heating a greenhouse with infrared rays.
- The advantage of this type of heating is that the warmest heating zone is concentrated below, closer to the soil and only second at the very top.
- For plants, this is the most effective way of heating; there is no need to install a ventilation system designed to equalize the temperature in different zones.
Greenhouse heating methods
To maintain a temperature inside the greenhouse of at least 25 degrees Celsius, powerful equipment is required.
The peculiarity of its choice is that it requires heating a fairly large area - sometimes up to 1000-5000 square meters. m.
For this use:
- gas boilers;
- solid fuel stoves;
- electric boilers;
- diesel and combined models;
- IR heaters.
Reference. The most inexpensive option in terms of maintenance is gas boilers. By spending money once on the purchase of the device itself, in the future you will have lower utility bills for gas, maintenance and repairs.
Diesel fuel and electricity are costly ways to heat a large greenhouse area. Coal, firewood, sawdust, and briquettes are a little cheaper, however, they must be constantly purchased, delivered, and stacked manually.
The power of gas heaters for greenhouses with an area of up to 400-600 sq. m should be at least 40-60 kW. This is quite heavy equipment (from 100 kg), which is often controlled using automation.
Air
This heating method is usually used using solid fuel stoves. A “potbelly stove” can be used as a stove, which is installed outside the greenhouse and connected to a pipe for removing flue gases. To ensure uniform heating of the room, a horizontal chimney is made along the length of the greenhouse.
Photo 1. Air heating of the greenhouse: several convectors are installed around the perimeter of the room that heat the air.
For air heating use:
- electric, gas boiler, stove or regular outdoor fire;
- Heating elements/convectors;
- radiators and blowers.
Sometimes infrared heaters, which are mounted in the walls or ceiling of a building, are also classified as air heating. They are completely dependent on the electrical network, but are capable of heating a large area of the greenhouse.
Air heating with a heat pump (a temporary way to solve the problem), as well as heating with steam, which is supplied inside the table through external pipes and returns back to the boiler through other underground pipes, is also considered air heating.
Advantages: easy installation, volumetric air heating (bottom, top, side).
Disadvantages: low efficiency, sometimes dry air.
Water
It involves supplying water through radiators and pipes along the walls or in the center of the greenhouse. Due to this, a large area of the room is heated. This may be single-pipe wiring or other types of piping.
The heat source is a boiler (usually gas, electric or solid fuel), to which the pipes are connected.
For water heating use:
- chimney for waste disposal;
- system for automatically adding coolant (to maintain a constant temperature);
- external and internal pipelines, boiler.
Water heating can easily work due to the natural circulation of water. You can buy a pump and use it as needed.
Reference. It is best to choose cast iron radiators or bimetallic, aluminum devices that are easily connected to the heating system.
Advantages: the ability to install it yourself, warming up not only the air, but also the soil.
Disadvantages: not suitable for large areas.
Possible problems with a homemade device
- The most common problems when operating a homemade heating unit are:
- uneven heating of the internal space;
- excessive dry air.
Both factors negatively affect the condition of the plants in the greenhouse, so you should be especially careful when laying air pipes and providing additional air humidification. Undoubtedly, the selection and installation of technically complex, expensive equipment requires a considerable amount of time and effort to study the issue. However, these efforts can be attributed to a prolonged investment in a future rich harvest, which will delight you both morally and materially for more than one season.
DIY heating sources
Simple heating boilers for a greenhouse can be assembled and installed with your own hands. For implementation, you can use metal sheets, an old barrel or an empty gas cylinder.
Boiler for a greenhouse from a gas cylinder
Necessary materials:
- empty gas cylinder;
- metal grill;
- door latch;
- handles and hinges;
- U-shaped metal pipe – water circuit coil;
- steel plate and chimney pipe.
Step-by-step progress of work on manufacturing a heating boiler for a greenhouse:
- Cut the balloon in half. One hemisphere is the furnace body, the second is the ash tank.
- Prepare a grate that matches the size of the cylinder.
- Insert the grate into the body and secure it with welding - the grate should divide the space into 1/3 and 2/3 parts.
- Cut a circle from a steel plate, the diameter of which is equal to the cross-sectional size of the cylinder.
- Cut 1/3 off the circle. For the most part, prepare a rectangular hole. Weld fittings to the door (latch, hinges, handle).
- Make an ash pan door from the smaller segment of the circle.
- Cut the bottom of the ash pan from the second half of the cylinder and connect it to the end - the door.
- Inside the boiler, mark the location of the ash pan and drill two holes at the top of the body.
- Weld the coil to the inner surface of the furnace by threading the ends of the pipes through the holes. To secure the fastening, you can place a metal sheet.
- At the top of the boiler, cut a hole for the pipe and weld the pipe. The chimney should pass through the greenhouse at an angle of 20°, and the exit should be through the back wall. The height of the pipe is equal to the height of the greenhouse plus 1 m.
- Connect the chimney to the pipe using a coupling and sheet asbestos.
Connecting the chimney to the combustion chamber
When connecting the boiler, it is important to ensure reliable thermal insulation of the area where the chimney comes into contact with the roof of the building.
Video: greenhouse heating system
The proposed videos demonstrate the features of organizing and operating various methods of heating country greenhouses.
Option 1. Water circuit: connection through a Zhukovsky gas boiler, exhaust - galvanized pipe 15 mm, installation method - combined (at the top and bottom of the greenhouse). Coolant circulation is forced through a pump.
Video: Water system
Option 2. Stove heating. The use of two types of wood stoves in the greenhouse: brick and metal, the chimney is laid horizontally. Recommendations for choosing wood for kindling.
Video: Stove heating
Video: boilers for greenhouses
Video: Technology for assembling a pyrolysis boiler for a greenhouse, installation, connection and operation
Video: Transformation of a wood-burning stove into a water boiler
Brick ovens in a greenhouse
Stove structures made of brick are usually installed in greenhouses, which are used throughout the year. They have increased heat capacity and therefore can heat even in severe frosts. A stove is selected for a greenhouse so that its performance matches the area.
To build a simple version of the furnace you will need:
- solid ceramic brick – 220 pcs.;
- fireclay brick – 80 pcs.;
- clay solution – 80 l;
- fireclay solution – 30 l;
- concrete for pouring the foundation - 0.25 m3;
- grate;
- doors - blower, combustion and cleaning;
- smoke valve;
- pieces of glass insulation or roofing felt.
The height of the stove to the chimney is 215 centimeters; it can be placed in a greenhouse of standard sizes. The dimensions of the structure being constructed are: horizontally 51x77 centimeters.
The work is carried out step by step:
Step 1 – creating the base. It is constructed from reinforced concrete. The thickness of the foundation should be at least 20–30 centimeters. First, soil is removed from an area of 70x100 centimeters to a depth of 35-40 centimeters. To level the bottom, take coarse sand and cover it with a 20-centimeter layer. Formwork is installed along the perimeter of boards. Rods of 12 mm reinforcement are laid in the form of a lattice in two rows with a cell side of 20 centimeters. The concrete mixture is poured into the finished pit. Allow at least three weeks to dry the foundation, periodically moistening its surface.
Step 2 – laying the firebox and ash pan. The stove is laid out according to the diagram. The first 4 rows are made of red brick using clay mortar. Install the ash pan door, securing it with wire in the masonry. Rows 5 to 12 are made of fireclay bricks using a refractory mixture. A grate is placed in the 5th row, and a firebox door is placed in the 6th, 7th and 8th rows. Rows 9 - 12 form the arch of the combustion chamber.
Step 3. Rows 13 – 15 of fireclay bricks are laid out on refractory mortar. The furnace arch is covered with rows 13 and 14, and a cleaning door is placed in rows 15 and 16. From the 16th row, masonry is made with red brick. Rows 17–21 form smoke channels, and in the 22nd row the first of the smoke dampers is placed.
Step 4. From rows 23 to 27, continue making smoke channels. From the 28th row they begin to narrow the channel, and in the 29th row a second smoke damper is installed. Rows 30 and 31 form the stove vault. Starting from the 32nd row, construct a chimney of the required height from 4 bricks with dressing.
About heating greenhouses
The most effective way is to heat the soil. A do-it-yourself winter greenhouse can be created in several ways.
By laying the heating circuit in the ground, it is possible to provide acceptable conditions for the normal growth of plant roots and the supply of nutrients to them. Simply heating the air can also create comfortable conditions for most crops, especially in the climate zone in which the European part of Russia lies.
When heating greenhouses, there is a large flow of heat through the walls and soil. Therefore, it is customary to install 250 - 350 W of heating system power per 1 m2. Taking into account the different heights of greenhouses, you can use a different standard - 100 W per 1 m3.
The elements of a water heating system provide air heating by convection and should be located as low as possible. The air heating system is mounted on top, at a height of at least 2 m from the ground. The temperature of the air supplied through the air ducts should not be higher than 40°C.
Greenhouse on the garden plot
Boiler and chimney
A do-it-yourself greenhouse with heating means not only hanging radiators and laying pipes, but also installing a boiler with a chimney.
The heating boiler can be placed either inside the greenhouse itself or placed in the heated room itself, which will further increase the efficiency of the entire system. The heat transfer from the boiler to the surrounding space will be unambiguous, so the air temperature in the greenhouse will increase.
But in the first option, you don’t have to go inside the greenhouse at all while loading the boiler with fuel. The second option not only improves productivity and efficiency, but also seriously saves space.
Convenient boiler – convenient operation
Laying out a brick oven is not an option, because for a greenhouse it will be too bulky and labor-intensive, unless you have a greenhouse of regional significance. Ready-made heating boilers are not that expensive, but they are compact, efficient and easy to use. The boiler issue is closed.
Now the chimney: this is perhaps the most important part of the entire heating system. It’s probably worth putting the chimney on a light foundation, installing a supporting channel or pipe and attaching the main structure to it. This is for black pipes, that is, for ordinary material under the chimney.
We shallowed out the horizontal version of the chimney. Therefore, we do not expect high efficiency from the smoke removal system in terms of air heating. We make the chimney as short as possible and reliable in terms of sealing, so that combustion products do not get inside the greenhouse. It is best to buy a sandwich chimney and place it vertically directly from the boiler - then there will be no need for a foundation.
Install the structure no higher than 7.5 meters, but no lower than 6 meters - this is the optimal height for good traction. Both the boiler and the chimney can be installed using a simple, classic heating scheme. And now connect the circuits to the boiler - according to your project.
Optimal choice
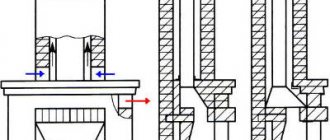
The best option for heating greenhouses is to install a potbelly stove, which is considered the most economical and easy to operate. The heater consists of a barrel with a door for the firebox, a chimney, a pipe for the heat to escape outside, and a jumper in the upper part.
Heating occurs due to the movement of smoke:
- Hot smoke moves through the pipe; the pipe is installed either on the sides of the greenhouse or in the center.
- The surface of the oven radiates heat.
- Warm air forms above the jumper and flows out through the pipe.
Waste lumber, coal or firewood can be used as fuel. The quality of combustion depends on the type of fuel and the penetration of air into the combustion chamber of the furnace. This heating method is suitable for those who can often control the combustion process. This is the only drawback of the stove.
For long-burning stoves, this disadvantage is an advantage: fuel can be added to them much less frequently. They also consume less fuel and reduce heating of the furnace walls without reducing heat output. They are very similar in characteristics to infrared heaters.
A long-burning furnace has two chambers, one of which completely burns the residual fuel, and the other burns only the main part. The access of oxygen to the chamber is limited, as a result of which the fuel does not burn immediately, but smolders for a long time, releasing a large amount of heat.
Various household waste can be used as fuel for long-burning stoves, but without harm to plants. Constant temperature in the greenhouse provides the necessary conditions for crop growth.
About boiler power
Forgive me, but your post is akin to the question “I want to go for a walk, what clothes should I wear”? To recommend panties or a sheepskin coat, you need to know whether it’s winter or summer outside, hot or cold, sun or rain. It's the same with the greenhouse. Where do you live, in the Krasnodar region or in the Northern Urals? What type of cellular polycarbonate is used to cover the greenhouse? Is the cheapest 4 mm (thermal conductivity 3.8 W/(m K)) or 25 mm (1.6 W/(m K))? How are you going to heat it: just in the spring to drive out the seedlings or do you want to have fresh vegetables all year round? What temperature should be maintained? What is the average height of a greenhouse? After all, we heat not the area, but the volume? What are its proportions, the floor area does not matter, heat is lost through the external walls - it is their area that you need to know. How is the structure oriented to the cardinal points, does it receive direct sunlight in winter? Since we don’t know any of this, we can’t give you any advice on boiler power.
About agricultural economics
Heating a greenhouse with electricity is by no means a cheap thing. Such solutions are not used in the agro-industrial sector; they are unprofitable. You are not the first to come up with such an idea, but if you are interested in the economic side of the issue, calculate the costs and compare with the possible benefits. All your predecessors abandoned the idea of heating greenhouses with electricity; it is much cheaper to buy vegetables and fruits.
For comparison - a comparison of the cost of installing heating equipment using different energy sources, using different energy sources
And operating costs. The data is given for the Moscow region; in a particular area, the cost of solid fuel can be much lower. Electric heating with low initial costs is extremely expensive to use
Butakova
Today, the market offers a wide range of stoves from various manufacturers. The rectangular unit is equipped with an ash pan. It has convection pipes. The operation is similar to the previous heating equipment. Thanks to its special design, Butakova is highly efficient. Despite all its advantages, it is rarely used for heating greenhouses.
When installing and constructing equipment, it is worth taking into account the design features and operating principle