Very often, during construction work, heating pipes are hidden in the wall; the pros and cons of this method of hiding pipes need to be studied thoroughly to determine whether this method is suitable for you or not.
Otherwise, not only the functioning of the heating, but also the design of the room may suffer. It is better to carry out hidden pipe laying at the construction stage. In an already functioning house, this issue is much more difficult to resolve. If previously communications were left attached to the walls, then a significant advantage of modern high-quality repairs is that these options are not acceptable.
Video
In this video, a specialist will share his knowledge and tell you how to install a home heating system with your own hands:
Today, water supply is produced using modern materials.
Metal-plastic pipelines have become a very popular option for using these products for cold and hot water supply, as well as heating. However, it is worth knowing that when installing metal-plastic pipes with your own hands, it will be appropriate to additionally install gearboxes. This type of pipe does not like pressure drops in the system; reducers equalize this pressure.
Water pipe routing diagram.
Infrared floor
This is the simplest and most affordable way to heat bathroom floors. The system consists of infrared film. This system is laid on a concrete screed and attached to it with glue. Ceramic tiles are immediately glued on top. In this case, it will not be the air that will heat up, but the coating, in this case ceramic tiles. The tile will be heated partly by electrical elements and partly by infrared radiation. The surface temperature will be about 26 degrees. When laying, the room itself heats up little. Only the floor remains warm. You can install a heated floor in your bathroom within one day. You don’t have to invite specialists, but after reading the instructions, spread the film with your own hands. If we compare energy consumption, the infrared system is more economical than the electric one. The savings occur due to the fact that there is no concrete screed above this system. These systems are also equipped with thermostats.
Fasteners and other materials
In addition to the pipes themselves, for installation you need to prepare in advance:
- Fastening materials:
- plastic fastening clips or clamps for polypropylene pipes of a given diameter;
- dowel-nails.
- Tools:
- hammer;
- drill;
- crosshead screwdriver;
- scissors or a knife for cutting pipes;
- roulette;
- level;
- marker.
Clips - their meaning and installation details
The clip is made from a special material - nylon. It has such useful properties as high heat resistance and resistance to mechanical stress.
Among the technical characteristics of the clip, you need to pay attention to the diameter; it must correspond to the size of the outer diameter of the polypropylene pipe. Installation of clips has its own rules, the implementation of which determines the service life of the finished communication system
Single clips and double clip
The main issue that is important not to miss is the step size between the clips. If you install the clips too far apart, there is a risk of sagging in the support areas
When installing a communication system with two parallel pipes, use a double clip.
Correct pitch between clips
In what cases are clamps used?
It is recommended to fasten polypropylene pipes to the wall using clamps in cases where it is necessary to install large-diameter pipes with a fairly heavy weight. The clamps are a design with a screw tie and a rubber internal gasket, which is necessary to compensate for vibration. Thanks to this, they reliably hold the pipe even when strong vibrations occur.
The clamps are equipped with a dowel and a pin. The mount can be made of metal or plastic. When laying polypropylene pipes, it is better to choose clamps from similar raw materials: this way you will ensure the same strength indicators for the entire structure. Installation of fastening material can be rigid or floating:
- Rigid fastening is made by tightening the clamp extremely tightly around the pipes. A rigid coupling is required in areas below the bell. Thanks to rigid fixation, the possibility of displacement of the communication system is eliminated.
- A floating mount indicates that there is a gap between the pipes and the clamp. The fastening is tightened in such a way as to allow free movement of the pipe. The mobility of the fasteners allows the pipes to expand during temperature changes.
How to attach the clamp
Decorating methods for lovers of thoroughness
If the heating system is so boring that you want to completely hide it from view, then the following solutions will suit you. They are somewhat more complex than those given above, largely due to the fact that they are intended for a luxurious, expensive interior, for which homemade creativity is strictly contraindicated.
Stationary box with lattice lid
False decorative columns are made of polyurethane. Easy to install: fastened with liquid nails. Easily dismantled if necessary to inspect heating pipes. Organically fit into an elegant interior; a creative solution for decorating a riser.
Drywall is an interesting solution for those who are not looking for easy ways
This is because to get an effective result, it is important to have the skill to work with a serious electric tool (like a screwdriver)
The basis of the box is a structure made of galvanized profiles
After facing with plasterboard, the structure is puttied and finished in any way
This is a capital structure that completely hides the heating system behind it. Boxes decorated with stone and lined with colored tiles look great.
Shredding brick walls with a hammer drill
A hammer drill is a universal construction tool that can be used to drill holes and knock out hard materials - thanks to these properties, the tool can quite effectively knock out channels for water supply or heating pipes. The work order is as follows:
- Pobedit drill for concrete with a diameter of 8 or 10 mm. in perforation mode, it makes a series of holes of the required depth along the entire length of two lines, the step can be chosen arbitrarily, but the smaller the distance between the holes, the better the quality of the groove edges.
- Next, insert a shovel-shaped attachment into the hammer drill, switching it to impact mode, and knock the brick between the drilled grooves, controlling the depth with a pipe section.
- Upon completion of the work, the groove is cleaned of dust and foreign debris; for this you can use a household vacuum cleaner.
Rice. 8 Angle shifter with two discs
Optimal diameter for home heating
. After all, the system will operate effectively only if heat losses are correctly calculated. Without an accurate calculation of the cross-section, your heating system will not cope with its tasks.
When purchasing products for work, you need to consider not only what they are made of
It is also necessary to take into account the length and diameter of the pipeline
When choosing a diameter, it is better to take the following characteristics as a guide:
- Internal volume. This is the main indicator that shows the diameter of the internal section.
- External volume. This indicator is used to classify pipe materials. It can be: small (from 0.5 to 10.2 cm); average (from 10.2 to 40.6 cm); large (exceeding 40.6 cm).
- Conditional volume. Diameter indicator, which is displayed in inches or fractions thereof.
quite a difficult task. For this work, special formulas and tables are used.
At the same time, you can rest assured that the installation of the heating network will be carried out without errors, and nothing will have to be redone. And this will avoid additional financial investments.
Grilling technology using various construction tools
When deciding how to groove a wall in the bathroom for pipes or make channels in the floor to run hot heating pipelines through, they resort to dismantling work using the following methods and tools.
Hammer and chisel
An old-fashioned method, suitable for working on walls made of soft building materials (gas silicate blocks, foam concrete, gypsum plaster). During installation, at the beginning, special grooves are knocked out along two lines of the channel with a depth of about 10 mm, then the material is removed between the punched lines, after which the operation is repeated many times until the desired depth is obtained.
Hammer
To work with a hammer drill, a special construction attachment in the form of a spatula is used; the tool is used to break through any type of wall. The main disadvantage of the hammer drill is the not very aesthetic appearance of the punched channel and a large amount of excess debris - during operation, material is knocked out outside the outer perimeter of the groove.
Therefore, to optimize the work, before using a hammer drill, the boundaries of the grooves are cut with an angle grinder (grinder) or holes of the required depth are drilled into them in increments of about 10 mm.
Rice. 4 Chipping with a hammer and chisel
Bulgarian
When working with a grinder, special discs with diamond coating for concrete are used to cut through concrete or brick walls. The grinder is a dangerous tool, so it is imperative to use a protective cover on the body when working with it.
Using an angle grinder, smooth, deep lines are cut along the perimeter of the groove, after which the material between them is knocked out with a chisel or hammer drill.
The main disadvantage of working with an angle grinder is the high dust content in the air; for protection you should use dust goggles, thick clothing and a respirator.
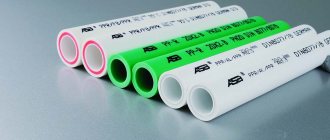
Laying polypropylene pipes in the wall
Very often, water and sewer pipes that are located along the walls of a room simply spoil its appearance. Therefore, many are interested in how polypropylene pipes are laid in the wall
This must be done carefully and thoughtfully, taking into account all the possible consequences of such camouflage.
Is it possible to bury polypropylene pipes in walls?
These pipes are made of material that is resistant to chemicals and is not afraid of corrosion. Installation is carried out by welding, and the connection is permanent and monolithic. Under this condition, there is no need to constantly tighten the connection, which would have to be done with metal pipes. Therefore, installation of polypropylene pipes in the wall is possible, however, if the condition of the pipe type matching the coolant in terms of pressure and temperature is met. For hot water pipes, you need to leave the necessary space for its expansion.
Rules for hidden installation of pipes
1. The system hidden in the wall should be as seamless as possible and have as few connections as possible.
2. The connecting elements of the pipeline must be made of the same material as its main part and have the same or even greater safety margin.
3. All pipes walled into the wall must have thermal insulation. This prevents them from fogging. Also, such a measure will give the pipes free opportunity to expand and contract.
4. Before masking the pipes, do not forget to leave free access to the inspection, shut-off valves, etc. You can close the holes with special plumbing hatches, of which there are many on sale and their sizes vary.
The process of masking pipes into the wall
1. Embedding a polypropylene pipe into a wall involves cutting the wall. Let’s say right away that horizontal gating of panel walls is prohibited. This also applies to brick walls laid out in half brick, since this thickness is not sufficient for such work.
2. Make special recesses in the wall. These are the grooves. Sewage and water pipes will be removed there. To do this, use a grinder or a hammer drill.
3. Make markings with a pencil. Place a special disc for cutting stone on the grinder. For large-area work, it is wiser to buy a disc with diamond-tipped teeth.
4. Do one of two things. Use a grinder to follow two lines, cutting them to the required depth. Then use a chisel to knock out all the excess. You can also do this: cut two marked lines with a grinder and use a hammer drill to connect them into one. Here you need a special attachment in the form of a spatula.
5. There is a special attachment for working with a hammer drill. It is intended specifically for gating walls. Its purchase eliminates the need to mark the future channel.
6. Install polypropylene pipes into the grooves. If the hole in the wall is larger than the pipe, then it’s okay. The grooves for hot water pipes should already be wider than the pipe itself. After installing the pipes in the grooves, they are cemented, and the wall is plastered so that it is completely level.
Advantage of plastic pipes
- Plastic pipes, unlike metal ones, are not subject to corrosion and are therefore environmentally friendly. During operation they do not become clogged, do not hum or vibrate.
- Plastic is a dielectric and does not allow electric current to pass through - electrical safety. Thanks to this property, pipes can be used for laying cables.
- They can withstand high temperatures (up to 95 degrees) and do not heat up, which ensures low heat losses.
- Plastic pipes are many times lighter and more elastic than metal ones.
- Cost-effective, a water supply system assembled from polymer pipes is 15-20% cheaper than the same system made from metal pipes. The service life of such pipes is approximately 50 years.
Based on the above, we can draw the following conclusion: plastic pipes are an excellent alternative to steel and cast iron pipes; they are well suited for cold and hot water supply and heating systems.
Installing plastic pipes does not require such large equipment, and almost anyone can carry out the assembly. The main thing is to observe certain nuances and adhere to the sequence of actions so that the system lasts a long time and does not cause problems during operation.
To complete the work you will need:
- Roulette;
- Soft pencil or marker;
- Special pipe cutter;
- Stripping (if foil-reinforced pipes are used);
- Well, and most importantly, a soldering iron (welding machine) with attachments.
How to properly weld polypropylene pipes?
Now here is the most important point on how to properly weld polypropylene pipes. To begin with, set the required operating temperature on the welding machine, attach the nozzles of the required diameter, and turn it on to warm up. While the soldering iron is heating up, prepare the pipes and fittings.
- We measure and cut the pipe to the required length. When using reinforced pipes, they must be cleaned;
- Use alcohol to degrease the joints;
- We measure the depth of the fitting and transfer minus 2mm to the pipe;
- On the parts we mark the alignment for correct placement.
We have already discussed the more detailed process of soldering plastic pipes earlier.
The device has warmed up, and now we proceed directly to soldering:
- Taking the pipe and fitting in your hands, we simultaneously insert it into the nozzles, the pipe to the mark, and the fitting until it stops. We warm up for the required time, each diameter has its own time (usually the table is on the lid of the suitcase from the device).
- At the end of warming up, we remove the parts from the nozzles and smoothly connect them, aligning our marks for alignment.
- Fix the connection until it cools.
To achieve the best soldering result, it is strictly forbidden to rotate the parts during the soldering process.
Is it possible to hide polypropylene pipes in the wall?
Is it possible to hide plastic pipes in the wall? If you follow a number of recommendations, yes.
- The pipe should have as few connections as possible and be as solid as possible;
- All elements are made of the same material;
- Thermal insulation of pipes must be performed;
- Access to taps and meters must remain free.
How to install polypropylene pipes in the wall?
- First you need to make markings;
- Next, according to the markings, grooves are made;
- Connect the pipes and install them in a prepared place;
- Next comes the painting work.
How to cut a hole in a suspended ceiling for a pipe?
When installing suspended ceilings, it becomes necessary to bypass the pipes. How to cut a hole in a suspended ceiling for a pipe without damaging it. To do this, an incision is made on the working surface and reinforced with a special lining that will protect the ceiling from spreading.
It is better to make the overlay from 1-2mm. plastic. Cut out a rectangle 1.5 cm wider. on the diameter of the pipe. The length of the rectangle is equal to the distance from the baguette to the outer edge of the pipe, plus 1.5 cm. We draw a line in the center. On one side of the rectangle we draw a circle 4-6mm larger than the diameter of the pipe. At a distance of 3-5mm. We draw a semicircle from the circle, lower lines from it to the opposite edge, we get the outer part of the ring. Now we carefully cut everything out, the ring cover is ready.
The simplest way to bypass the pipe is to install a cover on the outside of the canvas. The entire canvas is tucked into a baguette, not reaching 20-25cm. to the pipe on both sides. Next, in the center of the pipe, the canvas is carefully cut and tucked into place. Now we put the ring cover on the pipe and glue it to the canvas. All is ready.
Types of fasteners
Steel pipes are attached to the wall using several types of fastenings:
- Special staples.
- Brackets.
- Clamps of the required configuration.
All elements must be selected taking into account the outer diameter of the installed system, the requirements for the appearance of the pipeline, and possibly the frequency of installation and dismantling of connections, joining flanges and the entire structure.
Without reliable fastenings it is impossible to lay a pipeline. First you need to select an element suitable for your conditions and assemble the system correctly.
Metal clamps
The design is the same for the largest and smallest clamps; the kit includes:
| Half rings | Allows you to securely clamp the pipe. Two half rings are connected together with bolts, they allow you to adjust the compression force. |
| Rubber gaskets | They are put on half rings, they serve to ensure that the clamp tightly compresses the pipe, and reduce the vibration that occurs when pumping liquid. |
| Mounting pin | Welded to a half-ring, it has threads with a diameter of 8-10 mm, used for installation of pipelines. The length can be different 80-180 mm. When purchasing clamps, you need to calculate the required length of this element, taking into account the design of the pipeline. |
The advantage of these products is their long service life and reliability, the disadvantage is that they are inconvenient to hide from view indoors.
Metal clamp
Clips
Many people know such elements; they are used to install mainly thin pipelines; they differ in that:
- Polystyrene is used in production - a reliable and durable material that lasts a long time and successfully resists external influences.
- The products can be single or double, the design speeds up the installation of the system.
- You can assemble the required structure from several elements for laying different branches (for example, pipelines with cold and hot water) thanks to the grooves on the products.
- Special clips are capable of holding pipes with a diameter of 15-50 mm.
- Installed using self-tapping screws or dowels, which simplifies installation.
Pipe Clamps
Similar to clips, these products have their own characteristics:
The main difference is the closed fastening element, with its help you fix the pipe, and do not just snap it into place
This increases reliability, which is important on systems located vertically. They produce 2 types of products, in the first the self-tapping screw holds the clamp holding the pipeline and secures the mount in the wall
In the second option, the snap part is separated from the self-tapping screw and, to dismantle the installed steel pipes, it is not necessary to unscrew the screws. There are products in which dowels are purchased separately; they are attractive due to their low cost.
They make it possible to securely fix the laid pipeline.
Staples
Made from galvanized steel, this results in durable products. They are used in places where service life and reliability are important
Pay attention to the thickness of the bracket; thick metal can withstand heavy loads:
Classic design - a curved bracket with two legs, with eyes on both sides for installation in place
The most important thing is to choose the appropriate diameter of the products
Steel bracket
- The second option is a bracket in the form of a P-shaped product, in which 2 strips are connected together and have one hole for installing products. They are well suited for installed water pipes, corrugations and so on. Can clamp pipes with a diameter of 10-120 mm.
- Single-leg staples are used for light loads.
The products can be used together with a rubber gasket for reliable fixation and reduction of possible vibrations.
Materials and tools for installation
To carry out installation, you will need the following:
Installation of metal-plastic pipes.
- pipe cutter or hacksaw for metal with fine teeth; construction knife; hammer; external and internal mandrels; set of adjustable wrenches; fittings, nuts, ferrules, fastening clips; calibrator; pliers; drill; dowels, screws, nails (for fastening clips).
The advantages of metal-plastic pipes include:
- ease of installation; low price; ability to operate for a long time at high temperatures; mechanical strength; low coefficient of thermal expansion; long service life (50 years); absence of mineral deposits; corrosion resistance; aesthetic appeal.
Close the riser with a box
This is one of the two most popular solutions. Unsightly pipes are hidden in a box erected over a frame, and from this box an open line comes out to the heating radiator. The remaining open battery itself can be placed in a decorative perforated box.
Advantages of the box
- The riser pipes are no longer visible;
- The cheapest option for closing with a building structure;
- Does not require any permits or approvals.
Disadvantages of the box
- Having gotten rid of the riser pipes, we still left the supply pipes to the radiator open;
- The aesthetic appeal of the box is very questionable (in most cases, I’ll tell you about exceptions at the end of the publication);
- The hidden location of the riser makes it difficult to detect leaks and eliminate them. Even if an inspection hatch is installed in the box, dismantling the structure may be required to carry out repair work.
Features of polymer products
As you know even from a school physics course, when substances are heated, they begin to increase in volume. This is directly related to plastic products, and the high temperature also makes them plastic.
When installing pipelines for cold water, you can not take into account the expansion coefficient (for more details: “Preliminary calculation of the thermal expansion of polypropylene pipes”). At the same time, when arranging the heating structure, this nuance must be taken into account.
It is this circumstance that raises doubts among many home craftsmen as to whether it is possible to wall up polypropylene pipes into the wall, which will begin to lengthen and expand when the hot pipeline is started.
This raises a logical question as to whether the finishing materials in which the elements of the engineering system are embedded will be damaged.
Experts assure that metal pipe products that expand slightly can simply be embedded in a layer of material, but in order to hide polypropylene pipes in the wall, you have to fully adhere to the technology of installation work (more details: “Types, properties, installation of propylene pipes with your own hands”) . Otherwise, the finishing of the room will become covered with cracks, and the tile covering will most likely fall off.
When a hidden heating system is unacceptable for safety reasons
Safety regulations contain provisions that access to communications must be ensured without interference. It follows from this that pipe joints cannot be tightly walled up; therefore, it is only permissible to close the area in which the probability of leakage is zero.
Do not use metal pipes for laying in the wall, as they are susceptible to corrosion
The competence of regulatory authorities includes assessing the thickness of the wall. So, if it is not enough, the permit will be denied.
Making walls for pipes with your own hands
After drawing up a plan for the placement of the pipeline, taking into account the fact that all branches and changes in direction in the line are carried out at right angles, begin marking. The work is performed in the following sequence:
- Checks for the presence of hidden wiring at the work site; if there is no layout diagram, you can use a special device to search for wires.
- Using a construction pencil and a level, two lines are drawn on the wall, corresponding to the width of the pipes with a small margin. If a heat insulator is used on a hot water pipeline, increase the width of the channel accordingly.
- Once you have finished marking the walls using a building level, tape measure and pencil, you can begin grooving; the above tools are used when carrying out the work.
If gating is necessary, there are several options for how to most effectively carry out this procedure; to carry out the work you can:
- Use the services of hired specialists; the cost of one linear meter of groove, depending on its parameters, wall material and region, fluctuates within 5 USD. per linear meter.
- If you don’t have the necessary tool, you can rent it and do the work yourself, saving some money.
- If you have your own hammer drill and the necessary attachments for it, you can drill the wall yourself using only this tool. If you only have a grinder, use it to cut through the wall, and you will have to knock out the material manually using a chisel and hammer.
Rice. 6 Cutting a channel using a grinder with a diamond blade
How to hide communications behind a false wall
Heating hidden behind a false wall
Everything is quite simple here. You need to build a structure from metal guides and sew it up with any material you like:
- drywall;
- blockhouse;
- lining and others.
There is a myth that this reduces the usable area of the apartment. Fortunately, this remains a myth. If you need to hide pipes, these are usually places under or next to a window. All the space that is above a meter in these areas is absolutely not used in real life. The maximum that can be lost is 15 cm under the windowsill. At the same time, the window sill itself will accordingly become 15 cm wider. Agree that adding to the width of the window sill is much better than the same unused space under it. You can also insulate the walls from the inside.
There is an option to leave everything as it was originally, that is, the communications are attached to the wall and there is no need to hide anything. But, if we are talking about high-quality modern repairs, this option is unacceptable.
Hidden heating pipes
Pros and cons of hidden gasket
The undoubted advantage of this method is that there is no need to fear that when designing the room, the heating pipes will not fit harmoniously into the interior.
Disadvantages of hidden installation:
- Labor intensity.
- The presence of heat loss, since even with high-quality pipe insulation, part of the heat is spent on heating the structure, which simultaneously performs protective and decorative functions.
- Difficulty of maintenance associated with the need to dismantle protective and decorative structures to access emergency areas;
- High price due to the need for more material.
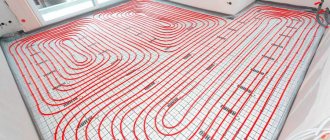
Hidden installation of heating pipes in the floor is carried out before pouring the screed
Hidden heating pipe technology
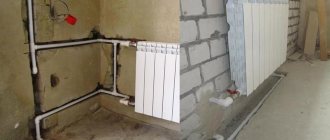
Installation of heating pipes is carried out after installing all radiators on the walls. During finishing work, the original packaging of radiators is not removed.
Stages of work production:
- Preparation, including choosing the type of heating. To install a forced circulation system, it is best to lay heating pipes under the floor or in a wall structure. With natural circulation, the discharge pipe is placed behind the suspended ceiling, and the riser drains and the lower pipeline are laid in the wall.
- Pipeline markings made on walls.
- Execution of grooves. First, using a grinder, its boundaries are set, then the groove itself is knocked out with a puncher.
Laying heating pipes in a groove
- Wiring laying. The heating pipes are secured in the groove using clips.
It must be remembered that the use of detachable connections, such as connections with detachable nuts, collet connections for metal-plastic pipes, is unacceptable for hidden wiring.
- Connecting the pipeline to heating devices.
- Crimping is carried out, in accordance with current standards, under pressure.
For hidden wiring, pipes must be filled only after a hydraulic test (pressure testing) of the heating system.
- Decorating or walling up. Before starting work, the pipes must be insulated. Decoration can be done in the following ways:
- Plastering - sealing the groove with a low-strength solution of sand and cement or gypsum-based plaster.
- Heating pipes in the wall can be decorated with plasterboard. Strips of drywall are glued using gypsum plaster. The subsequent putty completely masks the groove.
- Boxes made of plasterboard, which do not require damaging the walls. They are used quite often, since their use eliminates the need to destroy the finish when problems occur.
Decorating the heating pipeline with a box
The sealing of the pipeline should only be carried out when the entire heating system is under pressure, which emulates its “behavior”. Making the necessary adjustments allows us to achieve minimal impact of deformation forces on the decorative finish.
Which decorative screen is better?
At the moment, decorative boxes for pipes of heating systems are made from the following materials:
- plastic;
- metal;
- MDF;
- wood.
Plastic is one of the worst materials for making boxes designed to hide hot pipes. The fact is that in order to reduce prices, manufacturers use inexpensive types of plastic for these products. Such material quickly warps from heating, loses its appearance, or even turns yellow and becomes brittle. Of all types of screens, a plastic pipe box is the cheapest, but it does not last long and is well suited as a temporary solution to the problem. The plastic box made to look like a plinth deserves attention, but this is a different price category.
Metal, on the contrary, is the best solution for decorative fencing of heating risers and mains. Products with frequent perforations or lattice designs are especially good. Metal is an excellent conductor of heat and will successfully transfer it into the room, and through the holes the casing will allow enough air inside for heating. So from the technical side, metal has no equal.
From the point of view of operation, steel products are also at their best. They are coated with a durable polyester powder coating that can withstand high temperatures and various mechanical stress. Again, metal boxes can always be repainted if necessary, so they will last a long time. Well, the last argument in favor of steel screens: they are easy to clean in any way, even wipe with a rag, or remove and wash in the bathroom under running water.
Preparation for installation
The primary task is to draw up an installation drawing of future highways. In fact, the pipeline plan must be carried out taking into account all connections, taps, technological cabinets, shut-off valves. Detailed planning helps to avoid redundant connections and waste of material, since it is determined in advance which parts and in what quantities are needed.
Walls for hidden installation of pipes will have to be grooved, that is, a channel will have to be cut in the concrete for laying a pipe line. It is advisable to pre-mark the working area in order to make an even and high-quality channel.
It is advisable to take into account that it is not recommended to groove walls in panel houses, since the thickness of the panels is usually small. The most suitable walls are made of thick brick or concrete. They can be tapped without fear.
Next, you need to mark the pipes and fittings to know the welding direction and installation order. If necessary, it is better to trim the products in advance.
To perform installation work, you need tools designed for polypropylene:
- cutting scissors;
- a shaver for removing reinforcement and a chamfer for leveling the cut surface;
- welding machine with temperatures up to 260 °C;
- wall chaser or grinder for cutting out a cavity in the wall;
- chisel and hammer or punch to remove material between the grooves.
Installation
When the tools are ready, there is a detailed plan for installing pipe lines and markings, you can start working:
- Using a grinder or wall chaser, cut parallel to each other slots on the concrete surface of the wall; the distance between the slots should be slightly greater than the thickness of the polypropylene pipe in the thermal insulation. It is recommended to use a stone disc or a toothed disc coated with diamond.
- Use a hammer drill or chisel to remove concrete between the slots.
- To place technological cabinets, you will have to make a cavity in the wall and install a cabinet with slots for communications in it. This design will facilitate access to shut-off valves or sensors.
- The pipes are welded in advance, after which they are laid in the wall and fixed in the channel with clamps or supports. It is advisable to do most of the welding outside the channel because it is easier than welding in a confined space. Before sealing the grooves, it is recommended to check the system for leaks by running water into it. If no leaks are observed, then you can proceed to the final finishing.
- Before laying the pipes, it is advisable to wrap them in a layer of energyflex, or fill them with polyurethane foam after installation. This will provide space for the pipe to expand.
Of course, you can lay pipes on top of the walls, and make finishing on top of the main line, but then the free space in the room is reduced, and the cavity formed between the finishing and the wall will have to be filled with insulation. This approach is ineffective, since the finishing material must adhere tightly to the surface.
If you need to hide a ready-made pipeline structure, it is better not to make a blank monolithic wall, but to build a special plasterboard box to ensure free access to the pipes if necessary.
After a test check of the functionality of the pipeline, you can begin finishing the wall; it is better to use drywall for this.
Do the work yourself or call a professional?
To install a heating system with hidden pipes, it is better to invite a specialist. Typically, this method of camouflage is used at the construction stage of a building or during its major renovation, when old pipes are replaced with new products.
Assembling the system requires a competent approach to ensure further reliable operation of the entire heating system.
You can cover the pipes with a box, a screen, or decorate them yourself. The maximum you risk in this case is that the design will not look beautiful enough. You will not cause much harm to the home heating system itself.