The installation of warm water floors includes the installation of a concrete screed. The main requirement for a floor screed is sufficient density. This indicator completely depends on the brand of concrete. For heated floors, the recommended grade is 150-300.
The mixture for a warm water floor must be of high quality; it is important to know the technical characteristics of the components, the mixing technology, what the thickness of the mortar layer should be, and at what stage of floor construction it should be poured.
Preparatory work
Sometimes, when preparing the surface for screed, people do not pay attention to important details that, in fact, play a big role. The rough surface must be thoroughly cleaned of debris and small stones.
Before properly pouring a heated floor, a damper tape with a thickness of at least 40 mm is laid along the walls of the room in a circle. It is needed in order to prevent future cracks in the concrete layer from the effect of thermal expansion. The damper tape should not be neglected under any circumstances. Cracks in concrete will damage the heating system very quickly. It is necessary to make a heated floor cake on concrete according to all standards.
When the room area is more than 40 square meters. meters, or one of the sides is more than 8-9 meters, the concrete coating must be divided into zones using thermal joints. To do this, use a T-shaped damper tape. It is laid before concrete work begins. Each zone must have its own heating circuit; this should be designed in advance.
Sometimes builders lay reinforcing metal mesh on top of the insulating board. If the heat insulator is durable and the load on the heated floors is not very large, such a mesh can be ignored. The mesh is attached to the concrete through a layer of insulation. The water circuit is twisted with mesh rods. This method is convenient, but not justified in all cases. If the reinforcing layer is laid directly on the heat insulator, the mesh will not withstand the vertical pressure on the floors. It will perform a single function - convenient fixation of the water pipeline.
When using durable insulation (foam glass), the situation will be different. If soft insulation (foam plastic) is used, the screed must be additionally reinforced. Reinforcement, which is placed on top, and not in the concrete itself, neutralizes only horizontal deflections. To prevent the formation of splits, the mesh is placed closer to the center of the concrete covering, above the pipes.
Sometimes they use an option where two meshes are laid: on top of the pipes and under them.
There is another way using one grid. It is raised above the heat insulator by 15-20 mm using pads. The pipes are laid on top.
A screed where the water circuit is completely embedded in concrete will be stronger. But the cost of constructing a heated floor is increasing. The total thickness of the concrete layer will be 20-30 mm greater.
Before starting concrete work, water should be poured into the circuit, creating working pressure in the pipes. Sometimes they use compressed air. It is prohibited to heat the pipes.
Is it possible to fill a heated floor with concrete?
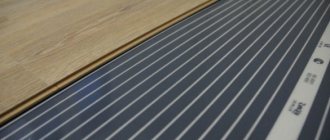
In principle, we have already answered this question in the introduction, but we need to make a small clarification. There are several types of underfloor heating: for example, heating mats, flooring systems, water pipes and electrical cables. Their operating principle is approximately the same. Heating is carried out either by circulating hot water through laid channels, or by electric current. The difference lies in the installation features of these structures.
Without going into installation details, let's say that a screed is only necessary for water pipes and electrical cables. Here, concrete not only protects the system from mechanical damage, but also participates in heat exchange processes. In other cases, the floor covering is laid directly on the heated floor, without pouring a screed.
A mixture of cement and sand
How to properly fill the floor under heated floors with a water circuit? The most common type of screed is made of cement and sand. It is easy to work with; sand particles act as an excellent plasticizer.
Typically, for concrete work in living rooms, cement-sand mortars of grade 150 are used. For installing a water floor, it is recommended to use M200. With increased loads on the floors, you can use a higher brand:
- M200-M250 when installing floors in retail premises or public buildings;
- M300 is used in warehouses and garages.
Factory mixtures, which will be delivered to the repair site, are purchased at mortar units. In stores they are packaged in bags. You can make the mixture yourself. This is a more labor-intensive way, but economical. You need to maintain the dosage of the components and find river sand with a coarse fraction.
Cement-sand mixtures for damp, wet rooms (bathrooms, swimming pools) are made with M400 cement. M500 cement quickly gains strength and is suitable for rooms with dry floors. The recommended thickness of underfloor heating screed is about 40 mm. In this case, laying a water-heated floor in a screed will be carried out without difficulty.
How to properly fill a warm water floor so that it lasts a long time? It must be resistant not only to mechanical, but also to thermal stress. It is recommended to add polypropylene fiber to the solutions: 900 grams per 1 cubic meter. The cost of such an additive is small, but it will increase the level of strength of the screed and prevent the appearance of small cracks. You should be aware that the fiber additive does not replace the reinforcing mesh.
Types of screeds for heated floors
There are two of them: wet and semi-dry screed. Let's figure out how they differ and which one is better.
Wet screed
This is the most common concrete. By the way, many people unknowingly call concrete any mixture that contains cement, water and sand. In fact, one should distinguish between concrete and the so-called cement-sand mortar, or CSP. Real concrete always contains coarse aggregate – usually crushed stone or gravel. If this component is missing, then we are talking about a regular solution.
As a rule, DSP has less strength and is not used in critical work (for example, when pouring the foundation of a house). However, the absence of coarse aggregate in the solution also has its advantages: such a mixture is easier to prepare and lay, and the surface of the screed is very smooth.
To install a wet screed, you can order the delivery of ready-mixed concrete at the factory or prepare the mixture yourself. True, in the second case it will be problematic to achieve ideal proportions.
Among the advantages of this type of screed are:
- Optimal cost
- High heat transfer
But there are also disadvantages:
- Quite a large weight of the structure
- Labor intensity of pouring
- Long term concrete strength gain (up to 28 days)
Semi-dry screed
It is a mixture of sand and cement with the addition of a minimal amount of water. Most often, semi-dry screed is sold ready-made and delivered to the customer’s site using pneumatic blowers. Then it is laid and processed with a trowel. The result is a perfectly flat surface on which the flooring can be installed almost immediately.
Advantages:
- Light weight design
- Rapid strength gain (after 24 hours you can walk on the screed)
- Less dirty work compared to pouring wet screed
Flaws:
- High cost (4-5 times more expensive than a conventional screed device)
- Low density and, as a result, worse heat transfer
- Requires special equipment (pneumatic blowers and trowels)
Sometimes a third type of screed is mentioned - dry. It is a compacted layer of expanded clay on which the flooring is laid. But this type of tie is not used for water pipes and electrical cables. Expanded clay has low thermal conductivity, so the system will not work effectively with it.
In recent years, the semi-dry variety of screed has become increasingly popular. A construction team can lay up to 100 square meters of such covering in one working day. At the same time, you will not need to wait a whole month for the concrete to gain strength: installation of floors can begin in 3-5 days. On the other hand, the high cost of semi-dry screed and the inability to lay it yourself force in most cases to give preference to traditional pouring with concrete or a cement-sand mixture. It is this option that we will talk about in the continuation of the article.
Screed from dropouts
If you pass crushed stone through a construction sieve, you will get a fraction of particles up to 1 cm in size. This is screening. It is similar to sand with a coarse fraction, but the grains of sand are round in shape, while the particles of screenings are chipped, with sharp edges. This structural feature significantly increases the strength of the mortar compared to sand. This solution is more difficult to install, but the effort is ultimately worth it.
A warm floor under a solution with this composition is reliable. You can save money by using the M150 mixture. No fiber need to be added.
The inconvenience is that it is difficult to find a concrete layer from screenings at mortar units. Large fractions may be present in the purchased solution. This will significantly complicate the process of leveling the screed. Pebbles larger than 2 cm are acceptable according to GOST, so manufacturers produce such a solution in accordance with the standards.
If you are concerned about the question of how to properly fill a heated floor in a house, it is more advisable to prepare the solution using a home concrete mixer, using fine screenings.
On the ground
The filling technology will be the same regardless of the type of land and where exactly the groundwater is located. To work, you will need concrete grade M300 (or higher) and reinforcing mesh.
Before pouring the screed, the earthen flooring is leveled and compacted. Medium-fraction crushed stone or gravel can be used as the first layer of backfill. A second layer of sand is laid on top.
Each layer of bedding is compacted using a vibrating plate or manually.
Then the base for the rough screed is covered with waterproofing. These can be specialized materials or thick polyethylene film.
A subfloor 5-10 centimeters thick can be poured onto the finished base.
Self-leveling solutions
You can use a self-leveling mixture to screed a warm water floor.
This building material is not cheap. Labor costs are noticeably reduced. Simply add water to the dry mixture, stir, pour it onto the floor and you don’t need to do anything else. The mixture will even out on its own.
The advantage of self-levelers is the harmoniously selected components of the solution, mixed in the factory. The mixture is already enriched with the necessary additives and plasticizers.
The finished leveling solution is poured onto previously prepared floors and stretched over the beacons. If you follow the manufacturer's recommendations, you will get a durable surface that is resistant to temperature changes.
There are some subtleties that you should know about before purchasing a self-leveler. It sets very quickly, and you will need a lot of solution. If you fill the floors in small bathrooms, then there will be no problems. The mixture can be stirred with a drill mixer. But how to quickly mix, at one time, a cubic meter of solution for a room of more than 20 square meters? This is impossible to do in a regular trough. If you fill it in parts, in layers, the quality characteristics will deteriorate. To make such a solution, you need special equipment, a compact mortar mixing plant.
In order to fill large volumes, you can buy or rent such equipment. But under normal conditions, for apartment renovation, this is impractical. The self-leveler will still have to be leveled manually.
Such a solution will pay off on site if you have an unlimited budget. Or when laying heated floors in a small area. There are brands of self-leveling that can be laid in a thick layer. You should know: despite the fact that such a solution sets quickly, it reaches “standard” within 7-15 days, no less.
Pouring concrete under a heated floor
Now let's talk about how to properly install a concrete screed for a heated floor.
The whole process consists of the following steps:
- Preparation of tools and materials
- Preparing the base
- Installation of a heated floor system
- Installation of beacons
- Preparation of concrete mixture
- Filling the screed
- Care of hardening concrete
Step 1: preparing tools and materials
You will need:
- Rubber boots
- Construction gloves
- Damper tape
- Polyethylene film thickness from 200 to 250 microns
- Foamed polyethylene with a heat-reflecting foil layer or extruded polystyrene foam (5-10 mm). Density – minimum 35 kg/m2
- Steel mesh with cells 10x10 or 15x15 cm
- Laser level
- Cement, sand, crushed stone (if you want to prepare concrete and not CFRP), water
- Plasticizer and fiber (for DSP)
- A container for measuring out the components of the solution (for example, buckets)
- Concrete mixer or container for manual mixing (trough, basin)
- Bayonet shovel
- Deep vibrator
Step 2: preparing the base
By base we mean a rough screed, which should have fully gained strength by the time work begins. The first step is to clean the surface of the screed from debris. Please note that any unevenness or foreign objects may negatively affect the quality of the finishing coating.
A damper tape with a thickness of at least 40 mm to the height of the screed is installed around the perimeter of the room. It will compensate for the expansion of concrete under the influence of temperature, and also prevent heat from escaping into the walls.
If the area of the room exceeds 40 m2 and is not divided by partitions, or if the length of any of the walls of this room exceeds 8 meters, it is necessary to install expansion joints. They are also made using damper tape.
Then a waterproofing layer is installed. To do this, a polyethylene film is laid on the screed with an overlap of 10-15 cm. The film is secured with mounting tape.
Foamed polyethylene or expanded polystyrene is laid on top with a height of 3 cm for residential premises and 9 cm for basements or outbuildings. Expanded polystyrene acts as a heat insulator. Without this layer, the warm floor will heat not only upward, but also downward, which will lead to loss of efficiency.
Now you need to mount the fasteners for pipes or electrical cables, and also install the reinforcing mesh. Please note that the mesh should not be located on the insulation, but above it - at a height of 10 mm. Otherwise, there will be no reinforcing effect.
Step 3: installation of a heated floor system
We will not describe this stage in detail, because it all depends on what specific system you have. As a rule, underfloor heating manufacturers provide detailed instructions for their products. There you will find all the information regarding installation.
After laying pipes or cables, you can lay another layer of reinforcing mesh for additional strength.
Step 4: installing beacons
In the center of the room it is necessary to pour semi-dry concrete, and then compact and level it - so that you get a small platform 8 cm high. A laser level is placed on it.
Further along the perimeter of the room and throughout its entire area, the same concrete embankments are made for future lighthouses. It is best to place them at a distance of no more than a meter from each other. Or focus on the length of the rule: it should be greater than the distance between the beacons.
After installing the beacons, leave them for 3 days so that the concrete has time to harden. If deadlines are tight, you can skip this step.
Step 5: preparing the concrete mixture
The setting reaction of concrete begins after you mix water with cement. Next, you will have 1 to 2 hours to lay the solution; after this time, it will harden and completely lose its plasticity. Therefore, you need to work quickly. Organize your space so that you have quick access to all components of the mixture.
When laying concrete, it is important not to allow the hardened screed to come into contact with fresh mortar, as this will greatly reduce the strength of the structure. Accordingly, if you are pouring the floor in several rooms, you need to plan the work so that by the end of each day you do not have any under-filled areas within one room.
To prepare the mixture, it is most convenient to use a concrete mixer. A volume of up to 90 liters will be quite enough. Otherwise you will have to do the kneading manually. To do this you will need a construction trough or basin.
First, cement and sand are poured into the container. They must be mixed to a homogeneous consistency without lumps. If you don’t have a concrete mixer, you can work with a shovel. Next, water is gradually poured in. It is better to add it in small portions until the solution becomes thick enough. The resulting mass is mixed very well for 5-6 minutes. Plasticizer and fiber are added according to the manufacturer's instructions.
At the end you will get a cement-sand mixture. If you need to prepare concrete, then now crushed stone should be added to the container with the remaining components. It is always added at the very end, because mixing large stones is quite difficult. It is necessary that absolutely all grains of crushed stone are covered with the solution.
Here's how to make sure you've prepared the right mixture: Scoop up the solution with a shovel and then let it drain back. If the concrete does not stick to the shovel, it means its plasticity is too low. It will be very difficult to fill it. Add a little more water and stir. If, on the contrary, the mixture turns out to be too fluid, the amount of cement and sand should be increased. However, this way you will most likely violate the ratio of components and will not get the required strength.
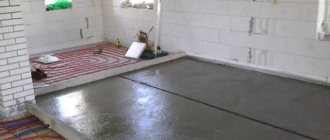
Step 6: pouring the screed
Please note: if you are installing a warm water floor, then you must fill the pipes before laying concrete. Otherwise, during pouring, they may become deformed under the weight of the solution.
The concrete mixture should be laid in small sections - from the far wall of the room towards the exit. Each section must be leveled using a rule.
The concrete must be very well compacted. The fewer voids there are, the more reliable the screed will be. Typically, the bayonet method is used for compaction. To do this, a shovel or reinforcement rod is repeatedly immersed in the solution. Under its own weight, the concrete is compacted, and excess air comes to the surface.
But when laying the mixture on pipes or cables, it is important not to damage them. Therefore, the only way to compact the solution is to use a deep vibrator. They need to walk several times in different directions throughout the entire area of the room.
At the end, the beacons are removed. The recesses from them are also filled with solution.
Step 7: Caring for Hardening Concrete
As we have already said, the screed will gain full strength only after 28 days. It is very important to provide the concrete with optimal conditions for hardening in the first 7 days. To do this, after pouring, the floor is covered with plastic film. Every day you need to remove it and wet the concrete with water. If this is not done, the top layer of the screed will dry out too quickly and become covered with cracks.
In addition, during the first week the concrete should not be exposed to loads or sudden temperature changes. Do not try to speed up the hardening of the screed by turning on the floor heating. This will have the opposite effect.
The evenness of the coating is checked using a two-meter strip. It is laid on the floor and the clearance is measured - it should not exceed seven millimeters. If the gap is larger, it is necessary to apply a leveling layer. To do this, you can purchase a self-leveling filling mixture.
How to fill with a “wet” screed
If a lot of water is added to the solution, you get a “wet” screed. The solution will be plastic.
The component ratios are as follows:
- When laying heated floors in a dry residential area, an M200 solution using M500 cement is suitable. You will need 1 part cement, 3 parts sand and 1-1.4 parts water.
- When laying heated floors in a damp room (in a bathroom), you need an M200 mortar based on M400 cement. Take 1 part cement, 2.5 parts sand and 1-1.4 parts water.
- In reality, the volume of liquid depends on the moisture level of the sand and the amount of dust in it. In this regard, water is added gradually, mixed and plasticity is controlled. The result should be a mixture similar to thick sour cream.
- The solution is leveled between the pipes and compacted, removing air bubbles.
Metal-plastic pipes can become deformed if you walk on them. Polyethylene is more durable in this regard.
The process of leveling the mixture is facilitated by a long rule and pre-placed beacons. The recesses are filled with the mixture and leveled again.
The screed is made from the screenings in the same way. But everything is done more carefully, more labor will be required. The advantage of the “wet” method is the plasticity of the solution, which is easy to level with a rule.
Brand of concrete for underfloor heating screed
Some builders recommend using concrete class B22.5 (corresponding to grade M300). It is capable of withstanding pressure up to 325 kg/cm2, and its frost resistance reaches grade F200 (up to 200 freezing/thawing cycles without loss of quality).
To more clearly explain what kind of material this is, it is enough to mention this fact: B22.5 concrete is used for pouring the foundations of multi-story buildings and as road surfaces. Let us also clarify that the density of finished structures from this brand is 1,900-2,500 kg/m3. A 10 mm screed with an area of 6 m2 will weigh up to one and a half tons.
The disadvantages of B22.5 concrete include poor workability. Due to its low plasticity, the solution requires careful compaction. Otherwise, there will be voids in it that can destroy the screed. On the other hand, intensive compaction can damage the pipes and cables of the heated floor, which is also unacceptable.
In fact, using such strong and dense concrete to screed a heated floor is in most cases impractical and unprofitable. It makes sense to use the M300 brand only in rooms where serious loads will be placed on the coating - for example, in a garage.
Now let's look at other brands of concrete that are suitable for pouring heated floor screed.
Concrete B3.5 (M50)
This is the lowest grade, so its use in construction work is very limited. It is not suitable for installing a full-fledged screed: it can only be used to level the surface for laying the floor covering.
Concrete B10 (M150)
This material has a low cost due to its low cement content. This brand does not withstand heavy loads, but can be used for pouring heated floors in small rooms (bathroom or kitchen). Due to its relatively low density, such concrete has good thermal conductivity.
Concrete B15 (M200)
This brand is optimal for most residential premises. The screed can withstand loads of about 175-225 kg/cm2, and this is enough to install a heated floor in an apartment or private house. For basements, garages and other outbuildings, it is better to choose a higher grade.
As you can see, B10 or B15 concrete is mainly used for screeding. These two varieties have good quality and reasonable cost. If the floor will be exposed to serious loads of more than 500-600 kg, it would be more advisable to use B20 (M250) or B22.5 (M300) concrete.
Our own concrete production and laboratory, as well as a large fleet of equipment guarantee high quality products and accurate delivery times
Concrete - production and delivery
Concrete pumps - rent
Read more about us here
7 904 179–31–56
Valentin Yurievich Shvets
Director of BetonStroy
"Semi-dry" method
There is much less water in the solution for the “semi-dry” method. If the mixture is made correctly, it will be moist but not runny.
They check it this way: squeeze a little semi-dry solution in your palm. It should form into a plastic lump without cracks. This is the consistency of a factory-made solution. It is more difficult to level, but then you can rub it to a shine, and ultimately get a surface that is dense and durable in structure.
If you order such a solution ready-made, you need to explain for what purposes it will be used. This concrete layer can withstand heavy loads. It is of higher quality than when laying concrete using the “wet” method.
You will have to rub it very carefully; this requires skill and patience. You will need a long grater or trowel. Semi-dry mixtures from screenings are practically not amenable to smooth grouting, so it is ground with sandy mortar.
Preparation
To make the floors wear-resistant, it is best to use M400 or M500 cement when preparing the mortar. As for the added sand, it should have large grains, approximately 0.8 mm in diameter. This will protect the surface from the appearance of cracks and other defects. The fine fraction of sand used for bricklaying is not the best option. When installing a warm water floor, a thickness of at least 20 mm will be required, depending on the type of screed. Use the concrete volume calculator to determine the quantity.
There is one nuance that allows you to eliminate the liquid solution - adding water in portions. The important thing here is to eliminate the possibility of using too much water.
Dry cement mixtures M300 sand concrete are presented in finished form. Here you no longer need to think about proportions and getting a quality fill. Dry mixtures can only be diluted with the required amount of water, which is prescribed in the instructions from the manufacturer. Separately, it is very difficult to obtain all the required components of the semi-dry mixture for pouring a warm water floor. For this reason, it is better not to experiment, but to buy a ready-made version for installation.
Each type of mixture can be accompanied by plasticizers that can give the final solution more qualities and characteristics. In any case, even if they are included when purchasing, you should adhere to the mixing options indicated on the package. If it is difficult to decide which mixture to choose for underfloor heating screed, it is better to seek help from specialists or company representatives.
How to properly lay a “semi-dry” concrete screed
In order for the concrete layer to be perfectly smooth, you need to position the beacons correctly. The distance between the beacons is left such that the one and a half meter rule can be used. That is, a distance of no more than 140 cm should be maintained between the beacons.
Types of beacons:
- Mortar beacons made of narrow ridges of cement-sand mortar (gypsum cannot be used). Not the most effective method, since the ridges must dry out, and this takes time. In addition, a rule can accidentally “knock down” such pointers.
- Lighthouses made of metal pipes. Pipes or other rigid profiles are strengthened at the required height. A day after laying the concrete, they are removed and the recesses are filled with mortar. Pipes are used several times for this purpose. The only condition is that they must be perfectly even. Both round and rectangular profiles are used.
- Galvanized guides for plaster. The stronger the beacons, the better. The optimal size is 1-1.4 cm. After they have performed their function, they can be left in place or removed after the solution has set. Such beacons are disposable. If you have the skills, you can set them as evenly as possible. Strengthen with mortar, adjusting it to the level using a piece of tile or a brick fragment. The distance between the beacons is 40-50 cm. Sometimes they are installed on special supports that can be adjusted.
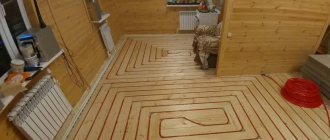
On wooden floors
To fill a wooden house, you need to perform the following steps:
- Carefully inspect the covering (replace damaged joists, and turn over partially damaged joists);
- Add support beams (if the logs are installed in increments of 40 cm);
- Recess the nail heads into the boards by 2-3 mm (otherwise they will later tear the insulating film);
- Seal the gaps at the junction between the walls and the floor with thin boards (they are removed after pouring, which ensures ventilation of the base and does not allow it to rot);
- Eliminate deep and small cracks;
- Remove debris and dust, sand the base if necessary;
- Prime wooden surfaces (this will ensure their moisture resistance);
- Cover the bottom of the wall with damper tape (10-20 mm thick and 2-3 times thicker than the screed) to cut off its surface from the cement;
- Ensure waterproofing of the base using an intact polyethylene film (its individual parts are overlapped by 10 cm, the overlap on the walls is 20 cm, all tears and punctures are sealed with tape).
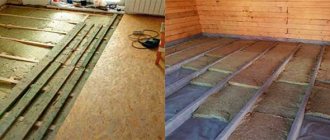
Option for installing TP on wooden logs
Attention! It is not recommended to fill if the wooden floorboards are fresh. They can become deformed under the weight of the screed.
What thickness should the screed be?
To understand what the thickness of the concrete screed for water heated floors should be, the following points should be taken into account:
- The concrete layer should not interfere with thermal radiation. The water circuit must perform its function.
- In order for the screed to be strong enough, the thickness of the self-leveling compound should not be less than 2.5 and 4.5 cm.
- The thickness of a regular concrete layer reaches 6-7 cm.
- In total, the thickness of the water heated floor will be 15 cm.
- If you increase the thickness of the screed, this will lead to the risk of splits in the concrete layer. To prevent this from happening, it is necessary to provide expansion joints.
Finish filling on TP
If the rough screed has dried, it’s time to move on to the next steps:
- installation of heat insulator . Thermal insulating material is mounted only on a clean base (it is best to vacuum it). The heat insulator can be cork, foam, polypropylene, aluminum foil or metallized Mylar film. To secure it, tape, dowels and glue are used.
- Laying damper tape . The damper tape protects concrete from cracking associated with temperature fluctuations. Mounting area: along the perimeter of the room and between the contours of heated floors.
- Laying heated floor elements . Pipes need to be checked for breaks (especially at bends), and when running cables, grounding must be ensured.
- Reinforcement . Reinforcing mesh can be placed under the pipes, above them, or in both places at once. Pipes are easily attached to the lower metal mesh during installation, however, unlike the upper one, it does not provide reinforcement for the screed. If the concrete is of high quality, then this part of the work can be abandoned.
- Pouring finishing screed . Before proceeding to the last stage, you must check how well the heating system is functioning. The screeding solution is poured at above-zero temperatures and in one go. Partial filling is allowed only in rooms with a multi-level floor. The concreting process begins from the far side of the room and ends next to the door.
Pie TP
After finishing the pouring, it is recommended to make several punctures in the coating with a metal knitting needle or similar object. This will prevent the formation of voids.
In the next week, the concrete surface should be moistened with water 2-3 times a day. This will prevent it from drying out while it hardens.
The thickness of the finishing layer can be from 3 to 7 cm in a private house, and in an industrial area - 10 cm.
If a water heated floor is installed, the height of the screed above the pipes should be 3.2-7 cm.
Attention! If it is impossible to make a fill thicker than 3 cm, then it is better to use a self-leveling mixture, or mix cement mortar with a plasticizer.
Read more about the thickness of the screed and the design of heated floors in the article.
Caring for wet screed
After the concrete layer is poured, the screed requires maintenance. The room temperature must be maintained at least 5 degrees above zero. The screed must not be allowed to dry out. A day after installation, it is covered with plastic film. The concrete needs to be moistened from time to time for about a month. The strength of concrete depends on this. You can begin installing the water circuit for heated floors no earlier than 28 days later. All this time, the working pressure must be maintained in the pipes, but the heating cannot be turned on.
Rough preparation
A warm floor is formed in several layers:
- Rough screed;
- Sound and heat insulator;
- Heating elements;
- Finishing screed (upper part of the structure).
The rough layer is leveling. It is not required if the base is a flat floor slab, like in an apartment. In a private house, floor heating is often installed on the ground; in this case, a self-leveling solid foundation is necessary.
To properly fill, you need the following materials:
- dry mix or cement mortar;
- reinforcing composition (can be replaced with a reinforcement mesh with medium-sized cells);
- waterproofing and insulating materials;
- fasteners;
- container where the solution will be mixed;
- construction mixer (can be replaced with a drill if you have a suitable attachment);
- putty knife.
Subfloor
Installation technology
Before pouring the solution:
- Make sure that the temperature at the work site is between + 5°C and + 25°C.
- Clean the working surface (the presence of debris will impair the adhesion between the solution and the base);
- Repair all cracks in the base;
- Line the perimeter of the wall with damper tape to the depth of the screed;
- Install level beacons.
After this, you can move on to the main part of the work:
- Prepare the mixture;
- Fill it, strengthening it with reinforcing mesh if necessary;
- Wait 24 hours, cover the dried concrete with polyethylene;
- After a week, remove the film (further hardening will occur without it).
Expert opinion
Sergey Permyakov
Heating systems engineer
The minimum thickness of the rough screed must be at least 3 cm ; a thinner layer will crack and collapse. There is no point in pouring more than 5 cm under a warm floor; exceeding this limit will lead to a noticeable reduction in the volume of the room.
You can start the next stage of work in a week . The strength of the screed will be about 70%, this is enough to withstand the load. It will take 28 days for the base concrete coating to dry completely. During this time, concrete gains 100% strength.
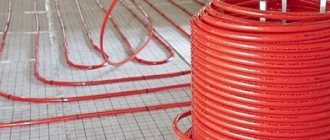
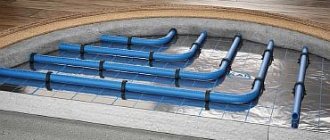
Pipe layout options
There are three types of installation of pipes for underfloor heating: spiral, serpentine or looping, with a double spiral. When installing pipes in a spiral, heat is distributed evenly throughout them, since the pipeline is directed towards the center of the room. Therefore, heat from the source flows to the center, and from the center it is directed to the collector. Spiral laying does not have sharp bends, but there are also few straight sections. Although this installation often uses fasteners. When laying with a snake, heat will come in from one side and come out from the other. As it moves away, the water will cool, and this will cause the far part of the pipe to heat up more than the near one. Therefore, the total length of pipes used in such a system should not exceed 70 m.
Important points when installing screeds
Errors in the installation of the screed can lead to its destruction or ineffective operation of the water floor. When performing work, pay special attention to:
- Water cement ratio. Often, to make it easier to lay the mixture, more water is added than necessary, which causes cracks to appear in the screed.
- Mandatory use of plasticizer and reinforcing fiber in the working mixture.
- Optimal screed thickness (thin screeds form cracks, thick screeds take a long time to heat up).
- Construction of an expansion joint and use of damper tape around the perimeter of the room.
- Temperature conditions in the room and absence of drafts.
Do not turn on the water heating until the screed has completely set!
By lighthouses
If the room is large, then beacons must be installed before pouring the heated floor. They represent levels - guidelines, based on which you can level the screed.
Types of beacons for heated floors:
Pin. Usually these are self-tapping screws on dowels. Pin beacons are suitable for semi-dry screeds and self-leveling floors. Their length should be 2-3 cm greater than the estimated height of the screed.
Beacon self-tapping screws are installed one for every 1-3 m2 and connected with a fishing line, which should be located exactly at the level of the future leveling layer. After this, the composition is poured. When the work is completed, the beacons are unscrewed so as not to damage the screed.
From mortar piles. To make such beacons, use the same solution as for pouring. Their height should also slightly exceed the expected level of the screed. They are most suitable for working with wooden bases, since they do not harm the insulating layer.
Mortar piles are placed along pre-marked lines. The outer rows retreat from the wall by 30 cm, the step to the adjacent rows is 1 m. The heaps located in the same row are spaced 30-50 cm apart. The beacons are given a day to harden, after which they are covered with a primer and the screed begins to be poured.
Linear. They are made from metal profiles, drywall, slats, boards, etc. This type of beacon is used more often than others. The rules for their installation do not differ from those described above. The only difference is that a number of small elements are replaced by one large one. When all the landmarks are placed, all that remains is to fill the screed.
After laying out the solution, you need to level it using the following rule: place the tool on the guides and pull it towards you, moving it slightly from side to side. After a day, the profiles are removed and the holes are sealed with a primer or mortar.
Attention! If the screed is dry, then there is no need to remove the profiles.
Selection of materials and method of fixing pipes
Fixing clips for heated floors
The water circuit pipe must be secured in such a way that the loops do not unbend, the required distance between turns is maintained, and the fastening does not interfere with the thermal expansion of the material. The type of fixing elements directly depends on the chosen installation technology and the type of insulation.
| Retainer | Base | Installation principle |
| polyamide clamp | reinforcing mesh on top of the heat insulator | The clamp is tightened by hand, consumption is 2 pcs. per meter of pipe |
| steel fastening wire | reinforcing mesh on top of the heat insulator | the ends of the fastening wire have ears for quick twisting using a hook, consumption is 2 pcs. per meter |
| plastic U-shaped clamps | polymer heat insulator with a smooth surface | the legs of the element are securely fixed in the insulation; a special stapler is used for installation, consumption is 2 pcs. per meter |
| fixing track | polymer heat insulator with a smooth surface | PVC strips with U-shaped sockets are attached to the insulation and allow pipes to be laid according to the chosen pattern |
| thermal insulation mats with a relief surface | protrusions on the slab polymer insulation make it possible to lay pipes without additional clamps | |
| metal diffusion plates with channels (for wooden floors) | the pipe is laid in channels on straight sections of the contour without additional fastenings |
Water underfloor heating in the apartment
Underfloor heating – comfort in the home
In most cases, local legislation prohibits the installation of an underfloor heating circuit connected to a DHW or central heating system.
This is due to the fact that the temperature of hot water or coolant drops when passing through the circuit, which will cause discomfort to neighbors. In addition, the pressure in the system decreases.
In those regions where there is no ban on installing a hydraulic floor circuit in apartment buildings, the project must be submitted for examination - specialists will issue permission only after making sure that the operation of the central heating system or hot water supply will not be affected.
Technical solution for an apartment
Technically, the installation of water underfloor heating is possible with the obligatory installation of a pumping and mixing unit , which will allow maintaining pressure in the system. There may be restrictions on the material used to make pipes - propylene and metal-plastic cannot be installed if a jet pump (elevator) is used in the heating system of an apartment building.
Selection of pipe material
XLPE pipe
To lay the water underfloor heating circuit, it is recommended to use pipes made of the following materials:
- metal-plastic - pipes hold bends well, are resistant to thermal deformation, are affordable, easy to install, and due to the aluminum reinforcing layer are characterized by high heat transfer
- cross-linked polyethylene (PEX-EVOH-PEX) – pipes are more difficult to install, as they do not hold bends well, but do not burst when the coolant freezes
- copper - pipes are strong and durable, transfer heat efficiently, but require protection from alkali when installed under a screed and are expensive
Arrangement of the collector unit, connection to the boiler
Collector unit
The heating boiler is responsible for heating the coolant. Its power should be equal to the total power of all floor heating circuits (and heating radiators, if provided) plus 15-20% of the result obtained.
The house should be designed for installation of manifold cabinets , inside of which equipment for connecting heating circuits is located:
- 2 collector combs (supply and return)
- shut-off/control valves
- circulation pump
- air vent
- flow meter
- pressure gauges
The number of collector comb outlets must correspond to the number of connected circuits , so the distribution unit is installed after the underfloor heating project has been developed. The combs are connected to the supply and return pipelines connected to the boiler.
Principle of operation
Operation of the distribution unit
The heated coolant enters the floor circuit, gives off heat and returns through the return pipeline to the boiler, where it is heated again. The circulation pump is responsible for the constant movement of liquid. When the air in the room warms up to the set values, the temperature sensor installed in it is triggered, and the valve shuts off the flow of heated coolant into the corresponding circuit. In a simpler version, the heating of the heated floor is adjusted manually.
You should not save money by installing a manifold with shut-off valves instead of control valves - the installation of more expensive equipment will pay off due to energy savings and will automatically maintain a favorable microclimate in the house.
How to measure floor flatness
When carrying out repair work indoors, non-residential, apartment or house, it is imperative to start from the foundation of this very room, that is, from the floor. To lay any floor covering, for simplicity of calculations, to simplify the work itself, to save material, durability and aesthetics of the repair in general, it is necessary to level the base of the floor.
The floor in a room is considered level when its entire surface is in one straight plane and in an ideal horizon.
It is fashionable to measure the evenness of the floor in several ways:
- Using building rules and levels. The simplest and most common way. Using the rule and level, you can determine whether the floor is in the same plane. The rule should be 1.5 (one and a half) meters or more. This way, you can measure a large area of the floor and see exactly where there are gaps. Using the shorter length rule, the measurements will be unobjective and erroneous.
The rule is the required length, it must be laid on a thin base, in an arbitrary place, on the floor. Then, lightly pressing the rule to the floor, visually check whether there are gaps between the floor and the base of the rule. If minor gaps are found, it is advisable to mark these places with a pencil on the screed for further work with them. Also measure the height of the gap with a ruler to see if it is acceptable for laying the floor covering. This procedure must be performed in several places around the perimeter of the floor, near the walls, and in the central parts of the room. This way you can understand that the floor screed is in the same plane.
The evenness of the floor is checked by building rules and level
- Using a laser level. The tool is expensive and not every builder has it. It can help you obtain more accurate measurements if required.
- Using a hydraulic level, which is a long rubber tube that works on the principle of communicating vessels. You can either purchase it at hardware stores or easily make it yourself. This method is more labor-intensive for measuring gender and came to us from the past; we describe it in detail here. However, the hydraulic level is also effectively used for other measurements when performing other repair and installation work.
Tools and building materials for pouring
To create a screed under a heated floor, you need to prepare or purchase:
- sand, cement, polyethylene film;
- damper tape;
- plasticizer and fiber;
- mounting grids;
- thermal insulation material;
- profiles for beacons;
- level;
- solution container;
- 20 mm pipes;
- nylon ties for fixing to the mesh;
- hammer drill and screwdriver;
- construction mixer (you can use a hammer drill attachment);
- rule;
- vacuum cleaner, broom;
- protective clothing (rubber boots and knee pads).
Pouring technology
Having understood the subtleties and nuances, let's look at how to make a concrete floor warm. When carrying out floor installation work, the room temperature should be in the range from 5 to 250C. If the base is in good condition, it should be cleaned and dusted. If necessary, a rough screed is arranged.
Preparation
Damper tape is glued over the prepared base and plastered walls.
This is done without fail in order to:
- prevent heat loss due to wall heating;
- avoid destruction of the screed as a result of thermal expansion.
If you decide to save money, you can lay strips of thermal insulation, for example, foam plastic, around the perimeter, the effect will be the same.
Important! It is necessary to install a thermal barrier not only between the system and the wall, but also between two systems. If the kitchen and corridor have different heating circuits, a damper tape must also be laid at their junction.
The perimeter of the room must be taped with damper tape
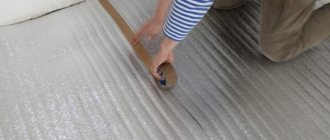
After thermal insulation of the joint area, a waterproofing film and heat-reflecting material are laid on the floor.
System installation
Laying a water floor, or any other horizontal heating system with your own hands, is done in strict compliance with the manufacturer’s recommendations. The instructions always come complete with the elements of the system itself. If a cable or pipe passes through an expansion joint, it must be protected with a corrugated hose.
Corrugated hose for laying a heating system element
After laying and fixing the system, the heating elements are connected. Before pouring concrete into the system, it is necessary to check the operation of all elements of the system. If the test run was successful, work can continue.
The video in this article will show the installation of a water floor.
Finishing fill
It is not always necessary to fill the system with concrete from above. Sometimes other materials are used for this.
- Some apartment owners, in an attempt to reduce costs and reduce the weight of the screed, are trying to fill warm floors with expanded clay concrete. What happens if you fill a warm floor with expanded clay concrete?
- The answer is nothing good. Expanded clay is a heat insulator. By adding it to the concrete solution, you significantly improve the thermal insulation properties of the screed. Therefore, it makes sense to install the floor system on such a base to avoid energy losses.
- There is no point in filling the floor heating from above with such a composition, because this will reduce the efficiency of the system. The fact is that the top layer of expanded clay will prevent the passage of heat into the room. In fact, you will simply be wasting your money this way.
Important! The layer with which the floor heating is poured must have the highest possible thermal conductivity in order to reduce the cost of operating the system.
Expanded clay concrete screed has excellent thermal insulation qualities, but requires a leveling layer