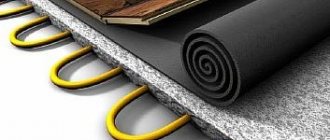
In order to economically and effectively warm the base of the floor in the room, you should install a high-quality warm water floor. It will not require labor and costs during operation. At the same time, the required temperature will be constantly maintained in each room. The heating elements must be placed in a heated floor cement screed, which must be poured from a well-prepared mortar. Here you can do everything yourself, observing the proportions, or buy a ready-made mixture for pouring a warm water floor. In any case, the composition of the solution for screeding a water-heated floor will be slightly different.
Features of the solution
The use of a mixture for a heated floor when pouring a concrete screed is somewhat different from those rooms where there is no heating. The operating mode of such a floor becomes somewhat more complicated, and, consequently, the requirements for the solution increase. Inside the cement screed under the heated floor, a temperature of 50 degrees is maintained. It becomes slightly lower closer to the base - within 30-35 degrees. The following installation errors may appear if you do not follow the installation technology and prepare the solution for screeding the heated floor poorly:
- Minor microcracks will begin to appear on the base, which will only increase in size over time. This can subsequently lead to destruction or damage to the floor covering.
- Due to the appearance of a large number of cracks, the layer of cement in the screed will begin to warp. The heating elements will also be damaged and the entire system will lose full efficiency.
- Temperature conditions will decrease not only inside the entire structure, but also near the base of the floor in the room. The cracks that appear have excellent thermal conductivity, and heat will escape through them.
To prevent all this from happening during the operation of the water heated floor, the prepared screed for pouring onto the pipeline must have a certain set of technical characteristics:
- Low period for cement setting. The likelihood of residual stress will increase depending on how long it takes for the solution to dry completely. In addition, the setting process may vary: in one area there is still moisture, in another - everything is dry.
- Minor porosity. The efficiency of the water heated floor system will be higher if the density of the entire structure reaches its maximum. At the same time, the thermal conductivity of the structure increases.
- High strength. Cement-sand screed for heated floors must be able to withstand external loads and mechanical stress.
- Low probability of cracks appearing on the base. If this indicator can be achieved, then the pipeline itself will not be bent or damaged during operation.
Fighting cracks
First way:
- the room is divided into several even parts;
- each part is poured separately, with a damper tape laid between them;
- the gaps that appear after pouring are filled with putty.
Second option:
- after the screed has completely hardened, the entire area is also divided into separate sectors;
- after that, using a grinder and a diamond wheel, the screed is cut into separate sections;
- the expansion joints that appear are filled with silicone;
- After this, the seams are sealed with putty.
When using this method of dealing with cracks, you should know in advance (make a plan) where the underfloor heating pipes go.
Third way:
- filling is carried out at room temperature and pressure within 2 atmospheres;
- the filling is covered with plastic film, and for high-quality setting, the screed is sprayed with water for a month. If a ready-made dry mixture is used, then point No. 2 does not apply;
- heated floor heating starts and over the course of 3 days the temperature gradually rises, from room temperature to working temperature;
- If no cracks appear on the screed, then the work was carried out in accordance with the technology.
Conclusion
In order for heated floors to function without problems for a long period of time, it is necessary to install them correctly and fill the screed.
Modern specialized solutions, as well as subtleties of technology, can provide such assistance.
Screed material
If we consider the option of a traditional screed for a water-heated floor, then the solution includes cement and sand, diluted with a certain amount of water. The most important thing in this situation is to fully observe the proportions of each component in order to obtain a truly high-quality solution for screeding a warm water floor. This in turn will help to obtain a protective layer for the entire system.
It is very problematic to obtain the necessary solution for screeding a heated floor if you do without such modern means as plasticizers or additives that improve the quality of the fill. In addition, the surface above the pipes must have the same thickness over the entire area of the room. These components help get rid of excess water, give the mass plasticity and ensure a uniform composition of the screed for warm water.
Depending on the amount of water, screeds for water heated floors are divided into:
- Liquid. They are the most popular. A homogeneous structure over the pipeline is achieved by uniformly filling the existing voids in the base.
- Semi-dry. The amount of water in the solution corresponds to the minimum parameter. In this case, instead of a reinforcement layer, it would not be superfluous to add a special additive - fiber fibre. Its properties are in no way inferior to metal mesh, but it gives the finished solution better qualities.
Rough preparation
A warm floor is formed in several layers:
- Rough screed;
- Sound and heat insulator;
- Heating elements;
- Finishing screed (upper part of the structure).
The rough layer is leveling. It is not required if the base is a flat floor slab, like in an apartment. In a private house, floor heating is often installed on the ground; in this case, a self-leveling solid foundation is necessary.
To properly fill, you need the following materials:
- dry mix or cement mortar;
- reinforcing composition (can be replaced with a reinforcement mesh with medium-sized cells);
- waterproofing and insulating materials;
- fasteners;
- container where the solution will be mixed;
- construction mixer (can be replaced with a drill if you have a suitable attachment);
- putty knife.
Subfloor
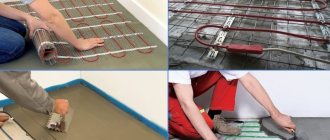
Installation technology
Before pouring the solution:
- Make sure that the temperature at the work site is between + 5°C and + 25°C.
- Clean the working surface (the presence of debris will impair the adhesion between the solution and the base);
- Repair all cracks in the base;
- Line the perimeter of the wall with damper tape to the depth of the screed;
- Install level beacons.
After this, you can move on to the main part of the work:
- Prepare the mixture;
- Fill it, strengthening it with reinforcing mesh if necessary;
- Wait 24 hours, cover the dried concrete with polyethylene;
- After a week, remove the film (further hardening will occur without it).
Expert opinion Sergey Permyakov Heating systems engineer
The minimum thickness of the rough screed must be at least 3 cm; a thinner layer will crack and collapse. There is no point in pouring more than 5 cm under a warm floor; exceeding this limit will lead to a noticeable reduction in the volume of the room.
You can start the next stage of work in a week. The strength of the screed will be about 70%, this is enough to withstand the load. It will take 28 days for the base concrete coating to dry completely. During this time, concrete gains 100% strength.
Composition of the solution
The mixture for screeding a heated floor can contain not only standard, but also additional ingredients. However, there is no hard and clear indication of their total number. Special components can be plasticizers, catalysts, and composition strengtheners. It is worth noting that the overall composition will depend on which particular screed option is chosen for implementation.
Liquid pouring mixtures are characterized by a classic mixing option, which includes, in addition to cement, sand. The proportions of content in the solution are 1 to 3. As soon as a certain amount of water is added to the mixture, a homogeneous liquid mass should be obtained. Plasticizers can be added to the final solution. Gypsum is not used in such mixtures for the reason that the system is highly hygroscopic.
If you are preparing a large amount of mixture for pouring screed over a heated floor, it is better to use a concrete mixer, which allows you to obtain homogeneity of the components. In this case, the cooking process itself will be less time-consuming.
For semi-dry mixtures for screeding a warm water floor, the composition is slightly different. In addition, the preparation of the solution is carried out in two stages. Initially, two components are mixed - sand and cement in a ratio of 2 to 3. That is, 10 kg of cement will require 1 kg of sand. Fiber fiber is added to this after thorough mixing. A similar size of mixture will require about 15 grams of additive. Add 4 liters of water to the resulting volume of mixture for filling the heated floor. Water should be stirred gradually in portions to ultimately obtain a homogeneous mass. What happens should stand for 20-30 minutes, after which a second portion is added for the final solution - sand, water and fiberglass, in a ratio of 20 kg, 4 l, 15 g. That is, cement is no longer used a second time . The resulting mass is used to install a screed over a warm water floor.
An online mortar calculator will help you calculate the required amount of screed materials.
Warm floor on the ground
At the initial stage of work on the ground, it is necessary to properly arrange the subfloor, i.e. the base on which the finishing coating will be laid.
But before we begin to describe the technological process of arranging a concrete floor base on the ground, it should be noted that not all soils are suitable for pouring it. The following conditions for working on soil must be met:
Scheme of a warm floor with corrugated sheets.
First: the level of groundwater should not exceed 4 meters, so that the floor does not flood and there is no moisture suction. Second: the soil should under no circumstances be mobile. On moving soils, a concrete base is a pie, and the entire floor can collapse quite quickly and at the same time damage the foundation of the house. Third: the soil must be dry before starting work.
Work on the ground begins with marking the level of the finished floor. Let’s take the lower part of the doorway as a guide, from which we place a mark on the wall at a height of 1 m. Then, from this mark, which must be present, a horizontal line is drawn along all the walls of the room. The horizontal direction of the line being drawn must be controlled using a level. After this, marks should be placed along the entire perimeter of the room 1 m down from the drawn line. By connecting the applied marks with a horizontal line, we get the level of the final floor covering. For the convenience of further work, you can hammer nails in the corners of the room and tighten the cord.
After all construction debris has been removed from the room, it is necessary to form a cushion (pie) for the concrete base of the floor from several layers of a certain thickness. A layer of gravel (5-10 cm) is laid, followed by watering and compaction. The next layer is sand (10 cm), watering and compaction. The third layer is filled with crushed stone (10 cm), which after careful leveling must be compacted. When forming a bedding, it is necessary to control the horizontal level using a level.
The top layer of the required thickness of the crushed stone cushion is compacted on the ground until there are no sharp corners that could damage the next waterproofing layer. For waterproofing, you can use rolled materials, several layers of roofing material or polyethylene film (at least 200 microns thick) or a mixture of them. The material should be spread correctly over the entire area of the room. The edges of the waterproofing are overlapped onto the walls to the “zero” level, where they are secured with tape. If several strips of fabric are laid in a room, the joints are overlapped up to 20 cm and secured with adhesive tape.
A separating layer is attached to the walls around the perimeter of the room - strips of insulation 20-30 mm thick. The width of the stripes should reach the “zero” level.
Then, on the ground, a monolithic concrete floor preparation with self-leveling properties is formed. To fill it, lean concrete (class B7.5 -B10), crushed stone fraction 5-20 mm is used. The thickness of the concrete layer should be 50-80 mm. Concrete preparation should be reinforced with fiberglass or metal mesh. The reinforcing frame cannot be installed directly on the waterproofing layer, because in this case it will be not only useless, but also superfluous. The frame is raised by 1/3 of the thickness of the intended concrete layer, for which special stands 2-3 cm high are used.
Preparation
To make the floors wear-resistant, it is best to use M400 or M500 cement when preparing the mortar. As for the added sand, it should have large grains, approximately 0.8 mm in diameter. This will protect the surface from the appearance of cracks and other defects. The fine fraction of sand used for bricklaying is not the best option. When installing a warm water floor, a thickness of at least 20 mm will be required, depending on the type of screed. Use the concrete volume calculator to determine the quantity.
There is one nuance that allows you to eliminate the liquid solution - adding water in portions. The important thing here is to eliminate the possibility of using too much water.
Dry cement mixtures M300 sand concrete are presented in finished form. Here you no longer need to think about proportions and getting a quality fill. Dry mixtures can only be diluted with the required amount of water, which is prescribed in the instructions from the manufacturer. Separately, it is very difficult to obtain all the required components of the semi-dry mixture for pouring a warm water floor. For this reason, it is better not to experiment, but to buy a ready-made version for installation.
Each type of mixture can be accompanied by plasticizers that can give the final solution more qualities and characteristics. In any case, even if they are included when purchasing, you should adhere to the mixing options indicated on the package. If it is difficult to decide which mixture to choose for underfloor heating screed, it is better to seek help from specialists or company representatives.
Plasticizer for heated floors: release forms and application
Plasticizers are additives of different composition and form that give the cement-sand mortar the desired properties.
There are two forms of release: dry and liquid. The liquid plasticizer is packaged in canisters of various sizes. Before use, it is shaken well and added to the dry mixture along with water. Most often, 1-1.5 liters of liquid additive are required per 100 kg of dry cement.
When using a dry form of release, the plasticizer is first diluted (usually 1 part powder to 2 parts water, but the exact dosage is indicated on the packaging), and then left to infuse for several hours. Next, after pre-stirring, use it to mix the solution.
One of the plasticizers for heated floors
Different additives impart different properties to concrete, but most of them contribute to a more complete dissolution of cement particles, which makes the solution more uniform and strong
Many of them reduce water permeability, which is very important for the floor. Some allow you to reduce the proportion of cement by 10-20% without loss of strength.
When choosing a plasticizer for a screed, pay attention to all the qualities of the additive, as well as the area of application. The instructions must indicate compatibility with heated floors.
Now a little about the prices of plasticizers. They are not the highest: a kilogram of dry form costs from 50 rubles/kg. Taking into account the fact that from 0.2 kg to 1 kg of additive is used per 100 kg of cement, we can say that the costs are minimal. Liquid options have a wider range of prices: from 20 rubles/l to 100 rubles/l. But they also have a different set of properties and different consumption: in some places you need a cap of the product per bucket of mortar, in others - 2 liters per 100 kg of cement (dry).
Homemade solution
There are several options for making a homemade solution for installing a water-type underfloor heating screed. Among them, there are five main ones, which are worth paying special attention to. The main components are sand, granulated slag, plasticizer, cement, or all of this together in one solution.
- When using granulated slag, one portion of the selected cement is poured into the prepared container, followed by 3 portions of sand and 2 portions of granulated slag. But the proportions will depend on what brand of cement is used in the work. For grade M200 you will need sand and cement in the same quantity - 2 portions each. For grade M500 – 4 portions of sand and 3 granulated slag. You have to be very careful here.
- "All inclusive". If you mix all the components in one solution and additionally include a special reinforcing mesh made of metal or plastic, the final base will be not only reliable, but also very durable.
- Adding a plasticizer. All components are preserved in proportions, as mentioned earlier, only an additive intervenes. It will make the solution more stretchy, and all the granules will be tightly bonded to each other. They will not be “afraid” of a friend. On the packaging of the plasticizer there is an indication of its required quantity in the screed for water heated floors. For 1 cubic meter of mixture you will need about 50-150 grams of plasticizer.
- Using fiber fiber as a component. For each cubic meter of the final solution for screeding a heated water floor, you will have to use about 600-800 grams of fiber. Its length must be at least 12 mm. The composition of the solution and proportions will be appropriate. Here you just don’t have to use granulated slag.
All of these options for preparing the mixture for pouring yourself will require the same amount of water for each cubic meter of solution. It will need about 210-230 liters.
Types of screeds used
There are three types that are suitable for installing a water heated floor system. Each of them has advantages and disadvantages.
Dry
The presented species is considered common, consisting of expanded clay. The base material is foamed with vermiculite, polystyrene foam or perlite. Convenience lies in self-installation, since it is enough to scatter the dry screed and level it. The surface is covered with a sheet of plasterboard or chipboard
An important condition here is the use of only moisture-resistant material
The advantages include simple and quick installation, good sound insulation. Workers have the opportunity to lay out a finished floor the very next day. The use of this variety reduces the load on the slabs by 2 times.
The disadvantages boil down to the possible appearance of mold, which occurs due to the ingress of water. A dry screed cannot withstand a large load - this is explained by the use of chipboard and gypsum boards. Therefore, it is not recommended to install additional partitions. Owners of apartments and houses note the presence of characteristic rustling sounds when walking during the first time of use.
Wet
Water-heated floors are usually placed on a wet screed. This is a cement-sand mortar or concrete mixture, which is diluted in accordance with the proportions of the purchased products. The work requires accuracy and attention, so self-installation is not always undertaken. Suitable for floors with ceramic or stone finishes. Requires precise surface leveling. Otherwise, finishing will be carried out with errors and geometry violations.
The benefits are as follows:
- This type is stronger, so it is recommended to use it when constructing additional partitions in the room.
- Can be used as a finishing coating indoors. After it is completely dry, it is enough to paint the floor in the desired color.
- High sound and thermal insulation.
The disadvantages include the laboriousness of the process and the large weight of the resulting layer. Therefore, it is not recommended to use the presented type of screed in panel houses. They have weak floors, and heavy weight can lead to cracks in the wall. They also note that it takes a long time to dry, which significantly complicates the process.
Semi-dry
A semi-dry screed is not much easier to lay than the wet version, since here you will need a pneumatic blower, a mixing machine and a grinder to work. The mixture is presented in the form of a sand-cement composition, which is difficult to level over a large area. With self-installation, you can do without additional equipment, but only if small areas are being repaired. Otherwise, laying out the floor evenly will not be possible at all.
The advantages of the semi-dry variety are the following factors:
- The light weight of the cement mortar ensures safe living in an apartment building.
- Finishing can begin after 2-3 days, since during this time complete drying is achieved.
- Moisture resistance, good sound and thermal insulation.
The only negative aspect is the need for additional equipment for repairs. If you can rent it, then there shouldn’t be any problems with the semi-dry screed.
Installation nuances
When installing a screed for a warm water floor, you should remember that there are certain subtleties that must be known before starting work. The density of the solution used is very high, resulting in a reliable structure that can withstand external mechanical influences.
The solution can also be used to arrange beacons on the surface of the base in the form of cones. Beacons should be laid in a straight line and strictly following the building level. According to these beacons, guide profiles made of steel are laid. All this will allow you to fill the future screed smoothly and efficiently.
Concrete is poured along the exposed beacons, along the lower edge of the profiles, which are subsequently removed. All possible areas with superficial damage to the floor must be sealed with concrete mortar.
seam damper separator
We must not forget about the damper tape, which serves as a compensator for the thermal expansion of the completed screed. It is most often made from foamed polyethylene. All subsequent work should be carried out only after the solution has completely dried.
Installation of damper seams
Depending on the composition, the time frame for carrying out the work will vary. The mixture will harden much faster with less water.
There may be cases of obtaining a not entirely flat surface in order to lay floor coverings such as carpet or linoleum. In this case, resort to additional leveling using leveling compounds. The layer is insignificant and does not affect the difference in distance from the floor to the ceiling in the room. The maximum thickness of self-leveling fill reaches 5-7 mm. It is this indicator that elevation changes should not exceed.
When installing a screed for a heated floor, the proportions must be observed. This is what will allow you to get the desired result in the form of a durable and warm foundation.
Video description
In this video you will see the secrets of good screed pouring: The mixture is laid out in small slides. A shovel is used to level them. Pouring a heated floor with a perfectly flat surface is not always possible. Therefore, in order to achieve this result, the solution is laid above the established profile. The next morning they come and remove the excess. But you don’t need to wait until the mixture hardens completely. It should harden a little.
Upon completion of the work, they begin to remove the guide profiles. The places where they were are treated with cement mortar and leveled.
Finally, a small amount of water is applied to the surface and covered with a polyethylene film. This will prevent the base from cracking. To prevent the floor from drying out too quickly, it needs to be moistened for at least 3 days.
Finish filling on TP
If the rough screed has dried, it’s time to move on to the next steps:
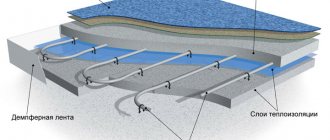
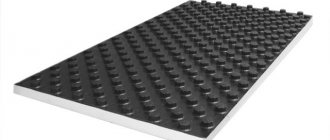
- installation of a heat insulator. Thermal insulating material is mounted only on a clean base (it is best to vacuum it). The heat insulator can be cork, foam, polypropylene, aluminum foil or metallized Mylar film. To secure it, tape, dowels and glue are used.
- Laying damper tape. The damper tape protects concrete from cracking associated with temperature fluctuations. Mounting area: along the perimeter of the room and between the contours of heated floors.
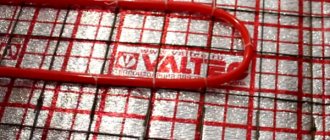
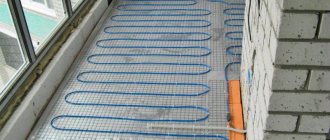
- Laying heated floor elements. Pipes need to be checked for breaks (especially at bends), and when running cables, grounding must be ensured.
- Reinforcement. Reinforcing mesh can be placed under the pipes, above them, or in both places at once. Pipes are easily attached to the lower metal mesh during installation, however, unlike the upper one, it does not provide reinforcement for the screed. If the concrete is of high quality, then this part of the work can be abandoned.
- Pouring finishing screed. Before proceeding to the last stage, you must check how well the heating system is functioning. The screeding solution is poured at above-zero temperatures and in one go. Partial filling is allowed only in rooms with a multi-level floor. The concreting process begins from the far side of the room and ends next to the door.
Pie TP
After finishing the pouring, it is recommended to make several punctures in the coating with a metal knitting needle or similar object. This will prevent the formation of voids.
In the next week, the concrete surface should be moistened with water 2-3 times a day. This will prevent it from drying out while it hardens.
The thickness of the finishing layer can be from 3 to 7 cm in a private house, and in an industrial area - 10 cm.
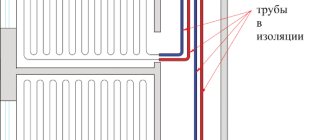
If a water heated floor is installed, the height of the screed above the pipes should be 3.2-7 cm.
Read more in the article.
Mistakes you shouldn't make
When building with your own hands, a number of mistakes are made, which ultimately lead to problems:
- Savings on specialists to install water circuits (not everyone will be able to do this at the same level).
- Work before installation of the system is a mandatory process.
- Poor quality installation of damper tape.
- The rough screed is poured unevenly.
- Sloppy installation of the system, poor-quality fastening.
Many small mistakes occur when you fail to properly fill a heated floor. A plan for performing preparatory and installation work and studying professional tips will help you avoid mistakes. An estimate of waste is drawn up, which must be followed and not skimp on materials.
Concrete pouring serves as protection against damage to the water circuit. In order for it to serve for a long time, you need to follow all the rules. Precise laying of the heating circuit and high-quality screed determine the level of reliability and operation of the system.
What you need to fill the floor
The work can be done efficiently if you have the following tools at hand:
- beacons (steel pipes, slats, aluminum profiles);
- building level;
- roulette;
- stationery knife;
- roller (needle or regular);
- rule;
- drill;
- concrete mixer, mixer;
- metal brush;
- spatulas;
- reinforcing mesh;
- fastening material;
- brushes;
- container for mixing the solution.
Use professional flooring tools.
T-shaped aluminum profiles, which are left in the coating after the solution has hardened, can act as beacons. Steel pipes with a diameter of 7 cm are also suitable.
Floor screed plays an important role and performs several functions.
To understand in what proportions to prepare the mixture, you will need to calculate the screed per 1 square meter. The final numbers will depend on the selected components.
Known methods of mixing mortar for floor screed require precise calculations.
When choosing ready-made mixtures, you don’t have to worry about calculating additional materials, since everything is taken into account in its composition
It is important to read the composition of the product, since ready-made mixtures have different characteristics. The packaging provides complete information for calculating consumption
They often write on the packaging how to prepare a solution from the mixture.
Standard proportions of cement mortar are 1:3. This means that 1 bucket of cement requires 3 buckets of sand. This option is chosen for most types of work.
Calculating the thickness of underfloor heating layers
It will be necessary to check that all underfloor heating systems are covered with concrete during installation.
With the listed numbers on hand, it will be possible to calculate the thickness of the entire floor, but it is worth keeping in mind that the “pie” in any case must have a thickness of at least 140 mm, counting from the top of the base to the surface of the rough screed. It will also be necessary to make adjustments for the thickness of the gravel “pillow” and the overlap of the first floor.
It is worth taking into account the purpose of a particular room, for example, the same screed in residential premises should not exceed 100 mm, as for warehouses, shopping pavilions, as well as car centers, it should not exceed more than 200 mm. If you need to heat an aircraft hangar, you will already need a 300 mm screed.
It will be necessary to check that all underfloor heating systems are covered with concrete during installation. To do this, the minimum thickness of the screed must be 65 mm. It is imperative to remember that a warm water floor screed differs from a conventional screed by the presence of expansion joints in them.
Other points of mandatory inspection of underfloor heating systems before use are:
The choice of screed materials must be made responsibly
- checking the functionality before laying the pipeline screed;
- checking the pipeline for hydraulic density;
- checking the heat-reflecting layer placed under the pipeline system in order to avoid losses.
In order for the screed to be of high quality, the choice of materials for it must be made responsibly, only in this case the warm floor will work for a long time and effectively. At the same time, you need not to overdo it with its thickness so that the heat can function normally in the room.
In the case when the described heating system will operate in a non-residential premises, you need to pay special attention to the strength of the heated floor covering. For this purpose, it is imperative to carry out the reinforcement procedure
It is the reinforcing mesh that will help you make the floor durable and at the same time highly functional.