0
7636
08.03.2014
How to heat a greenhouse - you ask? Before we talk about the technology of building a potbelly stove for heating a greenhouse, let's remember how pleasant it is to spend a weekend or even a whole summer at the dacha. Especially if there is a heated house and a greenhouse on the site, which is built according to all the rules and brings a rich harvest. And thanks to the stoves, neither sudden frosts nor nighttime drops in temperature are scary. Of course, speaking about heat, we immediately advise you to read about: the construction of a bubafonya furnace, as well as a furnace for mining.
Do-it-yourself potbelly stove for a summer residence
Greenhouse heating
heated greenhouses are erected in summer cottages . Stove heating is especially relevant in the north of the country, in harsh climates. In greenhouses, simple stoves, usually metal, are installed. A potbelly stove is capable of heating the greenhouse space and protecting seedlings from temperature changes; in addition, any solid fuel, including fuel briquettes and sawdust, is suitable for this stove. And combustion products (ash and ashes) can be used as fertilizer.
The minimum temperature for a greenhouse is 18 degrees. When calculating the dimensions of the furnace, the dimensions of the greenhouse are also measured. One potbelly stove successfully copes with heating a greenhouse with a volume of 15 square meters. The distance between the heating parts of the stove and the walls of the greenhouse is at least 25 cm. And from the chimney to the top ceiling is at least 15 cm.
When installing a greenhouse, the chimney is either laid in the soil or installed on supports under the roof, depending on the climate and the crops grown. The stove itself is installed in such a way that the combustion hole is located outside the greenhouse space. This is necessary to protect plants from possible smoke, as well as for the convenience of adding solid fuel. If the stove is completely outside the greenhouse, this will result in loss of heat emitted by the metal parts of the potbelly stove.
How to choose fuel
Long-burning furnaces operate on almost all types of fuel: coal, wood, sawdust, waste.
The choice depends on the parameters of the greenhouse:
- Sawdust is an affordable type of fuel for summer residents who have a sawmill next to their property. Most often they can be taken for free, since workers simply collect and throw away these wastes.
- Firewood is the best choice for a greenhouse stove. In a small greenhouse, fuel can be added once a day. Firewood is affordable and environmentally friendly.
- Coal . The main advantage of this type of fuel is its high calorie content. Disadvantages: release of toxic substances, as well as a large amount of waste. Some types of coal can be dangerous if stored improperly because they are prone to spontaneous combustion.
- Briquettes . This type of fuel combines the advantages of wood and coal. Briquettes are characterized by rapid combustion and maintain long-lasting combustion. The fuel is highly efficient, economical and has no harmful emissions.
Heating a greenhouse using a potbelly stove
The structure consists of:
- – potbelly stoves;
- – a chimney located horizontally (hog);
- - chimney.
To make draft more efficient, the chimney is positioned at a slight angle (inflated towards the chimney). The slope is taken to be one and a half centimeters for each meter of pipe.
Operating principle: when wood burns in the firebox of a potbelly stove, a large amount of heat is released, which enters the chimney, where it accumulates and simultaneously heats the air around the chimney. The smoke is discharged through the chimney.
The principle of operation of a potbelly stove for a greenhouse
Materials and tools:
- – metal corners for supports;
- – pipes for the chimney and chimney;
- – metal sheets and rods for installing the furnace;
- – a welding machine, an angle grinder and the necessary materials for them (in the absence of an angle grinder - a hacksaw and metal scissors, a file);
- – bolts, couplings for connecting pipes;
- – bricks and clay mortar;
- - roulette.
Drawings and diagrams
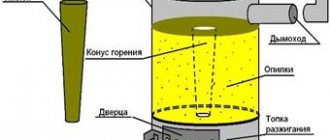
It is much easier to assemble a stove for a long-burning greenhouse with your own hands, having the diagrams in front of you. Let's consider one of them.
The furnace body consists of two parts. The first is the base, which consists of a body and a chimney. Fuel is placed here and covered with a lid. The second part is the base - the firebox and the door. There's a fire burning here.
You can assemble a simple stove in a greenhouse with your own hands in a few hours, because it is a simple and doable task.
Experienced designers recommend seeking help from a professional who will help you install the chimney correctly, weld the parts and recommend the correct placement of the device.
Step-by-step instructions for assembling a potbelly stove
We take measurements of the greenhouse in order to install a potbelly stove and calculate the length of the chimney. Be sure to leave room for brick cladding. We will place the combustion hole outside the greenhouse, and the stove itself will be located inside. We are building a drawing of the future structure.
We will assemble the firebox from welded iron sheets. This will make the volume of the furnace large enough, which will lead to an increase in heat transfer and will allow you to load fuel less often.
We make markings on the sheet metal and use a grinder to cut out the walls and bottom of the future rectangular potbelly stove.
We weld together the bottom and three side walls of the oven. Then we weld inside limiters from metal corners , on which we will lay the grate.
the grate itself from longitudinal and transverse metal rods connected by welding. Another option is wire bent in a zigzag shape. The grate must reliably hold the fuel and ensure unhindered penetration of combustion products into the ash collection box.
We cut a hole on the stove roof for installing the chimney, and attach the stove roof .
On the front side of the potbelly stove there should be a firebox door and a ash door, through which the stove will be simultaneously cleaned of combustion products. Using the markings, we cut out the doors and the wall of the oven, then weld strong metal hinges and handles to the doors. It is not advisable to use awnings on old furniture; high temperatures will quickly damage them.
We weld a short section of pipe onto the stove roof. We will connect the entire chimney to it. The prefabricated design will facilitate the maintenance and repair of the furnace.
To complete the work, we attach legs made from pieces of metal corners to the bottom or ends of the furnace, connected by jumpers for greater stability of the structure.
We fasten the legs from pieces of metal corner
Foundation
The foundation is necessary to prevent possible distortion of the stove, the collapse of the legs of the structure into the ground and to protect the greenhouse from fire.
The foundation for a potbelly stove is similar to the foundation for other stoves and fireplaces. And in the same way, it should not interact with the base of the greenhouse. If they are very close, then be sure to create a sand layer at least five centimeters wide. All stages of work are carried out by checking the horizontal position with a building level.
Stages of foundation construction:
- Preparing a pit about half a meter deep;
- Filling the pit with rubble (a mixture of small broken bricks, crushed stone, sand);
- Installing formwork from wooden boards and pouring cement mortar (sand is poured between the formwork and the ground);
- Laying roofing felt over dried cement mortar;
Laying roofing felt over dried cement mortar - Laying two rows of baked bricks.
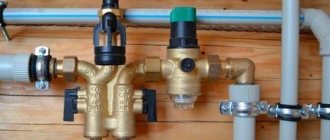
Chimney
The chimney does not have to consist of a solid pipe. Segments of equal diameter, fastened together, are quite suitable.
It is best to use steel, cast iron or ceramic pipes. Asbestos-cement ones are cheap, but very fragile, require frequent cleaning and can cause fire and smoke in the room.
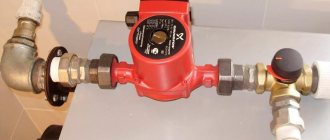
Chimney from a pipe
The connection to the furnace and pipe sections to each other is carried out using welding or couplings. A coupling is a small rectangular sheet of metal that is used to wrap a pipe joint and tighten it with wire or bolts. Under the coupling, the joints are coated with oven clay (or a layer of heat-insulating material is laid).
Connection to the furnace using a coupling
To prevent the structure from deforming, the chimney is installed on supports made of metal corners stuck into the ground.
The chimney must be covered with lime or chalk. White surfaces better reflect the sunlight necessary for plants, and in the event of pipe deformation and smoke, the damage site immediately becomes noticeable.
Potbelly stove for greenhouse (chimney)
Chimney
The chimney passing through the top floor of the greenhouse must be wrapped with heat-insulating material. A spark arrester and a cone are placed on top of the pipe, protecting it from dirt and precipitation. A spark arrestor can be easily made from an ordinary tin can of suitable diameter by drilling many holes in it. A protective cone is made from an ordinary tin lid, secured to the pipe with wire. However, you can purchase a finished part.
Tip for chimney
For the convenience of regulating draft, heating pipes and cleaning, a hole is cut out in the chimney - a view. This hole is closed with a small door, and a damper is installed inside the pipe, which is cut out of a piece of sheet metal and welded to a piece of thick wire. The ends of the wire are brought out transversely from the pipe, and the damper is attached by welding. Thus, when the wire is turned, the damper also changes position, increasing or decreasing the gap in the chimney.
View in the chimney
If the chimney has a rectangular or square cross-section, the view is made in the form of a retractable sheet of iron.
View in a square chimney
Water tank for country stove
The last important detail for a country potbelly stove is a water tank. It can be installed on top of the stove or made removable, installing it near the heating walls of the stove if necessary. In this way, sufficient humidity will be maintained in the greenhouse, and in cool weather there will always be warm water for watering the plants.
To increase heat accumulation, better heat transfer and additional fire safety, all heated parts of the stove must be coated with stove clay or brickwork placed at a short distance from the firebox. Fireproof bricks are used and they are held together with clay. This avoids cracks.
Any fuel is suitable for a country stove. Regular firewood, homemade fuel briquettes, packaging materials, and old rags will do. However, it is worth monitoring the moisture content of the fuel, otherwise plaque and condensation will form on the pipes, which will require cleaning the structure due to reduced heat transfer and increased fuel consumption for heating the greenhouse.
Disadvantages of heating with Buleryan
During operation, it turned out that it is not so convenient for heating greenhouses.
An important drawback is that Buleryan is heavy. It is difficult for a healthy adult man to endure it alone. It's also bulky. It is problematic to transfer it from one greenhouse to another. For a person with a bad back, this manipulation can take the whole day. The stove is not mobile.
The main disadvantage is the price. Last spring we bought it for 25,000 rubles. It is not cheap. We thought we could save on firewood and get some of the cost back.
As time passes, I realize that I can’t save money. Part of the funds can only be returned over a very long period of time, about 10 years. The starting cost of such a stove eats up all the savings from it.
It also turned out that Buleryan has a small firebox. If men can chop wood for him without any problems. It's difficult for me to do this. Therefore, I heat my homemade potbelly stove with much greater pleasure. Any firewood and boards that can be found on the farm go there.
To summarize everything that has been said. If you don’t have money for Buleryan, but you need a stove in the greenhouse, take a closer look at homemade stoves. They are not inferior to their foreign counterparts.
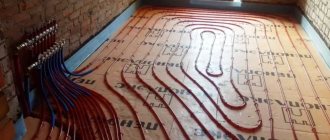
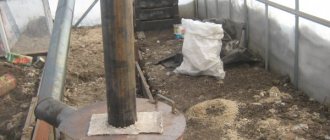
Heating a greenhouse using an underground chimney from a stove
The design of the stove, the foundation, and the brickwork around the firebox remain unchanged. But the chimney will lie in the soil, and not be on supports under the roof of the greenhouse.
Chimney from a potbelly stove underground
The distance between adjacent parallel pipes should be within 60-100 cm. The depth of the pipes is 25-40 cm. The pipes are laid at an angle in dug trenches, covered with crushed stone or expanded clay. The ends of the pipes lead outside the greenhouse. Thus, warm air from the potbelly stove enters the pipes, heats the soil and air, and smoke from fuel combustion is discharged outside without entering the greenhouse space.
A DIY potbelly stove for a summer residence is a budget-friendly and quick way to increase the amount of harvest and protect it from unfavorable natural conditions. With properly installed heating, roses will bloom thickly in country greenhouses, and cucumbers, bell peppers, grapes and other fruits of heat-loving crops will be on the table.
Popular purchased models
You can purchase ready-made models of stoves for heating a greenhouse in stores.
The most popular of them:
- Kuznetsova. Made of brick and has 2 metal registers. The efficiency is approximately 90%. Inside the furnace there is a special “cap” that connects the hearth to the lower part of this device. It separates gas into cold and hot. In this case, the hot one is inside, accumulating heat for heating, and the cold one is discharged through the chimney. This device heats evenly and also limits the formation of soot.
- "Rocket". The principle of operation of such a device is that at high temperatures, fuel (wood, coal) breaks down, forming gas, which burns in a separate compartment, giving good heat transfer. This model is fuel efficient. The heating device was called “Rocket” because of the hum it produces, which can be heard at the beginning of operation. Such sounds stop when the oven heats up to the required temperature. Heating of the greenhouse space is carried out using a chimney, which is located along the perimeter of the structure or along it.
- "Vologda". Solid fuel is placed into this device every 8–10 hours. The furnace operates using gas generation. Some models contain a water heating coil. Chimneys are laid through the ceiling or window to the outside. In this case, the upper chimney must exceed the ridge by at least 0.3 m to enhance draft. To improve the heating process, the device must be mounted 0.3–0.6 m above floor level.
- Buleryan. This device is a barrel that is located on its side. Pipes stick out from it in different directions at the top and bottom. The lower pipes are needed to absorb cool air, and the upper pipes are needed to release warm air flow. The basis of the work is gas generation: in the first internal compartment the firewood smolders, and in the second the gas that is released is completely burned. The room is heated evenly. The efficiency is 72–75%. Firewood is added to the stove every 7–8 hours. Unfortunately, this version of the heating system does not have a temperature controller.
- Slobozhanka. Quite a practical stove for heating a greenhouse using wood, hay and sawdust. Typically the ignition system is located at the top of the device. There are 3 variations of this heating device, which differ in the system of supply and air flow.
- Butakova. This model resembles a Buleryan oven. It also operates on the principle of gas generation, but additionally has a convector, which provides faster heating of the greenhouse. There is a regulator available that allows you to set the required temperature. There is a drawer at the bottom for removing soot. Temperature differences are regulated by the grate.
Nowadays there are various types of long-burning solid fuel boilers on sale that can be used to heat greenhouses. You can make and install such a stove yourself.
Is it possible to do it yourself?
Any of the listed stoves can be made independently, from metal or brick. Another question is the complexity of such work: a conventional potbelly stove can be made by any more or less handy owner, but only a master with the necessary tools can recreate a Butakov stove.
The approach to creating different furnaces also differs. If the same potbelly stove can be made from what is lying around, then Buleryan will be more demanding on the design, and materials will need to be purchased separately.
There are designs for primitive stoves. Amateur gardeners make their own from barrels, old gas cylinders and other unnecessary things. Such stoves are easy to make, but they are not suitable for more or less serious work, since they have low efficiency and a small heating area.
The device of the “pre-furnace” sheet
- a workpiece measuring 500 x 700 mm is cut out of a steel sheet;
- the workpiece is painted on both sides with oil paint and dried;
- felt, moistened to prevent overheating with a clay solution of creamy consistency, is placed on a steel sheet and dried well;
- a sheet with glued felt is placed under the firebox of the potbelly stove with the metal facing up and secured to the foundation.
At the end, a potbelly stove on legs or trenches is placed on top.
To prevent deformation of its structure, the chimney is placed with an upward slope (1.5 cm/meter of length) on supports made of steel angles stuck into the soil of the greenhouse
Installation of a horizontal chimney-hog
- The base of the hog does not have to be a solid pipe. Instead, you can take pieces of steel, cast iron or ceramic pipes of the same diameter. It is better not to use asbestos-cement pipes because of their fragility and the need for frequent cleaning.
- A hog with a piece of steel pipe welded on top to the furnace, and the pieces of the hog are fastened together with clamps made of rectangular sheets of steel, wrapped around the joints of the pipes and tightened with wire or (through the edges bent and pressed together) with bolts. Under the clamps, the joints are coated with oven clay.
- To prevent deformation of its structure, the chimney is placed with an upward slope (1.5 cm/meter of length) on supports made of steel angles stuck into the soil of the greenhouse. It is better to whiten it with lime or chalk for better light reflection and quick identification of damaged areas.
It is necessary to constantly monitor the humidity of the heating oil, otherwise plaque and condensation will form on the pipes, reducing their heat transfer and increasing fuel consumption for heating the greenhouse.
You can heat the soil in a greenhouse using heat from an underground chimney