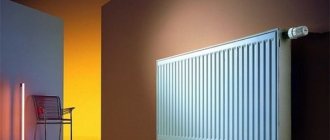
Warmth in a private house or city apartment is an important component of a comfortable life. A heat-reflecting screen for the radiator will help you save a few degrees in the cold winter (and at the same time save a little on heating costs). I will tell you how I built such reflectors in each room of my cottage, and even hint at how much you can save with the help of this simple device.
Disadvantages of the material
Energy-saving film is not a source of heat and does not affect the heating of the room.
Retains heat produced by central heating sources. The material maintains the existing air temperature. Through a window covered with athermal protection, heat from the street does not penetrate
Disadvantages of the material:
- The protection does not allow UV radiation to pass through and is not recommended for use in rooms with indoor plants. Not suitable for tinting glass in greenhouses and greenhouses in the local area. Plants need ultraviolet light to grow. If there are plants in a room with energy-saving coating, you can use phytolamps. However, you can forget about saving energy - for normal plant growth and compensation for the lack of sunlight, lighting must work at least 12 hours a day.
- The effectiveness of the film coating depends on proper gluing. It is better not to cover large areas of glazing - for example, panoramic windows or portals - by yourself.
- The coating prevents the penetration of natural solar heat from outside into the room; in spring and autumn the apartment will be uncomfortable - damp, cold. Mobile heating devices must be turned on.
- Ability to reflect radio signals. Radio waves from the outside going to the indoor antenna or mobile phone are reflected by the coating. There may be interruptions in cellular communications.
- If the room has window systems with two or three-chamber double-glazed windows, it is not necessary to use film.
Comparison of air conditioners when operating for heating
Below are independent results of research and measurements of this coefficient (taking into account defrosting cycles!), which were carried out with some of the highest quality brands of air source heat pumps - Mitsubishi Electric, Panasonic, Gree, Fujitsu. To view, click on the appropriate tab.
Mitsubishi Electric MSZ-FH25VE + Mitsubishi Electric MUZ-FH25VEHZ
Panasonic CS-NE9MKE + CU-NE9MKE
Panasonic CS-HE9LKE + CU-HE9LKE
Gree Hansol 25-A (GWH09TB-S3DNA2D/I) + GWHT09TB-S3DNA1D/O
Mitsubishi Heavy Industries SRK25ZJX + SRK25ZJX-SA
Fujitsu ASYG09LMCB + AOYG09LMCBN
The market leader is Mitsubishi Zubadan. However, you should not believe the marketing and purchase budget models of this brand. They are distinguished from conventional splits mainly by a more powerful compressor. You are unlikely to get normal heating at -25C from them either.
The energy efficiency of real Zubadans, depending on the region of your residence and the average temperature in winter, can be calculated on a convenient online calculator on the Mitsubishi website here.
If COP is not initially indicated anywhere on the device, you can calculate it yourself. To do this, divide the thermal power, which is written on the device nameplate, by the consumed electrical power.
How to choose the power of the air conditioner according to the area of the room, read a separate article.
What is a heat reflective screen?
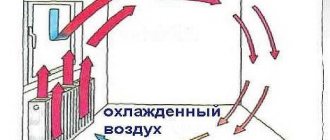
Warmth in a city apartment or cottage in winter is provided by a heating system. Hot water or steam, circulating through the pipes, passes through the radiators, heating the metal. The battery gives off heat to the air masses in the room, which are continuously mixed due to convection currents.
The main disadvantage of the scheme is that part of the heat escapes through cracks in the windows, open vents, and is also spent on heating the walls (and through them - the streets). The idea of saving heat using a reflective screen is to return into the room the heat that comes from the radiator to the outer wall.
A thin layer of metal foil can reflect at least 95% of the heat, reducing losses.
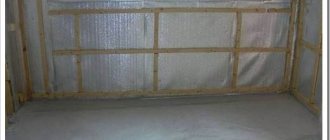
It is not enough to stick foil on concrete or brick. The metal has good thermal conductivity, so the foil will heat up and then warm up the wall. To prevent this, a layer of material with low permeability to heat must lie between the wall and the metal. That is why I decided to build a screen from foil foam.
Principle of operation
To understand the principle of operation of such insulation, consider the main methods of transferring heat from one coating to another:
- thermal conductivity - the ability to conduct heat (solids);
- convection - heat transfer through the air due to different densities of cold and warm air currents;
- radiation - any body with a temperature above zero emits heat waves, which are absorbed by walls and ceilings (surfaces), converted into heat and transferred to the cold external environment. This exchange accounts for about 60-90% of heat loss.
Thus, heat loss is inevitable. It turns out that to create the effect of thermal insulation, it is necessary to minimize heat loss from radiation. But traditional TIMs are not able to protect a building from this type of heat transfer. And the optimal material was found - foil insulation, known for its reflective and low-emissivity properties.
Reflective thermal insulation works across all heat transfer processes: radiation, convection and conduction, inhibiting heat loss.
Scope of application
Reflective thermal insulation is applicable to all surfaces without dirt and dust, suitable for complex structures with corners, bends and differences. Insulating walls from the outside can achieve maximum effect by creating an air gap of 20 mm on the foil side.
The material is effective for multi-story and single-story frame houses, and it will increase the resistance of the walls without increasing their volume. Installation is carried out end-to-end without overlaps, and the seams are taped with foil tape.
Application from inside
If you want to insulate the room from the inside, then there are two options. The first option is to make 2 air gaps between the external wall and the material, between the insulation and the cladding (for example, drywall). In this case, TIM with double foil is used.
The second option is to create one gap between the external wall and the insulation, for which material foiled on one side is used. The foil is turned indoors.
Roof insulation
Reflective TIMs mounted on the roof provide not only thermal but also vapor insulation. The under-roof space is also protected from moisture.
Reflective film is especially effective when insulating the ceiling of a bathhouse.
Piping and ventilation
Pipes require insulation with double-sided foil. If the pipes have a diameter less than 159 mm, then there is no need to create an air gap between the TIM and the pipe. If the pipes have a larger diameter, then a gap is required. The air gap is arranged as follows:
- The first option is to attach rings made of foil film to the pipe with a distance of 300-400 mm from each other. And on top of the rings the pipe is wrapped with insulation;
- the second option is to lay wooden blocks with a cross-section of 10 by 10 mm or 20 by 20 mm along the pipe, after which insulation is wrapped on top of them.
The joints must be sealed with aluminum tape. Insulating ventilation ducts will eliminate heat loss and provide sound insulation.
Convective beam calculation
The thermal calculation of the boiler is carried out in order to determine the volume of thermal energy that the beam is capable of absorbing in order to prevent overheating of the boiler heating surfaces and exceeding the operating parameters of the steam. It is performed by drawing up a heat balance for this heating surface and a heat transfer equation.
Moreover, the second calculation is performed to compare heat indicators. The calculation will be considered reliable in the case when, when comparing two results, the discrepancy in the calculations will not be more than 5%.
Algorithm for calculating CP:
- Using reference data or drawings of the steam boiler, the structural dimensions of the convection shaft of the flue and the gas window are specified.
- The temperature and enthalpy of the gases at the entrance of the first convective beam are taken according to the calculation data of the screen pipes at the exit from the furnace.
- The temperature of the heating medium is taken from the table of saturated steam at the operating pressure of the steam boiler.
- Initially, the first control point is calculated, then the second one is calculated in the same way.
- In the initial calculation of the convective heating surface, 2 temperature parameters at the outlet of the flue are initially taken: 700 C and 400 C.
- Both calculation options are carried out synchronously.
- After performing the calculations, the real temperature of the flue gases downstream of the flue is determined graphically by the amount of heat transfer calculated using the heat balance and heat transfer coefficients at previously accepted temperatures.
Convective heating surfaces of steam boilers play an important role in the process of steam generation. They affect the efficiency of the boiler as a whole, increase its efficiency and reduce thermal emissions into the atmosphere from flue gases.
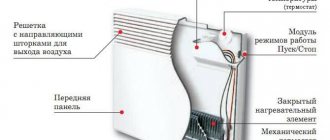
What should the screen for the battery be like?
Heating radiators release heat to the environment through radiation of thermal energy and direct heat exchange with air, which is facilitated by active convection of air in the room. The screen for the radiator should ideally not affect the efficiency of heat transfer at all. When choosing a suitable design, the negative impact on heat transfer should be minimized.
Based on this requirement, we can put forward a number of rules that must be taken into account during manufacturing:
- The presence of a ventilation gap at the bottom along the width of the radiator for air access to the surface of the radiator of at least 7 cm.
- The presence of a ventilation gap at the top along the width of the radiator of at least 10 cm for the exit of warm air.
- The distance from the extreme part of the radiator to the front panel of the screen is at least 5 cm.
- At least 50% of the front panel of the screen consists of gaps. For any selected grille, more than half of the area is made up of through holes.
- The entire internal surface is painted black.
- A heat-reflecting screen is mounted on the wall behind the heating radiator.
- The design is made removable, at least the front panel, for access to the radiator.
If there are thermostats on a siphon-type radiator, they should not close even partially; insulating the valve is allowed, but the siphon must be outside the screen.
If these simple rules are not followed, the heat from the radiator will accumulate under the screen and, most likely, will flow back into the coolant and go into the return line. The power of the radiator will decrease, because it directly depends on the temperature difference between the coolant and the air in the room, and as a result, less heat will get into the apartment.
Design
The radiator screen can have several designs, depending on the location of the radiator and the design of the niche in which it is installed.
One-piece screen-box. For a radiator located on the wall without recessing into a niche or strongly exposed from it into the room.
An overlay screen from only one front panel, if the radiator is recessed completely beyond the border of the niche under the window and sill.
A false wall made of plasterboard with a grille opposite the radiator.
In the first case, the most universal option is obtained. If you understand how it works, you can reproduce any other option required in a particular situation. A frame is assembled using a frame made of wooden blocks or a metal profile of the smallest cross-sectional size, which is subsequently covered with decorative panels and a grille in the front part.
Slots are made in the side walls for pipes suitable for the radiator, or the screen expands enough to completely hide the pipe outlets if they were originally laid inside the walls. Fastening is carried out to the wall behind the battery, for which hanging loops on the screen and a bracket on the wall are used.
The required gap at the top can be hidden from view by placing an additional shelf made of laminated MDF sheet above it. It should be spaced from the screen by the width of the gap itself, that is, at least 7 cm. This is quite enough to visually hide the radiator. The shelf will be a pleasant and useful addition to the decor of the battery.
Separately, the features of screens mounted in false walls made of plasterboard should be discussed. It is not enough to simply place the grille opposite the radiator. It is necessary to limit the space around the radiator from the rest of the space behind the false wall. For example, wrap the edges of a heat-reflecting screen made of metallized polyethylene foam and secure them to the back of the drywall. Ventilation gaps are necessarily formed along the upper and lower parts of the grille, respectively, above and below the radiator, which are trimmed with plastic trim from PVC panels.
Tags thermal insulation
Comments 65
If it’s hard to paste wallpaper behind the battery, you can put such crap, it seems to cover the hole, and you can also feel the “effect”
But I don’t even know, the first time I glued it to my grandmother seems to me to be of little use, although I didn’t actually measure the temperature.
I don’t know about you, but in Moscow every year they go and glue them (in apartments, but I don’t need them) with the same crap, and they glue them on the floors too
Good topic, I enjoyed reading it.
The thermostatic tap is installed incorrectly - it should be horizontal. And cover all the walls with such a screen, then the effect will be))))
Time will put everything in its place, it’s a shame that we throw mud at each other. Why do we have such “ugly” happening on the radio about the fraternal people, what do you have...
p.s. There are plenty of cattle and degenerates everywhere. Those who write “Dill” and “Vata” have probably found themselves and are stuck in their development at the 5th grade level.
On the contrary, I cover all radiators with blankets all winter, the heat is unbearable)))
We have battery-powered regulators and pay according to the meter for heat, so we’re thinking about how we can save money.
Apparently you pay pennies, in my new apartment it was in a corner room of 8.7 sq.m. 2 batteries - one 7 sections, the other 11 - as it turned out, they were building because they were afraid that people would freeze, + a street wall with brick masonry exactly 1 meter high.
The effect is no more than a placebo. The temperature in the room is, roughly speaking, the thermal energy that came from the batteries, minus the thermal energy that went out, through the windows, doors, ventilation, and also through the walls. That is, this way and that - the total will be exactly the same, because the area of the walls leading to the street and the number of other windows remains unchanged. Such Velcro worsens heat exchange with the wall specifically in this place, but, firstly, it’s a drop in the sea compared to the area of all the walls; secondly, the wall in this place will warm up worse, i.e. cooler outside. As a result, the temperature difference will increase and heat transfer will stabilize at the same level. We do not consider the issue of aesthetics.
PS If you want the batteries to heat better, put a fan on them. True, after this your neighbors will start to freeze
Here is Dmitry, thanks for the detailed and clear answer)))
The effect is no more than a placebo. The temperature in the room is, roughly speaking, the thermal energy that came from the batteries, minus the thermal energy that went out, through the windows, doors, ventilation, and also through the walls. That is, this way and that - the total will be exactly the same, because the area of the walls leading to the street and the number of other windows remains unchanged. Such Velcro worsens heat exchange with the wall specifically in this place, but, firstly, it’s a drop in the sea compared to the area of all the walls; secondly, the wall in this place will warm up worse, i.e. cooler outside. As a result, the temperature difference will increase and heat transfer will stabilize at the same level. We do not consider the issue of aesthetics.
PS If you want the batteries to heat better, put a fan on them. True, after this your neighbors will start to freeze
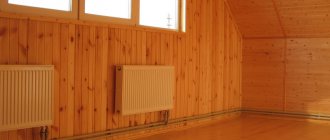
Excellent answer. I’ll just add that such things can be installed in houses made of organic materials (wood, etc.) to reduce the impact of the radiator’s heat on them. And undoubtedly the wall in this place will become colder and at moments when the radiator is not working this cold will get inside the room faster.
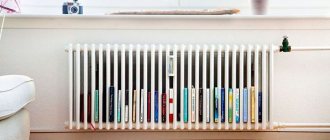
On bi-metal batteries they are not particularly needed, because... (even in the photo you can see) their heat exchanger fins are located towards the room and the heat transfer is better than on cast iron, cool air passes from below and, passing through the fins, warm air comes out from above. If you put your hand up, you can feel it. In the case of cast iron, the thing is POSSIBLY edible, because... The cast iron ribs heat the area around them and, accordingly, the wall, but this results in no heat loss in the room. Modern cast iron is of poor quality, as practice has shown... We installed a new (factory-assembled cast iron battery) and after 2 - 2.5 years, 3 ribs at the bottom burst, fortunately not during the heating season, this is for your information. And so I think such things are glued, so to speak, for complacency))) If the wall freezes, then you need to fight the freezing, i.e. insulate the wall, look for “bridges” of cold and arrange. In practice, you will not feel the difference, maybe even when taking temperature measurements or some tests you will see a difference of no more than 2-3%. Usually there are problems with heat in corner apartments of panel houses or external walls, there you just need to insulate and sort out all the joints of walls, floors, and ceilings. In brick houses there are no problems with this and this “device” is of no use))
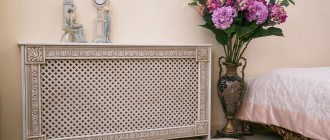
How to choose screen material?
The screen can be made of various materials:
Tree
Natural non-toxic material. Its only drawback is its heat capacity. Until the radiator screen heats up, the room will be cold. Massive closed screens should be avoided. It looks rich and stylish, suitable for children's rooms.
Sheet metal
The most commonly used materials are stainless steel and aluminum. Heat loss is minimal (up to 3%). A thin metal sheet is easy to install, but does not always look aesthetically pleasing.
Drywall
Only the base structure is made from plasterboard, and it is better to use a removable metal grille for the screen.
Glass
They look elegant and stylish. For the manufacture of such radiators, stained glass or tempered glass is used. After sandblasting or photo printing, the screen becomes an interior decoration. One of the significant disadvantages is increased fragility.
MDF and HDF
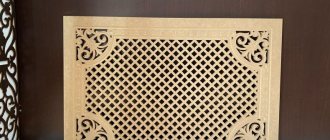
Easy to maintain, low cost, high decorative qualities. The softened wood fibers are pressed, in the process the natural substance lignin is released, which glues the fibers together. No harmful binders are used. Thin openwork screens are often made from HDF (High Density Fiberboard) - the layer is thinner, with more perforation.
Forging
These grilles are beautiful, but too lacy. Forging is often combined with a contrasting background, against which the elements will look brighter. Metal sheets provide better circulation.
Plastic
Hygienic, moisture-resistant material, but looks cheap. It is not recommended for use in living rooms, more often in bathrooms or office spaces. The screens are made of heat-resistant plastic that can withstand heating up to 80 degrees. It is better to install at an angle.
Exotic materials
Grilles can be made from rattan, bamboo, bark, and wicker branches. Paints, rhinestones, decorative nets and other elements are used for decoration.
Benefits of using decorative elements
Similar decorative elements are used for batteries for several reasons:
- Improving the aesthetic properties of the room. For example, creating a beautiful accent in a room.
- Protective function against touching a hot battery. This is especially true if there are small children.
- Simplifies the maintenance of radiators.
A multifunctional screen can be made in several versions:
- Flat - protects the battery located in a niche.
- A closed box is used when it is necessary to close the entire radiator.
- The hinged cover is designed to cover the radiator protruding from the window sill.
How to properly install a screen behind a radiator
So, the heat transfer of radiators increases significantly if a heat-reflecting screen is placed on the wall behind them. Its installation will not cause any difficulties even for a novice home craftsman.
When purchasing material to perform this work, pay attention to the fact that its reflective surface is not matte, but polished. When installing the screen, do everything possible to ensure that there is an air gap of about 2 cm on both sides of the heat insulator, guaranteeing heat retention in the interior of the room
To install the heat-reflecting screen, you can use liquid nails or regular wallpaper glue. When cutting out a heat insulator, you should remember that its area should exceed the size of the battery by approximately 10%. This ensures greater efficiency of the installed screen.
When everything is ready, you can proceed directly to installing the product, performing work in the following sequence:
- remove the radiator and its suspension brackets, having previously marked their attachment points;
- inspect the exposed wall, if necessary, putty or plaster it in order to eliminate the defects found there and level the surface;
- stick the screen;
- install brackets, hang and connect the radiator.
After performing the described operations, the heat transfer from the radiators in your apartment will increase significantly. You can be sure of this when the next winter comes and when the heating is turned on again.
R.S.
Among our readers, there are probably experts who have a deeper knowledge of the intricacies of this issue. We will be glad and grateful if you leave some corrections and clarifications in your comments.
Criterias of choice
The optimal choice of material for installing a heat-reflecting screen behind a radiator is based on taking into account the distinctive characteristics of insulation materials.
These include:
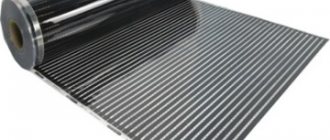
- type of material: foil, isolon, penofol, foil plastic, Porilex;
- thickness of heat-reflecting fabric;
- density and sound absorption rate;
- thermal conductivity;
- moisture and vapor absorption;
- service life;
- the presence of a self-adhesive base;
- temperature conditions for using the material;
- heat reflectivity;
- manufacturer company;
- cost of material.
Please note: changing the direction of heat flow can help save heating costs.
Is it worth the candle: pros and cons of installing a screen
On forums dedicated to home heating issues, there is a constant debate between supporters and opponents of installing reflective screens behind radiators. Some participants in such debates say that screens provide a real increase in temperature and savings in heating costs. Representatives of the other camp are confident that screens have more of a psychological effect.
I have collected the main arguments of both sides in a table:
| Pros | Cons |
| The cost of a reflector (if you do the installation yourself) is low. With the cost of a roll of insulation being 18 sq. m 1.5 thousand rub. You can equip an entire house with screens for 2–3 thousand rubles. | Due to the low efficiency of the screen, the cost of creating it is money thrown away. |
| It’s easy to build a screen; a person without special skills can handle it. | If you do not understand what and how to do, you can disrupt the air flow and reduce the efficiency of the heating radiator. |
| The screen saves 5–7% of the energy emitted by the radiator. | The screen only protects 5% of the external wall of the room. Through the rest of the area, not protected by a reflector, the street is still heated. |
| The temperature in a room equipped with a heat reflector will be 2–3 °C higher, all other things being equal. | Often there is no objective evidence of savings, and all talk about effectiveness is based on the “placebo effect.” |
Complex option
At the same time, the simplest solution in terms of finishing work, and the most difficult in terms of preparation, will be the solution of removing the heater.
Preparation will consist mainly of removing the battery completely. Not every home craftsman will be able to cope with this, and in winter, in the absence of a tap that shuts off the water, this simply becomes impossible. If removing the radiator is not a problem for you, then the repair itself is not difficult - the technology for performing all the work will not differ from the rest of the room. Therefore, there are only two ways to prepare everything here: remove the heating device yourself or call a technician who will first remove it and then, after some time, install it back. You will need to call it twice - for removal and installation, and this will require additional costs. In this regard, finishing the wall with a battery and removing it is one of the most expensive and difficult ways to repair the surface. It is much easier to make repairs without removing anything.
Masking of radiators and the laws of heating engineering
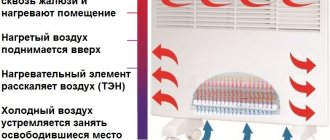
The main task of any heating radiator is to heat the room. The goal is achieved by combining or separately using two methods - infrared radiation and convection. Thanks to them, comfortable conditions are formed.
We can feel thermal energy if we place our hand in close proximity to the radiator. Convection ensures air circulation and uniform temperature distribution throughout the room.
The screen for the radiator performs several important functions: it links the device with the design, protects it from damage and settling dust, the combustion of which releases toxins.
It would seem that the task of decorating the radiator was completed successfully, but the room immediately became noticeably colder. This all happened because glass almost completely neutralizes infrared radiation.
An original way to disguise a heating radiator will help to expand the window sill and use the structure as a piece of furniture.
This statement fully applies to blind screens that prevent both long-wave infrared radiation and short-wave convection.
The same can be said about the blind boxes above the top of the radiator - they are an insurmountable barrier to the spread of warm air upward (the convection method does not work). The conclusion suggests itself - the larger the area of the holes in the lining, the smaller the heat loss will be.
Ways to increase heat transfer
From the point of view of releasing the maximum amount of heat into space, it is less effective than a pipe, perhaps a ball. It has an even worse surface to volume ratio.
What did the ancestors do to make these monstrous heating devices warm?
How to increase the heat transfer of a pipe?
Increased infrared radiation from the heating device. Simply painting the register with matte black paint gave a noticeable warming effect in the room. By the way, the current chrome plating of modern bathroom coils looks impressive, but from the point of view of the heat transfer of the device, it is pure idiocy.
The heat transfer of steel pipes can also be increased due to fins welded or otherwise mounted on the outside of the pipe. The final stage of implementation of this method is a convector, a coil of pipe with transverse plates. Of course, in this case, all methods for calculating the heat transfer of a pipe are not applicable - the pipe gives off a smaller portion of the heat in this device.
Installation of films behind radiators is a simple sequence of actions
From a technological point of view, the foil behind the heating battery is installed without any difficulties. You will complete all the work efficiently and quickly if you listen to some advice.
First, don't buy matte metallic material. Use only polished foil.
Second, don't buy double-sided films. One air gap is quite enough to ensure high-quality heat reflection.
Thirdly, leave a gap of about 1.5–2 cm on both sides of the insulator layer. It is necessary to obtain the optimal thermal resistance of the reflector (1.15 sq.m*°C/W).
Prepare liquid nails or standard adhesive used for installing wallpaper, as well as directly reflective foil, and proceed to install it. The procedure is as follows. First, carefully measure the dimensions of the wall areas where you plan to install the screen or niches.
The parameters of the film must correspond to the projection of the heating radiator onto the wall. Add about 10% to the result obtained. In this case, the heat-reflecting potential of the foil will be slightly greater. Some masters say that extra centimeters are not needed.
The effect from them will be insignificant, but the edges of the screen sticking out from behind the radiator will greatly spoil the aesthetics of the room. See for yourself, choose the option that suits you personally.
Then make sure that there is a gap of at least 1.5 cm between the heating device and the film that you will mount. When there is not enough free space, you will have to adjust the radiator suspension to provide the missing centimeters.
Next, remove the radiator. Mark the places where its mounting brackets are located. Dismantle them. Inspect the brick or concrete masonry of the wall surface.
If there are gaps, cracks, or other defects, plaster them (or putty). Level the wall, glue the screen (coat its back side with wallpaper or polymer composition).
Instead of glue, as noted, it is allowed to use liquid nails. In some cases, it is permissible to use staples or small nails to secure the foil (if they fit into the wall material without any problems and are firmly held in it). Carefully return the pendants to their place and install the battery.
Additionally, we will give some useful recommendations to home craftsmen who are installing heat-reflecting products for the first time. If during installation of the screen you damage its outer covering, the cut site can be masked with LAMS or LAS films.
They are made of foil and do not reduce the efficiency of heat reflection. Don't try to find screens that are too thick. Practice shows that five centimeters is enough to effectively save heat in the house.
Recommendations for the installation process
- Installing a heat-reflecting screen behind the battery is technologically simple, but will be done faster and better if you take into account the following practical recommendations:
- the maximum effect when using penofol and similar materials is achieved if there is an air gap of 15-20 mm on both sides of the insulating layer. In this case, the thermal resistance of the insulating structure is achieved up to 1.1-1.2 (m∙°C)/W. Installation is carried out on wooden slats, and penofol must be double-sided foil (type B);
- in most cases, to create a reflective screen for batteries, one air gap is enough - between the radiator and the insulating material. Double-sided foiling is not necessary in this case;
- When choosing a reflector, it should be taken into account that the foil must be polished (not matte).
Local heating systems
The easiest option for maintaining home heat, which does not require the independent construction of any device, is to purchase a heater. Before purchasing, clearly determine what area you need to heat. The choice of electric heater power depends on this (on average you need at least 1 kW for every 10 m2). It would be nice if the device is equipped with a temperature and power regulator. Various types of heaters are suitable for heating a house - oil radiators, convectors, quartz radiators and fan heaters. An alternative heater can be an electric fireplace, which functions in a similar way.
While maintaining warmth and comfort in your home, do not forget to observe another important condition - ventilation. It is better to replace static ventilation with periodic ventilation: 2-3 minutes every 3-4 hours. This will save much more heat
This will retain much more heat.
Remember that the best warmer is love and care for loved ones. Love each other, create a family hearth, and then there will always be comfort and warmth in your home, regardless of the time of year.
Do-it-yourself installation of a plasterboard box
In order to close the battery, you need to measure it, and then buy metal profiles and other additional products.
What materials are needed:
- 12 mm plasterboard sheet,
- metal profiles 27x28 and 60x27,
- self-tapping screws for drywall and metal,
- dowel-nails size 6x40,
- construction serpyanka,
- perforated corners.
Tools:
- screwdriver,
- hammer drill,
- metal scissors,
- stationery knife,
- construction stapler,
- pencil,
- roulette,
- building level.
Work order:
Installation of the frame. The profile should be mounted on three adjacent sides: floor, wall, window sill.
- Press the 27x28 metal profile to the base with your hand, drill a hole using a hammer drill in both the profile and the wall.
- Using a screwdriver, screw the dowel-nail into the hole.
- At the bottom of the window sill, a 27x28 metal profile is mounted on self-tapping screws; the length of the screws should not be greater than the thickness of the window sill.
- Next, you can install jumpers made of metal profile 60x27.
Selecting the grid size. This hole must be made slightly smaller than the grid size.
Installation of drywall. Plasterboard sheets can be cut with a utility knife. Screw it in with a screwdriver.
Installation of corners. They must be secured at the corners with a construction stapler, or attached to gypsum plaster.
- Serpyanka should be applied to all seams of the plasterboard box and covered with plaster.
- Before painting or wallpapering, the plasterboard box must be puttied, sanded and coated with primer.
Manufacturing technology
Before you start making a fence for the battery, you should choose a suitable design: hanging or resting on the floor in the room.
Then a drawing is made, and tools and materials are selected.
Materials and tools
For manufacturing you will need the following materials and tools:
- Chipboard sheet.
- Special edge for finishing with a thermal adhesive layer on the back side.
- Metal screws and angles.
- A stapler with staples or small nails with a hammer.
- Iron.
- Knife.
- Sandpaper.
Marking and measurements
First you need to mark the location on the wall and take the necessary measurements. We mark the mounting points for placing the panel. We make a simple schematic drawing with important dimensions.
We make four walls for the frame from chipboard. You can purchase already manufactured parts. We connect the walls together using metal corners.
We make a lattice from the edge and fix its parts on the frame using small nails and a furniture stapler. The length of the edging material is calculated by the formula L(edge length)=(a (product length)*b(width)*1.3)/c(edge width).
The holes on the grill must be the same size; for this you need to make preliminary markings on the frame or a special template. The front side of the grate must be heated with an iron at high temperature. As a result of this procedure, the heated glue will connect the lattice elements at the intersection points and give it greater rigidity.
The same edge must be used to finish the end parts of the frame. We apply the edge to the end and smooth it with an iron. Using a knife, cut off the protruding edges of the edge. Protruding edges are sanded with sandpaper.
Consolidation
If the screen is supposed to be located close to the wall, then we simply insert it. If a hanging option is planned, then you need to perform a few more manipulations.
- We make recesses in the frame at the junction points with the heating pipes. Then the decorative fence is placed on the pipes using special grooves.
- You need to attach metal corners in the marked places.
- Then we bend the edges of the corners 10 mm upward and hang the made panel on the resulting hooks.
The enclosing screen is an excellent solution for various heating devices. If you do everything correctly and choose high-quality material, you can create a wonderful decorative element yourself.