The main item in all the houses of our ancestors was the stove. Most often it was erected in the very center of the room in order to heat the house as evenly as possible. In addition, food was prepared on it and colds were treated if there was a bed. But at present, a brick oven is only a heating structure. At the same time, making it with your own hands is not so difficult. The procedure does not require expensive specialized equipment, extensive experience or the involvement of a professional stove-maker. And if you use high-quality and outwardly beautiful brick, then you won’t have to do any finishing work. But despite all the ease, basic knowledge must be present.
Additional requirements for choosing a furnace
Since we suggest doing everything yourself, rather than buying a ready-made stove in a store, when choosing the required design, we recommend paying attention to the following parameters:
- Easy to use . The heating process should be a pleasant and uncomplicated task that every family member can handle.
- Economical . This point is especially important if you plan to use only this stove to heat the house on an ongoing basis (in winter). In this case, one unit of fuel will provide maximum heat transfer.
- Simplicity of design . If a person who does not have experience in masonry takes on the construction of a complex model of a device, difficulties may arise that will subsequently lead to incorrect operation of the stove.
- Appearance . The design of the structure should please the eye and create coziness in the room, so it is worth paying special attention to the quality of the brick.
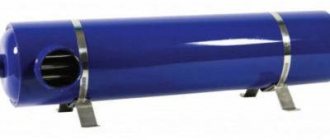
- Presence of a water circuit . It is known that even a small heating stove with a built-in heat exchanger for heating the coolant is much more productive than other models without this device.
When choosing a heating stove, you should consult with a qualified stove builder. He will tell you which configuration to choose and what you should pay special attention to.
Design creation process
Initially, it is important to know which steps must be completed in order to obtain a stove that meets all requirements and conditions. The following sequential actions are implemented:
- Initially, it is important to decide what parameters the future oven will have. To do this, take into account the size of the rooms that must be heated by the structure. Additionally, it is necessary to decide whether it will be used not only for heating, but also for cooking, according to which the need for installation of certain elements is determined. The size of the stove and its main characteristics must be such that it effectively heats the necessary rooms in the building or the entire building.
- Choosing the location of the structure. It is important to remember that any stove is a dangerous element in which there is an open flame, so it must be protected from various materials that are flammable.
- Installation of the foundation for the structure. Since a brick stove is being created, it will have quite a lot of weight, so it is extremely important that the unit is installed on a special base. It will take on all the loads, which will then be transferred to the foundation of the entire structure.
- Direct laying of the structure. This process must fully comply with the pre-created order.
It represents the sequence of laying each brick in the stove. The design itself can be completely different. You may use 3 by 3, 3 by 4, or some other options. Each variety must be created carefully and correctly, and all types have their own specific characteristics and nuances. Therefore, creating an order is a mandatory step, after which the actual work on creating the stove begins. It should be remembered that during this process a special masonry mortar must be used, and there is often a need for halves or quarters of building material, which can be purchased ready-made or made independently.
Chimney installation. A special pipe is used to remove gases and combustion products. It may be straight or may have various transitions and bends. The pipe can be made of different materials, and brick is often used for this. The chimney outlet can be made through the wall of the room or through the roof.
Selecting a location
Before you begin construction, you should decide where the stove will be located. If there is only one small free area in the house, there is nothing you can do about it. But to obtain maximum heat transfer, it is recommended to place the stove in the central part of the house or room. Thus, none of its elements will touch the street wall, and accordingly, warm air will not escape outside. In addition, when adjacent to the supporting structure, temperature changes may occur, which negatively affects the durability of the heating device and the operation of the chimney.
Features of creating a 3 by 3 stove
Today it is possible to create ovens of completely different sizes and parameters. Since in any case ordering must be used in the process , you need to know exactly what features and parameters it should have for the selected option. Creating it yourself is actually quite difficult, so it often becomes necessary to contact a specialist with this question. However, if you know the correct sequence of all stages of masonry, you can tackle this issue yourself.
You must first decide what size the stove will have. The most popular designs are those that are created with 3 by 3 bricks. However, if it is necessary to heat a fairly large room, a 4 by 3, 4 by 5 or other types of masonry can be chosen.
The order itself is a special diagram that clearly indicates the sequence of laying each brick in the structure. When using a high-quality arrangement that is suitable in all respects, a high-quality and safe heating structure will be obtained. At the same time, this work can be carried out by a person who does not have any experience at all in creating a 3 by 3 brick structure.
Also, the positive results of using high-quality and correct ordering include the efficiency of all work and the excellent efficiency of all efforts expended. As a rule, builders are involved in creating the order either before the actual formation of the furnace, or already in the process. A special document must clearly and clearly state absolutely any action, and must also indicate what materials are used in the work process.
What are we going to build?
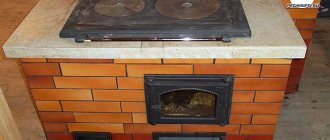
The stove that we propose to build with our own hands has several names among the people: Malyutka or the single-bell stove PTO-2300. Its dimensions are 770x510x2380 mm. This design is well suited for country house construction. The firebox is made of refractory bricks. The device can operate on almost any solid fuel, namely wood, coal, peat, anthracite.
PTO-2300 is the most compact of all thick-walled models. Below you can see a 2x3 brick oven with a fairly simple design. The name itself speaks about its power, i.e. the device can produce up to 2300 watts per hour. One firebox is enough to heat a room measuring 25 m² or two adjacent rooms measuring 35 m².
Basically, a similar structure is installed in the central part of the house. Thanks to the shape of an elongated rectangle, it acts as a partition between rooms.
Device
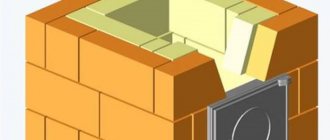
In the presented furnace, hot gases rise through the firebox channel into the bell (their path is indicated by arrows in the diagram). Next, the gases descend, go around the “undercut,” enter a vertical channel and rush into the chimney, where two valves are installed.
In the absence of a convective system, the solid fuel stove would not have time to heat up. The cap serves to slow down gases and increase their contact time with brick walls.
You can download the drawing in high quality from this Link.
Main features
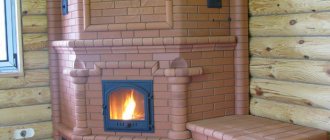
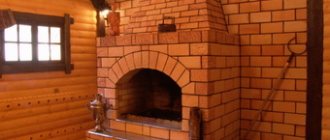
A similar oven is popularly called a “Swedish stove”. If everything is done correctly, the oven will not only perform the above functions - you can even bake bread with its help.
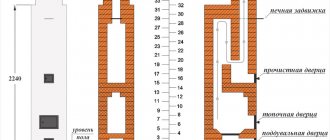
This is the option that will be discussed in today’s article. Below is a drawing and order of the “Swedish”.
Knowledgeable people will immediately notice that this arrangement is in many ways similar to the Russian stove, but also has elements of a fireplace. There is nothing surprising here, because despite the foreign name, “Swedish” ones in the domestic interpretation are intended, first of all, for use in our homes.
Advantages of a small stove
Among the main advantages the following are noted:
- The simplest design allows even a non-professional to build a stove independently.
- The device occupies an area of only 0.4 m². Thanks to these dimensions, this heating device is popular in country houses.
- A strong foundation is not required since the weight of the structure is light.
- The efficiency of the stove allows you not to make large stocks of firewood. In addition, it can be heated with other types of fuel: coal, peat, anthracite.
- The device does not contain heating channels. Their functions are performed by the fuel cap.
- Can heat a room up to 35 m². In the spring and autumn, one firebox will be enough to heat the room, and in winter – two.
- The structure can be installed in a wall, thereby saving space and uniformly heating two rooms.
About other modifications of the “Swedish”
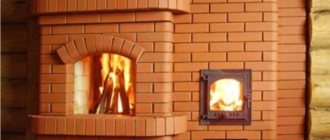
The described cooking and heating stove is one of the simplest design options. If desired, such a stove can be upgraded with glass doors - this will not only improve the appearance, but will also additionally protect the room from food odors.
Another variation of the “Swedish” can be considered a structure with a fireplace installed between the living room and kitchen. In this case, the kitchen will have a full-fledged stove with oven, dryer and hob, and in the living room there will be an original fireplace, which will not only heat the room, but will also serve as an additional decorative element of the interior. For this, one common chimney is used, for this reason additional costs will not be required.
Important information! One of the main advantages of the “Swedish” is the ability to effectively treat colds and flu. You just need to sleep on heated (but not hot) bricks, after which the disease will very soon pass.
In the same way, you can heal your joints and get rid of lower back pain. To do this, you need to equip the stove with a stove bench. For the first time, such a design was developed by Henry Reznik and it consisted of a stove measuring 3x4.5 bricks and a stove bench - 2.5x7 bricks, respectively. This stove can operate in two modes - winter and summer - and heat a room up to 40 m².
Video - Stove with a stove bench
Foundation
The foundation must be separate, not connected to the house. Depending on the material, rubble, rubble concrete and brick foundations are distinguished. Usually cement or lime-cement mortar is used.
The size of the foundation should be laid 5-7 cm larger than the dimensions of the stove itself. In depth it should be 15-20 cm below the floor. A cement-sand screed is placed on top of the masonry. It is recommended to use a level and check that it is horizontal. Then you need to lay two layers of roofing felt and lay out 2-3 rows of bricks to the floor level.
Furnace order
Below we will consider in detail the order of the heating furnace.
Row 0. As described above, you first need to lay out two levels to the floor mark. They are placed on the waterproofing layer of the foundation. For this purpose, roofing material is used.
Row 0(1) is continuous. The number of bricks in a row is 12 (red).
Row 1. An ash chamber is formed, where ash from products burned in the oven will be collected. To make it easier to remove the combustion residue, two bricks are cut down to the middle in the front part.
1 row. The number of bricks is 11 and ½ (red).
Row 2. We continue to form the ash chamber, to access which we install a hole for the door. Its size is 140x140 mm.
2nd row. Number of bricks – 12 (red).
Row 3. Identical to the previous row and continues to form the ash chamber.
3rd row. The number of bricks in a row is 10 and ½ (red).
Row 4. Here the ash chamber is blocked and grooves are cut out in the bricks for installing a grate measuring 200x300 mm. It is recommended to do this as follows: apply the existing grate to the row without mortar and trace it along the contour with a margin (usually about 5 mm is left, which is necessary for temperature deformation of the metal). Next, each brick needs to be processed and hewn. Then an estimate is made and everything is put into solution. After this, the grate is immediately placed.
4 row. The number of bricks is 11 and ½ (red).
Row 5. Refractory bricks are laid and a fuel chamber is formed. At the front and rear it contains bevels of the inner surface towards the grate. This is necessary so that combustion products can roll down to where there is sufficient air access.
5 row. The bricks installed in the front and back of the chamber are cut at an angle of 45 degrees. Number of bricks – 11 (fireclay).
Row 6. Continuation of the fuel chamber. Here the door for the combustion chamber begins to form. Its size is 250x210 mm. It is worth noting that the rear brick has a slight slope towards the combustion area.
6th row. We cut the brick of the back wall of the chamber at an angle of 45 degrees. Number of bricks – 8 (fireclay).
Rows 7 and 8. Continuation of the fuel chamber.
7th row. Number of bricks – 7 (fireclay).
8 row. Number of bricks – 7 (fireclay).
Row 9. The fuel chamber door is closed and its height continues to increase.
9 row. Number of bricks – 8 (fireclay).
Rows 10 and 11. The fuel chamber is formed. It turns out to be quite voluminous. It is necessary to pay attention to the different placement of bricks on levels 10 and 11.
10 row. Number of bricks – 8 (fireclay).
11 row. Number of bricks – 9 (fireclay).
Row 12. The chamber begins to overlap. Three-quarter bricks with an edge are installed, leaving a vertical channel that will be used for the escape of gases.
12 row. Number of bricks – 11 and ½ (fireclay).
Row 13. Complete closure of the fuel chamber continues, leaving only the vertical channel. Its size is similar to the parameters of a whole brick.
13 row. Number of bricks – 13 (fireclay).
Row 14. The formation of the vertical channel continues. The chamber is covered with another level of fireclay bricks.
14 row. Number of bricks – 12 (fireclay).
Row 15. The formation of a new vertical channel and a hole for installing a door for cleaning begins. Its size is 140x140 mm.
15 row. Number of bricks – 9 (fireclay).
Row 16. Regular brick is used here. It should be noted that it is not placed in the center, since a connection is formed there between the first and second channels to ensure the passage of hot gases.
16th row. Number of bricks – 8 (red).
Row 17. The cleaning door opening is blocked. The channels are still connected to each other in the center, the brick is not laid.
17th row. Number of bricks – 9 (red).
Row 18. The formation of the cap begins, which will continue to the very top. Subsequently, the front channel will turn into a pipe.
18th row. The number of bricks is 9 and ½ (red).
Rows 19, 20, 21, 22, 23. The configuration completely repeats the previous level.
19 row. Number of bricks – 10 (red).
Row 24. The hole in the vertical channel narrows in the shape of the letter G. A hole is formed for the valve.
24 row. Number of bricks – 10 (red).
Row 25. A hole equal to half a brick is left, and a seat for the smoke valve is cut out.
Formation of heating equipment
First of all, you need to decide on the place where the Malyutka stove will be installed, and also prepare an exact diagram with dimensions and order. The general principles of stoves are also suitable for a small fireplace. Installation is carried out at a safe distance from the walls (approximately 25 cm), the stove should not be in a draft, and the chimney should not touch the ceiling beams. Safety principles must be fully observed - walls, ceiling and floor are insulated with fire-resistant materials.
For construction we will need:
- red stove brick (solid);
- fireclay brick (for firebox);
- clay or cement mortar M300;
- reinforcing rod;
- ash door;
- grate;
- fire door (if you choose a glass door, the baby can serve as a fireplace);
- cast iron hob;
- valve
Tools needed:
- trowel (leveling the solution, cutting seams);
- hammer and pick (for bricks);
- level;
- Master OK;
- plumb line (weight with cord) for checking angles;
- rule (a wooden ruler with a cross-section of 1.5 x 6 cm and a length of 1-1.5 m, having parallel planes) for evenness of the masonry;
- roulette.
Foundation
A solid multifunctional stove will require a foundation; rubble concrete will be more economical.
The pit must be at least 80x65 cm, formwork from boards is installed in it, covered with plywood or roofing felt and filled with concrete. Next, broken bricks and rubble stone are laid out, everything is filled with cement (ratio 1 to 3). The last step is to cover it with several layers of roofing felt insulation. It is recommended to use M300 concrete as a fill; it is strong and durable. Its hardening time is about 25 days.
If the brick oven is planned to be light, without constant intensive combustion, then the first row of bricks should be laid on a layer of insulation:
- polyethylene film;
- roofing felt;
- hydroisyl, glassine;
- dry sand 1 cm.
Furnace order
The first and second rows are aligned, each row is checked with a level.
Third - a blower is laid out on the front part, its dimensions are half the size of the firebox.
The fourth is the installation of a steel window in the ash pit; it is covered with a grate on top.
Fifth - fixing the grate, circular masonry.
The sixth is the beginning of laying out the firebox. The window is slightly narrowed for convenience.
The seventh is installing the firebox door. The firebox must be firmly held in the masonry; for this purpose, the fastenings are wrapped with asbestos cord.
Eighth - a strip of sheet steel is installed on top of the firebox.
From the ninth to the eleventh - circular masonry.
Twelfth, thirteenth - the formation of the rear wall, it is laid on the dock, and two small grooves are formed.
Fourteenth - the grooves are increased by half a brick, the rest of the space is laid out with bricks.
Fifteenth is a place for a channel; an oblong channel is left near the back and side walls. In the main masonry, a compartment is made with a supporting brick in the center (under the column).
Sixteenth - strips of steel are laid on the column, they form another channel.
Seventeenth - the channels are separated and form four channels under the walls and one in the center.
From eighteen to twenty-two - continuation of channels.
The twenty-third and twenty-fourth channels, except for the central one, connect and form an L-shape.
Twenty-fifth - channels, except for the central one, are covered with brick.
From twenty-sixth to twenty-eighth - the dimensions of the masonry are narrowed to the size of the pipe (chimney).
Twenty-nine - installing the damper.
From the thirtieth - the formation of a chimney and its output to the street.
During the laying process, it is necessary to make dressings one second or one fourth of the brick. Every six rows the masonry must be wiped with a damp cloth. And in order for the corners to be even, it is better to install plumb lines on the ceiling (temporarily on nails). During laying, the brick must be installed flat and on edge for the stability of the structure.
FAQ
Question: Is a 14x14 chimney section sufficient for this project? Answer: The device power is 1760 W. With this parameter, the chimney cross-section is quite sufficient.
Q: On what mortar is it better to lay fireclay bricks? A: It is recommended to use a ready-made mixture for refractory masonry, which is sold in any specialized store. As a rule, the packaging contains instructions for its use. You can use a regular solution, but it is recommended to add fireproof mortar to it in the amount indicated on the package. There may be pieces in it, so you should either sift it or grind it further.
Q: The power of such a stove will not be enough for a 6x6 m house consisting of three rooms? The walls are made of adobe blocks or frame-panel. In winter, the average temperature is -10 °C, but there are frosts and up to 35-40 degrees below zero. A: For such conditions this will not be enough. You need to use something the size of a Swede.
Q: If the oven is extended by four meters, stretching the hood higher, will it function normally?
A: In practice, it has never happened that the furnace was extended to four meters. The design, of course, provides for a change in height due to the upper cap, but 4 m - this needs to be tried.
Q: Is it possible to make a stove without a foundation by placing it on the floor? A: The weight of the structure excluding the pipe is almost 1.5 tons. See for yourself whether the floor can withstand this.
Q: Can the height be reduced? A: This can be done using rows 19-22 and 27-30. If any two consecutive levels are removed from the presented range, the design will not be broken.
Q: Tell me, will this stove be enough to heat two rooms (20 m² and 15 m²)? A: It all depends on how well the house is insulated and at what outside air temperature you will heat it. If you are going to live in this house in winter, it is better to choose a larger stove.
Q: What is the advantage of having 2 dampers? Is it possible to leave only the top one to simplify the design? A: Two valves hold heat better. You are allowed to place one, but it must close tightly.
Q: Can these ovens be made entirely of refractory? Will it be possible to lower the firebox and what will this affect? A: Laying a furnace from refractory bricks is possible. There is no need to make the firebox lower. In this case, the fuel may not burn completely and soot will form.
Q: How is the difference in size between regular and fireclay bricks resolved? A: Due to the better geometry of the refractory material, the seams are thinner when laying. This hides the difference in brick sizes.