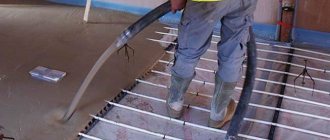
The water heating system is designed for the entire home or individual rooms.
To install it, radiators are completely or partially installed in the floor covering, which is heated by the circulation of heated water.
This is done by specialists who are helped by a program for calculating a warm water floor.
The parameters of the kitchen, dining room, living rooms, toilet, hallway/corridor, attic and balcony are entered there.
Such software also requests other characteristics that help make efficient and ergonomic home heating.
Calculation using special programs
The existence of such programs slightly simplifies the process of choosing the design of warm water floors.
How should you work with them? First, the program fills in all the data about the room and the intended product material for the circuit that you decide to use. The program will automatically give you the required pipe length and pitch.
At this stage, the following parameters are determined:
- The required length of the entire circuit.
- Correct distribution of thermal energy over the entire floor surface.
- Limits of the maximum thermal load that the system can provide.
Advice. If for some reason you need to increase the pipeline pitch, then at the same time you should take care of increasing the temperature of the coolant. The acceptable pitch is 5–60 cm; most often, pipes are laid in steps of 15–30 cm, using both variable and constant pitch.
How to calculate the length of coolants
Calculation of pipeline length is based on a combination of different parameters:
- room size;
- required air temperature;
- inlet and outlet temperature;
- location of pipes, distance between them;
- type of floor finish;
- thickness of the screed under and above the system;
- length of the supply line.
In some cases, additional indicators are required for calculation. The most important is the location of the coolants in the screed.
There are general rules that masters and amateurs follow.
- The distance from the wall to the outer contour of the pipes is 20-30 cm.
- The gap between the pipes is 30 cm (the diameter of the coolant itself is taken into account - 3 mm).
- The distance from the end of the pipe to the collector is approximately 40 cm.
Including these indicators, the maximum length of the water floor contour is calculated.
Temperature readings
The temperature regime in the coolant affects the size of the pipeline. To make it comfortable to move on the floor, the water must be heated to a maximum of 60 degrees. Optimal heating of the surface itself depends on the purpose of the room:
- residential - 29 degrees;
- passing – 35 0;
- workers - 33 0.
To monitor and regulate this indicator, sensors are installed. There are usually 2 of them: at the entrance and exit from the system. The temperature difference on these devices is no more than 5 degrees.
When an underfloor heating system operates, water circulates through the pipes. As it passes through the entire circuit, it cools. The total length of the pipe affects the speed of this process.
Collector
The collector is the main element of the floor heating system, which serves as its beginning and end. These devices have 2 modifications: internal (mounted in the floor) and external (installed indoors on the wall). When calculating the length of the water heated floor circuit, the supply of coolants to this device is taken into account.
Amount of water
To create a water heated floor, the amount of liquid consumed is a priority indicator. A lack of it will lead to rapid cooling of the system and surface. The calculation option for water consumption can be as follows:
- 20 sq. m. – room area;
- 27 cm – distance between pipes;
- 15 pipes – the number of main parts to create a snake;
- 40 cm is the distance from the pipe to the collector.
Taking these indicators into account, the maximum length of the circuit will be 51 meters. These are the general dimensions of all parts.
If the dimensions of the room are such that the maximum pipe length exceeds 100 m, it is better not to install a water circuit. Its effectiveness will be low. 70 m are considered optimal. If it is necessary to install a heated floor on an area exceeding 100 m, it is worth creating 2 approximately identical circuits. For example, the first is 62.5 m, the second is 77.5.
A 51 m pipeline will require 17.5 liters of water. This amount of liquid must be present in the system. A pump is used to replenish it. It forces water to circulate, helping to compensate for losses from natural evaporation.
Installation of water heated floor pipes and pouring screed
How to install a mixing unit for a heated floor with your own hands
Basically, heated floors are installed using special fastening profiles, which are secured to the floor with dowels and screws. They have sockets for securing pipes. With their help, it is much easier to maintain the pitch distance between the turns of the pipe.
Tip: To secure it, it is enough to use plastic ties that press the pipe to the reinforcing mesh
It is important not to tighten the pipe too tightly; it is better to keep the tie loop free.
Pipes are most often supplied in the form of coils. Do not pull the pipe out of the coil, turn by turn. It is necessary to unwind it gradually as it is laid and secured to the floor. All bends are made carefully in compliance with the minimum possible radius limit. Most often, for polyethylene pipes this radius is equal to 5 diameters.
If you compress a polyethylene pipe too much, a whitish stripe may appear on the bend. This means that the material began to sharply stretch and a crease formed. Unfortunately, such defects cannot be installed in a heated floor system due to the increasing risk of a breakthrough in this place.
The ends of the pipes that are supplied to the collector are, if necessary, laid through the walls and enclosed in insulation made of foamed polyethylene. To connect the pipes to the manifold, either a Eurocone system or a compression fitting is used.
If this is your first time encountering polypropylene pipes, we recommend reading about their welding and installation.
There are several schemes for laying underfloor heating pipes. You can choose the right one based on your needs
Along with other factors, it is worth paying attention to the arrangement of furniture and plans for rearranging it.
When the installation of underfloor heating is completed, a mandatory high-pressure system check is performed. To do this, water is poured into the pipes and a pressure of 5-6 bar is applied for 24 hours. If no leaks or significant expansions are noticed on the pipes, then you can begin pouring the concrete screed. Filling is carried out at connected operating pressure in the pipes. Only after 28 days can we consider that the screed is ready and begin further work on installing the floor covering.
Important nuances of forming a heated floor screed
There are some peculiarities in the formation of screeds over water-heated floors. This is due to the principle of heat distribution in its thickness and the floor covering used.
- If the heated floor is laid under the tiles, then you should make a screed about 3-5 cm thick, or distribute the pipes at intervals of 10-15 cm. Otherwise, the heat from the pipes will not properly warm the space between them, and this phenomenon will appear like a "thermal zebra". In this case, the alternation of warm and cold stripes will be quite clearly felt by the foot.
- Under laminate, linoleum, etc. It is advisable to form a thinner screed. For strength, in this case, another reinforcing mesh is used on top of the heated floor. This will reduce the heat path from the pipes to the flooring surface. Also, a layer of thermal insulation is not placed under the laminate, because it will only worsen the efficiency of the heated floor.
You can turn on the water heated floor heating at the first hint of the onset of autumn cold. The initial warm-up may take several days, after which the system will already maintain the required temperature. The greater inertia of water heated floors can also play a good role, even if for some reason the boiler is not able to heat the water for some time, the system will continue to transfer heat to the premises for a long time. In addition, you can keep the underfloor heating system at low power throughout the year, turning off most of the circuits and leaving only the part that heats the rooms where the flooring is made of ceramic tiles or self-leveling floors (hallway, bathroom, etc.), because even In hot weather, such coatings feel cold.
Why is it better to use a pipe with an outer diameter of mm
To begin with, why is a 16 mm pipe being considered?
It’s all very simple - practice shows that for “warm floors” in a house or apartment, this diameter is quite enough. That is, it is difficult to imagine a situation where the circuit fails to cope with its task. This means that there are no truly justified reasons to use a larger, 20-mm one.
And, at the same time, the use of a 16 mm pipe provides a number of advantages:
- First of all, it is about a quarter cheaper than its 20mm counterpart. The same applies to all the necessary accessories - the same fittings.
- Such pipes are easier to lay; with them, if necessary, you can perform a compact contour layout step, up to 100 mm. With a 20 mm pipe there is a lot more fuss, and a small step is simply impossible.
- The volume of coolant in the circuit is significantly reduced. A simple calculation shows that a linear meter of a 16 mm pipe (with a wall thickness of 2 mm, the internal channel is 12 mm) holds 113 ml of water. And in a 20 mm (internal diameter 16 mm) - 201 ml. That is, the difference is more than 80 ml per just one meter of pipe. And on the scale of the heating system of the entire house, this literally amounts to a very decent amount! And it is necessary to ensure heating of this volume, which entails, in principle, unjustified energy costs.
- Finally, a pipe with a larger diameter will require an increase in the thickness of the concrete screed. Whether you like it or not, you will have to provide at least 30 mm above the surface of any pipe. Don’t let these “unfortunate” 4–5 mm seem funny. Anyone who has been pouring screeds knows that these millimeters result in tens and hundreds of kilograms of additional concrete solution - it all depends on the area. Moreover, for a 20 mm pipe it is recommended to make the screed layer even thicker - about 70 mm above the contour, that is, it turns out to be almost twice as thick.
In addition, in residential premises there is often a “struggle” for every millimeter of floor height - simply for reasons of insufficient “space” to increase the thickness of the overall “pie” of the heating system.
A 20 mm pipe is justified when it is necessary to install a floor heating system in rooms with high loads, with high volumes of people traffic, in gyms, etc. There, simply for reasons of increasing the strength of the base, it is necessary to use more massive, thick screeds, for heating of which a larger heat exchange area is required, which is precisely what a 20, and sometimes even 25 mm, pipe provides. In residential premises, there is no need to resort to such extremes.
It may be objected that in order to “push” the coolant through a thinner pipe, the power parameters of the circulation pump will have to be increased. Theoretically, this is so - hydraulic resistance, of course, increases with decreasing diameter. But as practice shows, most circulation pumps cope with this task quite well.
Below we will pay attention to this parameter - it is also linked to the length of the contour. This is why calculations are carried out in order to achieve optimal or at least acceptable, fully operational system performance
So, let's focus on the 16 mm pipe. We will not talk about the pipes themselves in this publication - there is a separate article on our portal for that.
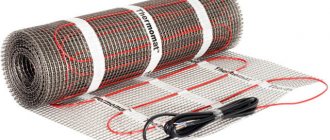
How to lay a heated floor cable, determining the pitch
Thermostat for water heated floors
If we are talking about a heating cable, then there is no need to be tricky with the “snail” - in this case, just lay it like a snake, maintaining the selected step. But choosing the distance between two heating wires on the floor is not easy.
The laying pitch is the distance between the underfloor heating pipes or the turns of the heating cable. It may be the same throughout the entire circuit. Sometimes in those areas where more heat is required (along external walls, for example), the installation step is deliberately made smaller.
How to calculate the step? If floor heating will serve only for comfort (there are also radiators), then, without much pain, you can choose a step for laying the heated floor cable in the range of 20-30 cm. If tiles will be laid on top, then it is better to take a step of 20 cm - it is heat-intensive and To keep your feet warm, you need to heat it up more. Laminate or linoleum cannot tolerate high temperatures; they can only be heated to 26-27°C. Therefore, here you choose a step of 25-30 cm. In general, when laying a cable floor, the distance between the turns of the cable also depends on the power of the heating cable. More powerful heaters are used for tiles, and less efficient ones for laminate and linoleum.
Basic “snake” installation schemes and some heating cable options
If floor heating is planned as the main heating, at least an approximate calculation is necessary. Just a few simple steps:
- Calculate the heated area. This is the total area of the room minus those places where heating is not needed: under furniture and appliances. There are two reasons for this. First: not all cables can withstand blocking (when something is placed on them). Second: there is absolutely no need to heat a cabinet or, say, a washing machine.
- Do you know the heat loss in this room? If you don’t know, they can be calculated, look in the article “”. You need a method for calculating heat loss by room volume and adjusting the results.
- Now you can determine how much thermal power should be removed from each “square” of heated area to replenish all heat losses. To do this, divide the heat loss by the heated area.
- If you have already purchased the cable, you know its thermal power (it is in the passport data). If you don’t know or haven’t bought the cable yet, find it on the manufacturer’s website. Now count how many meters you need to place on one square of area. To do this, divide the figure found in the previous paragraph - the required power per heated “square” - by the power of the cable. You get the length that needs to be laid on one square of heated area. Usually it is 4-6 meters. Depending on the obtained value, you determine the laying step of the heated floor cable. For example, you need to lay 4 meters. This means that the laying step is 20 cm.
Take the length of the cable for a heated floor not “butt-to-tail”, but with a margin of 10-15% - for losses when turning.
The nuances of laying a heating cable
The heating cable at the base of the heated floor is a universal system, which, depending on the specified power, can be used under any coating. The cable differs from other methods in the ability to change the power for each square meter of the room.
Installation is carried out according to any of the schemes on a concrete base, prepared and leveled. After laying the contour, the system is filled with screed to a depth of 3-5 cm.
A substrate with a heat-reflecting surface is also laid on the concrete base. This is necessary so that the heating does not go down towards the ceiling. A mounting tape is attached to the top.
Reinforcing mesh is used as a basis for fixing the heating cable, especially in cases where it is impossible to attach mounting tapes. Experts recommend making a snake pattern over the entire area of the room, with the exception of places where there will be furniture or carpet.
Fixation is carried out on the mounting tape, and the contour should not intersect in any of its parts. This is important to ensure uniform heating and the absence of excessive heating. The cable ranges from 4 centimeters or more.
Taking into account all the rules, restrictions on use, advantages and disadvantages of possible floor heating systems, the owner makes a decision on choosing the desired scheme and method of its installation.
A water heating system is a complete or partial replacement of radiator heating, which is located under the floor covering. Heating of the room with such a design occurs due to the circulation of warm water along its contours. Thanks to these indicators, this design annually gains popularity among the population. But in order to determine whether the room for installation of such a model is suitable and how much equipment is required, it is worth producing all the data through which the program for calculating a warm water floor can establish this.
But before you begin the calculation process itself, find out what data you will need for this.
Tile 6.0
Connecting a heated floor to a thermostat
Specialized program for laying out tiles and wallpaper. There are three versions: Home for home use, Profi - for professionals, Profi+Render - professional with extended functionality. Tile 6.0 Home is suitable for creating your own design, but it is not free - 1000 rubles per month of use. All of them can be purchased on the campaign website tile3D.com. Naturally, there are hacked copies, but it’s difficult to say how safe it is to download them.
Program for laying out tiles in 3D Tile 6.0
The program in its current version is good: even the stripped-down home version allows you to create three-dimensional projects (3D) and receive calculations for the necessary materials (in addition to whole and cut tiles, it calculates the amount of glue and grout for joints). What else can she do:
- Take into account door and window openings, columns, arches and other curved surfaces.
- It is possible to add new tiles to the directory and save them for future use.
- Tiles can be installed and moved at any angle.
- You can add three-dimensional images of other objects (bathtub, shower, etc.) by specifying their coordinates.
- The program calculates tiles and consumables, but in the “home” version you cannot print them, but you can copy them from the screen or take a screenshot and print them as an image, not a table.
In addition, you can change the degree of illumination, shine and relief of the tile. All these settings can be made for each individual object. What’s also good is that the site has educational videos on how to use the program, where the creation of a project is described step by step. Working in the program is easy, the interface is clear, and you can master it the first time. One of the disadvantages of the home version is that you cannot get a scan along the walls, which is completely inconvenient. In general, the program is good, but not free.
Valtec “Sputnik” software package
The Valtec “Sputnik” software package is intended for use in the housing and communal services sector (management companies, homeowners' associations) and industry. The intuitive interface makes it easy for users to quickly learn. A number of special reports for management companies (homeowners associations, resource supply organizations) and integration with accounting programs (1C) make it easy to generate payment receipts. The control center includes reports that allow you to track emergency situations, unauthorized access to resources, and requests from subscribers from your personal account.
Integration into the Housing and Public Utilities GIS has been introduced to simplify reporting in organizations.
To familiarize yourself with the program's capabilities: Login: demo Password: demo
In the case of a comprehensive supply of metering devices and dispatch systems, a license file that allows you to fully work with the program is issued free of charge. The server is formed on the customer's side.
As an additional paid service, it is possible to use a Valtec remote cloud server.
For commissioning, commissioning of a facility or testing of dispatch system equipment, a free test license file valid for 1 month is provided.
For details on obtaining a test license, please contact the managers working in your region.
Source
Selection of materials and necessary devices
Before making a heated floor with your own hands, you should decide on the composition of the equipment and all elements of the system and calculate the materials.
The composition and design of a warm water floor includes the following elements:
- Water heating boiler;
- Pressure pump (may be included in the boiler);
- Ball valves at the boiler inlet;
- Distribution pipes;
- A manifold with a system for setting and adjusting heated floors;
- Pipes for laying on the floor surface;
- Various fittings for laying the main route from the boiler and connecting underfloor heating pipes to the collector.
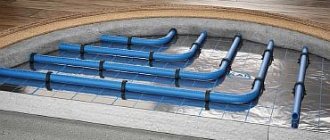
The pipe material for water heated floors can be either polypropylene or cross-linked polyethylene. It is better to choose polypropylene pipes with glass fiber reinforcement, since polypropylene itself has a significant linear expansion when heated. Polyethylene pipes are less susceptible to expansion. It is the latter that are most widespread in the layout of surface heating systems.
Pipes with a diameter of 16-20 mm are used. It is necessary that the pipe can withstand temperatures up to 95 degrees and a pressure of 10 Bar. It is not necessary to chase expensive options with oxygen protection and additional layers. Especially if the main goal is to reduce the overall costs of installing heated floors.
The collector is a pipe with a number of branches (splitter). It is necessary to connect several underfloor heating circuits to one main warm water supply line and return, cooled water intake. In this case, two splitters are used, which are installed in a special manifold cabinet. One is for distributing hot water, and the second is for collecting return, cooled water. It is within the manifold that all the necessary elements for setting up heated floors are located: valves, flow regulators, air vents and emergency drain systems.
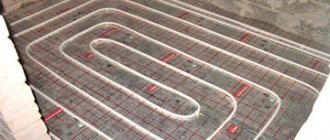
Snake or snail?
Types of laying heated floors: snake (left) and snail (right).
There are two main types of laying underfloor heating pipes - snake and snail (see figure). Although there is no fundamental difference between them in terms of pipe consumption.
A warm water floor laid in a snake pattern heats the room less evenly - the temperature of the floor in one part will be higher than in the other. Pipes are laid in this way when the room has a large window or a poorly insulated outer wall of the house.
The warmer part of the snake is placed where there is more heat loss. Sometimes the “corner snake” installation method is used (see figure).
The snail allows you to heat the entire room evenly. Heated floor pipes are laid in a snail pattern if the heat loss of the room is minimal - the walls are insulated, and the windows are at least two-chamber.
This is interesting: Heating coil Functions - In the form of a spiral pipe, with a tank, in the form of a tube sheet
Installation of water heated floor
Before installing a heated floor, it is necessary to prepare the base for it
. The surface where the floor will be laid must be level, and the total number of unevennesses over the entire surface area should not exceed ±5 mm.
The pipes are laid on special fastening profiles, which in turn are secured to the floor using screws and dowels
. These profiles have sockets where pipes are fixed. Thanks to these sockets, it is much easier to maintain the pitch between turns of the pipe.
If, due to strong compression of a polyethylene pipe, a whitish strip is formed, then it is best not to lay such a pipe in a heated floor system, since it increases the risk of a breakthrough in this place. The pipes that are supplied to the collector are connected either by a Eurocone system,
or a compression fitting.
After installing a water heated floor, it is checked under high pressure.
This is done in this way: water is poured into the pipes and a pressure of 5-6 bar is applied, such testing lasts for 24 hours.
Concrete screed can only be poured if no leaks or expansions are found on the pipes. Filling must be carried out at connected operating pressure
. It will be possible to install the floor covering only after 28 days; it is after this time that the concrete screed is considered ready for further use.
Water-based heated floors with adjustable heating are increasingly used as a solution to the issue of heating a room. During renovation or construction, a closed-loop piping system can be installed under the finishing floor covering.
Thus, a comfortable temperature is ensured inside the room, regardless of work, if any. The exact amount of materials that will be required for the work can only be determined by a correct calculation of the water heated floor. To do it correctly, you will need to familiarize yourself with the details of this work.
How to position heating pipes
Based on what is more convenient for the master, communications can be arranged in 4 options:
- Snake.
- Corner snake.
- Double snake.
- A snail.
Correct calculation of the heating system is a difficult task, but quite feasible with a step-by-step approach
It is problematic to take into account absolutely all the nuances when installing a heated floor, so it is worth paying attention to the most important characteristics, namely the length of the pipes and the volume of water in them. In addition, it is worth remembering that even a slight excess of the circuit length of 100 m can seriously harm the system and produce an output temperature that is far from the expected one.
The double-circuit model, in turn, will be much more efficient, which will allow you to heat the house without much hassle and with less resource consumption.
Almost every country house must have a heated floor installed. Before such heating is created, the required pipe length is calculated.
Each such private house has an autonomous heating system. If the layout of the premises allows, the owners of such country estates install a warm water floor themselves.
Of course, the installation of such a floor can be done in an ordinary apartment, but such work is very labor-intensive. Owners and employees have to deal with a lot of problems. The main difficulty will be connecting the pipe to the existing heat supply system. It is simply impossible to install an additional boiler in a small apartment.
The correctness of this calculation determines the amount of heat that needs to be supplied to the room so that it always has a comfortable temperature. The calculations performed will help determine the power of the heated floor, and will also help make the right choice of boiler and pump.
It is very difficult to perform such a calculation. We have to take into account quite a lot of different criteria:
- Season;
- Outside air temperature;
- Room type;
- Number and dimensions of the window;
- Floor covering.
- Insulation of walls;
- Where is the room located, below or on the upper floors;
- Alternative heat sources;
- Office equipment;
- Lighting.
To make this calculation more convenient, average values are taken. If a double-glazed window is installed in the house and good insulation is done, this parameter will be approximately equal to 40 W/m2.
Warm buildings with little thermal insulation constantly lose about 70–80 W/m2.
If you take an old house, heat loss increases sharply and approaches 100 W/m2.
In new cottages where the walls are not insulated and where panoramic windows are installed, losses can be about 300 W/m2.
Having chosen an approximate value for your room, you can begin calculating the replenishment of heat losses.
Calculation of the length of the circuit and heating boiler
Using the collected data, you must first calculate the power of the circulation pump, electric or gas boiler. Also, these indicators are taken into account when calculating the pipe pitch during installation. Today, you can use 5 types of material to construct a heated floor circuit:
Working in Multiplaner CAD
- Corrugated stainless steel pipes. This material has effective heat transfer.
- Copper. They also have high performance, but at the same time they are much more expensive.
- Pipes made of cross-linked polyethylene. They are distinguished by good quality at an affordable price.
- Metal-plastic products. The most popular material, combining low cost and high quality.
The type of pipes used is also taken into account when calculating the heated floor, because each material has its own characteristics and thermal conductivity coefficient. For example, copper pipes have high heat transfer and operation, but due to the high cost of the material, not everyone can afford them.
Supply temperature / return temperature
Supply temperature—temperature of the coolant in the supply manifold. Those. at the entrance to the heated floor circuit.
Return temperature - the temperature of the coolant in the return manifold (at the outlet of the circuit).
In order for a warm floor to heat a room, it must give off heat, i.e. The supply temperature must be higher than the return temperature. It is optimal if the difference in supply and return temperatures is 10°C (for example, supply - 45°C, return - 35°C).
To heat the room, the supply temperature must be higher than the desired room temperature.
Up
Pipe system design software
New calculation program Aquatherm Project UA
The AquathermProjectUA software package for designing internal engineering systems contains:
1. The Aqua-therm 4 HCR program allows you to edit plans and layouts of any central radiator heating system in a one- or two-pipe system, as well as floor and wall heating systems. Also covers refrigeration systems. The graphic editor allows you to independently draw a building diagram using scanned construction drawings or using a more beneficial solution for the designer - importing construction drawings from dwg, dxf files, with recognition of walls and rooms. Projections and developments with plotted system and calculation results can also be exported in these formats. The program performs complex thermal and hydraulic calculations and automatically creates a complete bill of materials.
2. The Aquathermheat&energy 4 program is used to calculate the heat loss of a building and seasonal energy consumption. The program determines the balance of ventilation air in rooms and calculates the air temperature in unheated rooms. The program reads the building structure from the drawing recorded by the Aqua-therm 4 HCR program, due to which the structure loaded from a dwg or dxf file, or drawn in the graphic editor of the Aqua-therm program, only requires the addition of data such as wall structure, ventilation data and etc. This innovative solution significantly reduces the amount of labor required to perform heat loss calculations, and also ensures that the data in both applications is fully consistent (the data is stored in a single file that is shared between both programs).
3. The Aquatherm-san 4 TS program is used for designing internal water supply and sewerage systems. Equipped with a graphic editor that allows you to quickly draw a plan and layout of the system and supplement the data. Performs hydraulic and thermal calculations and automatically creates a complete bill of materials. In calculations of the circulation network, the so-called thermal method, which complies with the requirements of the DVGW and DBN of Ukraine. Projections and developments with the system and calculation results plotted can also be exported in dwg, dxf formats.
The program is designed to determine the thermal power of the heating system, select heating devices, calculate the hydraulic diagram of the heating system and pipes for heated floors and to calculate water pipes for hot and cold water supply. The AquathermIntegraCAD program uses many solutions that speed up and facilitate work on the project. The most important of them: - graphical process of data entry using drawings in AutoCAD; — presentation of calculation results on diagrams and floor plans in dwg and pdf formats; — a multi-window environment that allows you to simultaneously view many types of data, calculation results, etc.; — simple collaboration with a printer, plotter, with the function of previewing pages before printing; — error diagnosis, as well as the function of automatically searching for them on the diagram;
— quick access to catalogs of data on pipes, heating devices and fittings.
Simple programs for beginners
Easy to use programs with which you can make calculations.
"Snail"
The program provides accelerated planning and saves money. The floor layout using the “snail” method is done in a spiral with a step of 30 cm.
you can follow the link.
It is necessary to calculate the heating power based on the floor area. Almost 10 W are spent on 1 m².
Pros and cons of the Snail program:
drawing on a grid created for a new project;
the ability to create the necessary nodes, loops, rooms with calculation of the area of the room;
calculation of the amount of metal or plastic substrate;
displaying the resulting circuit on the screen and printing.
the demo version works without registration, but has limited functionality;
To expand the capabilities, the user must undergo authorization and receive a special key;
the software does not work without the Internet;
does styling according to only one option.
OVPlan
Convenient and simple service with constant updating of modules and databases.
on the official site.
Advantages and disadvantages of the OVPlan program:
a large number of functions if the user goes through a simple and free registration on the developer’s website;
The heating system plan is first drawn in AutoCAD and then transferred to the OVPlan diagram. As a result, you can get a detailed project;
displaying diagrams and specifications on screen and printer;
lack of rigid connection to radiators, pipelines, pumps and boilers, although the fittings should only be Oventrop;
rewriting local resistance coefficients for each section with determination of percentages.
you need to download only from the manufacturer’s website, otherwise the software will not be updated
Calculation and distribution of pipes
For each room, the calculation of the length of the pipe and the pitch of its installation must be made separately. Calculations of water heated floors can be performed using specialized programs or using the services of design organizations. It is very difficult to independently calculate the required power for each circuit; a lot of parameters and nuances are taken into account. If you make a mistake in the calculations, this can negate the entire operation of the system or lead to unpleasant consequences, including: insufficient water circulation, the appearance of a “thermal zebra” when warm and cold areas alternate across the floor, uneven heating of the floor and the formation of leakage points heat.
To carry out calculations, the following parameters are required:
- Room dimensions;
- Material of walls, ceilings and thermal insulation;
- Type of thermal insulation for underfloor heating;
- Type of flooring;
- Diameter of pipes in the underfloor heating system and material;
- Boiler power (water temperature).
Using these data, you can determine the required length of the pipe used for the room and the pitch of its installation to achieve the required heat transfer power.
When distributing pipes, you should choose the optimal laying route
It is important to consider that water gradually cools as it passes through the pipes. By the way, this is not a disadvantage, but rather a plus of water heated floors, because heat loss in the room does not occur evenly
When distributing water heated floor pipes in each circuit, a number of rules should be followed:
- It is advisable to start laying pipes from the outer, colder walls of the room;
Important: If the pipe entry into the room is not from the outside wall, then the section of the pipe from the entry to the wall is insulated.
- To gradually reduce the heating of the floor from the outer wall to the inner one, the “snake” laying method is used;
- To uniformly heat the floor in rooms with all internal walls (in the bathroom, wardrobe, etc.), laying in a spiral is used from the edge of the room to the center. The pipe is brought in a spiral to the center with a double pitch between the turns, after which it turns around and unwinds in the opposite direction until it leaves the room and goes to the collector.
In addition to the length and distribution shape of the pipes, their hydraulic resistance should be calculated. It increases with increasing length and every turn. In all circuits connected to the same collector, it is desirable to bring the resistance to the same value. To resolve such situations, it is necessary to divide large circuits with a pipe length of more than a hundred meters into several smaller ones.
For each circuit, a single piece of pipe of the required length is purchased. It is unacceptable to use joints and couplings on pipes that are laid in a screed. So the length calculation and order should be carried out after carefully carried out calculations with thinking through the entire laying route.
Important: Calculations are carried out for each room separately. It is also undesirable to use one circuit to heat several rooms.
To insulate a loggia, veranda, or attic, a separate circuit is laid, not combined with adjacent rooms. Otherwise, most of the heat will go to heating it, and the room will remain cold. Insulation under a heated floor is carried out in the same way as with a floor located on the ground. Otherwise, there are no differences in terms of installing heated floors on the loggia.
Installation Rules
Many people face great difficulties after installing a water heating system. Therefore, before starting work, you should familiarize yourself with the general requirements:
- According to safety rules, it is strictly forbidden to connect a water heating structure to a central heating system.
- Installing additional equipment should strictly comply with all rules. Otherwise, if water or condensate gets on electrical appliances, a short circuit in the wiring can lead to irreparable consequences, including system failure.
It is also impossible to independently connect the system to the common risers of apartment buildings without permission from the relevant authorities. Otherwise, an administrative fine cannot be avoided.
Having familiarized yourself with all the required data that the underfloor heating program will require, it will not be difficult to produce the result. The online calculator has formulas for calculating all parameters, as well as their characteristics. Thanks to which you will use these parameters when installing the system or, using a clear example, you will see the mistakes that you made during preliminary calculations.
AdminAuthor of the article
Did you like the article?
Share with your friends:
ViSoft Premium
This is specialized bathroom design software for professionals. One of the functions is tile layout. The database contains a large number of samples - almost 39 thousand types of tiles from different manufacturers (at the time of writing there were 362). The layout project is developed based on the samples that are in the database; new ones cannot be added.
There is also a Russified version
Here is a summary of the program's capabilities:
- Selected tile samples are automatically placed in the specified area.
- It is possible to view other layout options.
- To create a bathroom interior, you can choose plumbing fixtures from a huge database. In this case, the sets are compiled automatically. If necessary, they can be adjusted.
- During the creation process, the project can be turned in any direction, evaluating the result from different points.
- Take “snapshots” of the results obtained.
There are two operating modes: drawing and sketch. In drawing mode, a black and white image is created, which can later be “filled” with different colors. Sketch mode - immediately with color.
The layout is simple!
We save material - we save time - we get an accurate layout
User reviews
. I used the program myself and, thanks to it, I performed all the calculations myself, purchased everything and was not disappointed - even in the demo version, I printed the results via a screenshot, wound everything up and everything works - I’m very pleased. Thank you.
Data for calculation
The level of heating depends on the size of the contour laying step.
The step with which the contour is laid is from 100 to 300 mm. The step size controls the heating level. The heat transfer of a heated floor with a small step will be high, and with a large step it will be low. It is not recommended to make a distance between the tubes of more than 300 mm, since the floor will not warm up evenly. The tube itself will not allow less than 100 mm. If it is bent too much, it may break.
Pipe consumption depending on the pitch is presented in the table.
| № | Step | Number of pipes per 1 m2 |
| 1 | 100 mm. | 10 p.m. |
| 2 | 150 mm. | 6.7 p.m. |
| 3 | 200 mm. | 5 p.m. |
| 4 | 250 mm. | 4 p.m. |
| 5 | 300 mm. | 3.4 p.m. |
Heated floor pipes come in different diameters. Depending on the value of this parameter, the length of the entire system is selected.
For pipes with a diameter of 2 cm, the maximum pipe length should not exceed 120 m.
When using pipes of smaller diameter, the maximum permissible footage will be reduced.
Thus, a pipeline with a diameter of 1.6 cm will have a maximum length of only 100 m. Calculation of the length of the pipe for a heated floor must be made taking into account the pitch and cross-section of the pipeline.
Before calculating the coolant water, it is necessary to determine what temperature level in the room will be optimal. It is recommended to calculate the floor surface temperature in the range from 27 to 35°C, depending on the type of coating and the purpose of the room.
So, for parquet or laminate floors, a temperature of 27°C is suitable. When installing tiled flooring in a bathroom or kitchen, you can make the floor temperature about 33°C. It is recommended to lay coatings with the highest temperature of 35°C around the perimeter of external walls. In the living room, the floor temperature should be 29°C.
Calculation of a heated floor is impossible without determining heat loss. This takes into account such parameters as:
- floor height;
- planned floor temperature level;
- climatic parameters of the region of residence;
- dimensions of the perimeter, height and area of the room;
- availability and power of existing heating sources;
- high-quality composition of materials from which the external enclosing structures of the house are made.
You should know that heat transfer from the heating element through the floor screed does not pass without loss, so the coolant should be 10-15 ° C higher than the coating temperature that is ultimately required.
VALTEC.PRG.3.1.3. Program for thermal and hydraulic calculations
The VALTEC.PRG program is publicly available and makes it possible to calculate water radiator, floor and wall heating, determine the heat demand of premises, the required flow of cold and hot water, the volume of sewage, and obtain hydraulic calculations of the internal heating and water supply networks of the facility. In addition, the user has a conveniently arranged selection of reference materials at his disposal. Thanks to its clear interface, you can master the program even without having the qualifications of a design engineer. The program meets the requirements of Russian regulatory documents governing the design and installation of engineering systems (certificate of conformity).
Training videos:
Online calculator
From this publication you learned about the different types of installation of underfloor heating. About how they differ and in what cases it is better to use one or another option. We also told you how to calculate the length of underfloor heating pipes. We hope that the article was useful to you. Don't forget to share it with your friends!
Do you want to get help from a master, a specialist in this field? Go to the professional search portal. This is a completely free service where you will find a professional who will solve your problem. You do not pay for posting an ad, views, or choosing a contractor. If you are a master of your craft, then register on Pro and receive a flow of clients. Your profit is just one click away!