Installation of a geyser in an apartment and in a house: requirements.
To heat water in apartments or houses that do not have access to a centralized hot water supply, gas water heaters are installed. This is a type of instantaneous water heater; the liquid in it is heated and immediately supplied to the tap.
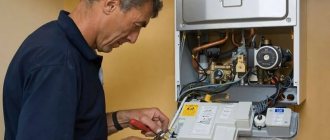
Gas fuel is considered economical. Installing a geyser in an apartment or house has some nuances and risks; the work requires precision and must be carried out by specialists, according to a previously developed scheme.
Installation work
The instructions for installing and connecting a gas water heater look like this:
| Description |
| We apply markings to the wall using a mounting template. As a rule, it can be found in the box along with the gas water heater itself. If none is found, then we mark the locations of the fastening elements using a tape measure. |
| We install a rail for mounting the device, fixing it on the wall using dowels and self-tapping screws, having drilled the required holes in advance. |
| We check its horizontal position with a spirit level. Crooked position of the device is not permissible. |
| We fix the connection bar. Here again you will need a hammer drill, dowels, screws and a screwdriver. |
| We install gaskets on the bar to ensure the tightness of each input and output of the column. |
| Remove the protective plugs from the new column. |
| We hang the device on the mounting rail. |
| We connect the connection strip from below using a suitable key. Then we bring all communications to it. |
| We check the draft in the chimney. |
| We connect a chimney or coaxial chimney from above. The diameter of the chimney should be 110 mm, length 30-200 cm, and the slope should be at least 2 degrees at the top. |
| Connect the drain hose to the safety valve. |
| We connect the device to the power supply. |
| We check access to the inside of the gas water heater. |
| Remove the protective film from the surface of the device. |
| We open the gas supply valve and perform a test run of the water heater. |
If the described installation work seems complicated to you, or you are simply not confident in your abilities, then you can always turn to specialists who will do everything quickly and efficiently. The average cost of their services looks like this:
- Installation of a domestically produced geyser – 2,400 rubles;
- Installation of a foreign-made geyser – 3,700 rubles;
- Installation of a chimney - 1000-1300 rubles.
Requirements for installing a geyser
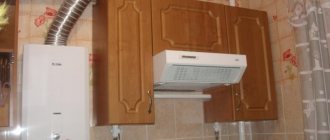
In an apartment, a gas water heater is usually installed in the kitchen
When installing a gas water heater, you need to think about where the water heater will be located. Poor placement may result in fire or fuel leakage.
Room
Safety standards prohibit placing the unit in a living room, children's room or living room. The room where the heater will be located must be adjacent to an external wall that has a window opening of sufficient area (0.03 m2 per cubic meter). If an ignition incident occurs, the explosive flow will break the glass and escape outside. The window also helps to ventilate the boiler room.
Installation of speakers is allowed in the following types of premises:
- basement and other technical rooms with an external wall and a window opening;
- kitchen, provided that the door has a built-in ventilation grille;
- combustion room, including an extension;
- corridor if other options are unavailable.
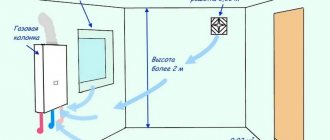
The ceiling height in the room where the heater is installed must be at least 2 m. If a boiler or other unit is also located there, the minimum figure increases to 2.5 m. The volume of the room must be more than 7.5 cubic meters.
Ventilation and chimney
There should be a ventilation hole next to the column
The room must be provided with good ventilation. Every hour, an amount of air equal to three times the volume of the room should be removed from it. The used air is removed through the shaft. If there is no channel in the building, the pipe is brought outside separately. Fresh air masses come from neighboring rooms through the lower door shutter or a grille built into it. In case of severe gas pollution, you need to open the window. If the column is placed in a room with a gas-fired boiler, there must be an additional inflow for combustion.
The column must be connected to the chimney channel using a steel pipe with walls no thinner than 0.5 mm. The material can be galvanized or enameled. Stainless steel can be used. Aluminum corrugation should not be used under any circumstances.
The channel must have a diameter not inferior to that of the outlet column pipe. The vertical fragment connected to the water heater must be long enough (at least 0.25 m). If the wall is made of flammable material, the areas located next to the pipe must be sheathed with metal sheets. In this case, the distance to the flue should be at least 10 cm. For non-combustible wall structures, it can be reduced to 5-7 cm.
The total length of the connecting fragments should not exceed 3 m. Up to three right angle turns can be included in the design. If the diameter of the shaft allows connecting the boiler and heater, there should be 0.75 m of space between the connections. It is possible to connect devices one by one to the same chimney, provided that the pipe cross-section and the size of the gap between taps are taken into account.
Fire and technological indentations
Requirements for the location of the column relative to furniture and other appliances
If the wall is made of wood or other flammable material, a 1 mm thick steel covering must be reinforced between it and the column. You can also use basalt cardboard. The edges of this protective layer should extend beyond the boundaries of the unit by 0.7 m at the top and 0.1 m on the other sides. If the column is located in a separate non-residential room (not in the kitchen), a 3 mm thick asbestos sheet is also suitable for installation.
The distance from the front of the heater to the housings of other devices, pieces of furniture, and wall surfaces must be at least 1 meter. For other sides, the normalizations are as follows:
- bottom – 0.3 m;
- top – 0.45 m;
- from the side parts - 0.15 m.
Fire safety indentations.
The speaker can only be attached to a wall that is finished with non-combustible materials. This is required by the standards rules. If it is impossible to comply with this measure in a wooden building, a special partition is laid between the wall and the column.
Suitable materials:
1. made of roofing steel: maximum millimeter thickness.
2. made of mineralite slab, maximum one centimeter thick.
3.made of basalt cardboard.
4.made of sheet asbestos, three millimeters thick.
Attention! Asbestos structures generate dust that is harmful to health, so they cannot be used in homes, but this option is acceptable in boiler rooms.
The material under the column, providing protection from fire, should be ten centimeters larger than the device on the sides, seventy centimeters on top.
Requirements for clearances from walls, furniture, etc.:
1.from the sides by 15 centimeters.
2.from the bottom side by 30 centimeters.
3.from the top by 45 centimeters.
4.The front space should be over a meter.
5.The gas stove and the horizontal removal of the appliance have a distance of ten centimeters.
6. The vertical distance to the chimney opening is three meters.
Attention! The column should not be installed close to the stove, as the released fats will eventually cover the body of the device.
If a gas water heater is not provided
In a house where the installation of gas equipment, such as a stove, is permitted, the installation of a water heater may be prohibited. This restriction applies to houses with more than 11 floors. No regulatory authority will issue permission to install a water heater in such an apartment, as this is dangerous for the residents.
In addition to the number of floors, redevelopment may be a reason for refusal. Studio apartments are not suitable for installing gas equipment, since the devices must be installed in non-residential premises.
If the kitchen is combined with a living room, this makes the use of gas appliances illegal. These limitations must be taken into account before redevelopment. The same can be applied to apartments where there is no kitchen or is shared.
If the house does not fall under these restrictions, then it is necessary to collect a package of documents to register the device.
The procedure is as follows:
- Write an application to the gas distribution company.
- Get a plan from the BTI or Rosreestr.
- Provide an extract from Rosreestr confirming ownership.
- Contact a specialized organization to draw up a project.
- Find certified specialists from an organization that has access to gas work.
After this, specialists will make an insert into the gas pipe, connect the device and put the water heater into operation.
It is highly not recommended to install a geyser yourself, bypassing the legal order. These actions not only lead to fines, but also put people's lives at risk.
If the column has already been installed before
When changing a water heater in case of malfunction, the device passport must also be replaced. If you install a gas water heater yourself, then the passport of the new device will not contain notes on commissioning and inspections.
According to fire safety requirements, gas equipment in homes must be inspected annually. Unauthorized replacement of a water heater will not go unnoticed and most likely the device will be turned off and sealed
After receiving the comment, it will be necessary to reconnect the column, inviting certified specialists.
Their responsibilities include inspecting the ventilation system. In older homes, they may become clogged with debris. It is dangerous to operate clogged ventilation ducts. This can cause carbon monoxide poisoning, which can be fatal. If the decision to install the water heater yourself is made, then first of all you need to check the ventilation.
Preparing consumables
Installing a speaker will cost a little less if you buy some things in advance. Here's what you'll need to get before the experts arrive:
- A piece of steel pipe with a wall thickness of at least 1 mm, through which the column will be connected to the chimney. The diameter must be specified in the instruction manual supplied with the device. Some models have this part included.
- A rosette ring that will allow you to decorate the inlet of the chimney.
- Water filter. If its quality is satisfactory, an ordinary household coarse filter, commonly called a mud filter or oblique filter, will do. If the water contains a large amount of hardness salts, you will need a filter with a softening effect. Without it, the column will have to be descaled very often.
- An installation kit consisting of the necessary fittings, pipeline parts (angles, tees, adapters, couplings), sealing material and fittings.
- Gas hose.
- Drills for concrete work and dowels.
Also, before the installers arrive, it would be a good idea to check that the water heater is complete if you forgot to do this in the store.
Before inviting professionals, make sure that the root valves on the water supply lines are tight. Sometimes they present an unpleasant surprise, due to which the installation process is not only delayed, but also somewhat more expensive.
Tools
To perform the work, prepare the following set of materials and tools:
- the certified unit itself with instructions
- drill
- Adjustable wrench
- open-end wrench - 27/30, 32/36
- FUM tape or tow
- PVC water pipes or hoses, with an internal diameter of 13 mm and a length of no more than 2.5 m
- metal-plastic pipes for gas
- gas hose
- fittings - “American” and for metal-plastic
- mounting clips
- gas taps
- water tap
- pipe cutter
- soldering iron
- filters - magnetic and salt
- Mayevsky crane
- dowels
When venting combustion products through a chimney, purchase:
- corrugated or galvanized pipe with a thickness of 1 mm, the diameter must match the diameter of the boiler inlet on the column (see the exact parameters in the instructions)
- rosette ring for decorating the chimney (the dimensions must match the dimensions of the corrugation).
Selecting a location
You can install the speaker on a glazed balcony
The main restrictions are related to fire hazards: hence the ban on placing units in living rooms, too cramped spaces and where sufficient ventilation is not provided. The following rules follow from this:
- the column cannot be placed above the hob (including electric stoves);
- It is not allowed to hang the unit on a wall bordering a living space;
- you cannot install a dispenser when a long bendable line (250 cm or more) is required to turn it on; however, it is permissible to lay a combined pipe consisting of a flexible hose and a fragment welded to the gas supply steel lines;
- placement in a balcony room with a chimney leading outside does not contradict sanitary standards, but makes it difficult to install pipelines.
Gas supply routes should not be laid in places where chemically aggressive compounds are likely to enter. Transit pulling at a height of more than 2 m is permitted if there are no reinforcing and detachable elements on the path. Steel pipes that pass through wall structures and floor slabs must be equipped with sleeve components at the entry and exit points.
The gas supply pipe can be laid blindly in grooves or openly along the wall surface. In the latter case, the possibility of access to the supply route must be considered. It can be laid in a box with removable inspection hatches along the entire length.
How to install equipment
It is necessary to comply with the requirements and take into account the placement standards:
- The kitchen area should be from 7.5 square meters. m.
- Ceilings with a height of at least 2 m.
- The diameter of the chimney opening is from 120 mm.
- Mounting is carried out on a wall made of brick or concrete (non-combustible materials). For additional protection, galvanized sheets (1 mm thick) and thermal insulation are installed.
- First of all, a gas shut-off valve is installed. It is painted yellow and left freely available.
- The minimum pressure in the system is from 0.1 atm.
- The distance from the stove is at least 10 cm.
- It is allowed to connect the outlet pipe only to a chimney or a special channel in the wall. Ventilation connections are prohibited.
- Distance from the floor - from 1 meter.
- The room should have natural ventilation (window, vent).
What you need for work:
- If it is not included in the kit, then buy a galvanized pipe (from 1 meter) to remove combustion products.
- Purification filter to “soften” water and reduce the amount of impurities.
- Gas hose.
- Fitting.
- Dowels.
- Drill.
- Open-end wrenches.
- Sealant.
- Fum tape.
How to organize the process yourself:
- Measure the distance between the column fasteners. Mark the hole for drilling on the wall.
- Use a drill or hammer drill to make holes and install dowels or hooks; they are usually supplied in the kit.
- Install the housing onto the mountings.
- Connect water hoses to the pipes, connect the other ends to the column fittings. You can use flexible or PVC hoses no larger than 2.5 meters.
- Now check the strength of the connections. To do this, turn on the water and see if there is a leak.
- Install the chimney pipe. Place one end on the housing pipe, and lead the other to the chimney opening. Make sure there are no gaps. They are insulated with sealant.
Before organizing a chimney, it is recommended to check the presence of draft. This can be done with the help of a burning match, the flame of which, when brought to the chimney, should deviate to the side.
- When using a coaxial pipe, it is led into a hole in the wall.
- The last thing to do is connect to the gas main. This work is best left to specialists.
Upon completion of work, the equipment is checked:
- Open the fuel supply valve.
- Lubricate the connections with soapy water to prevent leaks.
- Tighten the clamps, install clamps if necessary.
Chimney organization
Ventilation must be working; it’s good if there is an exhaust hood. So, if there is a leak at night, proper ventilation can save the lives of apartment residents.
When arranging a chimney, keep in mind that the length of the pipe should not exceed 3 meters. No more than 3 bends are allowed. When using corrugation, it is necessary to prevent its sagging, which may interfere with the removal of smoke. All connections are checked for leaks.
Installation and wiring instructions
Before fixing and connecting the column with your own hands, buy 3 ball valves - one gas, 2 water plus connectors with a cap washer - American. The diameter of the fittings is ½” (DN15). Fastening elements are supplied with the water heater.
Connecting a water heater to the communications of a private house
Recommendation. If there is no filter at the cold water supply inlet, purchase a mud filter and place it in front of the inlet pipe of the device.
How to install the speaker yourself:
- Place the heater against the wall in the selected location and mark the outline of the housing. After measuring the distance to the mounting points, drill holes. Mount the bracket or install hooks (the method of hanging depends on the model of the unit).
- Attach the water heater, install the chimney according to the rules. Enter the round channel into the brick shaft using an adapter, and seal the joint with asbestos cord.
- Screw the American connectors to the fittings of the device, then the taps. Be careful not to confuse the gas pipe with the water pipe.
Some manufacturers indicate the purpose of the fittings on the body; in general, follow the factory instructions - Connect the cold and hot water supply, open the common valve and thus check the tightness of the joints. If there are no leaks, connect the gas pipe after lubricating the sealing gasket with grease.
- Test the gas pipeline for permeability - open the shut-off valve and wash the connections with a sponge. Bubbles will appear at the leak site.
Starting and checking water heating for DHW is done according to the manufacturer’s instructions, but only after the device has been put into operation by a representative of the supplier organization. When it is necessary to replace the device, the procedure begins with dismantling, then work is carried out in a similar order.
Comment. It is allowed to supply water and gas to the device with flexible hoses no longer than 2.5 m. But with this connection scheme, the number of joints increases; it is better to connect the pipes to the heater directly, through taps and American connectors.
Installation of the flueless (turbocharged) version of the dispenser with automatic ignition differs in the way the flue is laid - horizontally through the wall to the outside. A double-walled coaxial pipe is placed with a slight slope towards the street so that the resulting condensate drains. The device must be connected to the mains and grounded - mount a socket nearby, powered through an 8 A circuit breaker, as shown in the diagram.
Start-up and commissioning
Before starting the column, check the tightness of all connections, make sure that water is not leaking anywhere and gas is not poisoning. You can check the connections on the gas pipe using soapy water. When all the connections have been made, the joints and fittings are moistened with a soap solution, and then the valve for the gas supply is opened. If there are no bubbles, then the line is sealed.
The necessary work to start the column is carried out according to the manufacturer's instructions and strictly in the specified sequence for the first start. It is better to entrust the burner settings to a specialist.
The main task is to determine the optimal gas pressure by tightening the adjusting bolt, and by adjusting the damper to determine the air supply. It is almost impossible to make adjustments without a pressure gauge
It is important to know exactly the pressure in the gas line when idle and when the column is turned on at maximum. In dynamics, the pressure should not exceed the permissible threshold established by the manufacturer for this water heater
Ideally, the optimal operating pressure should be established, and the burner flame should always remain with a uniform blue glow without yellow tints.
Setting up the hydrothermal control unit comes down to setting the optimal values for the maximum and minimum water temperatures at real pressure values, which vary greatly for different houses and apartments.
Installing a geyser: all the necessary steps
There is no need to rush and buy the speaker model you like. It may simply not fit certain parameters. First you need to complete a number of activities and only then buy.
- Checking the room where installation is planned for compliance with the placement of the column. The bathroom, and sometimes the kitchen, do not always meet the requirements. The home owner may not know this.
- Registration of permitting documentation, project preparation. This is done by specialists from the gas office to which the household is assigned.
- After drawing up a project and obtaining permission, you can purchase a column according to the parameters proposed in the project.
- Choosing a location. It is already indicated in the project. It is necessary to maintain the parameters. The distance from the floor surface must be at least 1 meter and 50 cm from the opening for the hood and chimney.
- It is imperative to have a ventilation system next to the column. This is not a chimney, but a special ventilation system.
- Purchasing the speaker itself. This must be done in specialized stores. A certificate is required. You should not purchase it secondhand or in spontaneous markets. This is dangerous and no one gives any guarantee.
- Before installing a gas water heater in a private house, you must contact representatives of the gas office and ask them to carry out the installation.
- Only professionals can install and connect to the chimney efficiently with a guarantee of complete safety.
- Installation and connection is not difficult. But minor violations can lead to tragedy. Remember that carbon monoxide is odorless and its effects on the human body are fatal. The person simply falls asleep and never wakes up again.
- Connection to the gas source and start-up is carried out only by professionals, for which a special act will be drawn up, which gives the right to use or prohibits until the violations are eliminated.
Analysis of the most common installation errors
The most common mistake is installing a geyser in the bathroom. As a rule, this room does not have a window. It is especially dangerous to install speakers without a chimney. There are models of water heaters in which carbon monoxide exits through openings, and is removed from the room through a ventilation hole in the wall.
The second most common mistake is the desire to hide the device so that it does not visually stand out from the interior. Often a geyser is installed in a cabinet. This leads to disruption of the proper functioning of the gas water heater.
Even if a distance of 10 cm is maintained from the cabinet walls and there is no bottom bottom, the air flow will still be insufficient to cool the device. It will take longer to cool down, which will significantly shorten its service life.
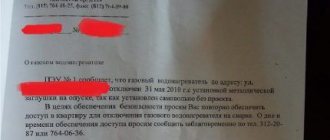
The third mistake that often occurs is a mixed-up connection of the gas pipe in the column. This leads to water entering the gas pipeline. The liquid gets there through the gas column and then moves down through the pipes. This is how water enters the gas equipment of the neighbors below, completely disabling it.
Liquid removal is carried out by gas services. Once a source is discovered in the owner’s apartment, the gas will be turned off and a fine will be issued. This is what a gas shutoff order looks like
It is impossible to prevent GorGaz workers from performing a shutdown. In case of refusal, the police will be called, as people's lives are at risk.
Geyser in the kitchen
The geyser is still a frequent guest in our apartments
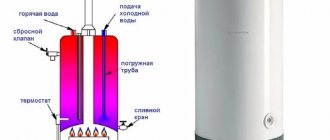
A column or instantaneous water heater is a device that, due to the combustion of gas, warms up flowing water. Gas can either be supplied through pipes or be liquefied from a cylinder. But in practice, only natural gas is used in city apartments. For many old houses, a water heater is the only way to heat water, because the power of the wiring is not designed for the use of boilers.
You can't always see it, but you need a gas water heater
Instantaneous water heaters are often used when planning a small kitchen in Khrushchev and Stalin buildings. Older models are lit with matches, and heating depends on the flow of water. Now they have been replaced by options with electronic control, auto-ignition and electronic temperature control.
In private houses and large country apartments, gas boilers are used instead of water heaters. Their difference is that the boiler has 2 separate circuits - heating and water heating. The column heats only running water.
Advantages
- fast heating of large quantities of water;
- compact dimensions;
- power does not exceed the capabilities of gas lines;
- direct-flow scheme. less heat loss, heats the apartment only when it is running (important in summer), hot water is available immediately as soon as the heater is turned on;
- relative cheapness of use, depending on the price of gas.
Flaws
- explosion and fire hazard;
- requires good traction. otherwise there is a risk of carbon monoxide poisoning;
- you need a chimney and good ventilation, which should be taken into account in the design of a small Khrushchev;
Strict requirements for installation and further operation due to the potential danger of the device.
List of documents according to standards
The list below is approximate and as complete as possible, but it depends on the region. In addition, if the connection is not happening for the first time, some documents may already be in the relevant services or in the hands of the owner of the apartment building/in the housing office. How to make an air duct for a kitchen hood can be read in this article.
So, you will need:
- A copy of the home or apartment's title deed or similar document proving that you are the owner.
- Copies of civil passport (pages 2,3 and 5).
- Copies of the tax payer's certificate (TIN).
- Permission to process personal data.
- Gas Buyer's Passport.
- Your letter about concluding a work contract.
- Maintenance contract for fire hazardous equipment.
- Specifications for gas connection issued by the distributor or supplier.
- Documents on the implementation of specifications (Acceptance certificate for the gas distribution system facility (copy) and others).
- List of equipment using gas, its characteristics, copies of technical passports.
- A copy of the deed on the division of property between the owner of the house and the distributor.
- Copies of passports for the gas meter, additional sensors if available, and certificates of verification.
- A copy of the gasification project page with the stamp of the Gazprom metrology department.
How to install a gas water heater in an apartment:
Installation of a geyser - technology, standards and connection requirements for houses and apartments
The best option for regular breakthroughs, or for preventive measures related to hot pipelines, is a gas water heater.
If you calculate the financial side of the issue, then this option will turn out to be profitable. After all, gas tariffs are lower than for hot water.
Choice
It is important to take into account a number of technical characteristics of the product. This is a reliable manufacturer that has proven itself in the market from the best side. The equipment must be of high quality, the same as the assembly.
Important! You should only choose appropriate equipment from trusted manufacturers. A prerequisite is compliance with certificate standards.
It is necessary to have a warranty term. In the absence of this, the consequences can be disastrous. Security is of great importance; in the absence of supporting documents, the risk for all family members is quite high.
Characteristics
Before installing a geyser in a house or apartment, you should rely on some technical characteristics. This is about power. The principle of regulating the power indicator is of significant importance. In this case, it is better to give preference to an automatic device.
Gradually, the manual method is losing its former popularity. Now they use an electronic mechanism, in which the robot is carried out using a galvanic component. This element increases the cost of the device, but also improves its use.
It is best to give preference to a closed turbocharged type of exhaust of combustion products. The choice of an atmospheric apparatus is justified only if a private house, for example, is equipped with its own chimney.
Additional functionality includes a draft sensor, a thermocouple, and the presence of a hydraulic valve that minimizes overheating of the device. All these features are a kind of security level.
Recommendations
There is no need to apply special knowledge or effort during the installation of a geyser, as can be seen in the photo. Time costs and difficulties lie elsewhere. This is the collection of documentation that complies with the standards.
To avoid negative consequences, you should know what is needed to install geysers. It is worth pre-designing the location of the device. The plan should be certified and work carried out in accordance with technical supervision standards, the fire service, GorGaz, and the City Administration.
Installation Requirements
During the work process, you should familiarize yourself with the basic requirements for correct installation of the device.
It is necessary to take a plan for the gas pipeline, chimney, and water supply. To do this, you need to contact the Housing Office.
You should plan the installation of the device, taking into account the basic standards. In this case, it is best to seek help from a specialist from GorGaz. This will help minimize the risk of conflict situations arising on this basis. This makes it easier to obtain the relevant documents.
The technical capabilities of the device in the project should be indicated. After this, the housing office checks the data you provided. After this, you need to submit an application to this service for installation permission, and add the necessary plan to this.
Then you need to apply for permission to repair, then replace the pipelines. Then, in order to comply with all standards and permits for the installation of geysers, you must submit an application to check the technical condition of your chimney.
An application is submitted to an organization that monitors ventilation ducts, as well as the chimney itself. You should contact the City Administration to obtain permission to redevelop communications.
If you change the location of the column, the collection of documentation that complies with the necessary standards is aggravated. This procedure will take much longer than replacing old equipment.
Documentation
If you fail to comply with all standards, you will receive fines for illegal installation of a gas water heater. To avoid this, you need to collect a number of documents and prepare properly:
- You must have the technical passport of the device with you;
- An application for reorganization is required. This application must be certified by the City Administration;
- You should have with you an approved project for installing the device;
- You must have a certified document that confirms the appropriate condition of your chimney.
Installation algorithm
Installation of a geyser must be carried out by specialists
Documentation is regulated by the law on gas supply to the population. The list differs depending on whether you are changing only the model, device and location, or if you are installing the equipment for the first time.
The model is changing
The column becomes outdated over time and can be modernized by replacing it with a more modern one
- Buy a certified gas heater. which is allowed to be installed.
- Take from the housing office certified copies of the gas and water supply system diagrams with the equipment installation location clearly marked.
- Then submit an application for replacement, subject to maintaining the installation location, to the gas service. there are also applications for the repair of water and gas mains on the site.
- The gas service will do the work, and it will issue a certificate of commissioning of equipment and compliance with the requirements.
Changing the device and installation location
How to install a gas water heater video master class:
- You will need to change the gas supply, water supply, and air venting.
- Come to the fire department to pick up a chimney condition report.
- Order a transfer project from GORGAZ or a private certified organization and receive it.
- An apartment building will require permission for redevelopment from the city administration.
- You must have in your hands an act, a project, a permit, a technical passport of the boiler or water heater, a document on the ownership of the apartment. With these documents and the application, contact the gas service again.
- Specialists will install and connect the equipment and conduct the first start-up. Then they will seal the meter and issue a Certificate of Commissioning.
- At the end, you should have in your hands certificates that confirm safety from the fire inspection, technical supervision, and commissioning. Information about the transfer is additionally submitted to the BTI.
First installation
To install a geyser you need to collect quite a lot of documents
If gas is not supplied to the house, you will need to build a gas supply line. This is an expensive process, and many owners of private houses prefer to make do with solid fuel boilers. For multi-apartment buildings, gas supply is carried out by the developer, the housing office, or contributed by the owners together.
In a small kitchen, placing a speaker is a little problematic, since every centimeter counts
- Obtaining documentation includes consent to supply gas from distributors and transporters, calculation of consumption, obtaining technical conditions, permission for land allocation for the gas pipeline.
- Design consists of concluding a project agreement, collecting and examining documentation, and approval by the authorities listed in the previous paragraph.
- Construction consists of construction and installation work and commissioning.
- At the end, a gas supply agreement is concluded with GORGAZ or OBLGAZ.
Have you already chosen an espresso coffee maker for your home?
Read how to fix a leaking faucet here.
Water connection
Now a pipe with cold water is connected to the column, and hot water is distributed throughout the house. It is better to connect to the water heater using an American connection with a movable union nut.
For cold and hot water lines, be sure to install shut-off valves - ball valves.
If there is no cleaning filter at the main inlet to the apartment or house, then a coarse filter of 80-100 microns is installed in front of the column. It is also advisable to install a fine filter of 10-20 microns.
The cleaner the water, the longer the heat exchanger will work without blockages and scale.
Pipes are supplied in one of the following options:
- Supplying pipes to a distance of less than 30 cm to the column and connecting using a flexible hose or copper/brass tube;
- Direct connection of metal-plastic, polypropylene or steel pipes, depending on the material used for the main wiring.
To tap into a cold water pipe, you will need a tee. The simplest option is to insert into plastic using clamp fittings. All you need is an adjustable wrench, a pipe cutter and a flaring tool. The fittings you will need are a tee, an American fitting and a shut-off valve.
Water connection diagram
Having previously cut the pipe in the right place so that the supply to the column is as smooth as possible and without additional elbows, American fittings are inserted into the cut and a tee is screwed to them. Next, a section of pipe is connected to the column.
For steel pipes, you will need a welding machine and welding skills. Instead, a special tee clamp is used. It is fixed to the pipe and then a hole is drilled through the outlet in the cold water pipe. Next, a section of pipe is connected to the column.
For polypropylene pipes you cannot do without a soldering iron. It is easy to rent, but the amount of work will be less than with steel pipes.
Next, the DHW pipes are laid out, if they do not already exist. A pipe with a shut-off valve is led from the column, and then to each mixer in the house.
If you are only replacing the column, then it is still advisable to re-lay the pipes to avoid the accumulation of adapters and elbows in front of the gas column. This will protect the equipment from unnecessary turbulent flows in the pipes, which can affect the operation of the hydrothermal control unit.
Specifics of gas supply installation
The pipes in the apartment are the property of its owner, but unauthorized changes to the gas supply system cannot be made. For any changes, you must obtain permission from the gas service, otherwise a fine will be issued.
If the gas water heater has already been installed in this place, then this will not cause significant changes to the project. It is enough to turn off the gas valve on the pipe and replace it. If you are installing a water heater for the first time, you will need to do some wiring.
The diagram shows how to properly route gas and water pipes. Depending on the material of the pipes, you will need tools for welding metal or soldering plastic (+)
When installing pipes yourself, you must follow the following rules:
- Turn off the gas before starting work.
- Carry out work with an open window.
- Remove debris from pipes that may have arisen during installation.
- Do not route pipes through door and window openings.
- Do not use the ventilation shaft for laying pipes.
- Do not install the gas pipeline into the wall.
- Do not use flexible hoses longer than 3 meters.
- Paint metal pipes.
Particular attention should be paid to sealing the connecting elements of the gas pipeline. To do this you need to use a sealant and sealant. After completing the wiring, you can begin installing the device.
Installation of equipment
The sequence of actions when installing a column usually looks like this:
Markings are applied to the wall: holes will be made along it. The column should be located at a sufficient distance from the stove and at such a height that the viewing window is exactly at the user’s eye level. The length of the vertical section of the chimney extending from the column must be 500 mm or more if the ceiling height is 2 meters or more, and not less than 250 mm if the distance from the ceiling to the floor is equal to or greater than 2.7 meters. You should also take into account the requirements of the standards discussed above. Having drilled the holes, insert the dowel sleeves into them, and then screw in the mounting hooks onto which the column is hung. A tee with a ball valve and a filter is cut into the cold water pipeline, which is connected by a pipe or hose to the inlet fitting of the water circuit of the column. With a collector circuit, the pipe is laid from the collector pipe, and a ball valve and filter are installed on it
Please note that the inlet and outlet fittings are not equivalent - it is important to identify the inlet one. If a steel pipe is used for connection, the threaded connections must be sealed with tow, flax, FUM tape or Tangit Unilok thread.
When using a hose (flexible line), there is no need to use a sealant - the tip of this element is already equipped with a gasket. In a similar way, a pipe for distributing hot water is connected to the outlet fitting. Next, you should smoothly open the root valve on the cold water pipeline. In this case, you need to monitor whether leaks appear at the joints. If it appears, you need to tighten the nuts (for the flexible line) or add a sealant. The gas fitting of the column and the tap on the gas supply line are connected by a hose, which must be clamped with clamps. The tightness of the connections is checked using soap foam - if there are leaks, it begins to bubble.
All that remains is to secure the pipe to the smoke exhaust pipe and install the draft sensor according to the instructions. The second end of the pipe is inserted into the chimney channel using a special adapter. Now you can carry out a test run.
Tip #3: Follow the instructions carefully during the installation process.
Let me remind you once again that although installing geysers is quite feasible on your own, do not forget that you are dealing with gas, so any amateur activities should be excluded.
The instructions begin with preparing all the necessary equipment that will be needed to successfully complete the plan:
Props
| Name | Purpose |
| Plastic pipes or hoses | Connecting water supply and gas supply |
| Fitting | Connection of pipe fragments |
| Shut-off valves | Shutting off the water and gas supply |
| Magnetic and salt filters | Purification of incoming water |
| Corrugation | Chimney connection |
| Steel screws with plastic dowels | Mounting the speaker to the wall |
| Hammer | Creating holes for dowels |
| Pipe shears | Pipe cutting |
| Pipe soldering iron | Pipe soldering |
| adjustable wrench | Tightening of threaded connections |
PVC pipes for water and gas differ in marking color
Fixing the unit on the wall
Before installing a gas heater in a private house, be sure to arrange a chimney opening above its location. The ventilation outlet can be made into the wall or the ceiling, whichever is more convenient for you.
Next we proceed as follows:
- The mounting holes are clearly visible from the back of the device. We measure them and transfer the obtained data to the wall;
- We insert a drill with a Pobedit tip into the nose of the hammer drill and drill holes in the marked places;
Drilling a concrete wall using a hammer drill
- Now we tighten the screws, in some cases these may be hooks, and hang the gas water heater on them with our own hands.
As you can see, so far everything is as easy as if you needed to hang a shelf or a picture. But it’s too early to relax; now something will be a little more difficult.
Connection
And now the device is already hanging in front of you, what next?
- We cut out a piece of corrugated pipe of the appropriate length and connect the outlet of the column to the chimney outlet. As a rule, the corrugation comes complete with the gas equipment itself, so there should be no complications on this side;
Photo of a corrugated pipe connecting a gas water heater to a chimney
- We turn off the gas supply, cut the gas pipe, if we are talking about a metal product, you will need a grinder, cut the thread and screw on the tee, having previously wrapped the thread with a special fum tape to enhance the seal;
Installed tee on a gas pipeline
- To the tee we connect the second end of the pipeline and a plastic outlet leading to the corresponding hole on the device being installed, which is very convenient to do using a pipe soldering iron. Also, do not forget to use fum tape, and fasten the hose itself with clips to the wall so that it does not dangle in the canopy;
- Now we turn off the water supply, after which we cut in a tee in the same way as with the gas pipeline. Only in this case, before branching, we also install salt and magnetic filters. This way you will significantly extend the service life of the water heater;
- We connect a hose leading to the mixer to the outlet of the column.
Example of a completed connection
By the way, if you are just replacing old equipment with new equipment, then all the tees are already installed, and the task is simplified to simply connecting pipes or hoses.
Testing
The first start of the gas water heater is a kind of assessment of the work you have done, so it should also be done correctly:
- We mix a soap solution with which we coat all the joints of the gas pipeline;
- We turn on the gas supply and very carefully inspect the threaded connections for the possibility of bubbles;
- If gas leakage is noticed somewhere, then it is necessary to immediately shut off the gas pipeline and redo the connection. If everything is fine, then open the water supply;
- We wait a while for the liquid to pass through the filters and open the hot tap. Next, you should hear the click of the piezo, unless, of course, you forgot to install the batteries, after which the burner will light up and the desired liquid will flow from the mixer.
Operation of the gas heater burner
That's it, you can take a bath, wash dishes and hands, well, in general, exploit the fruits of your labor.
Rules and regulations for installing a geyser
Installation of gas water heaters (dispensers) is regulated by the norms and rules set out in SNiP 42-01-2002. According to the recommendations set out in this document, boilers are connected to low pressure gas pipelines (0.3 MPa).
Standards for installing a geyser
Therefore, connecting the dispenser begins with drawing up a project for the “internal” gas pipeline. Without such a project, no management company will undertake the installation of a new water dispenser. After all, the column needs not only a gas pipe, it also needs an exhaust hood - a channel for removing combustion products or unburned “fuel”. And all the installation details, including recommendations regarding the dimensions of the exhaust duct, will be displayed only in the design documentation.
Well, if a water heater is not provided for in the gasification project, then the necessary changes are simply made to the documentation - a diagram of the installation of a gas water heater is drawn on the drawings. And if such a scheme is already present in the design documentation, then the apartment owner can look for a master who is ready to take on this work.
Moreover, all manipulations with the project concern only the owners of new speakers installed in the apartment for the first time. Replacing an existing gas heater does not require any approval from regulatory authorities: after all, this source of consumption is already included in the home gasification project.
However, most modern kitchens fit the regulated standards for installing a geyser (according to today’s SNiP, water heaters are installed only in this functional area).
After all, premises suitable for installing speakers must meet fairly modest requirements, namely:
- The kitchen area must exceed 7.5 square meters.
- The ceiling height cannot be less than 2 meters.
- The dimensions of the receiving channel for the “chimney” must correspond to a circle with a diameter of 120 millimeters. A standard exhaust vent is suitable for these conditions.
- The supporting surface of the column (kitchen wall) must be constructed of non-combustible materials.
Responsibility for unauthorized installation
If the insertion into the pipe for connecting the column is made bypassing the metering device, then such an act falls under Art. 7.19 AC RF. For this, administrative liability is provided in the form of penalties.
For individuals, fines range from one and a half to two thousand rubles. This is the least possible measure for those illegally connected to the gas system. How an official connection to a centralized gas main is made is described in detail in the following article, which we recommend that you read.
In addition to the administrative code, unauthorized tapping and installation of gas equipment is subject to Federal Law No. 69 “On Fire Safety.” According to the text of the document, the owner of the property bears administrative or criminal liability depending on the severity of the consequences.
If the actions cause property damage to third parties, the owner will be obliged to compensate it in full. In addition, a fine of RUR 80,000 may be imposed for a violation. If significant harm was caused to the health of neighbors, the owner may be taken into custody and imprisoned for up to two years.
Requirements for ventilation and chimney
To create air circulation in the room, a ventilation hole is necessary. It should not be clogged, air should pass through it calmly. If you neglect this rule, then in the event of a gas leak, the residents of the apartment will receive poisoning with serious consequences.
The risk of household gas detonation will increase significantly if it is not removed naturally, since a leak can occur at night, when a person is not able to detect it.
For the normal functioning of the gas water heater, an additional chimney must be installed. It can be brought into the common house system or directly onto the street. When constructing a chimney, it must be taken into account that it cannot have more than two bends at an angle of 90 degrees.
The total length of the chimney should not exceed three meters. Three options for the location of the chimney pipe are allowed.
The pipe must have a vertical section at the point of connection to the water heater. The length of the vertical section must be greater than or equal to 50 cm. The length of the horizontal section of the pipe should not exceed two meters.
It is possible to make a chimney from a flexible corrugated pipe, but it is necessary to prevent its sagging, which can block the removal of combustion products.
If the installation of the column does not involve a chimney, then you cannot limit yourself to a ventilation hole in the wall. It is necessary to install a full-fledged hood, but even in this case, the gas service will have questions about such a carbon monoxide removal system.
Checking the tightness of gas channels
After installing the water heater, you need to check the gas pipes for leaks. If you have a gas analyzer, this greatly simplifies the procedure and improves the quality of the test. If this device is missing, then you can use the old method.
To do this you will need regular soap, a jar and a brush. The soap is dissolved in the jar to form a liquid emulsion. Next, using a brush, the emulsion is applied sequentially to the pipe joints. As you apply, you need to monitor the appearance of bubbles in the treated areas. If they appear, the leak must be eliminated.
Before testing for leaks, you must take the necessary safety precautions. Be sure to turn off all electrical appliances
Under no circumstances should you check for gas leaks using fire. This is dangerous and may cause an explosion. There is no point in risking your life and the lives of your neighbors.
Gas equipment requires regular inspection and periodic cleaning. You can clean the dispenser yourself, but if you have no experience at all in servicing such systems, it is better to contact a company that has entered into an agreement with you for the supply of gaseous fuel and maintenance of the devices involved.
Column layout rules
The water heater cannot be located on a load-bearing wall of the building. This is directly prohibited by the requirements for the installation of geysers. In the event of an explosion, this may result in damage to the building or its partial destruction.
To clarify the possibility of installing the device, you need to take information from the cadastral passport of the apartment and the general plan of the house. This information can be clarified by calling specialists.
There are requirements for the space from the column itself to the opposite wall. The distance should not be less than one meter. This is necessary for free access to the device for its maintenance and inspection. It is also forbidden to install gas supply pipes into the walls.
This makes it difficult to inspect communications and find gas leaks in the apartment. If this violation is detected, an order to eliminate it will be issued and information will be provided on how to correctly install the gas water heater and where to contact.
The column must be located at a distance of more than 10 cm from the wall. It is not allowed to install a gas water heater on a wooden wall without prior preparation. A steel plate must be installed at the installation site, equal to or larger in area than the back wall of the device.
It is not allowed to install a column above a gas stove. These devices must be at least 1 meter apart from each other. Also, you cannot use the hood for a gas stove as a exhaust outlet for combustion products. You cannot use one chimney for the hood and gas water heater. This is expressly prohibited by safety regulations.
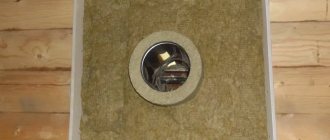
Installation of a chimney in an apartment with wooden walls
In wooden houses, the use of a blue fuel water heater is allowed, but fire safety standards for installing a gas water heater must be observed. The chimney cannot come into contact with wood; non-combustible material must be placed between them.
Basalt or mineral wool can be used as thermal insulation. It is allowed to use heat-resistant polyurethane foam.
This is necessary to prevent fire in the event of strong heating of the chimney. As a rule, old wooden houses do not have chimneys, or they are intended for stove heating. It is prohibited to install gas equipment in unsafe houses.
Image gallery
Photo from
Correct installation on a wooden surface
Violation of speaker installation rules
Protective apron made of ceramic tiles
Features of the use of thermal insulation