The application of the fundamentals of thermodynamics gives good results in various spheres of life. A development such as the Kholmov boiler is an example of an efficient installation, characterized by long-term operation on one bed, maximum use of heat energy from the fuel and afterburning of the resulting gases.
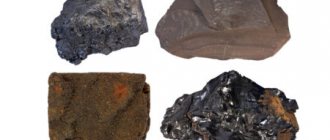
The following types of fuel can be used as raw materials for loading:
- coal;
- pressed crumbs;
- wood;
- processing waste;
- granulated materials – briquettes, pellets.
The operating principle of the Kholmov boiler provides it with an advantage over traditional installations, where, as a result of active combustion, the time until the next fuel load is reduced.
Features of the manufacture of the Kholmov boiler
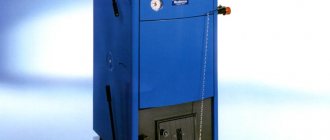
Making a cauldron with your own hands is not always possible. Some types of heating equipment require special knowledge and skills. But almost every craftsman can make a Kholmov boiler. Its design is completely clear, and the process itself is quite simple. What is a Kholmov heating device and how to assemble it yourself?
What is a Kholmov boiler?
The Kholmov unit is a heat generator operating on solid fuel. The device has vertically installed shafts. You can put coal, firewood, pellets or briquettes into the fuel chamber. Also, the boiler operates no less efficiently on bulk raw materials such as sawdust and wood chips. The design allows the use of firewood with a humidity of more than 30%.
With one load of fuel, the Kholmov boiler can operate for more than ten hours. Due to this property, the equipment belongs to the category of long-burning heating devices. The power of such units is 10, 12 and 25 kilowatts.
Boiler structure
The Kholmov heating unit has a mine-type structure. Such boilers are divided into two types:
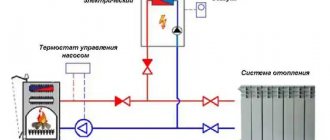
- dependent on electrical supply;
- working without connection to the electrical network.
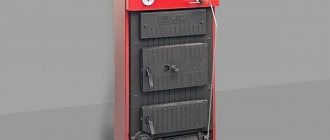
All Kholmov boilers have the same design, which consists of the following elements:
- metal case;
- two chambers - a fuel chamber and a shaft with a heat exchanger;
- thermostat;
- grate;
- the pipe to which the chimney pipe is connected;
- thermal expansion compensators;
- inputs and outputs for draining, supply and outputs and installation of a safety valve;
- doors;
- retractable tray for collecting ash.
The doors of the unit are made of two metal sheets, between which there is a layer of heat-insulating material. Their edges are covered with a heat-resistant asbestos seal along the contour. This design allows the doors not to heat up too much - their maximum heating temperature reaches 80 degrees.
The covers are secured with special latches, only the rear closing panel is secured with removable screws. The ash compartment door is cooled by continuous air currents, so it contains less than 50 percent thermal insulation.
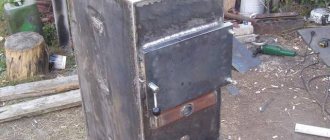
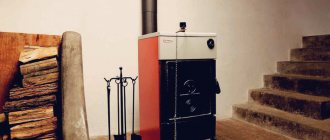
The photo shows a Kholmov boiler with an enlarged bunker
The bottom of the unit is a special plate coated with a material that reduces heat transfer. There is a camera on top, and two long, stable legs on the bottom.
Energy-dependent designs of Kholmov boilers are equipped with a fan and a device that controls the process. Units that operate independently of electricity have a thermostat on the front wall, with the help of which the heat transfer of heating equipment is automatically adjusted. The device with the blower door is connected by a special chain. The ash pit is located immediately under the wheel drive. When the door is open, the ash pan can be easily removed. At the bottom of the boiler there is a pipe for draining the working fluid. The inlet outlets are located at the top, and the returns are located at the bottom.
Expansion compensators are located around the perimeter of the unit, and also in the form of rods and partitions in the body itself. They protect the housing from increasing to critical volumes during warm-up. Thanks to this, the heat exchanger also does not deform. The dividing walls are 24 centimeters apart.
Advantages and disadvantages
The Kholmov solid fuel boiler is quite popular. It is important that it is a long-burning heating device. In addition to this, the unit has many positive characteristics:
- High level of efficiency. The boilers have high performance and are able to effectively heat cottages, summer houses or warehouses.
- Ease of use. The design is equipped with convenient hatches through which you can easily load fuel or clean the chambers. The ash pan can be easily removed to remove combustion products.
- Versatility of use. The heating unit can operate on any type of solid fuel. Logs with humidity levels up to 45% can also be used.
- Operational safety. During operation of the boiler, carbon monoxide and smoke are not released into the room.
Non-volatile Kholmov boilers can operate autonomously for up to 16 hours with one load of fuel into the chamber.
The disadvantages include the possibility of resin and soot settling on the walls of the loading compartment.
How to do it yourself?
Thanks to its simple design, the Kholmov boiler can be made independently. The device diagram and step-by-step description will help you study the entire assembly process step by step. The example shows the simplest model with a power of up to 10 kilowatts.
The boiler dimensions will correspond to the following parameters:
- depth including door and neck - 63 centimeters;
- body height – 80 centimeters;
- width – 47 centimeters.
How to make a Kholmov boiler with your own hands
To assemble the heating unit, you should purchase the following materials:
- thick-walled steel sheets with a thickness of at least 3 millimeters;
- asbestos cord with parameters 15 x 15 millimeters;
- metal pipe 47 millimeters long and 1 centimeter in diameter;
- pipes of different diameters - 15, 20, 40 and 115 millimeters.
You can make a solid fuel boiler with your own hands in the following sequence:
- The internal part of the structure is being manufactured. Initially, a water barrier is constructed. It consists of two vertical walls with a bottom and a lid welded to them. A metal U-shaped compensator is fixed in the center by welding. The ends of the structure remain uncovered. The water barrier should be 403 millimeters wide, 60 millimeters deep, and 485 millimeters wide.
- The internal side walls of the boiler are cut out of metal sheets 540 millimeters wide and 770 millimeters high. The rectangle should not turn out to be quite correct - in the lower corner in front there will be a vertical figure measuring 80x208 millimeters, and on top of the same side a horizontal rectangular structure with parameters 387x30 millimeters will be formed. At a distance of 10.2 centimeters from the back wall and 2 centimeters from the front, holes are made for the water partition on both sides.
- The back side is cut out - 770x403 millimeters and the front - 562x403 millimeters.
- All prepared parts are connected into one structure using spot welding.
- The first solid frame is welded to the top of the assembled boiler body. The second should be U-shaped and attached from below. A right angle must be maintained between the frames and the sides.
- A third frame in the shape of the letter “P” is prepared, which should fit inside the housing under the water barrier. The distance between them should be 9 centimeters.
- A strip of metal 103 millimeters long and 80 millimeters wide is welded horizontally to the rectangles protruding in the foreground of the structure.
- A hole measuring 115 millimeters is made on the back side at the top.
- The outer walls are cut from sheets of metal. They have a simple rectangular shape and correspond to the dimensions, the front is 562x463 millimeters, the back is 77x463 millimeters and the sides are 77x546 millimeters.
- Holes for compensators are made in the front wall on one vertical line. A couple of them with a diameter of 1 centimeter are enough. A round opening for the thermometer is cut out in the corner on the right side.
- Two compensation holes are added to the rear panel of the housing, and one each for the supply, drain valve and chimney.
- Two holes are made in the side walls in line with the prepared water barrier compensator. Next, on the side of the structure, round openings are made in the left wall for the thermostat and the return flow of coolant.
Diagram of a Kholmov solid fuel boiler
. After this, compensators are welded to specially prepared holes. All external walls are welded to the internal part. By means of welding, pipes are connected, smoke pipes are connected, and four bolts are connected on top of the housing along the perimeter of the chamber with a heat exchanger.
Water is poured into the assembled device and pressure is pumped up to 2.2 bar to check the tightness of the structure. In this case, all pipes must be plugged. At the end, the bottom of the boiler is welded.
A threshold is made from a metal sheet, measuring 400x160x550 millimeters with about 14 holes. It is installed at the bottom of the structure under the water partition. After this, the structure of the two-layer door and ash box is cut out. At the end, a lid is made to cover the boiler chambers.
Mine-type heating equipment operating on solid fuel has simple operational features and is quite efficient. You can build such a device for heating a country house or cottage with your own hands according to the principle of the Kholmov boiler assembly diagram.
pechiexpert.ru
Recommendations and operating experience
Many people mistakenly believe that if you increase the area or number of heat exchangers inside the chamber, this will increase the efficiency of the boiler. In fact, the largest amount of heat is obtained in the radiation part - about 60-70%.
It is recommended to stack firewood along the grate, and not across it, this will ensure better and more uniform combustion of the fuel. The boiler is loaded either completely every 12-16 hours or added periodically. Ash must be cleaned out once every 2 days. The heat exchanger is cleaned once every half month.
Kholmov's boiler quickly gains temperature. When fully loaded, it reaches extremely high temperatures in just 20 minutes. For 1 hour of heating, 3 kg of briquettes are required. When fully loaded with this fuel, it heats for about 13 hours; dry birch (36 kg) burns for up to 9 hours. In some cases, the boiler was unable to operate during the off-season, when a supply temperature of up to 50° was required, as well as at a minimum setting. Kholmov himself advises avoiding using the smoldering mode.
At the first start-up, it is mandatory to pressurize the boiler under a pressure of 1.5 atm with air, having previously coated the seams with a soap solution.
It is recommended to purchase a Kholmov boiler only from a trusted manufacturer and with a contract.
How to make a boiler with your own hands?
There are many models of heating boilers on the Russian market. But very often the cost of such structures turns out to be excessive, or something is not satisfactory in technical terms. Many people find a way out of the situation by making their own boiler equipment.
Before you get down to business, you need to find out what the advantages and disadvantages of making a heating boiler yourself are.
The positive aspects will be:
- individual design (taking into account the characteristics of the house and heating system as fully as possible);
- cost reduction;
- pleasant emotions from a job well done;
- the highest responsibility (rarely does anyone in large enterprises work as well).
But there are also difficulties:
- the need to calculate everything yourself;
- the need to understand structural materials;
- a prerequisite is skill in using tools;
- availability of free space where basic work can be safely performed;
- inability to make a claim to anyone in the event of unstable, abnormal operation of the boiler.
For all at least minimally trained home craftsmen, any of these problems is not very relevant. Most people prefer solid fuel (rather than gas or liquid) designs because their design is simpler to implement. When working in artisanal conditions, this circumstance is very important. At the same time, among solid fuel boilers, the most popular are those based on the shaft principle of operation, because they provide long-term stable combustion. Such systems, in turn, are divided into two subclasses - classical and pyrolysis schemes.
Any shaft boiler has two main chambers, separated vertically. One of them is used to burn fuel, and the other houses a heat exchanger.
Most video courses and printed manuals show a simpler organization diagram, including:
- firebox (accounts for 50% of the total volume);
- loading hatch (located at the top or side);
- ash accumulating chamber;
- grate;
- door for ash removal (with gate);
- heat exchanger chambers;
- chimney.
When the boiler starts up, hot gas rushes into the chamber with the heat exchanger and transfers energy to the coolant through it. The smoke flow rushes into the designated pipe, and the water goes into the heating circuit. The pyrolysis boiler is more complex. If you watch a video showing the first launch of such an installation, designed for 45 kW, the difference is quite clearly noticeable. The specificity of the equipment is due to the use of chambers for combustion and afterburning of carbon monoxide, a pipeline for re-supplying air and a wall valve separating the main working compartments.
The pipe through which the air recirculates has abundant perforation. The pyrolysis effect occurs due to the decomposition of fuel when the compartment is incompletely supplied with air. Partial combustion products are burned in another compartment. This solution makes it possible to increase the efficiency of fuel combustion and “extract” maximum thermal energy from it. But there are a number of other nuances that must be taken into account.
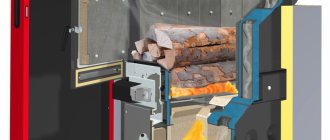
A long-burning boiler can operate on:
- wood (firewood);
- coal;
- sawdust;
- granules from wood waste (pellets);
- different types of fuel (universal type).
At the same time, it is categorically unacceptable to use in such heating devices:
- laminate;
- particle board;
- fiber board;
- glossy paper;
- liquid fuel;
- paints and varnishes, alcohol, perfumes and cosmetics;
- any printed publications.
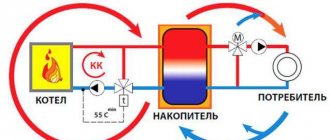
Loading the fuel used to heat a private home can be done manually or be a partially automatic process. In the latter case, there is a capacious, periodically replenished bunker, from where the heating equipment takes new portions of fuel. The combustion of used fuel can occur not only according to the traditional or pyrolysis scheme, but also according to the “top combustion” type. Additional differences may be associated with the construction material (steel or cast iron) and the number of working chambers - 1 or 2. Systems with one circuit can only heat the heating system, and with two lines they can also supply hot water to the tap.
Coal boilers, including those made by yourself, are characterized by an increased burning time per filling and increased heat transfer. Connoisseurs of environmental performance predominantly choose wood heating equipment. But it definitely requires a spacious working chamber and a wide door. This allows to some extent to compensate for the relatively low efficiency of firewood use.
automatic process on coal
manual process on wood
Pellet boilers, unlike conventional ones, are the furthest away from their “stove” ancestors. It is this type of heating equipment that is distinguished by the highest degree of automation. Carefully prepared wood burns with almost no residue, therefore the amount of ash is minimal. But for summer residents and gardeners this is rather a minus; in addition, the prevalence of pellets is still low, and in many places it is quite difficult to obtain them. In addition, any automation means a mandatory connection to (and dependence on) the electrical grid.
Another weakness of pellet automated systems is that they are more complex than conventional ones, and making such a boiler manually is quite difficult. You will have to thoroughly understand the design of automatic units and how exactly they regulate the fuel combustion process. Using the shaft principle allows you to receive heat for about 24 hours even when choosing firewood.
Coal in such systems burns 6 times longer, but there is a significant drawback - it is impossible to replenish the exhausted fuel until the stored mass is completely exhausted.
If the classic type of long-burning heating boiler seems unnecessarily complex, you can use the Kholmov design for 25 kW. The choice of such a solution is justified when very high efficiency is not too important, but you need a product that is as convenient and comfortable to use as possible. This is always a shaft structure, which, when the combustion compartment is fully saturated, is capable of warming up an average-sized house from 12 to 16 hours. The Kholmov boiler is found in both electricity-dependent and electricity-independent versions.
The system must include:
- thermal regulator:
- security group;
- grates;
- pipes for connecting to smoke exhaust pipes;
- devices that correct thermal expansion;
- ash block;
- doors.
The weight and dimensions of the Kholmov boiler make it possible to carry it into an ordinary doorway without extreme effort. This water heater is approximately the same size as most traditional furnaces and can easily replace them in their original location. The upper doors are made double, with a layer of heat-protective material. Thanks to it, the metal does not warm up to more than 80 degrees. The edges of the doors are covered with an asbestos-based sealant; it is quite easy to reproduce this solution at home.
The Kholmov boiler design combines excellent efficiency and decent fire protection. It can be safely installed even on floors made of wood. When a power supply-dependent apparatus circuit is selected, it must be supplemented with a fan and a device that controls the combustion process. The most in demand are still simpler devices that do not require electric current and operate on the command of a special thermostat.
It is very important to take into account the specifics of each component of the boiler. In solid fuel boilers you can find turbulators (aka swirlers) - this is the name of parts that, due to their shape, significantly slow down the flow of heated gases. This is necessary in order to increase the contact of gases with the heat exchanger and increase efficiency. Since the turbulator constantly operates in an aggressive environment, it must be as resistant to all harmful factors as possible. By installing such a device in a homemade boiler, subsequent cleaning of the heat exchanger can be significantly simplified.
The draft regulator is also of great importance. Power-independent adjustment is achieved mechanically. For this purpose, aluminum structures are most often made, because they are very “responsive” to temperature changes. The tubes at the top and bottom are placed near the boiler wall. The levers and fastenings of the axlebox crane are cut out of sheet steel by an angle grinder. The axis of the lever is located between the points of attachment of other parts to it.
The initial displacement of the tubes is determined by a tap. As the tube at the top gets longer, it pushes the lever. When you turn the lever, the tube at the bottom begins to move, touching the second lever, it forces it to release the chain. Since it no longer holds the ash flap, this flap goes down and the combustion gradually weakens.
It is recommended to ensure coordinated actions of the blower and smoke duct. Then the flue gases will not escape into the street too early. The agreement is that when the vent is opened, the chimney clearance should also increase. A device that redistributes force helps to solve this problem (most often it is a thin cable connecting the second lever and the smoke channel damper). Additional details can be found by watching the master class on draft regulators.
Despite the simplicity of energy-independent solid fuel boilers, the options with a control unit are still the most comfortable for people. Those who know a programming language should use an industrial device and customize it to suit their needs. Completely ready-made standardized systems can be installed very quickly, but no adaptation to specific conditions can be provided. Another good option is to use the Arduino platform. This allows you to use cheap controllers and supplement them with a variety of auxiliary equipment, but you will have to write program code in SI language.
Instead of a blower, a considerable part of the boilers are equipped with a fan. This solution makes it possible to obtain forced draft in the chimney, in addition to ensuring the most efficient combustion of fuel. The required ventilation power can be determined taking into account the highest efficiency of the boiler.
Proper selection and installation of the device will allow you to:
- extend the service life of the structure as a whole;
- use thermal insulation materials longer;
- reduce the risk of smoke in the boiler room.
The control unit must have connectors for the fan, pump, network connection and temperature sensor. Typically, the fan should start automatically when the fuel ignites. When choosing a ventilation device, you should give preference to products from well-known and reputable companies. In addition to all the listed components, a homemade boiler must use a reliable tripod.
Most boilers that are assembled and installed by yourself are made from stainless steel of various grades.
Almost always this is one of the varieties of AISI:
For chimneys of a solid fuel boiler, metal category 309, 321 or 310 with a thickness of 0.1 cm is mainly used. This is quite enough to conduct gases heated to 500 and even 700 degrees in the desired direction. Sometimes the smoke channel is made not from a steel pipe, but from brickwork (or they combine both of these solutions by inserting the pipe into a brick passage). It is imperative to use fluff, which blocks the harmful effects of heat on ceiling and roof structures.
To make fluff, natural stone, brick or concrete are used, since all three materials can withstand even strong fire and remain strong.
The dimensions of each boiler and its auxiliary elements are selected separately each time. To make the decision easier, you can use a ready-made device diagram, which was conceived by professionals. When preparing drawings, you should take into account the equipment with a hob. Double-circuit models are larger than single-circuit models.
If a 25 kW Kholmov boiler is being assembled, the typical dimensions are as follows:
- fuel loading hatch – 119 cm;
- coupling – 128.9 cm;
- ash compartment door – 0.43 m;
- cold water supply input – 76.5 cm;
- controller – 1.039 m;
- return entry – 4.1 cm.
Be sure to take into account general information about long-burning boilers in order to eliminate errors. If you still choose an electric device rather than a solid fuel one, you should give preference to a device that operates according to Tesla’s law. There is nothing supernatural or contrary to the basic laws of nature here. In the boiler design, instead of a conventional coil, a bifilar type part is used. The essence of the principle of operation is simple: electricity does not counteract itself, since back EMF is not created, and the potential quickly rises to its highest point.
Returning to the main topic, it should be noted that developers always pay great attention to blowing. It is installed after finishing work on the boiler itself.
This is done like this:
- the fan is attached to the pipe;
- the blower is connected to the control system;
- all necessary equipment is connected to the network;
- air pumping parameters are adjusted;
- a test ignition of the firebox is performed;
- after 5 minutes, the electric blower starts (then it will “remember” the optimal operating parameters).
Since any boiler is equipped with a heat exchanger, you will definitely need a booster to effectively flush it. Buying such devices is not the smartest thing, because their cost starts from 20 thousand rubles, and these are clearly not the best versions. First, take a pair of solid metal plates, their thickness should be exactly 0.25 cm. Drill holes (making sure that they coincide with the holes in the heat exchanger). The “American” ones are inserted into the bottom holes of the plates with the inner portion, then the plates are pressed with bolts so that the fittings do not move away from the heat exchanger.
Hoses are usually connected using ¾ brass fittings; you will also need a container (be sure to be properly cleaned). Use a fitting to secure the hose as tightly as possible. At this point, you need to prepare the reagent for washing; Contrary to popular recommendations, acids, even diluted ones, cannot be used. Now, having understood the additional components for a solid fuel boiler and its maintenance, you can think about the design itself. Manufacturing the housing to the exact size requires the use of welding.
Making an ash pan is much easier; it’s just a metal drawer with a handle. But more attention needs to be paid to the insulation of the boiler. The amount of heat loss and heating costs directly depend on the accuracy and correctness of this work. Light thermal insulation is best created with asbestos cement mortar; the boiler is covered with roofing felt, and a steel mesh is mounted on it, which holds the mortar.
It is impossible to do without the advance formation of the frame if the boiler is to be insulated with mineral or basalt slabs.
The frame is welded, then:
- install a thermal protection layer;
- they reinforce it with a net of steel;
- lubricate the network with a solution of lime and slag;
- paint the resulting surface in the desired tone.
Before installing thermal insulation using any method, the boiler body is cleaned and treated with anti-corrosion compounds. It is imperative to insulate pipes connected to heating equipment. To retain heat, the chimney is surrounded not only with cotton wool rolls, but sometimes they are replaced with polyurethane foam. Important: PU foam can only be used in liquid form if you have the necessary training and specialized equipment. If there is neither one nor the other, it is better to think about other options for solving the problem.
You can descale a homemade boiler using the already mentioned booster. Preference should be given to products from well-known companies, then the cleaning will take place without any risk to the equipment. Of course, before cleaning the boiler, you need to disconnect it from the heating system, from the electrical network and from the water supply. Disassemble the heat exchanger only if it is very clogged.
Ultrasonic cleaning, although mentioned in various sources, is unreasonably expensive for private owners.
There are various variations of solid fuel heating boilers. This is how, for example, a long-burning boiler of another version is set up. The photo below shows a rectangular vertical black cauldron with pink doors. Such a solution looks original and even unique. The waste oil boiler looks much more brutal, and is equipped with a number of vertical pipes.
To learn how to make a cauldron with your own hands, see the following video.
www.stroy-podskazka.ru
The principle of operation and making a Kholmov boiler with your own hands
Making your own heating boiler is a great way to save money. At home, you can make various modifications of such devices. A very simple one among them is the Kholmov boiler. At first glance, its appearance raises doubts about its effectiveness, and therefore many eyewitnesses have the opinion that it is better to start making another device.
Of course, the Kholmov boiler does not have increased efficiency, but it has a simple circuit, which greatly facilitates the work on its manufacture.
Device Features
The Kholmov boiler belongs to the shaft type devices. That is, its main part is a vertical firebox and a heat exchange chamber located next to it. The chambers are separated by a water partition. There is a hole under the partition through which smoke from the firebox enters the heat exchange chamber.
The heat exchanger of this shaft boiler is represented by a water jacket and a baffle. A Kholmov boiler can have different powers, and depending on this, its heat exchanger can change. With increasing power, additional water partitions appear in its circuit. According to the drawings and many videos, these partitions are mounted only in the heat exchange chamber.
Below we will consider the creation of a mine boiler with a capacity of 8-10 kW. According to the drawings presented in various videos, its dimensions are as follows:
- Height – 80 cm.
- Depth - 57.6 cm. If you take into account the neck and door, then 63 cm.
- Width – 47 cm.
Materials
To make a Kholmov boiler with your own hands, you need to buy:
- Sheet steel. Thickness 3-4 mm.
- Asbestos cord with a thickness and width of 15 and 15 mm, respectively.
- Pipes. The diameters are 115mm, 40mm, 20mm and 15mm.
- Metal rod. Length – 47 mm. Diameter – 10 mm.
The amount of each material is determined depending on the selected drawing. Of course, you need to take some margin into account.
Making the interior
It is a structure with front, rear and side walls, as well as a water partition. The Kholmov boiler begins to be manufactured by creating a water partition. Its dimensions should be as follows:
- Height – 485 mm.
- Depth – 60 mm.
- Width – 403 mm.
The partition consists of two vertical walls with a welded top and bottom. In the middle you need to weld a compensator curved in the shape of the letter “P”. It is welded to one wall at the very beginning. There should be no end walls in the partition.
Next, when making a Kholmov boiler, perform the following steps:
- The sides of the inner part of the mine boiler are cut out of metal. According to the drawings and various videos, they have a height of 77 cm and a width of 54.6 cm. True, they are not simple rectangles, because in front of the bottom corner there should be a vertical rectangle measuring 80x208 mm, and at the top, a horizontal rectangle measuring 387x30 should be adjacent to the same side mm. Also, holes for the water partition are cut in these two sides. They are made at a distance of 102 mm from the back side and 20 mm from the top.
- Cut out the back and front sides. According to the drawings, the size of the first is 770x403 mm, the second - 562x403 mm.
- All elements are welded into a single structure. At this stage, spot welding is performed. Thanks to this, all parts will form a single structure, and at the same time it will be possible to adjust its diagonals.
- Weld two metal frames. One should be solid, the other should be shaped like the letter “P”. The first is fixed at the very top of the welded structure. Another one below. The angle between them and the sides to which they are welded must be straight. Frames can be cut from metal or welded from metal strips 3 cm wide.
- All seams are carefully welded.
- Another U-shaped frame is made. It must be such that it can fit inside the structure. It is placed under the water partition at a distance of 9 cm from it.
- A horizontal metal strip is welded to the top of two rectangles that protrude from the front of the structure. Its width is 8 cm and its length is 40.3 cm.
- A round 115 mm hole is cut out at the top of the back side.
Manufacturing the outer part of the boiler
The Kholmov boiler also requires external walls of the water jacket and doors. According to many videos, the further process of making a boiler involves the following actions:
- Cutting outer walls from metal. In this case they are simple rectangles. The back side measures 77x46.3 cm, the sides - 77x57.6 cm, and the front - 56.2x46.3 cm.
- Cutting 2 round or diamond-shaped compensation holes in the front wall. The diameter of the rounds is 1 cm. They are placed on the same vertical line. A 15mm hole is also made in the upper right corner. It is necessary for a thermometer.
- Cutting holes in the back wall. There are 2 compensation holes and 3 additional holes in it: the first is for the chimney, the second is for supplying coolant (diameter 40 mm), the third is for the drain valve (diameter 15 mm).
- Cutting 4 compensation holes in the side walls. In this case, one pair is placed in two walls so that it is in line with the water jacket compensator. Later you need to insert a metal rod into these holes and weld it. Two holes are drilled in the left side wall: the diameter of the first is 40 mm (needed to return the coolant), the second is 20 mm (for the thermostat).
- Manufacturing of U-shaped compensators. There should be 10 of them. Dimensions 4x4x3 cm (LxWxH).
- Welding expansion joints to expansion holes in external walls.
- Welding all external walls to the internal structure.
- Welding of pipes and chimney.
- Welding 4 bolts at the top of the structure. They are placed around the perimeter of the heat exchange chamber.
- Checking for leaks. To do this, put plugs on all pipes and pour water into the Kholmov boiler. Next, raise the pressure to 2.2 bar. The operating pressure of the device will be 1.5 Bar. All leaks are welded using electrode welding at high currents using water. This process can be seen in various videos.
- Bottom welding.
Manufacturing of doors, threshold and grate
The threshold is a rectangular lid with sides and one row of holes. Its dimensions are 40x16x5.5 cm (LxWxH). Work on creating the threshold is carried out according to the following scheme:
- Take a sheet of metal.
- Cut out a 5.5 cm square in each corner.
- Fold the sides up.
- Boil the joints.
- Drill 14 holes with a diameter of 1.2 cm along one 40 cm side.
This threshold is turned upside down and inserted into the Kholmov boiler so that it is at the bottom under the water partition. A gap with a height of 3.5 cm is formed between it and the distillation.
The grate shown in various videos is made in the same way. According to the drawings, its dimensions should be 40x20 cm. However, longitudinal holes are cut out in its bottom.
The principle of manufacturing the main part of the ash pan door is the same as the principle of creating the base of the sill. Next, a hole with dimensions of 19x8 cm is cut out at the top of the door. It should be closed with a flap in the form of a lid, the curtains of which are welded over the cut opening.
There should be a metal box on the inside of the door into which asbestos is inserted. This box is placed below the hole and welded to the door so that the distance from it to the sides of the door is 1.5 cm. An asbestos cord is fixed around the perimeter of the door. To do this, use a heat-resistant sealant. Ears for the hinges need to be welded to one side of the door, and a metal strip with a slot in the middle to the other. A special handle will fit into this slot.
The manufacture of the cover of the heat exchange chamber and the firebox is carried out in almost the same way as the creation of the main part of the door. True, the inner box with asbestos occupies almost the entire surface of the lids. The cover for the first chamber is a metal sheet that does not have sides, but has holes for bolts, a box with asbestos, an asbestos cord around the perimeter and fastening for the firebox hatch hinges. This top is secured with bolts.
poluchi-teplo.ru
Long burning device - classic design
The proposed design has a power of 22 kW, efficiency 75%. It works on wood for 10 hours without additional loading, on coal for 24 hours. The firebox has a volume of 83 liters to the bottom edge of the loading hole. The boiler is equipped with automatic equipment made in Poland: a control unit with a KG Elektronik SP-05 temperature sensor and a DP-02 fan. The general view is shown in the drawing.
The device works as follows:
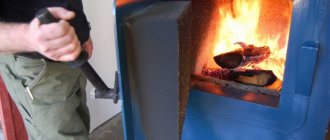
- Firewood is loaded into the firebox and set on fire. The doors close hermetically.
- The control unit sets the required heating temperature, at least 50°. The unit button is pressed and the fan begins to pump air.
- When the set temperature is reached, the air supply from the fan stops. The firewood smolders slowly and produces very little heat.
- After some time the temperature drops. The fan turns on again and combustion continues.
The electronic unit regulates the combustion process, which occurs at maximum efficiency. There is practically no smoldering; intensive burning and standby modes are used.
The following picture shows the inside view.
Solid fuel is burned according to the classical scheme: heat is directly transferred to the walls of the water jacket and the roof of the tank. A heat exchanger is built into it, taking heat from the gases. Heated air is supplied to the firebox through an air duct from below. Fuel loaded in large quantities ensures long operating time of the boiler. While waiting for the fan to turn off, the air is completely blocked by a gravity damper, activated automatically, and natural draft is blocked.
The drawing shows the rear end with a fire tube heat exchanger.
DIY long-burning solid fuel boiler. Boiler drawings
Print Entry
The cost of a set of drawings is 1000 rubles
How to get drawings of a solid fuel boiler 18-20 kW
Send us a request
just leave your name, email and
the subject of your request in the form below
The cost of a set of drawings is 1000 rubles
How to get drawings of a solid fuel boiler 18-20KW
Send us a request
just leave your name, email and
the subject of your request in the form below
prorabna5.ru