Traditionally, in private houses it is customary to use a gable ridge roof.
Few people think about its design and what it can affect.
Recently, one can observe a noticeable increase in the popularity of pitched roofs. This design not only looks more attractive and original compared to other structures,
but also has a lot of advantages :
- Proper insulation of a pitched roof can significantly improve the thermal performance of a room. The house will be warmer, and the microclimate will cool more slowly than in the case of a gable roof.
- Reduced roof weight, allowing to reduce the load on supporting structures.
- Reduced windage . This is especially important in open areas or if the region experiences strong winds.
- Easy to maintain both inside and outside.
- Possibility of creating an additional spacious room in the attic .
- Ease of installation of rafter structures and design of a pitched roof.
- The economic issue follows from the previous point - such a roof will be significantly more profitable . This also applies to the materials used in pitched roofs.
- A variety of roofing and rafter materials that can be used in such a roof.
- Original and interesting appearance . The design allows you to create a whole space for architectural and design creativity.
Unfortunately, a pitched roof has some minor disadvantages. For example, increased snow loads and all the ensuing consequences. We also recommend reading the article about insulating gable roofs yourself.
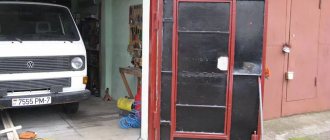
Deciding on the garage roof
To ensure the safety of your car at any time of the day, you can build a reliable, high-quality garage with a good locking system that no intruder can break into. What else, besides locks, will allow you not to worry about the condition of your favorite car while its owner is not around?
Of course, a well-equipped garage roof will protect the interior space from the negative effects of precipitation and other external factors. Let's talk about the species diversity and rules for arranging this element of the motorhome.
Any building, including a motorhome, needs a roof. But what type of construction should you prefer, what materials will you need for the garage roof? To find the answer, you need to consider the existing options, and only then select the right building material.
Let us characterize the design features of popular types of roofing for motorhomes:
Flat roof
The arrangement will require the use of a solid reinforced concrete slab, wooden boards, etc. The material is laid strictly horizontally on the walls of the building, but special equipment is required.
Small flat roof motorhomes are very common among single car owners, although the lack of an attic space reduces the comfort of the structure. To equip such a roof on a large building, you will need to put in a lot of effort, because making and installing a solid reinforced concrete slab of impressive size is not so easy.
The roof is pitched
An easy to implement option that is perfect for a small building. The function of the structure's stops is performed by walls that have different heights to create a slope.
The rafter system is used as simple as possible from well-dried pine boards, beams with antiseptic impregnation, and the roof slope level can be made from 0 to 60 degrees. For the purpose of covering the structure, metal corrugated sheeting, slate, and roofing felt are often used.
Gable design
It is somewhat more difficult to build a gable roof, but its advantage is the presence of an additional attic space, which can be adapted for storing tools and old things. Suitable for large garage buildings for two cars or more.
The rafter legs must be mounted in rows in pairs, and then connected to each other by the upper part at the ridge. The support for the lower parts of the rafters is the Mauerlat, attached to the walls with anchors. The most common cladding materials for gable structures are corrugated sheets, metal tiles, and slate.
Whichever of the described options is chosen, construction work must be carried out strictly following the technology and recommendations of specialists. Then the final results of the work will please you, the work will be done quickly, without additional capital investments.
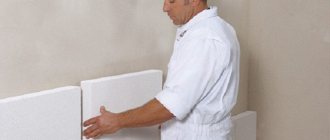
We make a frame for fastening
So, once you have decided on the material for the ceiling sheathing, it’s time to move on to making the frame for the sheathing.
Option #1 – metal slats
Attaching any facing material to such a frame is as easy as shelling pears: fireproof, lightweight, designed specifically for fastening. Today, metal slats for cladding are made mainly from two types of metal - steel and aluminum, as well as a special alloy “to look like metal”.
The rack structure is easier to assemble than a children's toy, and in the end it turns out to be almost weightless:
But there are also significant drawbacks: corrosion from the slightest scratch and a complete lack of sound and heat insulation. And also all the wooden elements that are located above such a frame quickly deteriorate.
Option #2 – wooden slats
In its design, the wooden sheathing for the ceiling of a pitched roof is similar to metal. The only difference is that wood, as a living material, is capable of expanding and contracting more rapidly depending on humidity and air temperature. In addition, moisture causes wood to become deformed. Be sure to treat the bars that you use to construct wooden slats with fire protection.
In general, there are no contraindications to the use of wood when arranging the ceiling of such a roof. Is it better to give preference to metal structures if you are finishing a sauna or bathhouse.
You will need bars with a cross section from 20x40 to 80x40. In addition, the wood must also be treated with an antiseptic and antifungal agent.
Design features and calculations
The rafter system of a pitched roof consists of a series of laid parallel wooden inclined beams. The rafters themselves become the basis for the sheathing for laying the roofing.
The roof design is based on calculations of such parameters as:
- angle of inclination and its direction;
- shape and design of rafters;
- cross-section and length of load-bearing beams;
- complexity of truss design;
- thermal insulation.
Angle of inclination and its direction
The greater the angle, the steeper the roof slope. Its minimum value is determined in accordance with SNiP 2.01.07-85*. Using its map and table, the maximum snow load at the site of construction of the box and the main direction of the winds are determined.
Based on these data, the optimal roof slope angle is found in the corresponding table. The direction of inclination of the roof is chosen in the direction of the prevailing winds so that the forceful flow of air masses presses the roof downwards.
In addition, the slope of the roof should facilitate the rapid removal of melting snow, and also correspond to a certain type of roofing:
- from 10 to 200 – profiled flooring;
- more than 200 – slate, ondulin, natural tiles;
- from 250 – metal tiles.
Shape and design of rafters
Rafters, rafter legs, support beams, beams and struts are made from three types of wood:
- Solid timber.
- Logs.
- Glued laminated timber.
Solid timber
Rafters and sub-rafter elements are made of timber. This is the most popular material for installing roofing systems.
Logs
In rare cases, the supporting part of the garage roof is built from logs. To do this, use tree trunks ø 15–20 cm, cleared of bark and treated with antiseptics.
Glued laminated timber
The material has increased load-bearing capacity, but is “afraid” of increased humidity levels. Such rafters will cost more than beams made of solid timber and logs.
If the high part of the roof is located above the garage door, then the rafters are extended with overhangs with roofing in order to protect the place of entry and exit of vehicles from the box from precipitation.
Section and length of load-bearing beams
The standard size of a garage box is 3 x 6 m. The length of the rafters, if laid in the long direction, will be approximately 6.2 - 6.5 m, depending on the length of the overhangs. Often the rafters are mounted parallel to the plane of the box gate. Then the beams are made 3.2 - 3.4 m long.
With a length of more than 6 meters, the supporting beam with the remaining elements forms a frame support structure - a truss. As for the cross-section of load-bearing beams, for a span length of up to 3.5 meters (including overhangs), it is sufficient to use solid or glued beams 50 x 150 mm, or logs ø 150 mm. For a length of 6 meters or more, I use timber with a section of 50 x 200 mm or logs ø 200 mm.
Complexity of truss design
A truss differs from a simple rafter system in that one or two additional struts (rafter legs) are installed inside the frame. Their function is to relieve the span of rafters as much as possible. Such rafter systems are called hanging.
Various truss design solutions are presented in the lower figure. The lower fragment of the figure shows a diagram of the roofing of a garage span from 12 to 16 meters long. Such garages are built for enterprises that maintain their own fleet of vehicles.
Thermal insulation
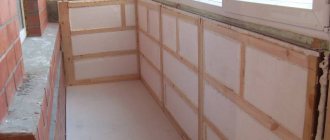
Insulating the roof makes sense if the box will be heated. To do this, install boilers of various designs, electric heaters, or extend pipes to radiators from the house boiler. In any case, in order to retain heat inside the garage, you need to insulate not only the floor, walls, but also the ceiling.
Since roll insulation material comes in widths of 1 m and 1.2 m, the pitch between the beams is maintained at this size along the axes. When laid, the insulation tightly occupies its space, leaving no gaps. Thermal insulation mats 50 mm thick are laid overlapping in three layers.
In the second option, when the shed roof of the garage consists of reinforced concrete slabs laid at an angle on walls of different heights, the roof insulation is carried out as follows:
- Along the perimeter of the roof, sides with a height of 150 - 200 mm are installed. This may be a continuation of the masonry walls or special panels made of sheet material;
- the dry surface of the slabs is cleaned of dirt and debris;
- covered with film vapor barrier;
- everything is covered with expanded clay 100 - 150 mm thick;
- the backfill is compacted using improvised means;
- a screed of cement mortar of a grade of at least M 150 and a thickness of 50 mm is made on top;
- The screed is covered with a soft roof on bitumen mastic.
Preparation for work
Work begins after securing the truss structure and checking its evenness and condition, selecting, calculating and purchasing materials. Any little details should be taken into account in advance; special attention is paid to matching the pitch of the rafters with the dimensions of the insulation and choosing the correct side of the insulating films.
Materials and tools
Directly to work with insulating layers you will need:
- The insulation itself, vapor and waterproofing films or membranes, tape for gluing joints and staples for fixing them.
- Stationery and construction knife.
- Marking and measuring tools: pencil, tape measure, level.
Thickness calculation
The minimum thickness of the insulating layer is determined by the formula:
L=(Rpriv-0.16)∙λ , where
- Rpriv – reduced resistance of the roofing (tabular value, selected taking into account the city or region of residence).
- λ is the thermal conductivity coefficient of the insulation, indicated by the manufacturer.
The resulting value is measured in mm and rounded up, taking into account the thickness of the heat insulation slabs or mats.
Preparing the thermal insulator
When installing single-pitch roofs and the space between the rafters matches the size of the slabs and mats, there is no need for a significant additional supply of insulation.
When using mineral wool and its analogues, the recommended margin is 5% , foam plastic - the same + polyurethane foam with a low coefficient of expansion for filling cracks.
The situation with films is more complicated; many users ignore the need for a 10 cm overlap of joints (from 15 - under unfavorable operating conditions) and special tape for gluing them. This leads to a decrease in the insulating ability of the layer or a shortage of roll materials at the most inopportune moment.
Purchased materials need proper storage, namely, protection from getting wet, weathering or damage. A number of fiber insulation materials are unpacked a day or at least 3-4 hours before installation to gain their volume. For obvious reasons, it is not recommended to do this directly on the ground; a covered area or space in the attic for storing the insulation must be prepared in advance.
Vapor barrier
Vapor barrier materials are divided into two main categories:
- Impermeable – this includes ordinary polyethylene and special vapor barrier films. They do not allow steam to pass through under any circumstances, so it does not matter which side such a vapor barrier is laid on. Strength and density are important because of the operating mode; the higher the load, the denser and stronger the material should be.
- With variable vapor permeability (adaptive) - this is a relatively new type of vapor barrier film that can conduct steam at high air humidity. They are used both for insulating new attic roofs and for major reconstruction from the outside, but only in rooms with normal temperature and humidity conditions or with temporarily increased temperature and humidity (bathroom, kitchen).
It is not recommended to use completely impermeable films; a proper vapor barrier does not allow household moisture to enter the cake and does not prevent the removal of accidentally accumulated condensate.
Main advantages and disadvantages of the design
The advantages of this design include the following:
- Saving money on the purchase of building materials.
- Simplicity of design, and therefore installation.
- Light weight compared to the gable option - less load is placed on the walls.
- High resistance to wind and loads from snow accumulated on the roof.
- The structure can be erected in different angular ranges - from 5 to 45º.
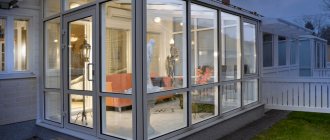
- The pitched roof, made at a slight angle, allows you to install a hot water tank or solar panels on it, as well as create a place to relax.
- Such a structure can be covered with any of the existing roofing materials, of course, taking into account the conditions of its operation and the angle of inclination.
Snow guard
Naturally, like any structure, a pitched roof has its drawbacks, which you also need to know when choosing this option:
- A roof with one slope requires more serious insulation than a gable roof, since there is not such a large space under it that creates an air gap. Without reliable thermal insulation, the attic space will become very hot in the summer months and cool down in the winter months, in both cases transferring the temperature into the house. However, if you correctly calculate and install all the elements, this drawback can be avoided.
- If the ceiling is made immediately under the roof, arranged at a small angle, then the house loses not only the upper air gap, but also the attic, and therefore the opportunity to arrange an additional room - this can be considered the second design flaw. But, if the attic space is planned a little differently, then this drawback can be overcome.
One of the disadvantages of a pitched roof is the accumulation of snow masses on it.
Another disadvantage of a pitched roof applies only to a structure that has a slight slope of 5-10º - this is poor shedding of snow masses from it. So, if there is a large accumulation of snow, the roof will have to be cleared manually or a heated roof system can be made using a heating cable.
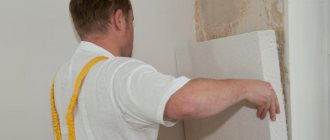
The vapor barrier is broken
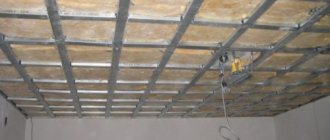
The vapor barrier film is fixed to the rafters with strips.
However, here we see that the slats are shifted relative to each other by almost 4 cm. We can only guess what the film is attached to. In addition, the panels sag, which means that after filing the ceiling there will be no gap left between the plasterboard and the vapor barrier, which will subsequently negatively affect the condition of the finish. In addition, the junction of the vapor barrier to the wall is not sealed. If the joint is not taped with self-adhesive tape in the near future, the insulation will fill with moisture and stop working.
Initial situation: ondulin roof, under the sheathing and counter-lattice (about 8 cm in total) on rafters 15 cm high. Izospan AM is attached. The roof has several small slopes and mainly a ceiling, above which there will be a cold attic. The house is made of timber, has stood for more than a year and initially the roof was not insulated. Now I am starting the process of insulating myself (for the pitched roof I will use Izover KL-37, for the attic Izover KT-40 Twin, vapor barrier - all this has already been purchased). A few questions: 1. Is it necessary to insulate the overhangs in the pitched and flat parts of the roof? (The overhangs on the outside are sheathed loosely (for ventilation) with clapboard, and between the last crown of the timber and Izospan AM there are now holes at the height of the rafters and the question is whether these holes need to be closed - for the slopes they will be closed automatically with insulation, you need Is it possible to do this for the flat part of the roof, i.e. leave ventilation of the attic space or not?). 2. It so happened that in the flat part of the roof there are quite long and wide areas between the joists (boards 5 cm by 15 cm), where it is supposed to lay 15 cm. Izover KT-40. I am not sure that the vapor barrier film will hold all this without severe sagging. What can be done in this situation (without adding additional logs) so that the insulation lies horizontally, without sagging? (In particular Is it possible to first sheathe the bottom logs with, for example, hardboard (it’s just already available), put insulation between the logs on the hardboard, and then when the finishing is done in about six months (no one lives in the house now, but there is heating) attach a vapor barrier film to the bottom of the hardboard and then - through the gap, the inner lining or vapor barrier should come into contact only with the insulation?) Sincerely, Vladimir
Why insulate a flat roof?
Having dealt with the main issues, let us summarize the need to carry out this rather complex and expensive work. As mentioned above, this design is used mainly for non-residential buildings or similar apartment buildings. In private housing construction there is no need for it. Not only does such a structure weigh more than a classic pitched one, but it also poses difficulties with water drainage. Its only advantage is the low cost of polymer-bitumen roll materials, but this is offset by expensive insulation.
So, why do you need thermal insulation for a flat roof:
- Retaining heat in winter and maintaining a comfortable temperature in summer, this is especially true if there is no technical floor
- Savings on heating and air conditioning, as a consequence of the previous point
- Multi-layer coating virtually eliminates leaks
- Elimination of condensation accumulation and, as a consequence, extension of the service life of the roofing covering
The need to insulate a shed
Any poultry farmer knows: poultry lays eggs only at positive temperatures. The optimal winter maintenance regime is considered to be +12 +15 o C. Large dairy animals: cows and goats maintain productivity up to +5 + 7 o C, but milk yield drops significantly, since the animal spends most of its energy on its own heating. This means that when severe frosts occur in a drafty, cracked plank barn, the bird may simply freeze, and large animals run the risk of getting sick.
Insulating your barn early will help keep your animals and poultry healthy and productive, and therefore economically viable, all year round. In addition, a well-insulated building saves not only heat in winter, but also coolness in summer, helping animals endure periods of summer heat.
Types of additional elements
Additional elements play a significant role in roofing equipment, so they should not be neglected. Elements for gutters, strips, weather vanes, elements for retaining snow must be installed in order to maintain the functionality of the roof.
Thus, the installation of a pitched roof can be done with your own hands quite efficiently.
You should not omit such indicators as the direction of the wind in the region, the amount of precipitation when calculating the design of the structure, since the frame bears the main load of the roof. In addition, you should not skimp on components.
Additional elements
Conclusion
Insulating a shed is not that difficult, and the costs can be minimal, although it is better to spend a little more and get better results. The video in this article will help you understand some of the nuances even better, and if you have questions, write them in the comments under the review.
Did you like the article? Subscribe to our Yandex.Zen channel
September 6, 2016
Buildings, Thermal insulation
If you want to express gratitude, add a clarification or objection, or ask the author something, add a comment or say thank you!
Advantages and disadvantages of pitched roofs
The advantages of roofs with one slope include:
Simple design
In the process of drawing up the project, only a few points need to be taken into account: in the case of a large area of the slope, the snow load will be increased; a roof with one slope is not afraid of wind loads, but it is important to ensure that the roof plane is directed towards the wind. Loads from snow and wind can be compensated by increasing the angle of inclination and strengthening the rafter system
Economical. Compared to a simple gable roof, it will require approximately 2 times less wood and time to complete construction work. Simplicity. You can build a structure without special knowledge, skills and large equipment. All parts are lightweight and can be moved and stacked manually. The support belt is fixed to walls of various heights, and the rafters are mounted on the mauerlat. If necessary, auxiliary supports can be installed vertically on the base. They should be tied with timber. In this case, the rafter legs must be installed at a higher level. High space utilization rate. The top floor will be 100% used. Here you can arrange a balcony and large windows from floor to ceiling.
There are no significant disadvantages to roofs with one slope. There are only a few features that distinguish this type of roofing device from others:
- specific appearance. Not everyone will like a lonely tall building with a pitched roof, but if you design the house correctly and fit it into the existing design of the site, then this disadvantage can be turned into an advantage: a combined roof of several slopes at different levels will be a worthy competitor to a hip roof. In this case, the roof covering is of particular importance. For example, ondulin can decorate and emphasize the curves of a lean-to building, and corrugated sheeting will make the building look like a barn;
- low attic height. But you don’t have to arrange it, everything will depend on the project. For example, in a sleeping room the ceiling should be low, but in the hall and games room - vice versa. Consequently, buildings with a single slope allow you to save money on construction work.
Video description
About diffuse vapor and waterproofing in the following video:
- A two-layer anti-condensation film is spread with the smooth side facing the insulation, and the rough side facing the source of warm, humid air, the living quarters.
- The foil film is laid with a metal layer to the living spaces - this way it can return some of the heat inside, increasing the thermal efficiency of the building.
- Diffusion double-sided membranes provide the roofing pie with the ability to “breathe”. If both surfaces of the membrane are identical, it is laid on either side. If you have chosen a one-sided membrane, it is better to check the data on the front and back surfaces with the manufacturer (in most cases, the membrane is adjacent to the thermal insulation with a rough surface).
Laying a vapor barrier in a roof with steep slopes Source bostonglobe.com
Insulation for roofing
You need to start understanding the insulation of pitched roofs with thermal insulation materials. They are presented in a fairly wide range on the market, but only four are used for roofs:
- mineral wool slabs are mineral wool pressed into mats;
- polystyrene foam boards;
- polyurethane foam;
- ecowool.
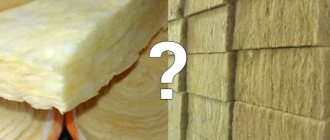
Which insulation to choose
Mineral wool boards
This is a material made from rocks that are heated, melted and drawn into threads. The latter are in a chaotic state in the material itself.
Regarding technical characteristics:
- thermal conductivity – 0.042 W/m K;
- density – from 50 to 200 kg/m3;
- 100% environmentally friendly;
- ease of installation by hand;
- service life 50 years;
- flammability class - NG (non-flammable).
Mineral wool mats
Expanded polystyrene boards
This is foamed polystyrene, whose structure is closed balls filled with air. In this case, air occupies 90% of the volume, which reduces the weight of the insulation and its thermal conductivity.
Specifications:
- thermal conductivity – 0.034-0.044 W/m K;
- density – 25-45 kg/m3;
- flammability class - G3 (burns and supports combustion);
- environmental friendliness is high;
- installation method – manual;
- service life – 20 years.
It should be noted that the higher the density of the insulation, the higher its thermal conductivity.
Foamed polystyrene boards
Polyurethane foam
This is a foamed mass that hardens in air, turning into a durable, seamless coating. Essentially, this is polyurethane foam, only modified. The insulation of this type itself is a two-component material. Its ingredients are mixed in a special container and supplied under pressure through a hose and nozzle to the insulated surfaces.
Specifications:
- thermal conductivity – 0.019-0.028 W/m K;
- density – 55 kg/m3;
- flammability class - G2;
- service life – 80 years;
- environmental friendliness is high;
- installation method - special equipment is required.
Polyurethane foam is applied to the attic roof
Ecowool
This insulation is pure cellulose made from wood. Looks like cotton wool. Here are its characteristics:
- thermal conductivity – 0.038 W/m K;
- density – 40-45 kg/m3;
- flammability class – G1 (low flammability);
- service life – 100 years;
- installation method - using equipment;
- environmental friendliness - 100%.
Ecowool - 100% natural insulation
Comparative analysis
It is incorrect to do such an analysis of insulation for roofs (various pitched roofs). Each material has its own pros and cons. In addition, the price is different, and the installation method varies greatly. For example, polyurethane foam is better than others in its thermal characteristics. But it cannot be applied to the roof without special equipment. And this increases its already high price.
In this regard, mineral wool and polystyrene foam boards are the best option. They are easier to install and inexpensive. But their service life is short.
Price comparison:
| Type of insulation | Mineral wool | Expanded polystyrene boards | Polyurethane foam | Ecowool |
| price, rub. | 50-100 per 1 m2 | 250-300 per 1 m2 | 1500 rub. per 1 m2 thickness 50 mm | 2200-2700 rub. for 1 m3 |
And one more criterion by which insulation can be compared is the thickness of the layer being laid. Here are the positions:
- mineral wool – 214 mm;
- foamed polystyrene – 120-150 mm;
- foamed polyurethane – 50-100 mm;
- ecowool – 150-200 mm.
Comparison of building materials by thickness and thermal characteristics
Heating system installation
Most modern poultry farmers prefer electric heaters as the safest and most affordable. You can install them yourself without any special skills. They can heat a room of any size.
Infrared lamp
Infrared lamps (IR lamps) are highly efficient, converting energy into heat. They do not pollute the air in the chicken coop; after switching on, they quickly warm up the area they are aimed at.
The disadvantages of lamps include their high cost and short operating period.
For additional heating of a thoroughly insulated chicken coop with an area of 30 square meters. m and a ceiling height of 200–240 cm, it is enough to install 2 IR lamps, each with a power of 250 W. Lamps are suspended from the ceiling, placing them in those areas of the house where maximum heat is required (for example, above nests, perches or a cage with chickens).
IR lamps should be equipped with a thermostat or dimmer (power regulator) in order to avoid overheating of the room.
Important! When installing an IR lamp, you must remember that it itself gets very hot. It is hung from the wooden ceiling not close, but at a distance of 30–50 cm
Or they protect the attachment point with asbestos plate. It is better to take ceramic lamp sockets.
Heater
An IR heater is mounted like an IR lamp (Cozy Warmth, Good Warmth). Its heating area is larger than that of a lamp. It is more reliably protected from overheating. Only ceiling models should be installed in the poultry house so that chickens do not have the opportunity to come into contact with the unit. The cost of an IR heater starts from 2700 rubles.
A popular way to heat a chicken coop is to install a household fan heater or heat gun inside. Not the most economical option, spending up to 1 kW of electricity per hour, but suitable for quickly warming up a room. The fan built into the heater quickly moves air around the room, mixing cold and warm layers. The fan heater has the ability to dry the air.
The unit is installed on the floor or attached to the wall so as to prevent birds from accessing the heater. It is necessary to regularly clean it from dust and feathers, which often accumulate inside the unit.
Comfortable microclimate parameters
Gost standards are largely intended for designers, housing and communal services and judicial procedural departments, since they establish mandatory temperatures for residential premises.
A microclimate is considered comfortable if it allows the human body to maintain a temperature of 36.6 degrees without complications. The “tabular” resulting range will allow you to maintain this body temperature, provided that the body is insulated in winter and water is consumed in summer
However, the full formation of a home microclimate requires attention to the recommendations of experienced doctors and psychologists, and to the individual preferences of household members.
Bedroom. The human body needs sleep not only because of fatigue during the period of wakefulness - to produce the hormone melatonin, which controls the biorhythms of our bodies.
The lack of acceptable conditions for sleep and, accordingly, the hormonal activation of melatonin results in insomnia and a “broken” state - general weakness and headache, slowing down the mental functions of the brain.
For proper rest of adult household members, the temperature in their bedrooms should be maintained in the range of +17°С…+18°С, i.e. The “sleeping” microclimate should be cooler than other living spaces. It is more difficult to fall asleep in a warmer or cooler atmosphere.
Children's room. Its optimal temperature is determined by the age of the child. For a baby, the best is +23°C...+24°C, since the baby’s body is not capable of “adult” thermoregulation. For children over 3 years old, the room temperature will be +21°С…+22°С.
Kitchen room. The operation of household equipment from the usual kitchen set - stove, oven, electric kettle, microwave, hood, etc. - is always accompanied by heat generation. Accordingly, when preparing food, the kitchen atmosphere becomes warmer than in other rooms.
Given the traditionally small size of the kitchen, the heat radiation from kitchen appliances warms it up quite quickly. Therefore, it is enough to maintain the temperature of this room in the range of 18-19°C.
Electric floor heating systems reach maximum heating faster and maintain temperature more accurately than circuits with liquid coolant. And you can’t flood your neighbors with them
Bathroom. Bathing procedures are accompanied by intense saturation of the bathroom atmosphere with moisture, which is why the microclimate of a room with a temperature outside the range of 24-26°C will be uncomfortable.
For other rooms and corridors, the comfortable temperature will be 18-22°C. Temperature differences between apartment rooms should not be more than 2-3 degrees,
In winter, less heat is required, in summer - more. Otherwise, the temperature imbalance between the external environment (street) and living quarters will be stressful for the body.
A sharp change in the temperature of the surrounding space when going outside from the microclimate of the apartment may be followed by hypothermia or overheating of the body, which, as discussed above, is equally bad.
The optimal difference in atmospheric temperatures between the house and the street during the transition between them is 4-5°C. Therefore, you should not overheat the apartment in winter or overcool in summer.
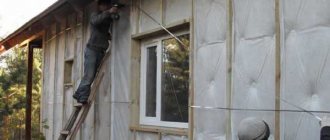
How to insulate a shed from the outside step by step
External insulation is the first stage of arranging a capital building for winter housing of animals (Figure 1).
Note: In such a barn you can keep any domestic animals and birds, from chickens and quails to rabbits and goats.
Insulation of the shed from the outside is carried out as follows:
It often happens that after the external insulation is completed, the barn becomes warm enough that no internal work is required. But, if the temperature in the room has not reached the required levels, the barn is additionally insulated inside.
Recommendations for choosing material
Each group of insulating materials has its own advantages and disadvantages, which in one way or another limit the scope of application. Therefore, you need to choose insulation taking into account the conditions and location of use. For example, it is prohibited to use flammable materials in wooden buildings. Below are the basic principles for choosing insulation for different surfaces.
Which insulation to choose
Table. The choice of thermal insulation for different coatings.
| Insulated place | Material selection |
| Reinforced concrete ceilings | It is best to insulate the outside with polymer materials. As an alternative, you can use Penoplex, but provided that the technology is followed correctly. |
| Concrete monolith | As a rule, polystyrene foam or polystyrene foam is used for their insulation. It is necessary to insulate a private house from the roof side. |
| Ceilings of attic rooms | It is not recommended to use glass wool as insulation in attic spaces. Basalt fiber is excellent for this purpose. |
| Ceilings in bathhouses | For steam rooms and baths, it is better to use environmentally friendly insulation materials, such as gravel, sawdust or expanded clay. Many people also use natural moss. |
| Wooden floors | For thermal insulation, it is better to use a mixture of sawdust and clay, expanded clay or basalt wool. Insulation should be carried out from the roof side. |
The ceiling in the bathhouse requires insulation
Let's sum it up
One of the most important criteria for the effectiveness of thermal insulation is its proper installation. Most of the thermal energy losses of all kinds of buildings and structures occur through the roof, so it is necessary to address the issue of its thermal insulation first of all. Otherwise, if technological requirements are violated during work, the roofing itself may deteriorate during operation, which will lead to its dismantling and huge financial costs.
Shed roof - the main nuances of construction
Roofs with one slope are used mainly in the construction of outbuildings: garages, sheds, domestic buildings. The advantages of a pitched roof are simplicity of calculations, uncomplicated installation, low cost of materials, resistance to wind loads, the possibility of self-construction, and maintainability.
The design of a pitched roof includes two mauerlats and rafter legs. If the spans are large, then it is necessary to add additional elements that increase the load-bearing capacity of the roof, which strengthen the rafter system: struts, racks, contractions, purlins, and beams.
When calculating the cross-section for erecting a pitched roof in a private house, you need to take into account the weight of the roof, wind and snow loads. On average, the following recommendations should be followed:
- For a span length of less than 4.5 meters, we use solid rafters made from logs with a diameter of 120-180 mm and boards cut from them, timber with a cross-section of 100x100 mm.
- If the span length is in the range from 4 to 6 meters, for the rafters we use logs with a diameter of 180-200 mm and hewn plates, and timber with a section of 150x150 mm. Sometimes you can get by with a standard six-meter length of timber. With a significant angle of inclination and a span length of about 6 meters, we join the rafter legs along the length. We use struts as additional fastening.
- If the spans exceed 6 meters, we make intermediate racks on which the load will fall, thus reducing the sagging of the beam. In this case, we carry out the calculation taking into account the intermediate supports. For rafters we take material of the same cross-section as for spans up to 6 meters. In this case, we extend the rafters along the length.
The following beam parameters are recommended: for a mauerlat with a side of 180-200 mm, for supports with a cross-section of 80x80 cm.
The distance between the rafters depends on the load on the roof, the presence of roof windows, and the heat insulator used. We divide the slope on which the rafter will rest into equal parts so that there is an equal pitch between the rafters. The longer the spans, the smaller the step between the rafters. The following pitch values are recommended for insulation:
- mineral wool – 58 cm;
- extruded polystyrene foam and polystyrene foam – 60 cm;
- For polyurethane foam, the step is not important.
The angle of inclination of the roof slope depends on the roofing material. The higher the angle of inclination, the lower the likelihood of leaks. For bitumen shingles, the optimal tilt angle will be 20-45 degrees, for ceramic shingles - 30-45 degrees, for metal shingles - 20-45 degrees, for slate - 6-27 degrees, for galvanized sheets - from 14 degrees.
Heating
There are times when thermal insulation alone is not enough to maintain a comfortable temperature, especially when there is bitter frost outside. As a rule, in such situations, suitable materials are purchased for the purpose of additional insulation of the building. They can be installed on walls, floors and ceilings
In addition, it is very important to remember to insulate the window structures and the entrance to the chicken coop. Otherwise, cold air will penetrate into the building through the remaining cracks.
For windows, it is best to use special masking tape. As for door cracks, you can get by using polyurethane foam, as well as insulating the door leaf itself.
In addition, for the purpose of additional heating, fairly powerful incandescent lamps are often installed in chicken coops. It is permissible to install special heat fans. Such products can be programmable, and they are what experts recommend for purchase because they are very easy to use. They may have time and temperature adjustments.
A good solution for heating a chicken coop is infrared lamps. Such products do not affect the surrounding air, but rather objects that fall within the range of their rays. Infrared lamps must be installed correctly, for example, above perches, as well as above the floor. But you need to take into account that if you turn them on and off frequently, these bulbs burn out quite quickly and require replacement.
Rafter dimensions
The minimum rafter size for the roof of a house should be 50x150 mm (40x150 mm), usually 50x200 mm rafters are used. For large roof spans, rafters of 50x250 mm or double rafters can be used, that is, two boards are connected together with nails. It is also possible to use bars with dimensions of 100x150 mm. To know exactly what size rafters you need to perform a calculation. To do this, the entire load (see above) that acts on the rafter is collected and the required cross-section is calculated.
If you don’t want to do the calculations, then you can use the tabular values, at least this is better than taking the dimensions at random.
How to insulate a shed for almost nothing - a description of the simplest way to carry out the work
In this article I will tell you how to insulate a shed from boards with minimal cost. This technique has been used for hundreds of years and has proven its effectiveness even in harsh regions. I am sure that this option is available to anyone, and to implement it, you need a minimum set of materials and devices, which is important, because no one wants to spend significant money on a shed.
In the photo: a barn for animals and poultry must be insulated
Thermal insulation technology for hipped roofs
The process of insulating a hipped or hipped roof is no different from the thermal insulation of a gable roof. These are all the same stingrays, only there are not two, but four. The volume of work being done is simply increasing.
The only negative point regarding slab heat insulators is the large amount of waste they generate. It's all about the shape of the stingrays. For a hip roof it is trapezoidal and triangular, for a hip roof it is only triangular. This means that in places where the structure narrows, the thermal insulation materials will have to be cut.
This does not apply to polyurethane foam and ecowool. Here the consumption does not change, and it corresponds to the area of the insulated pitched areas.
Generalization
Building a barn for keeping poultry is the most important point. The dimensions of the building will depend on the number and breed of birds. For example, to keep broilers even in the countryside, it is necessary to allocate a fairly large area for them, because the birds have a large build and already weigh about 3 kg at 2-3 months. For such representatives, the recommended stocking density is no more than one bird per 1 square meter. m. In a summer cottage, you can use an old barn that was left over from other animals, properly converting it to meet the needs of poultry. To set up a winter poultry house, you need to take care of insulation. The shed needs to be insulated on all sides:
- the walls are covered with metal sheets with foam panels laid in them;
- the floor can be insulated using corrugated sheeting;
- the ceiling is insulated with felt.
The inside of poultry houses should be equipped with a simple ventilation system, access to the walking area, perches where the birds have sweet dreams, as well as feeders and drinkers. For feeding, it is better to prefer automatic designs
They allow you to save maximum time and ensure constant access to feed, which is very important when keeping broilers that must eat to their heart's content
After birth, chickens are kept in separate warm rooms or a brooder is built - a special warm container with an infrared lamp for heating and round-the-clock illumination; details can be found in many photos on the Internet. Some novice poultry farmers try to replace the structure with a cardboard box, but it is better when the chickens and chicks are in the barn. This method is only suitable as a temporary brooder; if you plan to raise poultry in the future, you will have to build a real house for chickens.
Materials and tools
Required for work:
- insulation that meets the requirements;
- vapor barrier;
- waterproofing;
- construction buttons, nails;
- tools (carpentry);
- adhesive tape.
Work order
As a rule, a pitch of approximately 60 cm is maintained between wooden rafters, since the standard width of insulation in mats or rolls is 61 cm. The purpose of the technological margin is to fit the sheet tightly into the free space between the beams and prevent the formation of gaps.
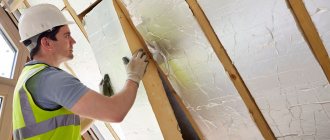
- First, a vapor barrier layer is fixed on the inside between the rafters. To do this, use construction buttons or brackets.
- The vapor barrier layers must be completely sealed. For this purpose, all joints must be glued using adhesive tape. From the inside, the vapor barrier layer is completely protected by any type of finishing: fiberboard, clapboard, finishing panels, plasterboard.
- On the outside, insulating material (mineral wool, fiberglass, etc.) is laid at least 15 cm thick. If the material needs to be cut, a special construction knife is used for this. During installation, it is necessary to ensure that the joints of the material fit very tightly.
- The edges of the layer of thermal insulation material and the vertical surface of the outer part of the walls must coincide. To limit the insulation, a board is used: it must be nailed between the rafters. To protect the insulation on all sides, the top edge of the board should be flush with the rafters.
Ventilation gap device
The first thing that had to be done during installation was to ensure a constant ventilated gap between the roofing material and the membrane, which is 20 mm. The easiest way to maintain the accuracy of the gap is to use 20 mm wide slats, which are nailed to the sides of the rafters close to the sheathing.
This is what the roof slope looked like from the inside before the insulation work began: Internal view of the roof slope before the insulation work began
I sawed the slats from scraps of boards left over from the construction site. The length turned out to be approximately 30-60 cm. I placed 2-3 2x30 nails in each rail so that their sharp ends did not protrude from the reverse side. And he quickly nailed the slats to the sides of the rafters.
Rail that determines the size of the ventilated gap: Rail that determines the size of the ventilated gap
Where the rafters were attached to the studs, nailing battens was not possible. So I:
- unfastened each post from the rafters,
- shortened by about 45 mm from the sheathing parallel to the rafters,
- I fixed the post in its previous position with a clamp and attached it back to the rafter with a screw.
On the right you can see a stand installed by the builders and preventing the membrane from being attached. On the left is the stand after shortening:
On the right you can see a stand installed by the builders and preventing the membrane from being attached. On the left - the stand after shortening
Trimming the stand with a jigsaw:
Trimming the stand with a jigsaw
Fixing the stand position:
Fixing the stand position
Then he proceeded to install the windproof, vapor-permeable membrane type A:
- First, I cut out a piece of windproof membrane 50 mm wider than the distance between the joists and 200 mm high.
- Then I attached the membrane with the same slats to the sides of the joists, and at the bottom to the wall beam. I haven’t secured the membrane at the top yet - it just lay adjacent to the longitudinal beam connecting the logs. So I nailed the slats to all the rafters on this side of the roof.
- Then he began to secure the membrane between the rafters. Since the distance between them is different, I measured the width of the canvas each time and cut it 50-60 mm more. The membrane was pressed with the same slats, but the driving step was reduced in order to press the membrane tightly to the rafters. I already hammered 3-4 nails into the slats for strength. The edge of the stretched fabric protrudes from the edge of the rail by the same amount.
- The next stage is to increase the width of the rafters. In my case, this operation turned out to be forced, because the original width of the rafters was not enough to lay the required number of heat-insulating boards. I bought 140x20 mm boards, 3 m long, from the building materials market. Using a circular saw, I cut them in half lengthwise and got boards about 70 mm wide. These boards were attached with screws at the bottom to the rack, and at the top to the ceiling board. Then these boards were additionally secured with wooden overlays: at the bottom of the rafters and in two places between the rack and the ceiling board. So I increased the width of all the rafters.