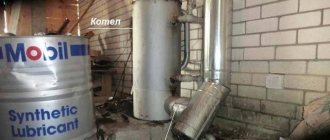
The idea of using used machine oil as burner fuel is not new. There are many different schemes for making such a device on the Internet. And the popularity of such products is only growing. This is understandable, because such a device will be very useful in everyday life, heating a country house or utility room.
In addition, it has a number of advantages:
- Most of the proposed schemes are simple , and anyone with a minimum of necessary skills and tools can assemble it.
- The fuel for this burner is very affordable. It can mainly be found in auto repair shops, where there is simply an overabundance of it. Thus, used oil can be obtained for free or for a minimal amount.
- The question of recycling used oil often arises , and such a burner will help to dispose of it without harming the environment.
- This device is multifunctional and can be used as a regular burner or an oil heating system.
- Such a device, as a rule, is mobile , as it is light in weight and size.
- This burner is universal in the type of fuel used. In fact, it can operate on any combustible fuel, be it used engine oil, gasoline, kerosene or any other.
Among the many schemes, one is the most interesting in terms of simplicity, functionality and unpretentiousness. This miracle unit is called a Babington burner. It is named after its creator and its device was unavailable for a long time due to a patent. But the patent has expired and now anyone can bring the scheme to life.
The principle of its operation is very simple and includes the following stages and parts:
- Preheated fuel falls on the sphere, spreading over it evenly, forming a thin film.
- A compressor is connected to the sphere itself , pumping air. A very small hole is made in the sphere, with a diameter of 0.1-0.3 mm. Air under pressure exits the sphere through this hole. Passing through the fuel, the air disperses it, forming something like an aerosol.
- Next, this jet is ignited and a burning torch is obtained.
- The rest of the unused waste flows into the settling tank and can be reused.
- In order for unused waste oil to automatically flow back to the sphere, it is necessary to connect a pump to the system, which will supply fuel from the sump.
Preheating the fuel solves 2 problems at once:
- Increased fluidity. The heated waste oil spreads better over the surface of the sphere and is atomized much more easily by the supplied air.
- Facilitates the process of igniting the torch. At the same time, it is not only easier to launch the device, so to speak, but the efficiency also increases.
The advantages of this scheme include:
- Versatility in fuel use. Such a burner is practically independent of the degree of contamination of the liquid energy carrier.
- No filtering required. Due to the fact that there are no narrow passages in the system, except for the air hole, it does not require filtration, unlike factory analogues.
A serious disadvantage of such a burner is that even if it is made almost hermetically and the entire process is controlled automatically, the room will still be polluted.
DIY waste oil burner - manufacturing features
The easiest way to make a burner is using a small gas cylinder or a blowtorch. To work you need to prepare:
- the above container;
- welding machine;
- grinder;
- a piece of 1.5-inch pipe;
- a round plate equal to the inner diameter of the pipe;
- a piece of wire 6 - 8 mm;
- bolt with a through internal hole for the oil supply nozzle;
- a thick round blank for the lid.
Beginning of work
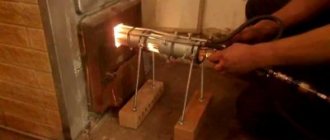
- Two holes are drilled tangentially in the cylinder: from the bottom (for the mixture of air and oil to enter), and from the top for the flame to exit. Tubes with a diameter of 1.5 inches are welded. One is a continuation of the other, only a little higher; so that the fire swirls inside and does not immediately fly out into the street.
- An ignition hatch is made on top and equipped with a heavy lid so that it does not open during operation due to the pressure of incoming air.
Waste oil is a cheap fuel and for some types of premises it makes sense to install waste oil furnaces. , pros and cons of use.
You will find instructions for making a heat pump for heating a house.
Was steam heating once widely used in our country? Why has it lost its relevance now? In this article you will find the answer to this question and learn how steam heating of a private house works.
Air flow control
The pressure and amount of air supplied for combustion is regulated by a homemade damper (it is made according to the throttle principle, like in a carburetor).
The flap is installed in the supply pipe upstream of the fuel injector as follows:
- A hole for the rotary axis is drilled strictly according to the diameter of the existing workpiece.
- A round plate is cut along the inner diameter of the pipe, which in the closed position can completely block the hole.
- A rotary axis is made in the shape of the letter “L” and a damper is mounted on it with small bolts.
- In front of the damper, a hole is drilled or a slot is cut in the supply pipe to remove “excess” air (in case there is a lot of it for the burner).
The principle of feeding waste into the burner itself
To supply oil, a diffuser is installed in the intake pipe immediately behind the damper. The diffuser is a chiseled ring insert that slightly narrows the flow area. Thanks to it, a vacuum is created and oil (or other liquid fuel) flows through the nozzle and mixes with air.
It is preferable to use metal pipes for the supply pipeline
. A freon tank is well suited for the fuel tank, and the needle valve allows you to precisely regulate the oil supply.
Simple homemade burner
The oil must be separated from water and filtered.
Principle of operation
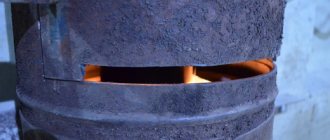
The fuel is supplied by gravity to the nozzle and is sucked in by air passing through the diffuser. The resulting mixture ignites inside the cylinder, and the torch is blown outside. Thus, the source of heat is the burner itself (heats up to a crimson glow) and the torch.
The flame can even be used to melt some metals such as copper, aluminum and others that have a lower melting point.
Principle of operation
By the way, how does it all work? After all, if you pour used oil into a regular furnace, it will all end in a fire!
In many ways, the principle of operation of the described devices is similar to that of the familiar blowtorch. The oven is made of two containers, which communicate thanks to a pipe for air supply.
In this case, the oil itself is poured into the lower compartment. There it heats up and begins to evaporate. These vapors enter the air exchange pipe, where they ignite. The burning oil-air mixture passes into the second tank (afterburner). There it finally burns out, and all the remaining gases and metal particles (of which there are many in oil) go down the chimney.
Types of Russian-made waste oil burners
During the cold season, not only residential but also auxiliary premises need heating. Currently, devices using different types of fuel are used for heating, including waste or waste technical oil. On the Russian market you can find devices that process different fuel bases, as well as having a narrow specialization. Based on the type of fuel burned, such devices are:
In terms of functionality, burners used for testing are not only heating, but also welding and lighting
- gas;
- liquid fuel;
- combined.
The simplest and most economical device for heating a room is considered to be an exhaust burner. According to functionality, burners are divided into 3 subtypes:
- welding;
- lighting;
- heating.
The operating principle of these devices was borrowed from primitive kerosene gas back in the 50s. Quite quickly, the simplest burners became popular; they began to be purchased for heating country houses and garages. In those days, any fuel was inexpensive, but over time, zealous owners, inventors and innovators began to look for a replacement for gasoline, diesel fuel and kerosene. Fuel oil and waste oil were used, which are now used as full-fledged fuel. Today, the device is still relevant, and is also an excellent way to preserve the environment.
By type, burners for processing are liquid fuel, gas and combined
Why choose a Babington burner
Used oil is difficult to dispose of; some organizations do not know how to get rid of it. Meanwhile, it is an excellent energy carrier, with an average calorific value of 1 kW / liter, i.e. at the level of diesel fuel and gasoline. Drowning with mining, if you get it for free, is extremely profitable. How much money is spent on heating a private house?... It is enough to extract 5 tons of shareware mining and... But the problem of burning it remains.
- The advantage is that the Babington burner can operate on the most contaminated types of liquid fuel. The quality may change even during the direct combustion process, and the energy output may decrease, but the operation of the device remains stable.
- The second advantage is that the composition of the fuel mixture is not regulated. In a normal design, combustion always occurs with an excess of air (oxygen), everything that can ignite burns out.
- Maintenance of the combustion zone is extremely simple or not required, i.e. the burner or nozzle does not fail due to exposure to flame - the equipment is relatively reliable.
How is this achieved in the design?
Advantages and disadvantages
The main advantage due to which the homemade burner at the Babington mine has gained wide popularity is its omnivorous nature, as mentioned above. In fact, you can pour any heated oil of a reasonable degree of contamination onto a spherical surface, and a properly made burner will still operate stably. It is not afraid of gasoline or antifreeze impurities, unless their ratio with oil is one to one, then problems will inevitably arise. And then, this is not at all a reason to get rid of such a mixture; for the burner to function normally using waste oil, it will need to be well diluted with the “correct” treatment, and then put into use.
Another advantage is the simplicity of the design, which is why craftsmen quickly mastered this product. Indeed, making the “heart” of the device from a ball or hemisphere placed in a body is quite simple. It is somewhat more difficult to organize the fuel supply and air injection, and even to configure the entire system so that the DIY Babington burner operates stably and safely. But there is wide scope for the implementation of various technical solutions.
Of the serious shortcomings of the unit, only one is striking. This is the constant presence of dirt in the room where the liquid fuel burner operates. Unfortunately, it is impossible to completely eliminate accidental spills or seepage of contaminated machine oil through leaks, even if all connections are sealed and an automatic Babington burner is installed. To one degree or another, the room will be dirty, you will have to come to terms with it.
Due to its popularity and simplicity, the burner for the waste boiler is made by craftsmen in different variations, but we will undertake to describe the simplest design, which will be available for repetition at home. First you need to select the necessary materials, here is their list:
- Steel tee with internal threads with a diameter of 50 mm - for the body.
- Squeegee with external thread with a diameter of 50 mm - for the nozzle. Its length is optional, but not less than 100 mm for the nozzle.
- Metal elbow DN10 with external threads - for connecting the fuel line.
- Copper tube DU10 of the required length, but not less than 1 m - to the fuel line.
- A metal ball or hemisphere that fits freely into the tee is for the working part.
- A steel tube of at least DN10 is used to connect the air duct.
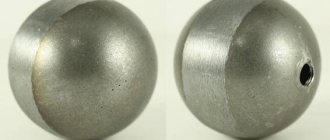
To make a burner for testing with your own hands, you need to perform one precise operation - make a hole in the center of the sphere. The hole diameter is from 0.1 to 0.4 mm, ideally 0.25 mm. It can be done in 2 ways: drill with a tool of the appropriate diameter or install a ready-made jet at 0.25 mm.
It is not easy to accurately make such a small hole; thin drills easily break. Instructions on how to do this correctly are shown below:
Another way to make a calibrated hole in the spherical part of an autonomous burner is to insert a nozzle of the required diameter there. To do this, a hole is drilled, the diameter of which is slightly less than the outer diameter of the nozzle, and processed with a reamer. The jet is pressed inside and polished, as described in the video:
When this operation is completed, we assemble the burner based on the drawing:
A hole must be made on the side of the nozzle wide enough to ignite the unit. A large fuel heating spiral is not needed, 2-3 turns are enough. The finished product can be mounted on a mounting plate and built into any boiler, including a homemade one. At the end of the work, you need to connect the air and fuel lines, and then organize the supply of oil and air. The simplest method of fuel supply is by gravity; for this purpose, the waste container is suspended from the wall above the burner device and a tube is laid from it.
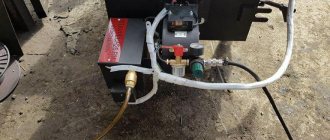
If you use a pump to pump oil, you can subsequently use control sensors and a control unit, then you will have an automatic burner that will be safer to operate. Detailed instructions for selecting materials and assembling the device are shown in the video:
If everything is done correctly and the diameter of the air hole is 0.25 mm, then the fuel consumption of the burner should not exceed 1 liter per hour. There should be no black soot during combustion; you need to achieve even burning of the torch. The adjustment is carried out by moving the sphere back and forth or changing the air pressure. Any compressor can cope with its injection, even from a refrigerator, since the operating pressure does not exceed 4 Bar.
Video on the topic
The idea of using waste oil as an energy carrier to heat buildings is not new. Due to the large amount of waste at vehicle service stations, especially trucks, a problem arose with its disposal. It is not surprising that various units, both factory-made and home-made, have appeared that make it possible to effectively burn this substance and receive thermal energy from it. One of such devices is a Babington waste oil burner, we will look at it in this material, and also tell you how you can make it yourself.
Fuel used
We have already figured out a little about how the Babington burner works and what it consists of. Drawings suitable for developing the unit can be found in this article. But it is necessary to understand that, regardless of the design and what materials this heating equipment was made of, it is prohibited to use fuels such as gasoline, methanol and other evaporating types of fuel.
Thanks to efficient atomization, it is rational to use heavy fuels. These include various oils, such as biodiesel, kerosene, diesel, motor and transmission oil. In any case, any of these flammable substances will do. As for heat transfer, it depends on the quality of the fuel. Of course, the amount of heat generated can be significantly increased by increasing fuel consumption. To do this, an additional hole of small diameter is drilled. But more on that later.
Characteristics of furnaces
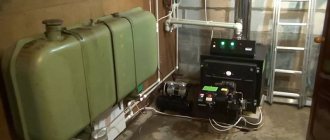
A waste oil stove is good because it can operate on the lowest quality and cheapest fuel. In this regard, lucky are those who work as a car repairman in their own garage - by doing routine engine oil changes, you can extract waste in almost unlimited quantities. The oil furnace itself is distinguished by its low cost, because it can be assembled from the remains of old iron.
Used oil is a very cheap type of fuel, and for auto repair shops it is completely free.
An oil stove burns fuel in the safest possible way. If you set fire to used oil poured into any container, it will fume and smoke, giving rise to hellish aromas and filling heated rooms with acrid and far from safe smoke. And very little heat will be generated from such combustion. A waste oil furnace, having a well-thought-out design, burns fuel so that it does not form soot.
Depending on the design of the stove and its size, it can heat an area of up to 500 square meters. m. and even more. Oil consumption is scanty - it ranges from 0.5 to 5 l/hour, depending on the power of the unit. The combustion temperature reaches +400-500 degrees. The average chimney height is from 4 to 5 meters. Stoves can operate on both clean and contaminated fuel. The resulting heat can be used for a variety of purposes:
- For direct heating of premises due to the generated heat;
- For cooking (only some models are suitable);
- For use as part of water heating systems.
Thus, the exhaust furnace is a fairly universal heater with a simple design, high efficiency and low cost.
How to choose?
There are several basic parameters that will help you choose the right burner for testing
To begin with, pay attention to the power of the unit, as well as the number of stages that are indicated in the description of the technical characteristics. They determine the main parameters of the equipment and the technological process in which it can operate.
The power must be greater than the combustion power of the unit, and back pressure must be taken into account.
Once you have figured out this parameter, pay attention to the thickness of the front walls of the door, boiler, generator, this will help you choose the optimal size of the nozzle and the chamber itself. The dimensions of the fire head must be selected so that it is thicker than the wall of the installation
The diameter of the hole also matters.
A characteristic such as oil consumption in the burner also plays an important role and can affect the further choice of device. It all depends on the model and manufacturer, since some consume half a liter of oil per hour, while others require more.
General information
Autonomous heating boilers operating on heavy fuel appeared in the middle of the last century. In 1969, engineer Robert Babington patented a unique burner design, which was equipped with an air atomizer, which ensured the most complete combustion of fuel, excellent heater efficiency and device safety. The first modifications of Babington boilers were used for military purposes and were intended to run on diesel fuel.
The operating principle of the Babington burner differs from classical oil boilers. Fuel, that is, waste or other oil and an air mixture, is supplied using nozzles and low-power pumps. A hemisphere is used as a working surface, onto which diesel or waste flows, forming a thin film. In the center of the nozzle there is a small hole with a diameter of no more than 0.3 millimeters. Compressed air is supplied through the existing hole, which makes it possible to tear off part of the surface from the oil film, resulting in a saturated air-fuel jet.
The saturated air-fuel mixture is ignited, forming a powerful and stable flame. The fire is directed into the boiler or furnace firebox, where through the walls or directly it heats the water jacket with the coolant circulating inside. Directly under the hemisphere there is one or several containers for expiring fuel, which allows you to select excess waste, directing it through the pump back into the combustion chamber.
To improve burner efficiency while reducing fuel consumption, the used waste oil is additionally heated, which allows for the following:
- The heated fuel forms a thin film on the working surface, which is better atomized by a saturated air stream.
- The smallest drops in the air stream are easily ignited, which subsequently improves the combustion performance of the stove.
- Fuel consumption is reduced and at the same time the efficiency of the heating system is increased.
Fuel heating can be done either using electric heating elements or through additional heat removal from the burner itself. In the first case, the boiler is energy dependent, and its maximum efficiency and fuel efficiency are achieved only when connected to electricity.
How to make a diesel burner with your own hands
Heat exchanger assembly
I made the stove to heat the garage. I don’t have hot water heaters in my garage, so I decided it would be better to have it immediately heated and circulate the air. If you have water batteries, then you can abandon the air heat exchanger and simply run 4-5 water coils through the upper chamber, connecting them in parallel. In this case, the design must be supplemented with a circulation pump and fan. Such equipment will allow you to heat the entire house with a stove; you just need to allocate a room for installing the stove.
Heat exchanger assembly
Let's go back to my heat exchanger. I installed it between the smoke exhaust pipe and the stove burner - this is where the heat is greatest. I welded an iron plate to the heat exchanger. Thanks to it, the flame will be held better. It will also help distribute the fire inside the stove body.
An air swirler was installed inside the heat exchanger. There are no engineering delights in such a swirler, but it copes with its task one hundred percent. When operating at maximum power, the metal of the case heats up to a scarlet color, and the heated outgoing air even penetrates the glove. You can see the swirler itself in the photo.
I'm making a swirler I'm making a swirler I'm making a swirler I'm making a swirler
Next, I took a duct fan and placed it on one side of the heat exchanger. By the way, you can connect a thermal relay to the fan for automation. This will allow you to set the temperature yourself and save resources. For example, I decided to use a thermal relay from Autonics - I just had it lying around idle. But you can also take some budget model, for example, Vemer KLIMA. I tried it too, it works great.
Supercharged
This is what happens
Heat is concentrated in the firebox compartment.
What is Babington's famous invention?
Every invention has its own author, even if his name is undeservedly forgotten by his descendants. For example, in 1969, British inventor Robert Babington received a patent for a stove running on diesel fuel, which was reminiscent of lighting kerosene gas operating on kerosene vapor. Robert Babington's design was originally designed for kerosene, then it was adapted for diesel fuel. When the number of cars increased disproportionately, the used oil had to be disposed of somehow. Therefore, innovators were looking for devices suitable for these purposes.
First, based on the patented invention of R. Babington, a do-it-yourself diesel burner appeared, then it was adapted for burning oil and other types of fuel. The testing device appeared much later than the diesel design, but it surpassed its predecessor in popularity and safety.
After some time, a similar device was proposed again, since the first patent had expired, and the liquid fuel stove had not lost its relevance. Similar devices were repeated in different versions, and not only self-taught craftsmen, but also design bureaus of reputable enterprises tried to assemble the Babington burner with their own hands.
By design, the burner is a simple device, so it can be successfully manufactured at home. It is characterized by fairly high efficiency in terms of obtaining the heat necessary for heating:
Burner diagram based on the Babington principle, where 1 – heating sensor; 2 – casing; 3 – heat exchanger; 4 – fuel sprayer; 5 – glow plug; 6 – supercharger; 7 – fuel pump; 8 – friction clutch; 9 – electric motor; 10 – lever for switching operating modes; 11 – fan; 12 – skeleton; 13 – fuel pipe; 14 – combustion chamber.
- technological installations;
- small workshops;
- workshops;
- garages;
- warehouse and utility rooms.
On a note! You should not adapt a homemade burner with your own hands for heating your home, since burnt oil has a specific smell.
Advantages and disadvantages
The main advantage due to which the homemade burner at the Babington mine has gained wide popularity is its omnivorous nature, as mentioned above. In fact, you can pour any heated oil of a reasonable degree of contamination onto a spherical surface, and a properly made burner will still operate stably. It is not afraid of gasoline or antifreeze impurities, unless their ratio with oil is one to one, then problems will inevitably arise. And then, this is not at all a reason to get rid of such a mixture; for the burner to function normally using waste oil, it will need to be well diluted with the “correct” treatment, and then put into use.
Another advantage is the simplicity of the design, which is why craftsmen quickly mastered this product. Indeed, making the “heart” of the device from a ball or hemisphere placed in a body is quite simple. It is somewhat more difficult to organize the fuel supply and air injection, and even to configure the entire system so that the DIY Babington burner operates stably and safely. But there is wide scope for the implementation of various technical solutions.
Of the serious shortcomings of the unit, only one is striking. This is the constant presence of dirt in the room where the liquid fuel burner operates. Unfortunately, it is impossible to completely eliminate accidental spills or seepage of contaminated machine oil through leaks, even if all connections are sealed and an automatic Babington burner is installed. To one degree or another, the room will be dirty, you will have to come to terms with it.
Due to its popularity and simplicity, the burner for the waste boiler is made by craftsmen in different variations, but we will undertake to describe the simplest design, which will be available for repetition at home. First you need to select the necessary materials, here is their list:
- Steel tee with internal threads with a diameter of 50 mm - for the body.
- Squeegee with external thread with a diameter of 50 mm - for the nozzle. Its length is optional, but not less than 100 mm for the nozzle.
- Metal elbow DN10 with external threads - for connecting the fuel line.
- Copper tube DU10 of the required length, but not less than 1 m - to the fuel line.
- A metal ball or hemisphere that fits freely into the tee is for the working part.
- A steel tube of at least DN10 is used to connect the air duct.
To make a burner for testing with your own hands, you need to perform one precise operation - make a hole in the center of the sphere. The hole diameter is from 0.1 to 0.4 mm, ideally 0.25 mm. It can be done in 2 ways: drill with a tool of the appropriate diameter or install a ready-made jet at 0.25 mm.
It is not easy to accurately make such a small hole; thin drills easily break. Instructions on how to do this correctly are shown below:
Another way to make a calibrated hole in the spherical part of an autonomous burner is to insert a nozzle of the required diameter there. To do this, a hole is drilled, the diameter of which is slightly less than the outer diameter of the nozzle, and processed with a reamer. The jet is pressed inside and polished, as described in the video:
When this operation is completed, we assemble the burner based on the drawing:
A hole must be made on the side of the nozzle wide enough to ignite the unit. A large fuel heating spiral is not needed, 2-3 turns are enough. The finished product can be mounted on a mounting plate and built into any boiler, including a homemade one. At the end of the work, you need to connect the air and fuel lines, and then organize the supply of oil and air. The simplest method of fuel supply is by gravity; for this purpose, the waste container is suspended from the wall above the burner device and a tube is laid from it.
If you use a pump to pump oil, you can subsequently use control sensors and a control unit, then you will have an automatic burner that will be safer to operate. Detailed instructions for selecting materials and assembling the device are shown in the video:
If everything is done correctly and the diameter of the air hole is 0.25 mm, then the fuel consumption of the burner should not exceed 1 liter per hour. There should be no black soot during combustion; you need to achieve even burning of the torch. The adjustment is carried out by moving the sphere back and forth or changing the air pressure. Any compressor can cope with its injection, even from a refrigerator, since the operating pressure does not exceed 4 Bar.
Types of structures under development
Depending on the area of application, boilers using waste oil as fuel can be divided into three groups:
- household stoves;
- water heating units;
- heating boilers.
Household stoves are installed in rooms that, for a number of reasons, cannot be equipped with water heating. These units are characterized by reduced fuel consumption, and their design ensures the most complete combustion of oil. Household equipment is virtually smoke-free. In addition, furnaces are often equipped with emission treatment systems, which increases the safety of their operation. The main advantage of units of this type is their mobility. Small dimensions make it easy to transport the stove and install it in a small room
It is also important that the device, if necessary, can be easily retrofitted with a water circuit or a cooking platform
Household oil stove
Water heating units at the module level for afterburning gases have a special platform on which a container of water rests. Its toroidal shape gives an additional advantage, since heating is carried out both from below and from the side of the smoke channel, which runs inside the tank. For autonomous water supply, a small water pump is installed at the inlet of the boiler. Due to the high temperature, water can be heated much faster than in factory water heaters. For example, a 100 liter tank will reach a temperature of 20°C to 65°C in about two hours, while an electric or gas appliance will take twice as long. If we talk about the cost of a standard liter of hot water, then when using waste water, costs are reduced by 20–25 times.
A container installed at the level of the afterburning zone turns the exhaust furnace into a powerful water heater
Heating boilers are used to connect to water heating systems, therefore they are equipped with exhaust gas afterburning devices, filters and safety devices. Despite all precautions, it is recommended to install waste oil heating equipment in separate rooms or outbuildings. Heating of water in heating units is provided by a heat exchanger installed in the fuel combustion zone. It can be made either as a continuous water jacket or in the form of a spiral tubular circuit
The movement of the thermal agent in the system is possible thanks to a circulation pump powered by electricity. The coolant temperature is adjusted by decreasing the flame temperature. For this purpose, the boiler is equipped with a forced air supply system. By decreasing or increasing the turbine speed, the air supply to the combustion zone is regulated. Installing a thermostat allows you to automate this process
It can be made either with a continuous water jacket or in the form of a spiral tubular circuit. The movement of the thermal agent in the system is possible thanks to a circulation pump powered by electricity. The coolant temperature is adjusted by decreasing the flame temperature. For this purpose, the boiler is equipped with a forced air supply system. By decreasing or increasing the turbine speed, the air supply to the combustion zone is regulated. Installing a thermostat allows you to automate this process
Heating of water in heating units is provided by a heat exchanger installed in the fuel combustion zone. It can be made either with a continuous water jacket or in the form of a spiral tubular circuit. The movement of the thermal agent in the system is possible thanks to a circulation pump powered by electricity. The coolant temperature is adjusted by decreasing the flame temperature. For this purpose, the boiler is equipped with a forced air supply system. By decreasing or increasing the turbine speed, the air supply to the combustion zone is regulated. Installing a thermostat allows you to automate this process.
A boiler with a spiral-type water circuit will ensure the operation of the heating system of a country house
First start
To do this you need:
- Move the valve on the evaporation chamber and check the flow of fuel into it.
- Start the fan and make sure that it effectively disperses air throughout the combustion chamber. The quickest way to verify this is by the flow of cold air from the chimney.
- Turn on the supply and check the air supply using the valve at the outlet of the combustion chamber.
If all components are functioning normally, all that remains is to check the boiler assembly itself. To do this, you need to start feeding the mining and light the burner from the lit paper. If after an hour the room becomes warm, the boiler is working properly and you can use it constantly.
Possible problems during operation
It is possible that you may encounter problems during the first launch. Possible malfunctions and their causes are listed below:
- The boiler is working properly, but the heating is weak. Increasing the temperature to warm the fuel will solve the problem. This will be confirmed by quickly accumulated soot.
- The room is stuffy and lacks air. The problem is poor sealing - waste fuel boilers burn oxygen from the surrounding space.
- The burner goes out quickly. It is necessary to inspect the filters and change them if clogged, because... poorly refined used oil quickly clogs the burner with soot even before it has time to heat up.
Advantages and disadvantages of a do-it-yourself burner
Each technical device has a number of useful qualities and shortcomings. Obviously, this device has more pros than cons. The main advantage is the utilization of waste raw materials for the greatest benefit. Other advantages of oil and liquid fuel recycling equipment:
- burning waste helps preserve the environment;
- ease of operation and high energy efficiency;
- manufacturing of the device is possible under normal household conditions;
- obtaining heat at a minimum cost of raw materials;
- simple design manufacturing scheme, clear drawings;
- a homemade apparatus can be made from available materials;
- use in workshops and enterprises where a lot of processed raw materials accumulate that require disposal;
- the small dimensions of the burner allow it to be moved if necessary;
- waste and the lowest-grade oil go into the furnace;
- device functionality;
- relative fire safety;
- reuse of used oil.
The main advantage of the burner is the beneficial disposal of used oil
Flaws:
- It is not recommended for use in cottages and residential premises due to burning and odor;
- the need to equip the premises with a fire extinguisher;
- It is imperative to follow all recommendations for the manufacture of the burner;
- the nozzle or nozzle should be checked periodically (if the holes are clogged with solid particles);
- sensitivity of the nozzle or nozzle to contamination;
- additional power supply to the components of the device (pump, compressor).
Difficulties of self-production
Hemispheres (balls) for a Babington burner can only be made independently by a highly qualified turner. It is problematic to drill holes of 0.35 mm - for approximately 35 kW of power. Or a smaller diameter of 0.25 mm - by 20 - 25 kW. Or a couple of holes are made - for 70 kW, for example. But the main thing is the alignment of this hole and the direction of the burner, otherwise...
How to make a ball (sphere) for an oil burner can be seen in this video.
In the future, this key detail is framed by all the necessary “who knows what”. To equip the burner, a crosspiece of pipes, sections of pipes, a copper pipe for supplying fuel wrapping around the burner is used, from which it is supplied to the pressure stabilizer…. The simplest additional equipment is an air compressor with a storage tank (stabilized pressure is required), a barrel installed higher for fuel so that it flows by gravity, and the same barrel under the burner where the remains go. You can see one example of such a design...
What is the difference between a blowtorch and a Babington burner?
The operation of a supercharged torch is often compared to the combustion of the well-known blowtorch. Indeed, their structure has certain similarities. But the principle of operation is completely different. In a blowtorch, gasoline in a closed container is exposed to excess air pressure created by a hand pump. This air does not mix with the fuel, but only pushes it upward, towards the nozzle. Along the way, the gasoline warms up and evaporates in the pipe casing, after which it enters the injector nozzle. Coming out of it, the fuel mixes with air and burns, forming a powerful torch of flame.
Everything happens the other way around in a vertical Babington burner during processing. Air, not fuel, is blown through the nozzle, while the contaminated oil does not evaporate, but is only heated to a certain temperature (no more than 70 ºC). In this case, the liquid does not burn completely; part of it goes into the sump. Due to the fact that it is extremely difficult to evaporate the waste and feed it through the nozzle into the combustion zone, it is not possible to make a burner using the waste from a blowtorch. Just like filling a Babington unit with gasoline, this is not only ineffective, but also downright dangerous.
Security measures
- A burner using oils and other GSPs can be dangerous if installed and operated incorrectly. To avoid a fire, a number of measures must be observed:
- floors and walls made of flammable materials are sheathed with metal or asbestos sheets;
- fuel reserves are stored at a safe distance;
- oil leaks must be removed in a timely manner;
- electrical elements of the installation must be carefully insulated to avoid sparking in the oil spray area;
- The burner must be placed out of reach of air currents and drafts.
A burner with an open nozzle must not be left running unattended!
The Babington burner, unlike a blowtorch converted for working in mining, is a reliable and durable unit that does not require complex maintenance. It is enough to periodically clean the fuel system, tank and sump, blow out the air duct in idle mode, and also monitor the serviceability of the compressor and oil pump. A working burner is a reliable and economical unit with a long service life.
DIY Babington burner
Another type of flare burner available for making at home is the Babington spherical burner.
Her device includes:
- two-inch diameter tee;
- metal pipe for supplying fuel;
- cutting to the thread size of the tee being used;
- hollow steel ball;
- air compressor;
- metal corners;
- thick wire.
DIY Babington burner
Design diagram
The tee is the basis of the device.
- A squeegee with a 15-20 mm hole drilled on the side (for ignition) is screwed into it along the thread - we get a burner with a nozzle.
- A hole is drilled on top of the letter “T” formed by the tee to connect the tube supplying liquid fuel. It is wound in the form of a spiral around a nozzle heated by a flame. This is necessary to achieve the required temperature and viscosity of the oil.
- And under the outlet of the supply tube, inside the tee, a ball or hemisphere is fixed, with a calibrated hole of 0.27 mm ± 0.02 mm, oriented strictly in the center of the nozzle. To simplify the task, you can use a jet of the specified size.
- Air is supplied from the compressor by a pipe connected to the back of the ball.
- Excess oil is drained through the lower branch of the tee.
- The oil supply container is secured away from the burner (and above it) to ensure the required pressure.
- The entire apparatus is installed on legs, which can be made of thick wire. It must be very stable!
The device works like this. Oil is supplied to the spherical surface by gravity or using a pump. From inside the ball, flown around with oil, air comes out under pressure, pumped by a compressor.
It sprays oil and forms a torch directed into the nozzle. This design is mounted inside the tee. Excess oil and impurities are collected in a sump located below.
To avoid fire, it must be located as far as possible from the torch.
The advantage of this type of torch burner is that it is unpretentious to the quality and viscosity of the oil. Because only air passes through the calibrated hole.