To this day, a significant share of the housing stock is occupied by Khrushchev buildings - houses that were built as a temporary solution to the problem of urban settlement. The quality of life in Khrushchev, taking into account the natural wear and tear of the building over the period of many years of operation, is not distinguished by comfort and coziness. At the same time, residents are forced to put up with other problems, including poor-quality heating during the cold season.
Most Khrushchev houses are heated by old heating devices that do not have proper heat transfer and do not perform their functions well in the heating system. Therefore, residents of such houses resort to various methods to improve the quality of heating of their apartments.
Installation of a heating system in an apartment building
As the name implies, the distribution scheme with bottom filling provides for the supply of coolant from bottom to top. Classic heating of a 5-storey building is installed exactly according to this principle.
Such a system operates on the principle of deaeration or automatic adjustment of the maintained pressure using a special, hermetically sealed expansion tank. This container consists of two sectors separated by a membrane made of heat-resistant rubber.
The disadvantages include:
- many pipes and connecting elements;
- quite complex installation;
- higher cost than a single pipe system.
Alternative sewer replacement method
An alternative solution for the open method of repairing external pipelines is trenchless sewer repair. In dense urban areas, this replacement method has gained popularity due to its obvious advantages:
- Reducing work costs. With trenchless replacement, there is no need to use earthmoving equipment to develop a pit and remove soil;
- Reducing the duration of sewer replacement work;
- Sewer replacement is carried out by a small number of workers;
- To carry out the work, there is no need to obtain a special permit - an earthwork warrant;
- There is no risk of damage to other utilities. With the trenchless method, the new sewer pipeline line runs along the old route;
- Possibility of laying a pipeline of a larger diameter, which increases the sewerage capacity;
- No interference for the movement of city vehicles and pedestrians.
Trenchless sewerage replacement in urban environments makes it possible to quickly restore emergency sections of pressure sewerage. What is the trenchless replacement method?
Rehabilitation method – replacement of sewerage system “pipe in pipe”
There are several types of trenchless sewer line replacement. The most popular method is to lay a new sewer system using the “pipe-in-pipe” principle. Sewer pipes that have become unusable are replaced with special polyethylene pipes. For this work, special equipment is used - a pipe pulling device with a pneumatic drive. Repair work is carried out from one sewer well to another. Modern technologies make it possible to replace a significant length of external sewer pipeline in two to three days.
Using the trenchless replacement method, you can repair not only sewer networks, but also replace water pipes.
How to replace an outdated heating unit
Let’s say that at a meeting of condominiums they came to the conclusion that the old elevator unit needs to be replaced. The question immediately arises: which ITP should I choose? How to “link” it to the existing hot water supply and heating distribution? That is, you need to choose an organization that will competently design, install and commission a modern heating unit
ITP in the basement of the house
We can give a specific example of solving such a situation. In Zaporozhye, at the address: st. 40 years of Soviet Ukraine, 78 in a five-story building there was an old and hopelessly outdated elevator unit that did not regulate anything, and the residents’ heating costs were simply “exorbitant” (a photograph of this house is at the beginning of the article).
At the meeting of the condominium associations it was decided: to replace the old elevator heating unit with a standardized individual heating unit for production. This decision to replace outdated components with new equipment made it possible to reduce coolant consumption, as a result, achieve an energy saving effect and reduce payments for heat consumed by residents by almost 30%.
Heating system in an apartment building: connection diagram and features
To meet the heating needs of residents of high-rise buildings, centralized heating systems are well suited. Centralized heat supply involves the transfer of heated coolant from the boiler room through a network of insulated pipes connected to a multi-story building. Centralized boiler houses have sufficient efficiency and make it possible to combine low operating costs and acceptable efficiency indicators for heat supply to multi-storey buildings.
But in order for the efficiency of the central heating supply to be at the proper level, the heating scheme in an apartment building is drawn up by professionals in their field - heating engineers. The fundamental principles by which a home heating scheme is designed are to achieve maximum heating efficiency with minimal resource consumption.
Contractors and builders are interested in providing apartment owners with a reliable and productive heat supply system, therefore the heating scheme of a multi-storey building is developed taking into account the current cost of heat resources, the thermal output of heating devices, their energy efficiency and the optimal sequence of connection to the circuit.
Design features of the heating circuit
There are several valves in the heating circuit behind the elevator. Their role should not be underestimated, as they allow you to regulate heating in individual entrances or throughout the house. Most often, the fittings are adjusted manually by employees of the heat supply organization, if the need arises.
Modern buildings often use additional elements such as collectors, heat meters for batteries and other equipment. In recent years, almost all heating systems in multi-storey buildings have been equipped with automation to minimize human intervention in the operation of the structure (read: “Automation of weather-dependent heating systems - automation and controllers for boilers with examples”). “). All the described details allow you to achieve better performance, increase efficiency and allow you to more evenly distribute thermal energy throughout all apartments.
Economic aspect
Reading about so many benefits, you involuntarily ask yourself a reasonable question: how much does it all cost, since free cheese is only available in one place? Of course, such systems are somewhat more expensive than traditional vertical distributions with natural circulation.
Specialists from leading construction companies in Russia answer this question in this way: the cost of installation and equipment of horizontal heating systems falls on the shoulders of the developer and amounts to about 20%.
But at the same time, thanks to subsequent heat savings due to adjustment, the consumer pays back the costs within two to three years. The number of accidents and leaks is also reduced, and dependence on the quality of housing and communal services is reduced.
The buyer receives an apartment with ready-made screed in all rooms, and this is high-quality, smooth work done to all standards.
It is also worth noting this nuance: transportation costs are significantly reduced and installation is simplified due to the low weight of polypropylene compared to steel.
Heating system in panel houses
Residents of Russia, especially its northern part, believe that if the walls are thin, it means that the house will be cold in winter. But what then can we say about houses with walls in which several rows of bricks or a multi-centimeter concrete block are laid? It's still cold anyway
And in panel houses, when constructing buildings, special attention is paid to insulating materials, which, despite the small thickness of the walls, retain heat well in winter
Not so long ago, panel houses entered the domestic construction market. The technology for creating such houses originates in countries such as Canada and the Scandinavian states. Agree, Canada and Norway have far from hot climates. But people live in panel houses and don’t think about building expensive cottages for themselves, and heating in a panel house is not a problem for northerners. It's all about the technology, which can withstand temperatures below minus 30 degrees. The fact is that builders lay special insulating material between the two panels. It turns out to be a kind of “sandwich” that does not let the cold into the room, but at the same time the walls “breathe” freely.
Also, in the design of a house structure, it is always taken into account which heating system is best installed. The main thing is not to trust crooks, but to turn to experienced craftsmen and engineers. The work of constructing a panel house and installing an acceptable and optimal heating system requires high qualifications. Installing heating equipment into a home is a labor-intensive process. It all depends on the requests of the owners and the total area of the panel house.
There are several optimal and effective ways to provide heating in a panel house, namely: install a convector, heat pump, water heating boilers.
Which heating method should I choose?
Many people prefer mobile heaters: oil radiators, convectors. Convectors operate using electricity; their convenience lies in mobility, but they require large financial costs. Oil heaters operate using mineral oil inside a steel casing. But the connection comes from the electrical network, and it is advisable to use them only as an additional coolant. Such heating in a panel house is too expensive.
A good solution is to purchase heat pumps with high technical performance. Energy savings reach 30% compared to other types of boilers. But the high cost and long work to install the device force many people to abandon this idea.
If there is no natural gas supply in the area, you can install a water heating boiler using solid fuel (coal, wood, peat) or electric. Liquid fuel boilers are very advantageous because they burn for a long time, continuously releasing heat into the room.
If natural gas is supplied to the house, there is no need to even think about installing heating in the panel house only through a gas boiler. There are many advantages:
- cost savings,
- gas is much cheaper than electricity, wood and coal,
- constant receipt of fuel,
- no soot or soot.
Water heating boilers occupy the first place in the list of heating systems. The operation process of boilers depends on the installed radiator coolant system. Now you can buy radiators of different types: aluminum, cast iron, steel, bimetallic.
Cast iron is becoming a thing of the past due to poor wear resistance and the heaviness of the metal. Aluminum and steel are light in weight and have maximum heat transfer. But the first in the row of batteries are bimetallic radiators. They have maximum heat transfer and lightness, are resistant to any type of coolant and chemical additives in fuel. The external finish of modern bimetallic radiators easily fits into any cozy room design.
Additional measures
Even after installing new radiators for the apartment, the price of which depends on the type, Khrushchevites may notice the insufficient efficiency of central heating.
Single-pipe heating systems in Khrushchev. Heating circuit - bypass
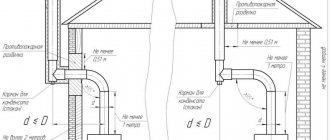
The hot air distribution system must be adjusted so that the rooms are heated with enough air to the lowest possible temperature and exit the diffusers without causing a noticeable surge. Excessive air flow will be perceived as discomfort, aggravated by increased noise in the installation.
The chimney heating parameters - temperature and air flow - must be specified in the installation design, but during operation adjustments are required due to predicted changes in operating conditions. Even a very large fan will not provide this.
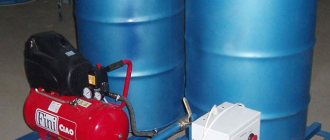
Autonomous heating in Khrushchev
To radically solve the problem with cold radiators and low air temperatures in the Khrushchev building, the apartment owner can implement an autonomous heating project.
The project involves installing a separate boiler in the apartment and having a well-developed project regulating the technical conditions under which the autonomous heating system will operate. If the heating of the firebox is insufficient, it is necessary to increase the temperature of the heating air or the intensity of its supply. Therefore, a house heated by a fireplace must have excellent thermal insulation - this will not only save fuel, but also provide greater comfort to heating users. This reduces the need for heat both during severe frosts and during the remaining periods of the heating season, which reduces the most important heating parameters, namely temperature and air flow.
Adjusting the heating power depends on the actual conditions we obtain, mainly by changing the burning intensity in the fireplace while maintaining a constant flow. However, sometimes it is necessary to adjust the amount of air, for example, set the initial supply or turn off the heating of some rooms.
The boiler for a Khrushchev apartment is selected based on the area of the apartment.
Often a device with a power of 7-8 kW is enough to heat a two-room apartment with an area of sixty square meters. According to the regulations, the boiler must have a closed combustion chamber, be equipped with a coaxial chimney and be installed in accordance with the manufacturer’s recommendations.
For this purpose, shock absorbers are installed on individual branches of the pipeline system. Rotary arms hidden in pipes in the ceiling or behind screens on the walls, combined with elastic straps, allow the airflow to be reduced or increased. Anemostats are used to precisely control flow, such as diffusers with an adjustable slot through which air flows.
Heating diagram with two pipes
Note. Excessive airflow suffocation increases airflow noise, which is undesirable, especially in the bedroom. A fireplace insert is usually chosen for its power and appearance. In theory, the rated power of a fireplace should correspond to the heat demand in a given building. However, a fireplace is not a gas boiler, and it is almost impossible to maintain rated power at all times.
Conversion of the circuit
In addition to the boiler, the existing circuit will have to be converted. You can connect used heating batteries and new radiators to it, which are connected via a pipeline according to the heating circuit. Depending on the required heating output, low radiators installed under the window sill, as well as standard radiators, can be used in the heating circuit.
Due to the fact that the operation of the fireplace requires work associated with igniting and maintaining the fire, we must also pay attention to the following characteristics of the cartridge, which affect ease of use. Combustion chamber dimensions. In a larger room it is unlikely that heat can be added and released longer than in a small room
The fixture in the chimney must ensure that the chimney is closed
In a larger room it is unlikely that heat can be added and released longer than in a small room. The fixture in the chimney must ensure that the chimney is closed.
In addition to the air that is distributed throughout the house after heating, the chimney must also be included in the combustion process. Through diffusers, air enters the room where the fireplace is located, and then under the fireplace through the hole under the fireplace door. Air is supplied directly from the house to the hearth... Regardless of aesthetic qualities, it is necessary to ensure good thermal insulation of the cartridge so that the body does not overheat.
We install heating in a private house
One of the options for a properly planned boiler room.
The heating system is installed in several stages. First of all, you need to arrange a room for the boiler. It should be well ventilated and treated with fire-resistant materials. The boiler itself is not mounted close to the wall, but with a slight indentation. You also need to retreat from the ceiling, floor and other walls. Hang the device so that it is easy to reach.
After installing the boiler, proceed to connecting the pump (if needed) or installing the manifold (if provided). Also secure all control and measuring instruments near the boiler. Only after the above actions should we proceed to the arrangement of main pipelines. Here you cannot do without a hammer drill, since to lay the line you will have to punch holes in the walls.
Important! The slope must be at least 5 mm per meter - it is very important to maintain the slope. The absence of this will negatively affect the operation of the entire system as a whole, so take this issue responsibly
Schematic representation of the correct slope in the heating system. Water flows by gravity into the radiators and by gravity is sent back to the boiler.
Radiators are installed last. Before installation, you need to mark the wall, then drill holes where the brackets are installed. When marking, keep the following distances: from the floor to the bottom side of the battery - at least 10 cm, from the wall to the back wall - at least 2 cm, and from the window sill - at least 10 cm. It is advisable to install valves at all inputs and outputs of the batteries, which will simplify replacement or repair.
Only after all work has been completed can the system be checked. If you installed a gas boiler, be sure to call a gas service representative for a test run.
In fact, installing a heating system in a private home is not such a difficult task. It is enough to follow all the rules and work without haste. The only problem is the timing. If you don’t have too much time, then look at the prices for the work, figure out what you can do yourself and what is better to entrust to the masters. This way you will save time and money. Buy high-quality materials, then all the elements will last you much longer. Also install good radiators, they will have greater efficiency, which means fuel costs will be reduced.
Heating installation diagram with heated floors in a private house
In the previous sections, we looked at which boiler is best to use to organize heating in your home and how to install the pipes. Here we will look at another option - heated floors.
Like any other installation work, installing a heated floor involves a number of works. You need to start with design. Then, based on the completed project, materials and components are selected. This includes pipes, a manifold with a mixing unit, and insulation. Then the base is prepared where the pipes will be laid and the entire system is installed. When everything is ready, a test run is done. If everything works fine, then the base is poured, the initial start-up and warm-up are carried out.
According to the technical design, a heated floor is something like a layer cake, in which all the components are arranged in layers. The base is either soil or a concrete slab, on which a thin film is laid - polyethylene, which acts as waterproofing. Then a thermal insulation material is laid, for example, extruded polystyrene foam. Pipes are placed on top of the thermal insulation material and the whole thing is filled with cement.
How to do heating yourself - option for two wings
It was said earlier that the heating system has two options, one and two pipes. The most common and best for heat conservation is the two-pipe one. It is also represented by two types: dead-end and passing. In a dead-end circuit, the coolant in the supply pipe moves towards the flow of liquid in the return, i.e., simply put, the coolant moves in one direction. This scheme is called a Tichelman loop.
If the length of the pipes is large, then the entire wiring is divided into two parts or, as they say, into two wings. This scheme is especially popular in private homes and country houses.
The length of both parts or wings must be made the same, and all radiators in this network are connected using valves. This will allow you to quickly and efficiently regulate the water supply.
Otherwise, the installation is similar to all others and does not require any special features.
Battery in the wall: leave it or dismantle it?
There are many apartment buildings with an “in-wall” heating system scattered throughout the former Soviet Union. They can be found both in Moscow and in Murmansk, St. Petersburg, Chelyabinsk, as well as in many cities of Belarus and Ukraine. But what is this “battery in the wall” - a whim or stupidity of Soviet architects? Or an innovation that appeared too early? And what to do with it today: change it or leave it as is?
Reasons for the appearance of houses with in-wall batteries
In Khrushchev and Brezhnev times, when such housing was built, the main task of architects and builders was to provide the population with their own living space as quickly as possible. And the formation of a centralized heating system at the stage of pouring reinforced concrete structures was a completely logical step.
Plus, batteries inside walls are a truly innovative and practical solution. With proper pipe laying and high-quality reinforced concrete production with good insulation, it is not the street air that is heated, as many believe, but the slabs themselves.
And according to the technology, heat should be reflected inside the premises. As a result, much less energy is required for comfortable heating. And the air in the rooms is not as humid as with conventional wall-mounted radiators. Today, such a technological solution is increasingly used in European countries precisely because of its cost-effectiveness and practicality.
Read also: Kitchen zoning design. Examples, photos, features
In the Soviet years, the technology of placing batteries inside walls was quite widespread and covered many regions. Such houses were built from series 91, 121, 1-515, 464, 1605 and many others. Each research institute sought to “improve” the design. And in some, only the riser was laid inside the slabs, in others, the entire heating system was installed. In some projects, pipes were installed in the facade walls, while in others, on the contrary, they were installed exclusively in interior walls.
Battery in the wall: how to get rid of it and is it worth it?
The main problem with such batteries is the inability to shut them down when it gets hot. Plus, houses age and naturally the pipes in them do too. An outburst can happen at any moment. And if in a building with “open” heating pipes, they can be replaced with new ones without any noticeable problems. Then you will have to work hard with the “walled up” ones.
Moreover, in most cases, the first thing you will need to do is order a project for rebuilding the heating system, and go through many approvals. Design and estimate documentation can be done externally, but you will have to go to the Housing Office for approvals. It is best to entrust the work to them.
Material selection
Sewage diagram of an apartment building.
Previously, cast iron pipes were used to construct the sewer system. However, at the moment they are being pushed out of the market by plastic products. There are three types of pipes: polypropylene, polyethylene and polyvinyl chloride. To install sewerage in a Khrushchev-era apartment, you can use any option: there is not much difference between them. The general characteristics of plastic pipes are as follows: they are light in weight, easy to install, and do not rust. Thanks to the smooth inner surface, waste water flows easily and quickly, and dirt does not stick to the pipes. The plastic drainage system is easy to assemble. Structural elements are inserted into one another.
The main disadvantage of the plastic system is poor sound insulation. To eliminate it, additional measures are taken and external sound insulation is made. There are PVC and polypropylene pipes with built-in sound insulation. However, their use is not always possible.
The size and parameters of the pipes depend on the task assigned to them. For drainage from a sink or bathtub, a diameter of 40-50 mm is sufficient. But the sewer pipe connecting the toilet and the riser must have at least 85 mm in diameter. Failure to comply with these requirements can lead to dire consequences, including complete system failure.
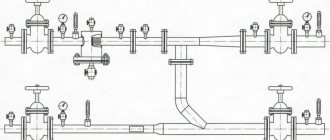
Installation of bypass jumper and ball valves
The sections of the hot water pipe into which the heated towel rail will be connected must be connected to each other with a jumper. The need for this element that complicates the design is obvious:
It is better to make the line to the bypass from stainless steel pipes.
- if problems arise in the operation of the coil, you will not need to visit the housing office to submit an application for a new water shutoff;
- work on installing and connecting a heated towel rail does not have to be carried out strictly within the established period for which the water was turned off.
This is especially true for those who are waiting to replace a heated towel rail in a Khrushchev building on their own and without sufficient experience.
How does the bypass work (Fig. 1)? If it becomes necessary to turn off the heated towel rail later for repairs, it is enough to close the ball valves at the inlet and outlet of the water flow from the coil. Opening the tap on the jumper at the same time will allow you not to deprive your neighbors in the house of hot water while the coil is being replaced or repaired.
What you will need to install a bypass:
- three ball valves;
- pipe sections of the required length;
- connecting elements: tees with a diameter corresponding to the diameter of the pipeline, 2 pcs.;
- Adjustable wrench.
- Install tees at the ends of the pipe leading to the hot water supply system so that a piece of pipe can be laid between them connecting the water flow in them.
- Connect two short sections of pipe with a ball valve and install this structure between the tee branches. Threaded connections are sealed with FUM tape or linen winding. Open the tap.
- Install ball valves on the remaining free ends of the tees, to which the heated towel rail will subsequently be connected. Move the taps to the “closed” position.
With this position of the three taps, water will pass through the jumper without entering the heated towel rail coil.
Replacement of external sewerage
Trenchless sewer replacement
The problem of worn-out external sewer lines often leads to serious accidents. Therefore, there is an urgent need for emergency emergency repairs. Many city residents are familiar with a similar picture: a part of the street blocked off with a large amount of digging equipment and piles of earth near an open pit. Replacing sewer pipes of an external pipeline using an open method is associated with great inconvenience and difficulty. After all, often at the location of sewer pressure and free-flow pipelines there are other underground communications of water supply, electrical power cables, and communications.
Main types of coolants
Heating system.
The operating principle of the heating system is that the coolant moves from the heat source to the end point through pipes, heating them. The type and design of the heating equipment determines the type of coolant used, which can be liquids and gases.
The most popular liquid coolants are:
- Water is the most accessible and cheapest resource. According to statistics, about 70% of heating systems use water, which has a high density and heat capacity. In addition, this type of coolant has gained such popularity due to its properties, such as low viscosity, high heat transfer coefficient, and easy temperature control. The main disadvantage is the ability to freeze at zero temperatures. If water freezes in the heating system, this will lead to rupture of pipes and failure of all equipment.
- Antifreeze - this type of coolant is not as widespread as water, and its use is 5%. It is used for heating administrative buildings and residential buildings where the heating system does not allow the use of water due to the increased risk of corrosion. The main advantage of antifreeze is freezing in frosts of 60 - 70 degrees.
The following gases are used as coolant:
- Water vapor is mainly used in industrial buildings, since its use is prohibited in residential and public buildings. Water vapor maintains the temperature of heating devices at 100 degrees; according to sanitary standards, this figure should not exceed 80 degrees.
- Flue gases are toxic, so recently they have been used only for heating water and in order to save electricity to produce a heat source.
- Air is characterized by low heat capacity, so moving it through the heating system requires large energy costs. It is most cost-effective to use air as a coolant, provided that it simultaneously performs two functions: heating and ventilation.
Currently, organic liquids are being introduced as a coolant, which have excellent freezing properties and low viscosity. However, they have not yet become widespread due to their high cost and scarcity.
Problem
The main problem that my relatives told me about was absolutely cold radiators in two adjacent rooms, while in other rooms the radiators became noticeably warmer with the start of the heating season.
For comparison:
- In rooms with warm radiators, the average daily temperature was +17C;
- In rooms with non-working heating +13C.
As they say, feel the difference...
For several days, calls from neighbors and relatives to the heating network ended in approximately the same way - nothing, because... the house is a cooperative one, and its maintenance is not their responsibility, except in emergency cases.
And for a cooperative of 60 apartments (4 entrances), where more than half of the residents are people of deep retirement age, it was expensive to maintain its permanent plumber out of pocket. The part-time specialist only made sure that there were no leaks during the startup of the system, and nothing more.
Searching of decisions
Having arrived at the place, the first thing I do is check the taps on the radiators and on the bypasses - everything is in the open position in both rooms. I open the Mayevsky taps on each radiator - a thin stream of water informs that there is pressure in the system and the radiator is not air-filled. But you need to find out whether there is any coolant in the system at all.
For this purpose I go to the basement of the house. From the elevator unit I determine the direction and find “my” supply and return pipes.
Having reached the location of the apartments at our entrance, I see two - supply and return. To the touch, both pipes differ quite noticeably, so it was not difficult to determine that the colder one was the return pipe.
I use my hands again - both risers are cold, although literally a meter before this section the temperature was more than comfortable. The reason is the airing of the system on the upper fifth floor, which is why the coolant does not circulate.
I leave the basement and go to get acquainted with the neighbors on the upper floor, simultaneously inquiring from other residents about the presence of shut-off valves and their condition. As you would expect, they all have cast iron radiators installed 30 years ago.
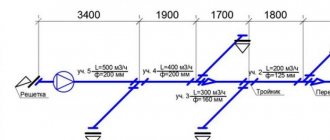
In Khrushchev-era houses there is no technical floor, so the coolant is supplied from below from the basement. To clarify the operation of the heating system, I propose to consider the diagram presented below.
We return to the fifth floor apartment. In two rooms of a family of pensioners, cast iron radiators with 12 and 7 sections were installed. They were the ones who had to be ventilated.
The only way available for this is using a nipple (a prototype of the Mayevsky tap) embedded in the radiator plug.
Armed with tools:
- Old galvanized bucket 12 liters;
- Pliers;
- Two flat blade screwdrivers;
- Several floor rags - splashes will be inevitable.
Since a lot of splashes are expected, I provide a place to work around the radiator - I clean it and move the furniture further away. Then I take a screwdriver and, carefully, so as not to lick the edges, unscrew the screw counterclockwise.
- The old system did not work on the first try, I had to use pliers - with their help I turned the screwdriver until the screw came off the stuck place;
- The hiss of air marked the beginning of the air lock coming out. Within 3-4 minutes, the air left the radiator, after which cold water flowed in a thin stream;
- Having adjusted the screw so that the water poured into the bucket, I gave it time - in about half an hour, when the bucket was half filled, the temperature of the water changed from ice to warm, after which I screwed the screw back.
I did the same operation with a cast iron battery in another room. A few hours later, the apartments became noticeably warmer - the thermometer showed an increase of a couple of degrees. Of course, there is no need to talk about a complete solution to the problem of cold in the apartment, because... The coolant temperature is far from 75C, but it’s not yet a bitter winter outside.
Diagrams by type of coolant supply
The radiator will work effectively if the coolant is evenly distributed across all sections.
Warm and cold water have different densities. The heated coolant always tends upward. In the system it is replaced by cold, denser water. This feature is taken into account when supplying coolant to the batteries.
Coolant supply diagram
Upper eyeliner
Each radiator has vertical channels connecting the horizontal upper and lower manifold. The presence of these elements allows the coolant to circulate in the device.
With the top connection, mainly only the top of the battery heats up. To prevent such an effect, a jumper is installed after the first rib in the direction of flow of the coolant. Therefore, the heated water first falls into the lower collector.
Then it passes through all sections of the radiator and enters the return pipeline. As a result, the top connection turns into a diagonal way to connect the battery.
If there is no jumper in the radiator, the supply pipe is connected at the top, and the return pipe at the bottom from the opposite end of the battery. This option is called diagonal strapping.
Bottom eyeliner
This is the easiest way to tie. The scheme involves installing the boiler in the basement or on the ground floor. From the heat generating unit, the main pipeline is led to the attic, where the expansion tank is installed. A starting line is laid from the tank, but not lower than 1.5 m to the first radiator.
The supply and return are connected to the batteries at the lowest points on opposite sides. All radiators in the system are connected to pipelines in the same way and installed in series.
When installing a heating circuit with natural circulation, the pipes are laid at an angle. The last battery must be located above the boiler. The height difference between the final radiator and the heat generating unit should not exceed 3 m.
Connection in progress:
- circulation pump;
- bypasses;
- shut-off valves;
- Mayevsky cranes.
Pumping equipment runs on electricity. When it is turned off, circulation of the coolant is possible only in a natural way. Therefore, it is better to lay pipelines at a slope.
Select the number of pipes
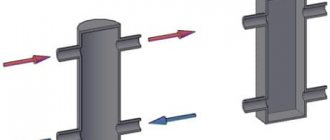
The scheme may involve the presence of one or two pipes:
- The option with one pipe implies that the coolant circulates in a closed loop, and the radiators are connected in series. This design feature leads to the fact that the temperature of the last battery will be lower than that of the first devices. However, with a short contour, this shortcoming is naturally corrected. As an additional way of adjustment, you can use the taps between the radiator pipes. Minimum volumes of materials for forming the system, no need for a circulation pump, small volume of circulating coolant - these properties can be attributed to the advantages of the technology.
- The two-pipe scheme is based on the installation of two circuits. The first is used to supply coolant to the radiators, while the second sends cooled water to the boiler for new heating. When laying, you must remember that the pipes must run next to each other, because the radiators are connected in parallel. An additional pipe increases the total volume of coolant used; often it is impossible to supply it by gravity, and therefore it is necessary to install a circulation pump. However, despite some installation inconveniences, the system is more reliable than the first option, since the formation of an air lock is eliminated.
How to properly start the heating system of 5 and 9 storey buildings
How to properly start the heating systems of 5 and 9 storey buildings?
There is no fundamental difference in starting the heating system of five and nine-story buildings from multi-story high-rise buildings.
The basic principles in all buildings, regardless of the number of floors, are the same - slow filling of the system and release of air. We wrote about the procedure and errors in starting heat in multi-storey buildings in a separate article.
It is not always possible to control the start-up of heat with heat supply organizations such as MOEK and the heating network. Often, the central heating station operator, in order to report to management about the launch of more houses, is in a hurry or, out of ignorance, turns on the charging pump in the central heating station at maximum speed; the system is guaranteed to take in air.
This is also possible due to poor contact between the operating staff of the housing and communal services sector and the operators of the central heating point.
But in one case or another, the consequences of the “quick” start-up of heat are the same. When starting up, the house takes in air and, since the air is lighter than water, it rises up and blocks the upper floors, forming air jams.
The “air lock” got its name due to the fact that when it forms on the upper floors, it completely blocks the circulation of the coolant through the heating device and, as a result, the “aired” radiator remains completely or partially cold.
The main task of the operating organization is, if air has already entered the system, to release it in a timely and correct manner.
Five-story houses come with or without attics. In houses with attics, heating systems are installed with overhead wiring, which means that supply main pipelines are laid through the attic, and air collectors are installed there.
Air collectors are an element of the heating system, which is a pipe of much larger diameter, installed on the supply lines at the highest point of the system, on which a drain valve is installed.
In order to avoid the mechanic having to run to each apartment on the top floor, all accumulated air is vented from the air collector in the attic.
To do this, open the drain valve, through which all the accumulated air begins to whistle out.
But this simple procedure must be monitored, because lack of proper attention to the air release process can lead to flooding of the upper floors.
After the air leaves the drain valve, an air-water mixture begins to come out, so you need to place a container under the valve or attach a hose and drain the remaining air-water mixture into the sewer until water flows without air impurities.
But there are five-story buildings without attics, and then air has to be vented in each radiator on the fifth floor.
After air is released from the heating system, all risers and radiators begin to fully warm up right before our eyes.
Bottom line
I hope that my experience will be useful to some of you. If the symptoms are similar, negotiate with the neighbors on the top floor and ventilate the riser before the onset of winter. Good luck, comrades!
Starting the renovation in September, and realizing that there is about one month left before the start of the heating season, a decision is made “first of all, the heating batteries in the apartment must be replaced,” and at the same time, preparations for the renovation of the Khrushchev building must begin. We will replace cast iron heating radiators, which after 50 years of use have become completely clogged and, as a result, have cold radiators, with bimetallic heating radiators. As always, we plan to install the heating ourselves. Replacing heating radiators in an apartment requires the presence of a certain tool:
- Grinder with cutting disc for metal.
- A hammer drill and concrete drill for making holes for attaching a heating radiator to the wall.
- Adjustable wrench.
- Building level.
- A tool or die for cutting threads on the riser pipes that will remain after dismantling the cast iron radiator.
Now let's try to do radiator heating at home with our own hands.
Ventilation in Khrushchev in the bathroom and toilet
The main exhaust duct is located in the kitchen, and the one serving the bathroom and toilet is considered additional, since the total volume of air passing through it is small. Having found out the cause of poor traction, you need to analyze the operation of the entire system
What is especially important here is the presence of a full inflow, which cannot be “interrupted” by an electric kitchen hood. If this is the main reason, then it is necessary to install window or wall supply fans
These devices will restore the flow of fresh air. Their installation does not require special knowledge, but if desired, you can use the services of specialists.
Main channel and satellites
Also, an exhaust fan is installed in the ventilation hole located in the bathroom or toilet. Thanks to it, moisture and unpleasant odors will not stagnate in sanitary rooms, and the kitchen hood will not be able to draw air from the additional ventilation hole.