A water heater is one of the most popular options for large household appliances, second only to refrigerators, stoves and washing machines in terms of demand. This is not surprising, because our state does not pamper us with acceptable tariffs for the supply of hot water, and periodically “pleases” us with its total absence and the impossibility of supplying it to private houses, not to mention housing in rural areas.
However, for normal operation of the water heater, it is not enough to choose a suitable model; it is necessary to ensure that the boiler is properly connected to the water supply.
Types of water heaters and features of their connection
All types of devices used in residential and public buildings for heating water (not for heating!) can be divided into groups according to:
- method of operation - storage (most models) and flow;
- type of energy used - electric, gas, wood, combined;
- volume of heated water. For storage devices, this parameter is determined by the volume of the internal container, into which the liquid is collected and subsequently heated. For flow-through systems - the amount of water passed through the heater per minute with heating to the desired temperature;
- mounting method - wall-mounted (strictly vertical, with a choice of horizontal or vertical placement), floor-mounted, built-in.
Gas, wood and combined water heaters are usually part of an individual heating system and have their own connection and installation nuances, so in this article we will only consider electrical devices.
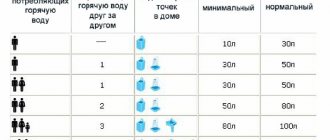
If hot water is constantly needed in the household and you need a lot of it, a storage tank would be the best choice. Flow-through models are suitable for limited flow and local water intake points. The table below will help you determine the approximate need for hot water.
Naturally, the required amount of water must be provided by the throughput of the water supply system. Therefore, for housing where water is supplied manually (from a well, a water heater), there is usually no talk about an electric water heater. As a last resort, this device is supplied with water from a separate storage tank and is turned on only as needed.
If the choice is nevertheless made in favor of an instantaneous water heater, you must immediately determine the possibility of connecting the device to the house electrical network - some models require too much electricity, the wiring simply cannot withstand the current.
The vertical or horizontal position of the tank has little effect on the way the water heater is installed in the apartment; here you only need to take into account the actual ability of the product to work in the chosen position and correctly place all the elements of the supply and discharge water supply.
Choosing a boiler - how many liters will be needed
We decided to touch on this topic, since the normal supply of hot water to the house (abbreviated as DHW) depends on the volume of the water heater. Buying a tank with a large supply of water is also pointless:
- the heating time to a comfortable temperature increases;
- the price of equipment increases;
- The installation of a storage water heater becomes more complicated due to the large weight of the device + a decent volume of water.
Advice. If you only need a heater for washing dishes, it is better to buy a low-power electric flow-through model, which is placed under the kitchen sink or instead of a faucet. How to choose the right electric water heater for your dacha, read in a separate publication.
The capacity of the storage tank is selected according to the consumption of mixed (warm) water per 1 resident per day - 20 liters for hygienic needs, another 12 liters for household needs. How many liters of boiler is needed in total:
- for economical consumption, a family of 2 people needs 50 liters, for comfortable consumption – 80 liters;
- 3 people – 80...100 l;
- 4 family members – 100…120 liters;
- 5 or more residents who actively use hot water - 120...150 l.
Necessary parts, materials and tools
For self-installation you will need:
- pipes - metal or PVC (the second option is preferable due to its greater simplicity and ease of operation). The length of the pipe sections depends on the location of the tank and the configuration of the bathroom (technical room), as well as the distance of the water intake points from the device. The type of pipe and its characteristics depend on the volume of water supplied (throughput) and the pressure in the system;
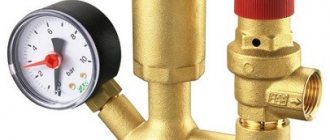
- sanitary fittings. You will definitely need ball valves - at least two of them, a safety valve (often included in the delivery package of the boiler), tees and adapters (depending on the configuration of the water supply system). If there is a risk of increasing pressure in the water supply system, it is recommended to supplement the connection diagram with a reducer. If there is a pressure gauge on the gearbox, it becomes possible to visually monitor the pressure level in the water supply;
- three-core electrical cable, cross-section is determined in accordance with the rated power consumption;
- automatic device for connecting the device to the in-house electrical network. The machine is selected depending on the current required by the device, with a margin of at least 10...15%;
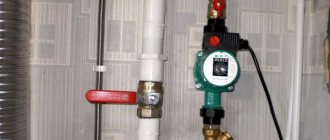
- An optional, but desirable and very useful addition to the electrical circuit will be an RCD (residual current device). These devices monitor the network voltage and turn off electrical equipment when the monitored parameter increases/decrease outside a specified range
An example of connecting a heating storage tank - the machine for it is highlighted in red, the RCD is located on the left. To prevent electrical equipment from constantly switching off, the RCD is set to an acceptable voltage range of 215…230 V
You may also have to think about gaskets, tow or plumbing tape (fum tape).
To quickly complete installation, you will need:
- a hammer drill or impact drill with a concrete/brick drill (depending on the type of wall). If the strength of the walls does not allow a large load from attachments, you will have to make one or buy a ready-made installation for the tank. Accordingly, when choosing a metal supporting structure, you will need a metal drill to make holes for fastening;
- a hacksaw, a grinder with a suitable disc for cutting metal pipes or special scissors for PVC pipes;
- a screwdriver, pliers and side cutters, a knife or a special device for stripping wires - a standard electrician’s kit;
- multimeter to identify zero and phase on the meter. Here you can read more about how to use a multimeter.
How to “crash” into a cold water supply pipe?
One of the main tasks is to cut a tee into a cold pipe. There are different options for solving this issue - it all depends on the material of the pipe itself and its location.
Metal pipe
The most labor-intensive case is perhaps one that will require special skills and tools. We will not consider the issue of welding work - this approach is practically not used in apartment conditions.
- Option one is when it is possible to cut the pipe and cut the required ½-inch thread at both ends. In this case, it will be possible to install the tee through a regular plumbing fitting, or pack it using special couplings with union nuts - “American ones”.
- The second option is when the location of the pipe excludes the possibility of using a thread cutting tool (die with a holder).
In this case, you will have to use a special repair and installation clip with a tap, which is often called a “vampire” among plumbers. This is a cast iron or brass collapsible structure with a rubber gasket inside and a tee perpendicular outlet and a transition to internal or external thread. This is what the Vampire repair and installation clip looks like
And this is the installation diagram
The pipe is thoroughly cleaned of old paint and rust. Then, in the right place on the pipe with previously blocked water, a radial hole is drilled with a diameter corresponding to the hole on the coupling. A hole that is too large will negatively affect the strength characteristics of the pipe. Too small and it will quickly become overgrown with dirt. When marking the center of the hole, be sure to take into account the further direction of laying the line to the boiler.
The coupling is put on through a rubber gasket and tightly tightened with standard bolts. Now from its threaded part you can continue laying any type of pipe.
Metal-plastic pipe
Tee for metal plastic
The simplest option is perhaps the one that requires only wrenches and a cutter. In the right place, the pipe is cut taking into account the length of the tee. Then the tee itself is installed on the standard compression fittings, with an outlet on an external or internal thread, or with the same fitting outlet if it is planned to continue to conduct metal plastic.
Polypropylene pipe
This requires a special approach. To weld a tee using a special soldering iron, a certain “spreading” of pipe sections is required for simultaneous coaxial heating. You can, of course, go the route of installing a “vampire”, but it’s still not worth the risk. It is better to cut out a section of the pipeline, and then solder the removable structure with a tee and transitions to “American” couplings. It may be a little more expensive, but the reliability of the insert will be guaranteed.
The same is done when inserting a pipe with hot water, if it is planned to connect it to the internal residential hot water supply network.
Step-by-step instructions for connecting a storage water heater
Installation is divided into several stages:
- fastening to the place of use - wall, installation;
- cold water connection;
- removal of hot water to water collection points;
- electricity connection;
- testing and commissioning.
Let's look at them in order.
Wall mount
The weight of the boiler is usually quite large; approximate figures can be seen in the table below.
Important: the weight indicated is for an EMPTY device! The total weight of the connected and operating tank exceeds the nominal parameter by the weight of the collected water (1 liter weighs 1 kg).
That is, for a heating tank with a volume of 150 liters, the weight of the product together with water will be about 190 kg. This weight is distributed over two, or at best (rarely) four attachment points. Accordingly, one hook/anchor/bolt accounts for up to 95 kg of weight.
Accordingly, the fastening must be very reliable. On a capital wall (reinforced concrete, solid brick), it is permissible to use ordinary anchor bolts. On a wall made of foam or aerated concrete or hollow brick, it is better to use special fasteners. The same applies to mounting heavy tanks on old main walls.
Anchor bolt with hook is convenient for both mounting strips with holes and regular strips without holes
Anchor bolt installation diagram
If the wall thickness is not enough for normal fastening of the anchor bolt, it is necessary to perform through fastening, but it is better to use special installations, examples of which are shown below.
Options with additional fixation to the ceiling - a reinforced concrete floor slab provides additional guarantees
If the boiler is located in a separate technical room, you can use a floor installation.
It should also be taken into account that different models may vary greatly in both the shape of the mounting strips and their location. This is especially important for models with the possibility of vertical and horizontal placement.
Connecting the boiler to the water supply
Below is a diagram of connecting the water heater to the water supply. It is typical for houses and apartments that have (at least theoretically) a centralized supply of hot water.
Manufacturers usually provide a connection diagram in the product instructions. It needs to be studied, since some nuances may not coincide with the generally accepted version.
The following points should be taken into account:
- Usually the pressure in the (domestic) water supply is about 6 atmospheres. On the first floors of multi-storey buildings, the pressure in the pipes can exceed this value, so the circuits contain an element such as a pressure reducer (optional). This reducer reduces the average constant pressure to normal and allows you to “stop” short-term changes. The photo below shows piston (left) and diaphragm (right) gearboxes. Both can be connected to a pressure gauge with an axial connection;
- if the water in the system is of poor quality, it is very advisable to install a coarse filter BEFORE the outlet to the tank (or better yet, at the entrance to the apartment/house), and an additional filter “at the approaches” to the boiler. This will significantly increase the service life of the device, especially with a “wet heating element”;
- the use of flexible hoses for connection is undesirable, especially for discharging heated water, since under the influence of consistently high temperature and pressure they quickly fail. It is permissible to use flexible hoses only if they are of guaranteed high quality;
Please note: in the photo, the copper pipe is cut and sealed, but there is practically no water pressure in this area, since two outlets for water intake points are installed on the way to it. If it is necessary to cut a centralized water supply pipe and there is no way to relieve pressure in the adjacent area, it is better to use threaded plugs
How to connect a boiler to electricity
The connection can be made in different ways, but most often this is the boiler connection diagram.
Using a three-wire wire (calculation of cross-section based on power), the output is carried out from the meter through the RCD and the machine either directly to the tank or to the outlet. The socket is also selected according to power and permissible current.
This diagram shows the most commonly used wire colors for the water heater itself - yellow-green, cyan (blue) and red (brown).
The photo shows that the colors of the tank wires match the colors of the cable wires. Connection via terminals simplifies installation and eliminates the need for twisting
This shows how the cable is connected directly to the connectors on the bottom panel of the tank.
For residents of multi-storey buildings, the issue of difficulty in grounding the device is relevant. If there is no “ground” and it is not possible to establish a full-fledged deep grounding (which is quite possible in a private house), it is sometimes recommended to connect the “ground” of the tank to the “zero” of the meter.
If it is not possible to extend a power outlet, we recommend considering French Atlantic water heaters. These are the quietest, most reliable, least serviced and most economical water heaters. Of all the boilers that are offered for sale on the Russian market.
If conventional water heaters need to be serviced annually, Atlantic's service is performed TWICE less frequently. And it costs three times less than servicing a typical inexpensive Chinese water heater.
Atlantic boilers can be plugged into a regular outlet. Compared to other water heaters, they consume 15-20% less energy due to the increased area of the heating element. By the way, Atlantic has a proprietary development of the company - a dry steatite heating element. The service life of such a heating element is up to 20 years. This is ten times longer than the “wet” heating elements that are installed in most inexpensive water heaters of other brands.
Atlantic's tanks are coated with a special enamel with titanium dioxide, and therefore they are practically non-corrosive. And due to the magnesium anode, scale practically does not form inside. Therefore, Atlantic operate very quietly and economically on all types of water.
Atlantic factories are located all over the world, except China (this is probably why Atlantic is also called the most UN-Chinese water heaters).
Atlantic water heaters have the longest warranty on the market - 8 years. Almost all Chinese boilers are no more than 5 years old.
Important: grounding to pipes, reinforcement of monolithic structures, metal parts in the walls and floor of a home is unacceptable!
Grounding for an apartment (house)
Grounding for a private house, the site must be located at a distance of at least 1.5 m from a residential building
Briefly about the principle of operation of the drive
To properly install and connect the water heater to utility networks, you need to know the structure and operating principle of the device. The design and operation scheme looks like this:
- The main container - stainless or enameled steel - is filled with cold water through a pipe that goes into the lower zone of the tank.
- When filling, the air is completely forced into the DHW system through the hot water intake pipe located in the upper zone of the tank.
- After turning on the boiler, the water is heated by a tubular electric heater (abbreviated as TEN), built into the bottom of the tank.
- An automation unit is installed on the same platform with the heating element - an immersion temperature sensor and a thermostat. When the temperature of the container reaches a predetermined threshold, the automation de-energizes the heating element. After the water has cooled by 3-5 °C, the thermostat turns on the heating again.
Sectional diagram of an electric heating tank - A boiler safety group is installed at the water supply inlet. The part consists of a safety and check valve whose function is to relieve excess pressure from the expansion of the heated liquid and prevent water from leaving the tank back into the pipe.
- Next to the heating element there is a magnesium anode, which protects the metal of the tank from electrochemical corrosion. The outside of the container is insulated with a layer of polyurethane, then covered with a decorative casing, as shown in the sectional diagram.
Reference. The power of the heating element is 1.5...3 kW depending on the volume of the tank. Some flat models of storage boilers are equipped with two electric heaters.
The design of vertical and horizontal type boilers is identical - the intake pipe is at the top, the supply pipe is at the bottom. This raises the main problem of servicing any storage water heater - it is impossible to drain the water through the tap. The issue is solved in different ways depending on the strapping scheme, which we will consider later.
Step by step instructions
So, having examined the stages in detail, let us once again clarify how to connect a storage water heater:
- The boiler must be unpacked and checked for external damage (dents, obvious lack of tight connections, uncut threads, other defects). An uncut thread can be corrected yourself; other defects may indicate a malfunction of the device;
- secure the tank to the wall using a mounting plate with two bolts/hooks. It is better to replace the fasteners included in the package with more reliable and high-quality ones. This also applies to the safety valve;
- connect pipes/hoses to the inlet and outlet pipes of the heating tank according to the diagram. Don't forget about sealing materials! Additionally, you can perform thermal insulation of pipes/hoses, this will reduce heat loss and reduce energy costs;
- connect the water heater to electricity, as suggested in the manufacturer’s diagram or according to any of the diagrams presented above.
Additionally, we recommend watching this video - it shows interesting nuances of mounting the boiler on the wall and attaching fittings to the pipes.
After this, there remains one, but very important stage of installation - verification.
Necessary:
- shut off the supply of hot water (centralized) to the intra-house (in-apartment) system;
- open the valve (ball valve) to supply cold water to the tank;
- open full flow of HOT water at the nearest mixer(s);
- wait until water comes out of the tap in a continuous stream. In the first minutes, alternating water and air from the pipes is possible;
- connect the device to the power supply and wait the required time for the first heating (according to the manufacturer’s recommendations);
- check the temperature of the water supplied by the tank and, if necessary, adjust the heating regulator (if this function is provided in the model).
Usually there is a warning light next to the heating regulator - it indicates possible problems in the system
For greater convenience, a number of manufacturers place the regulator on the front panel of the water heater
Useful tips
- The simplest option for installation is an electric boiler . This type of water heater may have 1 or 2 heating elements. It is better to choose a double one: since one of the heating elements may fail, then the second one will replace it. If desired, one can be disabled to save money.
- To increase boiler performance, it is recommended to connect recirculation .
- If you purchase a large-volume water heater (200 liters), then take into account that the water in it takes a long time to heat up (up to 6 hours) . And installation of the unit is possible only on the floor (installation on the wall is excluded).
- Each person consumes up to 20 liters of water per day . Based on this amount when determining the required tank volume of the device.
- In the case of using an electric heating element, grounding is done .
- It is reasonable to foresee the possibility of disconnecting the indirect boiler from the gas boiler and install special taps for this.
In general, installing a water heating system does not require much experience. The main thing is to take into account the type and method of connection to the power source. It is also necessary to carefully consider the project and take into account access to electrical lines, water supply, and drainage . And if you have to connect the unit to alternative power sources (or a gas water heater), then be sure to consult or entrust the complete connection of the water heater to a specialist.
What do you think of this article?
The nuances of connecting an instantaneous water heater
Connecting an instantaneous water heater to the water supply system of a house/apartment is even easier than a storage one. It is enough to follow the general principles of working with equipment of this kind (and the recommendations given above), as well as the connection diagrams proposed by the manufacturer.
All the main elements of the circuit are repeated; a drain valve, adapters from the heater pipes to the water supply pipes, and a connection to the electrical network are also required here.
Experts recommend:
- install the device in close proximity to the water intake point - sink, shower, kitchen sink. In this case, it is necessary to take into account humidity zones and use moisture-proof sockets, and also be careful about the waterproofing of electrical elements;
- if the cold water connection pipes are made of metal, they must be connected to the inlet pipe of the heater through a dielectric bushing (included in the delivery set);
- since the power of the device can range from 1 to 27 kW, devices with a consumption of more than 8 kW must be connected to a 280 V network with a cable of four or five cores;
- Before turning on for the first time, you should “blow out” the system to ensure that the main tank of the heater is filled and there are no air pockets in the pipes/hoses.
It is important to understand: an instantaneous water heater provides hot water constantly (if there is a power supply), but does not provide a large flow of liquid!
We recommend watching a video about connecting a conventional flow-through heater and the so-called “instant water heating tap.”
Selection Basics
When choosing an autonomous source for heating water, these indicators should be taken into account:
- Tank volume (taking into account the number of people living in the apartment).
- Device power consumption.
- Internal coating of the tank (it is recommended to pay attention to magnesium or anode rods , which are protected from corrosion and scale).
- Dimensions and other features of the unit.
Find out more information about choosing a boiler for an apartment here.
What should you consider before starting installation?
Good preparation is the key to successful heater installation. First, it is recommended that you carefully study the manufacturer's instructions, paying particular attention to safety issues.
The next important point is the choice of location for installing the heater. Here are some useful points:
- The device must be accessible for servicing at all times.
- To install a wall-mounted model, you should choose a wall that can support double the weight of the device when fully loaded.
- It is necessary to diagnose the condition of the wiring, correct any identified deficiencies and compare the characteristics with the manufacturer’s requirements.
- Study the condition of the water supply system: pipes and risers, since the operation of the heater depends not only on the quantity, but also on the quality of the incoming water.
If the location for the heater is chosen correctly, it will be easier to install and maintain.
Conclusion
Summarizing all of the above, we can say that with proper connection and compliance with operating rules, the boiler will serve for a long time. It is important to note that if you are not completely confident in your abilities, it is better to turn to specialists for help. If you are confident in yourself and are going to connect the boiler yourself, then carefully monitor what you are doing and keep common mistakes in mind so as not to accidentally make them. To avoid mistakes at a very early stage, try to take all measurements with maximum accuracy.
Preparation
If you have not previously installed a boiler, then first of all decide on its future location, then select tools and materials.
Selecting a location
When searching, follow these guidelines:
- The wall must be strong, preferably load-bearing, in order to support the large weight of the tank (add the weight of the water to the weight of the device).
- Free access to communications and to the device is important, since the water heater will have to be serviced in the future.
- Do not connect the boiler to bad wiring. Typically, the power of models is from 3 kW.
- Do not connect the tank to rotten or rusty pipes.
- Choose a place closer to the pipeline so that you don’t have to cut into the system from the next room.
- An acceptable choice for installation is a bathroom or kitchen, less often a toilet or hallway.
It's actually not that complicated. Regular high-quality wiring will easily withstand an average power electric heater. There are no installation requirements or restrictions for this device.
We still recommend running a separate line from the meter to the tank to relieve the burden on the main wiring.
Tools
Tools and materials needed to install the boiler.
If you do everything from scratch, you will have to work hard. First, cut into the pipeline with cold water, make the wiring for hot water, and only then start connecting the indirect heating boiler. You will also need special tools and materials:
- metal-plastic pipes;
- tow;
- paste;
- sealing tape;
- flexible hoses for connecting the boiler and water supply;
- tees;
- Ball Valves;
- check valve;
- hammer drill (a drill is recommended only for lovers of masochism, since you will have to drill fairly deep holes in a strong concrete wall);
- roulette;
- level;
- screwdriver;
- gas or adjustable wrench;
- a set of regular keys.