Hello dear readers of the site. This article will probably be more useful to residents of high-rise buildings than to residents living in private houses. Although, if gas is not supplied to the house, or it is a country house, then a storage water heater will be just what you need.
In city apartments, the hot water supply is turned off twice a year: in the fall before the heating season and in the spring after the heating season. Each outage lasts on average 2 – 4 weeks. So it turns out that a city dweller washes in a basin for about a month or two every year. It’s good for some to have a bathtub and for others to have a shower...
The main mistakes made when installing a boiler
If the homeowner decides to independently connect the storage water heater, under no circumstances should the following things be done:
- replace the components supplied with the device;
- connect the device to the AC power supply if there is no water in the tank;
- disassemble the device when connecting a water heating device to the electrical network;
- turn on or use an ungrounded device;
- operate equipment with inappropriate water pressure parameters in the central water supply;
- Completely drain the water from the tank while the storage boiler is operating.
And most importantly, under no circumstances should safety precautions be neglected when connecting a boiler - a fairly powerful electrical appliance. If you have any doubts about the correctness of carrying out installation work yourself, it is advisable to seek help from professionals.
To understand what water heaters are, how to connect such devices and what are the benefits of using them, you do not need to be a professional electrician or builder. All installation work can be performed by every person who is at least slightly familiar with the structure of the water supply system and can understand the simplest electrical circuits. The main thing is attentiveness, following all safety rules and, of course, desire, without which it is better not to take on such work on your own.
https://youtube.com/watch?v=HA9JlpwQXTI
Electric water heater device
Plumbing Electrical circuit of a water heater Hot water supply provides comfortable living conditions for a modern person. Installation of water heaters must be carried out in accordance with the markings indicated on the body of the water heater: Marking.
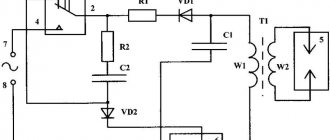
Here the difference is noticeable; for flow-through ones the price is rubles. Economical: in addition to heating the water itself, electricity is spent to compensate for heat loss through the insulation layer of the tank. Familiarize yourself with the existing nuances to get the job done as efficiently as possible. The connection is made from the thermostat output terminals. This is done due to the small diameter of the fitting, to which only a rubber hose with a small cross-section can be attached. At this moment, the transistor VT1 opens and the control electrode of the power thyristor VS1 is shunted to the minus of the circuit, from which it was previously separated by a voltage drop across the resistance of resistor R4.
This chain is configured so that with a current through the primary winding of 30A, a voltage of 45 volts is generated on the capacitor. The RCD and the automatic circuit breaker perform protective functions: the RCD eliminates the possibility of electric shock in the event of a leak, when the insulation is damaged or a breakdown occurs in the housing; Using a circuit breaker, the network is protected from overloads and short circuits. The PE neutral protective conductor is connected to the tank body using a special screw. 21 Hot water recirculation scheme
We recommend: Energy efficiency analysis of buildings
The procedure for connecting a water heater - preliminary work
Preliminary work begins with the installation of the water heater. Moreover, first you need to choose the optimal location of the column or boiler.
The first type of heating devices - the column - should be located close to the free valve of the household gas pipeline (no further than 2-3 meters), in a well-ventilated room.
A storage boiler can be installed literally anywhere. After all, electricity and water can be supplied anywhere. But before connecting the boiler to the water supply, it is necessary to take into account the heavy weight of the filled heater and the accumulative “nature” of this device, which limits the volume of hot water consumed.
Having decided on the location of the water heating device, you need to attach the column or boiler to the supporting surface. For the boiler, this stage proceeds as follows:
- Holes are drilled in the wall for anchor bolts, the position of which can be determined by “trying on” the empty (and light) water heater to the surface.
- Next, the boiler is “attached” to the wall, driving mounting anchors into the holes through the eyes in the heater brackets.
- You then simply tighten the anchor bolts, locking the fastener into the hole.
- Finally, you connect the heater to the mains. To do this, it is advisable to draw a separate line from the central panel using a 4 mm three-core cable. Well, as a plug and socket you should use a separate residual current device - a fuse, to which the electrical line and cord from the boiler are connected. Moreover, the installation of a separate line and RCD must be completed before connecting the boiler to the water supply.
A gas water heater requires a lot of trouble:
- First, you put a galvanized sheet on the wall, the dimensions of which coincide with the supporting edge of the speaker body. However, galvanization can be replaced with tiles or fire-resistant plaster.
- Next, you “try on” the speaker to the wall, marking the location of the fasteners along the lugs of the brackets of your speaker body.
- The next step is drilling the mounting holes.
- Next, you mount the column on the anchor bolts, driving them through the eyes and tightening them until they stop.
- The last stage - connecting the dispenser to the gas pipeline - is carried out only by a representative of the territorial gas industry. Self-connection may cause an accident or a fine for illegal tapping into a gas pipeline.
After completing the installation of the heater, you can proceed to connecting it to the “cold” water supply.
Methods for mounting a water heater
Wall-mounted water heaters have a mounting plate on the reverse side. With its help, the device is hung on hooks screwed into the wall. The location of the hooks and the center-to-center distance between them must exactly coincide with the holes or oblong eyes on the mounting plate. It is important to ensure strict horizontality so that the water level inside the heater tank does not shift and the operation of the device is not disrupted.
It is possible to use pins instead of hooks. With one side they are driven into the wall, and with the other they hold the bar in place with a nut. The weight of a fully filled heater should be taken into account when selecting fastener length and thickness. Floor-standing water heaters are installed on a stand and secured to the floor with anchors. The floor must be perfectly level so that the device does not warp.
Preparing to connect
When planning to install a boiler yourself, you need to carefully work out the work plan. This stage is a very important one and any mistake made by the master can complicate the further process.
The stage includes the following actions:
- The master performs calculations and selects the necessary anchors. The thickness of the mounting bolts is set depending on the weight of the filled tank. Since the fasteners will be constantly under load, it is necessary to allow for an error in the calculation. It is better to take massive anchors.
- Make a hole in the wall and screw a metal base plate to it. The unit will hang on it.
- A metal strip is attached to the heating device, which is mounted on the wall. For reliability, it is tightened with bolts.
It must be taken into account that the heater must be positioned strictly horizontally or vertically. Even a slight tilt is unacceptable, so marking is carried out using a mounting level. After completing the preparatory work, they begin to connect the device to the water supply system.
Types of electric water heaters
There are two large groups: flow and storage. Instantaneous water heaters heat the water that passes through them. In this regard, they have relatively small sizes, but very high power - up to 24 kW, but this is the maximum. For washing dishes and taking a shower, a power of 4-6 kW is enough, for taking a bath - 10-12 kW. So to connect such equipment, a dedicated power line with an RCD is required.
Water heaters of various types
Storage water heaters are also called “boilers”; they have a reservoir and a small power compared to instantaneous ones - from 0.8 kW to 4 kW. However, a separate power supply line is also desirable for them. The size of boilers depends on the volume of water contained in the tank. They have a cylindrical shape, and the cylinder can be positioned vertically (cheaper option) or horizontally (cost more).
The location for installing the water heater is chosen mainly depending on the existing connection conditions. Most often this is either a bathroom or a kitchen: both rooms have water supply. Secondly, the location is chosen for aesthetic reasons: so that the equipment is not too conspicuous. From this point of view, they usually choose a toilet or a bathroom. If there is space, this choice is optimal.
Electrical connection
To begin with, we want to introduce you to the basic rules for connecting a water heater to the electrical network. Compliance with these recommendations will allow installation to be carried out as safely and efficiently as possible.
- The socket for the boiler must be located in a place inaccessible to water splashes. Experts strongly advise using special waterproof sockets for these purposes.
- The water heater can only be turned on when the ground is connected to the electrical outlet. This can be done using a three-core wire (in this case, the socket must also be designed for three poles).
After making sure that all safety rules will be followed, you can proceed directly to work. The procedure will be as follows:
- measure the distance between the installation location of the water heater and the outlet;
- disassemble the device plug into elements;
- remove the insulating material from the cable;
- we strip the veins using side cutters;
- armed with a soldering iron, we connect the wires to the plug contacts (red - to phase, yellow/green/black - to ground; blue - to zero);
- remove the water heater panel and open the contacts;
- we strip the conductors at the opposite end of the cable;
- connect them to the contacts of the device and return the panel to its place.
You can connect to the electrical network differently - connect the water heater directly to the panel. In this case, you need to proceed as follows:
- lay the cable from the device to the electrical panel;
- We install an automatic machine near the water heater;
- we run the cable through the machine;
- remove about 100 mm of insulating material from the cable;
- we expose the phase from the machine;
- We connect the phase from the machine to the upper terminal, and from the water heater to the lower terminal;
- remove the insulating material at both ends of the cable, free the cores;
- remove the boiler cover, connect the wires to the device terminal;
- turn off the current supply and connect the heater to the electrical panel.
The following video shows water heater connection diagrams and their descriptions, which will help you understand how to connect the boiler correctly.
What to do if the thermometer on the boiler does not work
The main function of the heater temperature indicator is to control the water temperature. As soon as the water reaches the specified parameters, the temperature sensor is triggered, sending a signal to the control module. It does not show the exact temperature; its main task is to convey the degree of heating of the liquid.
If you have just started using a water heater to heat water and observe strong errors: the indicator shows that the temperature is low, and boiling water is pouring from the mixer, then it is better to contact a specialist.
What is required for installation?
Before installing an electric or gas boiler, you need to allocate a suitable place for it, taking into account the following points:
- placement of a water heater in an apartment or private house should be done taking into account ease of use and maintenance;
- it must be taken into account that when emptying or repairing the apparatus, a significant part of the water may spill onto the floor;
- It is convenient to connect the water heater yourself when the water supply and electrical networks are nearby and in the same room;
- Do-it-yourself installation and connection of a gas boiler involves connecting a pipeline supplying natural gas to the room.
Based on the listed conditions, the installation and connection of a storage water heater can be performed in the following areas of a private house or apartment:
- kitchen - above the sink;
- bathroom - above the bath;
- boiler room - above the tiled floor.
Before deciding how to connect the boiler to the water supply, you need to hang it from the wall. To complete all work, you will need an electric drill with an impact function (or a hammer drill), carbide-tipped drill bits and a standard set of plumbing tools, including a gas and adjustable wrench. The boiler connection diagram is assembled from the following elements and materials:
- check valve with safety valve in one housing (usually included with the boiler);
- bronze tee DN 15 (1/2");
- ball valve DN 15 (1/2") - 3 pcs., 2 of them - with American connection;
- pipes for connection (usually metal-polymer);
- FUM tape, flax or special thread for sealing joints.
https://youtube.com/watch?v=HA9JlpwQXTI
There is also an electrical diagram for connecting the boiler, according to which it is necessary to purchase differential circuit breakers for a current of 16 A (2 pcs.), a socket and plug with a grounding contact, as well as a power cable of the required length. The connection of a device operating on natural gas is carried out using a gas hose.
Tools and materials required for installation
When you plan to install a water heater yourself, you cannot do without tools. It doesn't matter what brand the boiler is. Let it be “Termex”, “Electrolux” or “Ariston”. The installation principle of storage water heaters is the same.
You will need the following tool:
- adjustable wrench and set of wrenches;
- impact drill or hammer drill;
- straight and shaped screwdriver;
- pliers;
- roulette;
- level.
You will need the following materials:
- flax or fum tape for packing threaded connections;
- Ball Valves;
- connecting tees;
- two flexible hoses or a plastic pipe for connection to the water heater pipes.
If the installation of the boiler cannot be done without replacing the wiring, you will need a cable, an RCD, a socket, and a 16 A circuit breaker.
Features of connecting a flow-through boiler
The flow-through design of an electric boiler, as in the photo, is installed directly into a branch of the water supply system intended for supplying hot water.
- The water supply in the central pipeline is cut off.
- At the point where the heating device is inserted, the pipe is cut, creating a rupture.
- Shut-off valves are attached to the ends of the breaks, which will allow repairs to be carried out in the future without shutting off the central water supply.
- Hoses connecting the boiler with shut-off valves are screwed onto the inlet and outlet pipes of the flow-through water heating system.
When independently carrying out work on dismantling heating equipment, instead of the central water supply, turn off the tap installed on the inlet pipe and only after that on the outlet pipe. Also, when using a flow-through water heating device, first turn on the water and only after that the heating device. If there is no need for hot water, then turn off the power supply and then the water.
Figuring out how to connect a boiler correctly is not that difficult, the main thing is to have the desire. But to be more confident, you can practice on pipe scraps so as not to spoil the main elements of the system. This will allow you to gain experience and avoid stupid and unnecessary mistakes.
Examples of connecting a boiler to a water supply
About signs of comfortable living
The presence of hot water in the house is one of the main signs of comfortable housing.
In apartment buildings, the hot water supply is often centralized. Water is heated separately in the boiler room and supplied to all apartments.
However, now such a water supply is economically ineffective, and also has many disadvantages in the form of a possible shutdown of the hot water supply during pipeline breaks or maintenance work in the boiler room.
Owners of private houses do not have access to such a supply of warm water, so they have to solve the supply problem themselves.
The solution is to use an autonomous hot water supply. A water heater is installed in the house, which provides heating.
This method of providing hot water is becoming so popular that apartment owners often abandon the centralized supply in favor of an autonomous one.
Water heaters provide homes with hot water in the right quantity, it is available at any time, and it is cost-effective.
Step-by-step instructions for installing a storage boiler
The installation diagram for a storage boiler is a little more complicated. Here you will need to correctly route the pipeline, securely secure the tank, and make electrical connections.
Choosing a location for the tank and its installation
The storage container takes up a certain space in the room, so it must be placed efficiently so as not to take up unnecessary space. But at the same time, the boiler should be located as close as possible to the water supply points. The remote location of the water tap from the heater increases the wait for hot water to arrive.
Convenient placement of a storage boiler with a separate bathroom
The mounting location is selected according to the layout of the room:
- The layout in a private house is different from apartments. Here the bathroom, toilet and kitchen can be located far from each other, and one boiler must supply hot water to all rooms. Here you need to determine the important room where heated water should be supplied first and install a water heater closer to it;
- The traditional layout of the apartment provides for the combination of all these rooms, so choosing the location of the tank here will be easier.
Most often, the tank is installed above the toilet. It does not take up useful space and is located close to the sewer, which makes it convenient to drain water from the safety valve. The unit is secured to the wall with anchors. A water tank has a lot of weight, so if the wall is loose, an additional support is welded under it from a profile pipe.
Connecting the water supply
The optimal connection option is considered to be a circuit with the ability to drain water from the container.
The step-by-step execution of the work looks like this:
- The house is disconnected from the cold water supply, and the hot water riser in the apartment is additionally shut off. The collection of all components of the circuit begins from the water heater suspended on the wall. To seal the connections, flax or FUM tape is wound around the threads.
- At the bottom of the tank there are two threaded pipes. On the right is the cold water inlet, marked in blue, and on the left is the hot water outlet, marked in red. Packing begins with cold water.
- A brass tee is screwed onto the inlet pipe. It must be turned with a transverse hole in a convenient direction to drain the water. A ball valve is screwed into the same hole through a brass adapter. A pipe with a hose for draining water is connected to it. A ball valve is also screwed into the downward thread of the tee to shut off the supply of cold water inside the container.
- Now it’s time for the most important thing – the safety unit. The boiler is equipped with a safety valve, which is mounted immediately behind the lower valve on the tee. To install it correctly, there is a guide arrow on the body. On the side of the valve there is a fitting for bleeding water. A transparent reinforced hose is attached to it with a clamp and lowered into the sewer.
- Original valves are not always reliable, so they often buy a “safety group” separately. It consists of a check valve installed on the tap coming out of the bottom thread of the tee. The safety valve is installed separately on the middle outlet of the tee.
- Next, it remains to supply cold water. This can be done with any pipes, for example, metal-plastic or eco-plastic, if desired. In order not to cut the main water supply pipe, the connection can be made through a tee, installing it on the threaded connection of the toilet tank or washbasin tap.
- The hot water unit is assembled in the same way as the cold one, only without a valve. In a private house, from the outlet of hot water from the boiler, pipelines are laid to water supply points. In the apartment, the water heater outlet is connected to the hot water supply pipeline. In this case, when the boiler is operating, close the tap on the riser supplying centralized hot water.
At this point, the water heater is connected to the water supply system, all that remains is to connect the electrical wiring and can be used for its intended purpose.
https://youtube.com/watch?v=HA9JlpwQXTI
Positive and negative qualities
By installing a water heater yourself, you can save a lot of money, this is the main advantage. But self-installation has other advantages.
Since the work is carried out by the owner of the house himself, when servicing or needing to replace a faulty water heater, you will not need to understand the connection system.
In the future, replacing the heater will be completely simple. In addition, installation work will increase your skills in performing various household tasks.
Among the disadvantages of installing a water heater yourself, one can note the possible occurrence of problems with connection to both the water supply system and the energy or gas supply.
In addition, incorrect work can lead to the system not working.
There are several factors to consider before installing a water heater.
You need to immediately decide on the type of water heater.
An electric storage heater, also known as a “boiler,” consumes less electricity, but it has fairly large dimensions, so you should immediately decide whether there is room for its installation.
A instantaneous electric water heater is much more compact and it is easier to find a place for it. But it consumes more electricity.
When choosing a storage heater, you should immediately decide whether the wall on which it will be located will support significant weight.
You should immediately take an interest in the wiring of the house. If it is old, it is unlikely to withstand a heavy load. Therefore, it may be necessary to replace the electrical system at home.
The wire cross-section will help determine whether the wiring can support the load.
So, in order for the wiring to withstand the load created by a 2 kW boiler, a wire with a cross-section of at least 2.5 mm is required. If a flow-through heater is installed, the wiring should be even thicker.
You should also take an interest in the water supply system. If, when laying it, they provided separate terminals for connection, then this is very good.
If there are none, but the system consists of plastic pipes, then inserting the leads is not so difficult. The most difficult situation will be with metal pipes.
But if the water supply system is already outdated, then it is quite possible that it will have to be completely changed. It is also important to know how to install an outlet in the bathroom.
Connection to different types of pipes
It should be taken into account that the diagram for connecting the boiler to the water supply may differ. It depends on the pipes. The most difficult work will be if steel pipes are installed in the apartment. They are difficult to shorten or lengthen without additional equipment. The master may need a grinder and other equipment. Each case is discussed in detail on video.
Polypropylene pipes
To carry out the work, you will additionally need a soldering iron and a wood file. Tees and couplings for connections must be selected from the source material. A polypropylene coupling with metal thread is the best solution; it is reliable.
The work process is simple if the pipes are on the surface. If the communications are embedded in the wall, the top covering will have to be opened to carry out the work. It is impossible to make a connection without damaging the finish. This will require the apartment owner to spend additional money on cosmetic repairs.
Metal-plastic pipes
Metal-plastic pipes most often pass along the surface, so there is no need to additionally tap the walls. Fittings are required for installation. Any connection scheme can be used. Tees are used for insertion. A heating device is connected to them through auxiliary pipes or flexible tubes
Steel pipes
You can do without welding when working with steel pipes. To do this you will have to buy a special tee. It looks like a clamp with a bend. The principle of use is simple, it is put on the pipe and the position is fixed with clamps. For a tight fit, a seal is used. It is prohibited to use dry welding for this purpose. The reliability of this substance is not enough for the system to fully operate.
Before installing the adapter, the pipes must be thoroughly cleaned of dirt, rust and traces of old paint. A threaded hole is made in the pipeline. It is needed to connect the tap and underwater hose.
Connection sequence
When installing a heating device, a safety valve is required. It will reduce the risk of a dangerous situation and ensure full operation of the device.
When ensuring self-installation, you need to proceed according to the following scheme:
- a tee is connected to the pipe;
- install a shut-off valve to drain remaining water;
- connect the tap to the adapter;
- connect a fuse with a drain outlet;
- install a shut-off valve.
In some cases, a filter and thermostat are connected. A special filter is required if the water in the pipeline is hard. It will prevent the formation of scale on the heating element and the walls of the container.
What to do if the boiler produces less hot water
Don't worry if you notice that your heater is producing less hot water than usual. If you decide to use a water heater (boiler) during the cold season, please note that the temperature of the water entering the water heater tank is significantly lower than in other seasons. Thus, the time required for heating increases, and accordingly, your waiting time also increases.
Another reason for a decrease in the amount of hot water may be an unclosed riser. If you don't screw the faucet tightly and don't turn off the water, then all the neighbors in your house will also be able to enjoy a hot bath. Therefore, it is better to once again check how tightly the tap is closed, and whether the water supply is turned off.
The principle of drawing water from a tank
There is one correct scheme for connecting a storage water heater, taking into account the features of its design and allowing, if necessary, to quickly empty the tank. This need arises for the following reasons:
- scheduled cleaning of the tank and heating element from scale;
- occurrence of a malfunction;
- moving or replacing the device with a new one;
- emptying a water heater in a country house or in a house with periodic heating in winter.
Connecting the water heater to the water supply, the diagram of its installation and placement must take into account that water is drawn from the upper zone of the tank. This is explained by the fact that at the top the water is the hottest, and in the lower zone it is replenished with a cold flow if there is a water supply in the hot water supply system. Selection occurs through a vertical tube, the cut of which is located in the upper zone.
Water from the container must not be allowed to return to the cold water supply system, so the boiler is connected to the water supply through a check valve. If the pressure in the network drops as a result of turning off the water, the valve will prevent the contents of the tank from flowing back into the pipe.
As a result of the standard connection of the boiler to the water supply, it will not be possible to quickly empty it by opening the hot water tap. Even unscrewing the hot water pipe from the fitting will not have an effect, since the water intake is located too high, and there is a check valve on the cold side. The drainage problem is solved by a simple diagram of connecting the water heater to the water supply system, assembled at the installation stage of the device.
Installation diagrams and solutions
You can connect a heating device to the centralized supply in one of two ways: through a security group or directly.
A security group consists of a collection of the following elements:
- shut-off valve;
- Check Valve;
- safety valve;
- expansion vessel.
Option number 1 . The presence of a safety group is traditionally used in indirect heating boiler installations, as well as when the pressure of the centralized system is higher than the limit parameter of the boiler operating pressure.
Classic scheme of indirect heating equipment. Two safety groups are used: 1 – boiler safety group; 2 – expansion vessel; 3 – boiler tank safety group; 6 – heating circulation pump; 7 – boiler circulation pump (+)
Option number 2 . Direct connection is usually applicable to small-capacity equipment with a flow-through operating principle. Direct connection is also allowed in conditions of lower and stable pressures of the centralized water supply. In any case, the installation diagram involves the installation of shut-off valves.
In order to be able to maintain and repair water heating equipment, it is equipped with shut-off valves at the inlet and outlet of the system (+)
Preparation
If you have not previously installed a boiler, then first of all decide on its future location, then select tools and materials.
Selecting a location
When searching, follow these guidelines:
- The wall must be strong, preferably load-bearing, in order to support the large weight of the tank (add the weight of the water to the weight of the device).
- Free access to communications and to the device is important, since the water heater will have to be serviced in the future.
- Do not connect the boiler to bad wiring. Typically, the power of models is from 3 kW.
- Do not connect the tank to rotten or rusty pipes.
- Choose a place closer to the pipeline so that you don’t have to cut into the system from the next room.
- An acceptable choice for installation is a bathroom or kitchen, less often a toilet or hallway.
It's actually not that complicated. Regular high-quality wiring will easily withstand an average power electric heater. There are no installation requirements or restrictions for this device.
We still recommend running a separate line from the meter to the tank to relieve the burden on the main wiring.
Tools
Tools and materials needed to install the boiler.
If you do everything from scratch, you will have to work hard. First, cut into the pipeline with cold water, make the wiring for hot water, and only then start connecting the indirect heating boiler. You will also need special tools and materials:
- metal-plastic pipes;
- tow;
- paste;
- sealing tape;
- flexible hoses for connecting the boiler and water supply;
- tees;
- Ball Valves;
- check valve;
- hammer drill (a drill is recommended only for lovers of masochism, since you will have to drill fairly deep holes in a strong concrete wall);
- roulette;
- level;
- screwdriver;
- gas or adjustable wrench;
- a set of regular keys.
How to install a instantaneous non-pressure water heater
Prepare tools and materials
- Water heater;
- spanners;
- hammer drill or impact drill;
- drill for concrete or wood;
- dowels or screws.
Select installation location
Non-pressure flowers, as a rule, are capable of providing only one water collection point, so there is no question of choosing a location. The device is installed instead of a faucet on the washbasin in the bathroom or kitchen, as well as next to the tap in the shower.
Secure the water heater
The device in the faucet form factor is the easiest to install. To do this, turn off the water on the mixer and remove the flexible hoses from it. Unscrew the faucet mounting bracket and remove it from the sink.
YouTube channel "Dachnik"
Assemble the water heater according to the instructions: attach the spout, screw in the inlet fitting and insert it into the hole in the sink. Screw in the fastening nut and tighten it to secure the flower.
Wall-mounted models will have to be mounted with dowels or screws, depending on the type of wall. Using a template or measuring the distance between the brackets, mark and drill holes. Secure the water heater with dowels or screws.
Connect to water supply
Everything is simple here too. The connection boils down to connecting the flexible hose, which you removed from the mixer, to the water heater fitting. Place the rubber gasket under the union nut and tighten it first by hand and then with a little force using a wrench.
YouTube channel Status 81
The wall-mounted flower can be powered from the same flexible faucet connection or from the shower. To do this, unscrew the watering can from the hose and connect the free end to the inlet of the water heater.
Important point! There should be no shut-off valves after the water heater. The water is turned off exclusively by the flow pipe itself or the tap to which it is connected. Otherwise, due to the lack of flow, the heating element may overheat and fail.
Connect to the mains
Compact non-pressure models usually have a ready-made wire with a plug, so the connection boils down to inserting the plug into a grounded socket. Since the water heater is a powerful device, it is prohibited to connect it through tees and extension cords. Due to the high current, the contacts in them can overheat, melt and cause a fire.
Do a test run
Turn off the tap on the hot water riser. Open the faucet and run water through the appliance. Wait a few seconds until there is a steady stream. Switch the appliance to heating mode by turning the lever or pressing the button. Check that the water is heating up.
Boiler installation.
Using the method described below, you can connect a storage water heater from companies such as Elenberg, Eltron, Etalon, Ferroli, Gorenje, Polaris, Stiebel, Thermex, Vega, Termex, Ariston, Atmor and others. It is considered the most effective option for connecting a simple vertical boiler, but first, let’s look at the design of the device.
The boiler consists of the following parts:
- heating element - element that heats water;
- Tank - maintaining the water temperature at the required level;
- Thermostat;
- Water drainage and supply systems.
The most important thing when choosing a boiler is the method of attaching it to the wall (vertical or horizontal) and the volume of the tank. Vertical devices are most often used: they take up less space than horizontal water heaters and connect to the water supply system much easier and faster
Connecting the storage heater
When installing a storage water heater, the technician must use a non-return safety valve, which ensures the correct functioning of the device and reduces the risk of unforeseen situations.
Mounted safety valve Source hi.decorexpro.com
Indirect heating boiler - what kind of unit?
This phrase means a tank filled with water, which is equipped inside with a heat exchanger coil connected to a boiler responsible for heating the house, or to another system within which some coolant circulates. The water in such a unit becomes hot due to the fact that the liquid supplied directly from the boiler to the heat exchange coil gives up its energy to the liquid located in the boiler tank itself. That is, it does not heat up directly, but only absorbs heat from another source. This is where the name for this unit came from – an indirect heating boiler.
Water heated in the unit can be used for a variety of household needs. Moreover, it remains in a heated state for a long time, since the system itself maintains the desired temperature level. By the way, you can install such a boiler not only in a cottage, but also in an apartment, hotel or other premises.
The boiler itself is a metal or plastic container, parallelepiped or cylindrical. The capacity of the tank can be anything and sometimes amounts to thousands of liters.
The water container is usually enclosed in another housing, and thermal insulation material is often laid between these two structural elements. It helps retain heat longer and also protects the outer casing of the tank from extreme heat. The water, which is directly responsible for heating the liquid in the boiler tank, usually circulates through a heat exchanger coil. The tank elements are protected from corrosion by the presence of a magnesium anode. To control the pressure in the unit, a so-called safety valve and thermostat are installed. Water circulation occurs thanks to the presence of a special pump system.
So BKN is a kind of “thermos” for water in the house. It does not heat the water itself, but is able to keep the liquid heated by the coolant in a warm state.
Varieties
Modern household water heaters are classified according to 4 main characteristics:
- Constructions.
- The type of energy used for heating.
- Installation method.
- Mechanism of action.
Let us examine in detail their main features for each criterion.
Design and energy type
Based on structural differences and the type of energy used to heat water, boilers are divided into 4 main types:
- Electric storage.
A thermostatic container of cylindrical or flat shape, the water in which is heated by an electric heater installed in the lower part. Among the most popular. The control system can be either the simplest mechanical or electronic with a digital display.
Main components:
- Thermally insulated double-walled housing.
- Inlet and outlet pipe.
- Thermostatic element.
- heating element.
- Anode.
Electric water heater with an electronic settings panel Source rumarkets.pro
Installation and connection of such a boiler at the dacha makes it possible to preheat the required volume of water, including at night in automatic mode. The device does not contain a combustion chamber and does not have associated disadvantages, for example, the need to remove exhaust gases. However, the installation procedure is quite labor-intensive and imposes a number of requirements on the mounting location.
- Electric flow-through.
It is characterized by compactness, lightness and simplicity of the device. The weight of the device usually varies between 1-5 kg. Water passes through the heating module without being delayed. Therefore, to maintain outlet temperature stability, constant pressure in the water supply system is required.
The device consists of the following main components:
- A heating element in the form of a tube through which water flows is heated.
- Temperature indicator.
- Relay.
- Flow sensor.
Electric instantaneous water heater connected to a shower Source vipvannaya.ru
The specifics of the device and the principle of operation of the unit force manufacturers to use powerful heaters - up to 9 kW. Therefore, installation involves the mandatory installation of wiring of the appropriate profile. In addition, frequent use will lead to excessive energy consumption.
- Gas storage.
It is a separately functioning gas equipment. In order to install a storage water heater of this type in your country house or in your home, you will need to hire a special service. In addition, to ensure safety, the selection of location, room layout, and type of wall covering must meet certain technical requirements.
The unit includes the following parts:
- Double thermostatic tank with insulation between the walls.
- Inlet and outlet pipes.
- Gas-burner.
- Thermostat.
- Combustion products exit pipe.
- Anode.
- Gas module.
For proper operation of the heater, proper installation of the smoke exhaust system and ventilation is required.
Wall-mounted gas boiler Source pechiexpert.ru
- Gas flowing.
Another type of water heater that runs on household gas. It is based on a burner and a heat exchanger coil heated by it. Passing through it without delay, the water is heated and supplied at the outlet to the consumer. The heating level is regulated by the intensity of the flame and the pressure in the water supply.
- Indirect heating.
A storage tank that is not equipped with its own heating element. Water enters it in a heated form from an external thermal circuit. As a rule, this is a heating boiler. However, there are modified versions of tanks when heating elements are additionally introduced into it, heating of which occurs due to alternative energy sources - wind, geothermal or solar generators.
It consists of the following components:
- Tank with double thermally insulated walls.
- Thermostat.
- Inlet and outlet pipes.
- From 1 to 3 heat exchange circuits.
- Device to improve circulation.
3 types of indirect heating boiler Source mosoblgaz.ru
See also: Catalog of companies that specialize in engineering systems (heating, water supply, sewerage and others) and related work
Installing an indirect heating water heater in a country house is possible if you have a powerful heating boiler and the need for a large supply of hot water. The tanks have a large capacity from 0.2 to 1 m³. Therefore, they are always installed on the floor and attached to the wall. At the same time, the strength of the structures must be appropriate.
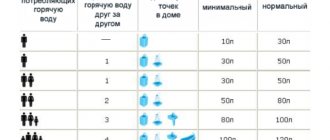
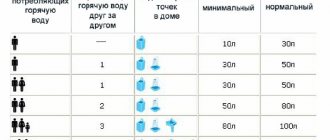
Advice! When calculating the volume of a storage water heating tank, it is necessary to take into account all types of consumers - washing dishes, laundry, cleaning, bathing, showering, etc., as well as the number of people living in the house. In this case, hot water is not used in its pure form, but only diluted with cold water. Therefore, the volume at the outlet of the tap will be at least a third or a half greater than the capacity of the boiler. For example, a 120 liter tank will produce 180-240 liters of ready-to-use water.
Installation method
According to the installation method, units of this type are divided into 4 main categories:
- Wall.
Models with a capacity of up to 200 liters are allowed for wall mounting. Moreover, the heavier the unit, the more demands are placed on both the fastening system and the surface. Preference is given to load-bearing structures made of concrete, brick and wood.
An example of installing a wall-mounted boiler Source td-viko74.ru
The requirements for flow-through models are not so stringent. They can be mounted almost anywhere, following the instructions. Installation above the sink, bathtub, or in a closet is allowed.
- Floor.
Heavy storage-type water heaters - regardless of the connection diagram with or without water supply - are allowed to be installed at the dacha or in your home only on the floor. Such models come from the manufacturer complete with a special stand.
The requirements for the floor surface, its evenness and strength are set in accordance with the level of load from the unit. Distortions during its installation are not allowed. Therefore, installation is carried out strictly according to the building level.
- Vertical.
Installation of the model is possible only in a vertical position. Since the heating element is located in the lower part, this ensures optimal heating of the water without significant temperature changes. Fastening is carried out at 2 or 4 points.
Vertically installed boiler in the bathroom Source pol-doma.com
- Horizontal.
It is compact compared to the above version. Can be mounted under the ceiling. Therefore, bathrooms and other small rooms are often equipped with models of this type. The disadvantage is the lateral location of the heating element. Because of this, the heating of the water is uneven.
Mechanism of action
According to the principle of operation, water heaters are divided into 3 types:
- Cumulative.
The device is based on a tank with a heating element. The latter is usually located at the bottom of the container. Thanks to this, the water is heated more evenly. The supply occurs from below, the intake from the top, which corresponds to the natural distribution pattern of water flows.
The unit's thermostat regulates the heating level. When it reaches the desired value, the heating element turns off; when it cools down, it turns on, on the contrary. When the valve is turned on, hot water flows out of the tank, and cold water from the water supply flows in its place under pressure.
Storage water heater design Source otoplenie-gid.ru
- Flow-through.
A instantaneous water heater is much easier to connect than the option discussed above. It does not take up much space and is light weight. Its operating principle is based on heating a cold water stream as it passes through a tubular heating element.
- Indirect heating.
In an indirectly heated boiler, water passes through a coil tube located in a large volume of heated water. As a result, the flow is heated and supplied to the needs of the consumer. At the same time, water enters the container itself in a heated form from the heating circuit. Sometimes the tank can be equipped with a special additional heating element.
Self-installation of a boiler
You can install an electric boiler yourself. This will require plumbing and electrical work.
Preparatory stage
This stage of work includes calculating the volume of water consumed, choosing a good location for the device (it is necessary that the user can easily reach all connecting elements of the system to simplify maintenance of the device).
If the boiler is storage, you need to make sure that the wall can support its weight with water (partitions that are too thin or plasterboard will definitely not work). The closer the device is to the water supply pipes, the better, since you will not have to lay an additional section of the water supply pipeline.
To work you will need:
- building level;
- ruler or tape measure;
- perforator;
- adjustable wrench;
- pliers;
- tees-fittings;
- shut-off valves;
- connecting hoses (for water drainage);
- additional pipes (if necessary), you must first ensure that the pipes are able to withstand the required load;
- sealing tape, tow or special paste (for sealing connecting elements).
After making sure that the location is chosen correctly and all the necessary materials and tools are available, you can proceed directly to the installation, working according to the finished scheme.
Installation and connection of a water heater
The first thing to do is to place the device at the mounting location: the distance between it and the ceiling must be at least ten centimeters, otherwise it will be simply impossible to hang the tank on the fasteners.
Carefully mark the attachment points (with a pencil or marker). You need to drill holes at the marked points and tighten the fasteners to the required depth.
The photo shows the main elements of connecting the boiler
For fastening, it is better to use steel hooks that come with the device. If they are not provided, then you need to choose a mount based on the weight of the boiler. Afterwards the tank is hung on them using grooves specially provided in its body.
Before installing the tank, you need to make sure that everything is in order with the threaded connections, since they are often unscrewed by 1-2 turns. In this case, it is recommended to drive the threads with a die 1/2 inch, but carefully, without excessive force.
Next, connect the device to the water supply. These works may have their own characteristics and differences depending on what material the pipeline is made of.
For polypropylene, metal-plastic and steel pipelines, you will need to use a special tool designed specifically to work on each of these materials. Also, for inserting into the pipeline, you will need to select various auxiliary parts (tees, couplings and fittings).
But the order of work is the same in all cases. First, turn off the water supply. The pipe is cut, and a branch is installed at the cut site. To do this, a tee is soldered into the pipeline. Pipeline branches are equipped with an MPH coupling, to which a shut-off valve is connected. The shut-off valve is connected to the boiler pipes directly or using flexible hoses.
Installation of shut-off valves
To ensure that water is supplied to the tank from a cold pipeline, the following steps are performed:
- installation of a tee on the tank pipe;
- connecting the drain valve to the side of the tee;
- installation of a check valve or explosion valve on a tee;
- shut-off valves are mounted in series behind the valve;
- connection of shut-off valves to the water supply system.
It is recommended to perform these manipulations at a branch from the central pipeline. This will prevent damage to water taps during installation.
What to do if the safety valve is leaking
The safety valve has an important function; it corrects the operation of the entire water heater. When water is heated, it increases in volume, which creates increased pressure in the boiler; when this pressure begins to exceed the permissible limit, the spring in the safety valve compresses and opens it. Excess fluid is released, then the pressure returns to normal. A “leaking” water heater safety valve is actually evidence that it is working correctly. During the heating process, up to one and a half liters of liquid can leak from the safety valve.
If the valve leaks when the device is turned off, it is necessary to install a pressure reducer, since the pressure of your network exceeds the permissible atmosphere value 4.
What to do if the water in the boiler has an unpleasant odor
If you do not use the water heater regularly, the liquid in the boiler may stagnate and an unpleasant odor may appear. Stagnant water is a favorable environment for the active proliferation of bacteria; their vital activity is a source of rotten odor.
In order to get rid of an unpleasant odor, you need to take the following measures:
- completely drain the stagnant liquid from the boiler;
- fill the tank with clean water;
- set the maximum heating value;
- leave the boiler on for a couple of hours;
- Drain the heated water and refill the tank.
After this procedure, the unpleasant odor will disappear.
In addition to bacteria, the materials from which the device is made can become a source of unpleasant odors. If you use a water heater made from low-quality plastic, then during the heating process the plastic will begin to release harmful substances such as formaldehyde or phenol. As a result, the heated liquid will smell like medicine. Unfortunately, to solve this problem it is necessary to replace the device. Filters will not be able to purify water from formaldehyde compounds.