The quantity of bricks should be known in advance, because, firstly, such a product is purchased or ordered in bulk: getting a couple of pieces later will be problematic. Secondly, unused material without proper storage in the house can deteriorate and it turns out that the money was wasted.
Calculations are not the most difficult thing, but they require attentiveness, intelligence, accuracy and accuracy. Professionals often use a tape measure, plumb lines, levels, and certain rules to determine the amount of building stone, mortar and financial costs, but there are simple schemes for beginners. It's enough just to be friends with a calculator.
Method one
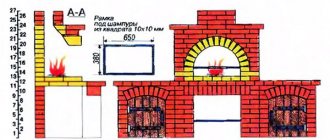
This method is based on a conditional formula: count the amount of material in the 1st continuous row, multiply by the number of rows in height (one row is approximately equal to 7 cm), subtract a third from the result. Let's assume that the base of the oven is 3x4. Then the first row will take 24 bricks. A building 2.4 meters high with a cut of 30 cm will have 20 rows: (240-30)/7 = 30-1/3 = 20. Multiplying by 24 bricks of the first row, we get the number 480. At least 50 will be needed for cutting. As a result, we have 530 pieces.
The basis for the calculation is to take the amount of material in the first continuous row.
It should be taken into account that a separate calculation is carried out for the pipe. If they usually take four linear meters, each with 14 rows, then in total such a structure requires 336 bricks (6 pieces per row). Summing up the results, we get 866 units of building material for a small stove. Based on this calculation, you can already plan a purchase of at least 5,000 rubles.
Method two
The formula is a little similar to the previous one, only at the last stage we do not subtract one third, but multiply the result by the filling factor (for heating stoves - 0.8, for a stove with a heating panel - 0.65). In a building measuring 90x90 cm, for the first row you will need 24.5 bricks, for 30 rows, multiplied by a stable indicator of 0.65, - 477.75 pieces. Round up to 480. On average, a four-sided chimney 4 m high takes 224 bricks (56 pcs./m). Plus 56 for cutting. The overall result is 760. You will have to spend a little more than 4,500 rubles on this stove.
Both methods of calculation are conditional. For a Russian stove, a “Dutch stove” (three-turn construction) and a stove with a stove, the calculation is carried out separately for each component.
Heating area m2
Optim. oven perimeter: -0.5 cm by -0.5 cm.
Oven height mm or 0 rows.
Quantity of bricks 0 pcs.
Payment service tarexi.by © 2020
Taking into account the one side of the stove you have chosen, its optimal size is 0 m by 0 m or 0 brick by 0 brick and 0 m in height. 0 bricks will be used to lay a stove of this size.
Knowing the size of the stove and the number of bricks for its laying, you can find out how much it will cost you to build such a stove. To do this, use the “Oven Cost Calculation Service”.
Furnace departments
Any stove, be it Russian, Dutch, Swedish or a sauna structure, consists of several main sections. For each of them, the material should be selected separately, since certain characteristics required specifically for a specific part of the hearth are important.
Foundation
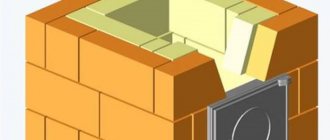
The first step is to build the foundation. Since the structure is usually located on the ground floor, the proximity of the ground must be taken into account. Therefore, a concrete slab is usually laid as the first layer, below the floor level, and a layer of waterproofing is applied to it.
Thus, we get a layer that will withstand the mass of our future structure, and also will not allow moisture and cold that come from the soil to affect it. Solid brick rows are usually laid on top of the waterproofing layer; there can be from two to four.
Another section of the design that raises the most questions about the selection of material is the firebox. This is the very place where firewood is laid and where the fire is made. The bricks in the firebox are directly exposed to the flame for a long time, and this happens over many years. Therefore, appropriate requirements are imposed on them.
As a rule, fireclay blocks are used to lay out the firebox. They have the highest fire resistance of all possible options, so they quietly perform their functions throughout the entire life of the fireplace.
In principle, the entire structure can be assembled from fireclay. But this is very expensive. In addition, the firebox lined with cream-colored fireclay blocks looks very advantageous when surrounded by red brick blocks, so this solution is optimal from the point of view of not only functionality, but also design.
The chimney does not come into direct contact with the fire and does not carry a particularly high load. However, it also has certain requirements.
Firstly, it is exposed from the inside to aggressive chemicals released during combustion.
They have a detrimental effect on the condition of the building material from which the inside of the chimney is lined, so special attention should be paid to the stability of these bricks in various destructive factors
Secondly, the part of the chimney that is located above the surface of the roof of the house - that is, the pipe - is also subject to attacks from the external environment. Rain and snow, frost, wind, sudden changes in air temperature - all this significantly undermines brick blocks.
The appearance of the fireplace is also important, especially in modern private homes. In principle, if we are talking about an old hut, then usually the structure is simply covered with whitewash, as in the old days.
But still, as a rule, recently preference has been given to finishing with facing bricks. This option is suitable for the Russian oven, and for the Dutch oven, and for other varieties.
When choosing a cladding, you need to consider two factors:
- heat capacity. She must be tall. The brick is required to accumulate as much heat as possible;
- thermal conductivity. This ability is important so that the stove not only stores heat, but also releases it into the room.
As a rule, both of these indicators are present in second-grade ceramic facing bricks. This is the material that experts recommend using for the exterior finishing of the stove structure.
Any stove, be it Russian, Dutch, Swedish or a sauna structure, consists of several main sections. For each of them, the material should be selected separately, since certain characteristics required specifically for a specific part of the hearth are important.
Foundation
The first step is to build the foundation. Since the structure is usually located on the ground floor, the proximity of the ground must be taken into account. Therefore, a concrete slab is usually laid as the first layer, below the floor level, and a layer of waterproofing is applied to it.
Types of mortar when laying a furnace
Bricks for masonry
Ordinary cement mortar is not suitable for installing a stove or chimney, since it cannot withstand high temperatures; it is used only when constructing the foundation of a stove. For laying a firebox or ash pit, where the solution is in direct contact with the fire, a clay composition is used, since the clay only becomes stronger when fired by fire. Lime mortar is used to lay out the chimney and chimney.
Height adjustment
To adjust the height of the heating device, special bolts are used, which are installed on its legs, or using supports. To set the required distance from the bottom of the firebox of a brick structure to the floor, lay several rows of bricks. Basic requirements before placing the combustion chamber in height:
you need to ensure a distance to the floor of 300-400 mm; if there is a niche for firewood under the firebox, this distance may be greater; When calculating the placement of the bottom of the combustion chamber, please note that you need to take into account the structure of the floor with all its components. Think about this when planning your heating system.
Fireplace size calculation
Fireplace size calculation
or rustic unpretentiousness against the backdrop of modest charm
The etymology of the word “rustic” speaks of the most characteristic features of this style - deliberate “roughness”, “rudeness”, stylization for a rustic interior (this style is also called country). The desire of our ancestors to introduce an element of aesthetics into the arrangement of their primitive home gave rise to this architectural trend, which subsequently began to develop so widely and comprehensively.
Country style is characterized by natural details, components and materials, emphatically “rough” processing and an open shape of the hearth. The most suitable materials are: shell rock, sandstone, tuff stone, etc.
How to calculate the number of bricks
The amount of this material depends on the size of the Dutch oven. If there is a ready-made project, then, as a rule, the amount of building materials is indicated. Experienced furnace specialists also know how much material is required for a furnace of a given size. But if you plan to lay a Dutch oven with your own hands, there is a universal formula for counting the number of bricks. It should be noted that the quantity calculated here is also imprecise, conditional.
You should calculate the number of bricks required to lay out the bottom row, provided that they are laid solid. Then calculate how many rows you plan to lay out in height, taking into account that the height of one row is approximately 7 cm. Multiply these two numbers and subtract 1/3 from the result.
//www.youtube.com/watch?v=apKtactWkqo
Let's say the base of the stove measures 3 by 4 bricks. It turns out that there will be 24 pieces in the first continuous row. Then you need to calculate the height of the future furnace. If the height of the house inside from floor to ceiling is 2 m 40 cm, the cutting height must be subtracted from this number - approximately 30 cm. The result will be 2 m 10 cm. Taking into account the row height of 7 cm, the result will be 30 rows in height. Then you should subtract a third of this number. 30 divided by 3 equals 10. Subtract 10 from 30 to get 20 rows. Then you need to multiply 20 by 24. You get 480 pieces. It will take about 50 pieces to cut, in the end it turns out that for such a stove you will need 530 bricks.
The amount of material per pipe is calculated separately. 1 linear m of pipe contains approximately 14 rows. For example, one row of pipe consists of 6 bricks, 6 multiplied by 14, you get 84. This number of bricks contains 1 m of pipe. Let the length of the pipe be 4 m, then 84 is multiplied by 4, you get 336. The result is that you will need 336 pieces per pipe.
The formula is quite simple. Of course, the amount of material calculated is not exact. But at the same time, you can already estimate how many bricks will need to be purchased and how much it will cost.
The Dutch oven has a simple design, is light weight and fits perfectly into a small room. It does not require large financial costs. For your dacha, you can build a rocket stove out of brick.
//www.youtube.com/watch?v=I4up-2P_lkc
It heats up quickly and can heat a room a few hours after it is lit. However, this design also has disadvantages. Its efficiency is about 40%, so it is difficult to heat houses where people constantly live. If you don’t close the view after heating, the stove will quickly cool down; it has a small heat capacity, so it has to be fired up often. These properties make the Dutch oven the most suitable, economical option for heating a summer house, garden house and other premises where people do not live permanently.
Russian style stove design
They put different models of stoves. However, any of the options is a heating and cooking structure. In addition, such a brick structure is equipped with an oven. Most of the options are also equipped with a bed of various sizes.
The laying of a Russian stove involves the construction of the following individual parts:
- A furnace, which is a firebox or cooking chamber. This compartment is used to store fuel, which is usually firewood. In the same chamber, dishes with products for heat treatment are installed.
- An oven that is used for placing and drying firewood. This part is not included in every model, because this department is not very functional.
The oven is often used to place firewood Source barbeku-stroy.ru
- A pole, which is a niche that is located in front of the crucible. In this part, a hob is most often created if the stove design implies its presence. In the absence of a stove, the hearth is used as a space where dishes previously cooked in the crucible are placed. This allows you to keep food hot longer.
- A cold stove, which is also not available on every model. However, this design element is typical specifically for a Russian-style stove. This department is used to store various utensils.
- The roof of the furnace, which is created with a slope towards the front part of the stove. Heated air accumulates under this structure. As a result, there is good heating of the stove walls and the stove bench, if it is located in the upper part of the structure.
- The hearth, which is the bottom of the crucible or chamber intended for cooking. The laying of this element is also carried out with a slope towards the front part of the stove. This feature of the hearth makes it easier to move dishes. To make it easier to move, this element is carefully polished during the construction of the entire structure.
Lined with a stove under the bottom of the cooking chamber Source mangal-besedka.ru
- Over-tube, made in the form of a niche located above the pole. A chimney is mounted above this part.
- Dushnik with outlet to the smoke exhaust duct. A Russian stove, the design of which includes this element, allows you to connect an old samovar that has a pipe for removing smoke. It is inserted directly into the choke. Although now stoves with it are usually not created.
- Thermal brick channel, the construction of which is carried out above the pole.
- A bed, usually located above the furnace and behind the main smoke exhaust duct. This allows this part of the structure to always warm up well.
On a note! In the old days, a couch was always used as a bed in winter. It was specially created in a large size so that several people could sit in this place at once.
- Views, which are a window, which is additionally equipped with a small door. Behind it there is a damper. It allows you to completely block the chimney. The damper can also be used to regulate the draft. This element is moved horizontally. More often, factory-made valves are installed instead of dampers.
A cross-section of one of the Russian-style stove design options Source pinimg.com
Modern brick heating structures are more functional structures than the ancient versions. Many homes have a Russian stove with a hob. Even structures with a water heating tank are being built.
On a note! Modern models are created with the possibility of heating the section under the firebox. This feature allows the entire structure to warm up much faster. Due to this, a comfortable temperature is created in the rooms in a short period of time.
Modern versions of Russian-style stove designs may have different departments. This allows you to use only the part with the hob in summer. After all, in hot weather there is no need to heat the room, but only need to cook food. This type of stove design allows you to maintain a comfortable microclimate in the building and at the same time save firewood.
Stove with hob Source mainavi.ru
For winter, a Russian-style stove is an ideal heating structure. It can be a multifunctional design. After all, it often houses an oven, a hob, a fireplace, a container for heating water, and a bed at the same time. In this case, the structure itself will heat the premises of the house.
See also: Catalog of companies that specialize in the design and installation of fireplaces and stoves
Peculiarities
The structural features of a classic fireplace suggest that air access is provided to the firebox through the fireplace window. Experts have calculated that the optimal traction force speed for a heating device of any size should be less than 0.25 m/sec. In practice, it is difficult to measure thrust speed. Until the fireplace is lit, its presence can be determined by the vibrations of the flame of a lit paper sheet. The user of a fireplace can only verify the adequacy of the traction force in practice.
Its presence or absence is also influenced by such external parameters as:
- indoor and outdoor temperatures;
- chimney condition;
- type, volume and dryness of fuel.
The main condition for the serviceability of the fireplace is to comply with the basic parameters and their relationships in the design of the heating unit. Optimal parameters of the heating design will allow you to organize high-performance operation of the device. An ideal result can be achieved if the basic requirements are met.
To avoid any violations in the device, the fireplace must meet the following tasks:
- provide warmth;
- remove smoke from the room;
- ensure the correct amount of air in the combustion chamber.
The standardization of dimensions mentioned above does not lead to the same appearance of all devices. Among all the device parameters, there are some that really affect its performance.
Certain dimensions must be implemented in projects exactly. These include:
- linear dimensions of the combustion opening;
- chimney dimensions;
- distance from the floor to the first edge of the window;
- tooth location;
- parameters of the pipe width in the area where the tooth is located.
Other parameters do not affect the operation of the device, but only determine the difference between the devices. The dimensions of the portal are often associated with the dimensions of the combustion chamber. They are associated with certain location parameters.
There is no absolute value:
The dimensions of the device are closely related to the volume of the heated room.
When implementing your own project, try using the table below. It specifies the conditions for normal operation of the device. Masters use similar tables. The data presented in the table is formed from certain values. The starting point of calculation for creating a fireplace is always the area of the room. In accordance with this value, the size of the fireplace combustion window is determined. To do this, the area of the room is divided by 50. Next, the dimensions of the furnace are determined by calculating the ratio of width and height. Calculations are expressed as a fractional value of 2/3.
With a buried combustion chamber, the gas removal rate increases.
This is bad, since the warmth in the room cannot be expected in such an outcome. With a shallow combustion chamber, good traction force will not be achieved. Combustion products will begin to enter the room. The depth of the combustion chamber must be related to the height of the windows. Two-thirds of the latter value are proportional sizes that have been verified over the years.
To make it clearer, we give an example of the calculated indicators of a fireplace for a living room with an area of 28 square meters. meters. First, 28 needs to be divided by 50, we get 0.56. These are the parameters of the combustion window. The area of the combustion hole will be 0.61x0.92=0.5612 sq. m., the depth of the fuel chamber is (610x2) /3 = 406.7 mm. The calculated figure can be rounded: you get a fuel chamber 40 cm deep.
In addition to the firebox, a standard fireplace includes a ventilation duct (chimney).
The dimensions of the ventilation duct openings are usually 1/8, 1/15 of the dimensions of the combustion box. In this case, the length of the chimney duct is taken into account. The permissible height is 10 meters. In this case, the design should not be too low. The most optimal height of the chimney structure is 4-5 m. The device is usually supplemented with knee bends.
The required height of the chimney is achieved with a specially laid foundation. Often the pedestal is not connected to the foundation of the house. It also serves as a safety platform for the fireplace. Therefore, it is often made to protrude several centimeters beyond the hearth.
The fuel chamber is placed on a pedestal made of non-combustible materials
, the height of which can be from 30 to 40 cm. An increase in the height of the pedestal is allowed by the structural features of the chimney. In some cases, a place under the pedestal is organized for storing firewood. Calculations of the position of the firebox, as well as the pedestal itself, include the characteristics of the flooring material.
How to build a brick oven - nuances?
Experienced people suggest that it is best to hire a professional stove-maker for this purpose. But if you decide to do the stove masonry yourself, start with a project. It is important to provide for all the functions that you expect to receive from the stove: cooking, baking, keeping warm, sleeping place if necessary, etc. Provide detailed order. This will help you not only during the work process, but also in calculating building materials before purchasing.
Remember that a stove, like a house, needs a separate foundation, and it should not be connected to the foundation of the house. After the stove foundation has hardened well, lay the waterproofing and begin laying.
Advice for beginners from professionals
To better understand how to install a Dutch oven and make as few mistakes as possible, you should listen to the following advice from experienced craftsmen:
- If the area of the room in which the Dutch oven will be installed is 40 m2, then it is possible to determine the optimal dimensions of the oven. For a stove whose height is 210 mm, dimensions of 780x580 mm are considered acceptable.
- In order for the masonry to be of the highest quality possible, before laying the bricks, experts recommend immersing each of them in water for a few minutes - during this time, excess air bubbles will be removed from them. This will ensure that during laying the brick will not absorb too much moisture, as a result of which it will turn out to be of better quality.
- Due to the fact that door frames installed during masonry are sensitive to high temperatures, before installing them in the oven they are either varnished or wrapped in asbestos cord. These materials are known to have fire-resistant properties.
- Most often, during the repair of a stove that was in operation, bricks break off at the ends and corners, which will then have to be restored. To prevent such a problem from arising, during brick laying it is advisable to finish it with special plates of various shapes.
- There is another fairly important quality indicator that guarantees long-term operation of a Dutch oven. Experts recommend maintaining the distance between the chimney and the roofing. We must strive to ensure that it is more than 150 mm.
conclusions
Don’t think that building a Dutch oven is completely simple and can be easily done without skills and experience. Rather, on the contrary, it is a process that will require from the master not only technical knowledge, but also attention to detail, accuracy and diligence. In our article, we tried to provide as many practical recommendations as possible from experienced stove makers to make it easier for you to learn this process. We hope that it will help you avoid common mistakes and make a high-quality and functional stove with your own hands. It is worth noting that all recommendations are dictated not only by experience, but also by safety precautions. Therefore, you should not experiment with building a stove, otherwise you cannot avoid serious risks not only to health, but also to life.
https://youtube.com/watch?v=GlVclepGte0
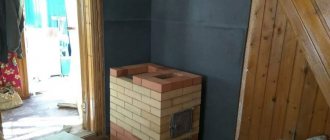
Brickwork of the stove base
stove base masonry
At the end of all calculations, exactly twenty rows are obtained and now this figure must be multiplied by twenty-four (the result is four hundred and eighty). Also, we must not forget that an additional fifty bricks will be needed, which will then additionally need to be added to the general cutting.
During laying, we also must not forget that the required number of bricks to build a chimney must be calculated separately. And a novice builder will wonder how many bricks are in a linear meter. In order to build one linear meter of a standard pipe, you will need fourteen rows of bricks (each row has approximately six bricks). It follows from this that there are approximately eighty-four bricks in one linear meter.
A similar formula for calculating building material is distinguished by its simplicity and convenience.
But, it is important to remember that such a formula is conditional and you can easily make mistakes when making calculations (so double-check the resulting numbers several times)
You can also read about the features of stove construction here.
Bottom line
Now you know how many bricks are needed for the stove. It is not difficult to calculate the amount of stone needed to build a stove on your own. Errors can only occur in numbers that need to be double-checked several times. Construction work on the construction of a furnace requires not so much an exact amount of material as its good quality. There are a large number of seemingly similar materials on sale, but they all have different quality.
The described calculation methods are used only in cases where the work is planned to be carried out independently. Hired workers will perform all calculations using their own methods. Don’t be afraid to pick up a calculator and then go to the store and purchase the necessary materials in the required volume.
Which brick is suitable
Choosing the right brick is very important when creating a stove. It must be of high quality in order for the stove to be economical, heat up quickly and retain heat for a long time.
The quality of bricks can only be determined by personal inspection.
Fireclay contains 70% fireclay clay. Its main qualities are refractoriness and fire resistance. It is from this material that a brick oven will be of high quality. It heats up quickly, but it takes a long time to release heat. Brickwork is also made from solid ceramic bricks. It is created artificially and when fired it becomes durable, moisture-resistant and heat-resistant.
It is advisable to choose a brick that is whole, without cracks, of the correct shape, and of a standard size. How much will be needed for the future stove depends on this size and the quantity in the tray. Usually there are 250 pieces in a pallet, but sometimes there are other quantities depending on the manufacturer. Ceramic bricks must have smooth edges in order for a product made from it to look aesthetically pleasing.
Recommendations for choosing bricks
In order to purchase high-quality material that will not let you down even after several years of use, you should carefully approach the selection procedure. Simple tips will help you do this:
- The counterfeit contains foreign inclusions, such as individual pebbles or pieces of limestone.
- It is advisable to buy the entire amount of material at once from one manufacturer and one batch.
- Brick that was not fired has a pale appearance and deviations from standard dimensions.
- The listed recommendations will help you correctly select and calculate the material for laying the stove. The process itself will require not only high-quality materials, but also solid experience.
Correct definition of parameters
A corner fireplace, the dimensions of which have already been calculated, can be made of any materials and have a certain lining of the hearth. Before making your choice, we recommend that you familiarize yourself with the following selection rules:
Criterias of choice
Detailed description
Decorative hearths
The dimensions of a corner fireplace largely depend on the type of hearth chosen for installation and the fuel used for its operation.
If you are looking for a purely decorative solution or a firebox that will serve as an additional source of heating for your house or apartment, we recommend that you pay attention to fireplaces that operate using bioethanol or electricity.
Effective foci
Installation instructions for the finished model are always included in the basic package. The most effective fireplaces that can become the main source of heating in rooms are gas and classic wood-burning structures. If installing a gas boiler is possible both in a private and apartment building, then wood-burning fireboxes require a chimney, which is only possible in your own home. It should be noted that the installation of such installations is more complex, costly and time-consuming.
Budget materials
The chosen finish, materials for making the hearth and portal also play a big role. The most inexpensive and budget coatings are plasterboard, metal profiles, ceramic tiles, and decorative plaster. Due to their low cost, the design of portals, fireplaces or such cladding provides lower efficiency and efficiency.
Expensive coatings
The price of materials and coatings that form and provide the furnace with additional heat capacity, efficiency, and heat transfer is quite high. This category includes tiles, natural minerals, cast iron, steel
The distinctive features of the materials are practicality, durability, fire resistance, easy maintenance and environmental friendliness.
Comparative characteristics of red and fireclay bricks
To lay the stove, blocks of different composition, size and shape are used. As a rule, red and gray fireclay bricks are used to create the body of the hearth. Each of the materials has several varieties that differ in technical characteristics.
The dimensions of the red brick for the stove are 120x250x65 mm. Types:
- Standard. Used for laying out walls, deck chairs and chimneys. Frost resistance F 50, moisture absorption 8-10%, thermal conductivity 0.51 W/(mK), voids up to 13%.
- Refractory. Designed for high temperatures up to +1750°C. Thermal conductivity from 0.70–0.85 W/(mK), voids from 8%, moisture absorption 8%.
- Backfill double. Used for walls, which is convenient for speeding up construction. Frost resistance F 150, moisture absorption 10%, thermal conductivity 0.50 W/(mK), voids up to 13%.
- Ceramic. Used for laying the foundation and base of a brick hearth. Frost resistance F 50-100, moisture absorption 6-16%, thermal conductivity from 0.70 W/(mK), voids 13%.
- Basement. Frost resistance F 100, moisture absorption 12%, thermal conductivity 0.51 W/(mK), voids less than 13%.
The weight of the red stove brick is 3.4-3.6 kg, the double model is 6.9-7.2 kg.
Fireclay blocks are classified into the following classes:
- SHA. Used to form fireboxes, designed for temperatures of +1800°C.
- ShB. A universal, relatively inexpensive material that can withstand heating up to +1600°C, which is quite enough for a household device.
- SHL. A lightweight option, in demand during construction without a heavy foundation. The fire resistance level is +1500°C.
When designing a fireplace, you can choose shortened and elongated blocks, shaped, large, special and complex. This will make laying easier and reduce the amount of additional fitting work.
Calculation example
To understand the calculation method, it is worth considering it with an example - this will allow you to later calculate how many bricks are needed for a stove, but for an individual project. Regardless of the perimeter of the stove, its first row is still laid out completely - for example, 4x4 bricks, i.e. for a monolithic first row you will need 32 bricks.
To continue calculating the bricks for the stove, you need to determine the number of rows, for which the height of the room must be known. A standard single brick has a height of 65 mm, and the thickness of the seam between rows is 5 mm. As a result, it turns out that the total thickness of one row is 7 cm. With a room height of 2.8 m, 30 cm is subtracted from this value for the fire protection structure, and the calculated size of the stove is 2.5 m.
The resulting value must be divided by the thickness of one row, and in this case you get 36 rows. By multiplying the calculated number of bricks required to completely lay one row by the number of rows, the result is 1152 bricks. The design of the stove is one-third hollow, so 2/3 of the total number of bricks is calculated - and this is 768 bricks.
The next step to find out how many bricks are needed for the stove in the house is to calculate the number of bricks for the chimney. In a standard square pipe, each row consists of 6 bricks - and for a 4-meter pipe consisting of 57 rows, 342 bricks will be required. Here the calculation method is exactly the same as in the case of the main part of the furnace. Of course, this method is not suitable for determining the number of bricks in the case of round or rectangular chimneys.
When deciding how many bricks you need for a stove, you must take into account the number of bricks that will be used for cutting. This amount directly depends on the design of the stove, its location and the thickness of the wall, if the stove is built into it. For a single wall, the minimum groove width is 25 cm, so a single groove is laid out on each side of the oven. The total is 36 rows on both sides, or 144 bricks. If the stove is not adjacent to the wall, then cutting is only needed near the ceiling and roof elements. In this case, the number of bricks will vary from 30 to 50 pieces.
Preparing for the installation of the furnace
Before installing the stove, you need to carry out a number of preparatory work:
- If a gas main is connected to the house, then the location of the stove must be coordinated with the gas and fire service so that the structure can be used absolutely legally. In addition to the location, you also need to pay attention to the features of the stove - for example, it can be built into a wall or located in close proximity to flammable materials.
- For the stove it is necessary to calculate and make a separate foundation. The perimeter of the foundation should protrude beyond the contours of the stove by at least 5 cm on each side. To fill the foundation, you can use either reinforced concrete or ordinary sand-lime brick. In the latter case, the foundation rows must be reinforced with mesh so that the structures do not deform. The soil under the foundation must be compacted well, and a sand cushion at least 5 cm thick must be placed on it.
- The room must have high-quality ventilation. Even if gas is not supplied to the house, ventilation is still needed - thanks to it, the stove will have good draft. The lack of high-quality ventilation causes a vacuum to appear in the room, due to which the stove “pops” noticeably during operation.
Let's determine the heat loss of our home
We need to understand how much energy consumption will be required to maintain the desired temperature in the house. The easiest way to do this is experimentally.
| Here is a selection of materials: IN Everything you need to know about heating and climate control Features of the selection and maintenance of boilers and burners. Comparison of fuels (gas, diesel, oil, coal, wood, electricity). Do-it-yourself ovens. Coolant, radiators, pipes, heated floors, circulation pumps. Chimney cleaning. Conditioning |
In cloudy, windy weather, close all windows, doors, ventilation openings in the house, and turn off all equipment, for example, the refrigerator. We don’t cook anything in the house; it’s better not to be in it at all. We open all internal doors to form a single space. Leave it like this for a day. After a day, we measure the temperature. It is better to measure in all rooms and average.
Now we turn on the electric heater, with a power of, for example, 1 kilowatt. If there are many rooms, then you can turn on several low-power heaters in different rooms. Again we leave it for a day. After a day, we measure the temperature. Again, it is better to measure in all rooms and average.
This experiment can be done at any time of the year. Basic temperature values do not affect the result, only relative changes are important. But it is necessary to conduct the experiment in cloudy weather. Sunlight, especially the infrared component, will spoil all measurements. And you need wind, since heat loss with wind is usually several times higher than without it.
We calculate the difference in average temperature without and with heaters. Divide by the power of the heaters in kilowatts. We get a number that shows how many degrees Celsius the temperature in the house rises from a one-kilowatt heater. In my house it turns out to be 10 degrees per kilowatt.
Introduction
In books about stoves, descriptions or orders of stoves are often supplemented by an indication of their heat output, expressed in kilocalories. In stores, as a rule, the price tag of metal stoves indicates the power of the stove in kilowatts.
At the same time, it is quite difficult for most users to estimate these figures specifically, especially since many manufacturers are disingenuous and in the descriptions of their products (metal stoves) indicate quite fantastic parameters or simply do not say anything, which can lead to the use of an unsuitable model in a room with the specified area.
For example, they often claim that stoves are capable of heating areas of 100 square meters or more without any additional tricks. Which is basically impossible according to the laws of physics - natural convection.
Such a stove is enough to ensure that the temperature in this room is above zero, but the atmosphere in such a room can hardly be called comfortable.
Since the stove itself will have a zone of strong heating and there will be outright heat, but in the far corners the coolness will be clearly felt. And that's only half the story. Most likely, such differences will also be supplemented by condensation and dampness in the corners.
You can only get rid of these unpleasant phenomena by arranging forced air convection (fan), or by arranging forced transportation of heat directly to the problem areas of the room - in other words, by arranging a heat circuit with coolant circulation. That is, turn the stove into a boiler and heat the house with a water system.
Stocking up on materials
If you have chosen the type of stove (“mini” or “maxi”), a firm decision has been made to build a Dutch oven - it’s time to stock up on materials and select tools.
The following materials are required
- standard size refractory kiln bricks;
- clay;
- crushed stone;
- sand;
- water;
- roofing felt;
- thin steel wire.
In addition, you should take care of the facing materials. The furnace heats up to a very high temperature; accordingly, a number of requirements are imposed on the facing materials:
- high strength and heat resistance
- resistance to mechanical stress
- low porosity structure
- thickness from 6 mm.
The volume of materials used in construction is taken structurally. In this case, it is necessary to calculate how many bricks are needed to build a Dutch oven.
During construction you will need the following tools:
- level;
- Master OK;
- roulette;
- container for building materials;
- shovel.
In addition, you will need stove dampers that regulate the draft and burning rate of fuel, and a combustion door.
Let's move on to calculating the number of bricks required to build a Dutch oven.
Foundation Foundation
A Dutch oven, despite its light weight, needs a foundation. You can equip the foundation in two ways - from cement mortar or from bricks. Both options have their own characteristics.
In turn, a Dutch brick foundation will be noticeably more expensive, but at the same time it is much easier to make.
Formation of a cement foundation
Let's consider a method for forming a cement foundation for a Dutch oven.
You need to do the following:
- Prepare a pit, the depth of which is at least 50 cm. The area of the formed base must be larger than the size of the planned furnace.
- Make a cushion of gravel 10-1 cm thick and carefully compact it.
- Install the formwork and place a reinforcing frame made of metal rods, the thickness of which is 1 cm.
- Prepare the cement mixture and gradually pour the reinforcing structure.
- Cover the foundation with cement powder.
And now the solution.
High-quality masonry of a Dutch oven with a stove requires the preparation of a clay mortar. The strength and heat resistance of the Dutch oven and its tightness during operation depend on the quality of the solution.
The ratio of binding elements in the clay mortar depends on its purpose:
- for masonry work or
- for finishing a stove with a stove.
The frozen mixture must have a high level of rigidity. Masonry mortar of the correct consistency will be plastic and viscous, it will not crumble and will not be liquid.
Preparation of masonry mortar.
This process includes the following steps:
- The clay is placed in a trough where some water is added to it.
- After this, the clay soaks for 6-48 hours.
- While the clay is soaking, the material is thoroughly mixed and, if necessary, trampled in rubber boots.
- Sifted sand is added to the solution.
Now that the preparations are complete, you can begin laying the Dutch oven and stove.
How to calculate the number of bricks
The amount of this material depends on the size of the Dutch oven. If there is a ready-made project, then, as a rule, the amount of building materials is indicated. Experienced furnace specialists also know how much material is required for a furnace of a given size. But if you plan to lay a Dutch oven with your own hands, there is a universal formula for counting the number of bricks. It should be noted that the quantity calculated here is also imprecise, conditional.
You should calculate the number of bricks required to lay out the bottom row, provided that they are laid solid. Then calculate how many rows you plan to lay out in height, taking into account that the height of one row is approximately 7 cm. Multiply these two numbers and subtract 1/3 from the result.
//www.youtube.com/watch?v=apKtactWkqo
Let's say the base of the stove measures 3 by 4 bricks. It turns out that there will be 24 pieces in the first continuous row. Then you need to calculate the height of the future furnace. If the height of the house inside from floor to ceiling is 2 m 40 cm, the cutting height must be subtracted from this number - approximately 30 cm. The result will be 2 m 10 cm. Taking into account the row height of 7 cm, the result will be 30 rows in height. Then you should subtract a third of this number. 30 divided by 3 equals 10. Subtract 10 from 30 to get 20 rows. Then you need to multiply 20 by 24. You get 480 pieces. It will take about 50 pieces to cut, in the end it turns out that for such a stove you will need 530 bricks.
The amount of material per pipe is calculated separately. 1 linear m of pipe contains approximately 14 rows. For example, one row of pipe consists of 6 bricks, 6 multiplied by 14, you get 84. This number of bricks contains 1 m of pipe. Let the length of the pipe be 4 m, then 84 is multiplied by 4, you get 336. The result is that you will need 336 pieces per pipe.
The formula is quite simple. Of course, the amount of material calculated is not exact. But at the same time, you can already estimate how many bricks will need to be purchased and how much it will cost.
The Dutch oven has a simple design, is light weight and fits perfectly into a small room. It does not require large financial costs. For your dacha, you can build a rocket stove out of brick.
//www.youtube.com/watch?v=I4up-2P_lkc
It heats up quickly and can heat a room a few hours after it is lit. However, this design also has disadvantages. Its efficiency is about 40%, so it is difficult to heat houses where people constantly live. If you don’t close the view after heating, the stove will quickly cool down; it has a small heat capacity, so it has to be fired up often. These properties make the Dutch oven the most suitable, economical option for heating a summer house, garden house and other premises where people do not live permanently.
Features of a Russian-style stove
A Russian-style stove has a different arch, firebox and smoke exhaust duct design compared to most fireplaces and the well-known heating structures under the general name “Dutch”. Some homeowners choose modern options. Many of them have a simpler design. After all, most Russian-style stoves are structures of impressive size. Some craftsmen even call them “a house within a house.”
However, adherents of the modern style consider such stoves to be archaic designs. Moreover, they do not justify the large investments required to build them. Fans of modern technologies believe that it is better to spend money on building, for example, in different rooms or even buildings, a separate “Dutch” and a fireplace.
The construction of a classic Russian-style stove is more expensive than the construction of a “Dutch stove” Source oboiman.ru
All people have their own opinions. However, the traditional Russian stove in the house has a number of advantages:
- Large surface area that gives off heat. Therefore, the heat flow has a low density. Because of this, the stove emits soft, even therapeutic heat, which does not dry out the air, unlike an electric heater or fireplace.
- The presence of a warm surface on which you can rest comfortably even at low temperatures in the room, provided that the Russian stove with a stove bench is built in compliance with masonry technology. It is recommended to build a heating structure with a place for rest, even if you do not plan to use it for its intended purpose.
- The ability to minimize the likelihood of deformation of the furnace foundation due to the loss of part of the heat that dries the soil. Therefore, the soil will heave less.
On a note! Many homeowners do not use a Russian-style stove as a building for heating rooms. They are designed to prepare various dishes that are superior in taste to food cooked on a gas or electric stove.
Very tasty dishes are prepared in a Russian stove design Source eco-kotly.ru
A moderately heated Russian-style stove remains in this state for several days. This allows the homeowner to leave his home for a couple of days and return to a still warm building. He will not have to quickly melt down the structure in order to create comfortable conditions in the premises.
A full-fledged Russian-style stove is suitable for houses where people live permanently. For a country house, the ideal option would be a small Russian stove with a fireplace. In some cases, a mixed heating system is suitable for such a building.
The Russian stove design warms up and fully begins to fulfill its purpose approximately 8 or even 10 hours after lighting. If this feature does not suit the homeowner, then it is possible to build a heating structure whose wall thickness will be less than that of a similar standard structure.
A Russian stove can warm up for up to 10 hours Source remstroybk.ru
There are variants of the Russian stove design, in which a combustion chamber with a gas burner is created. However, cracks appear more often in the fireboxes of such structures. The roof may even collapse in them.
How many bricks do you need for a stove?
/ Furnaces /
Owners of country houses, private lands and other types of buildings are increasingly introducing various stoves into the interior of their houses, and the first problem they face is how many bricks are needed for masonry, and how to make the correct calculations. The information presented below will be extremely useful to those who do not yet have experience in this area.
The best oven
The Dutch oven is characterized by ease of operation, simple design and high productivity.
The compact Dutch woman can be used in a country house or in the country. It heats up quickly and cools down slowly when the damper is closed.
The classic version of the stove is rectangular in shape, with extended chimney channels above the firebox - intended only for heating.
However, over time, various shapes arose: triangular, round, trapezoidal. Various options for using Dutch ovens have also appeared: in addition to heating ones, there are heating and cooking stoves that are combined with a stove, there are combinations with a fireplace, with a stove bench, and with a container for heating water.
Skillful design will allow you to make such a stove part of the decor, effectively integrating it into the interior of the room.
Type of material for the project
Scheme of laying furnace rows.
The outer layer of the project is usually made of ceramic bricks. This material is easy to process and has sufficient thermal conductivity.
When purchasing, carefully inspect its surface. High-quality stones of this type have no differences in color over the entire surface, there are no cracks or chips, and the geometry meets the standards.
The furnace firebox requires special refractory bricks that can withstand high temperatures and are highly durable. The latter property is both an advantage and at the same time a disadvantage, since it complicates its mechanical processing.
Refractory bricks are made in various forms. Moreover, it has no voids. This type of artificial stone can withstand temperatures of +1400… +1600 ºС. It differs from the usual type in its composition and characteristic metallic ringing when struck.
It is made from special refractory clay in industrial ovens at very high temperatures. This material has clear edges, which makes it possible to make precise geometric structures from it. But refractory bricks have a fairly high cost. Therefore, it is recommended to divide the building into external and internal decoration.
This allows you to significantly reduce project costs without compromising its safety and thermal conductivity.
Types of kiln bricks
Kiln bricks can be divided into three types:
- Quartz contains a small sand content.
- Fireclay is made from fireproof clay.
- The main one contains a lot of limestone-magnesia mass.
Refractory brick can withstand high temperatures for a long time.
It has high strength, which makes it difficult to machine. Fireclay clay is used in its production. Available in different forms, it does not have cavities or voids inside. A distinctive feature is a metallic ringing sound when you tap on it. When broken, it splits into large pieces without forming crumbs. Its resistance to high temperatures and chemicals makes it an ideal candidate for firebox lining. The outer layer of the stove can be made of ceramic bricks. It is not so resistant to high temperatures, but it also has some advantages: it is easy to process. It can be given any shape using a pickaxe. When choosing such a brick, you should carefully study its appearance: there should be no cracks, and the geometry should exactly repeat the standard. The shade of the product should not differ across the entire surface.