Often, dreams of building a completely wooden house, for example, a log house, come up against harsh reality in the form of the unfavorable climatic conditions inherent in our country. Severe winters, severe frosts, rainy autumns and springs force us to look for ways to insulate and protect the façade of a wooden house from precipitation.
Construction practice shows that a wall made of timber with a cross-section of 150x150 or 200x200 mm, according to thermal resistance standards, is not enough for year-round living. A house with walls of such thickness can only be considered as a structure for seasonal “dacha” living (we do not take into account the south of Russia). Therefore, developers are looking for ways to insulate a wooden house and save on heating costs in the future.
In this regard, the experience of the FORUMHOUSE user with the nickname ZlojGenij of insulating a timber house with stone wool and further finishing the facade with metal siding is interesting.
From this article you will learn:
- Why do you need to insulate a wooden house?
- How to perform a thermal engineering calculation of the walls of a timber house.
- What kind of thermal insulation material should be used to insulate a log cottage.
- Why you can’t insulate a wooden house with a vapor-opaque material.
- What are the features of a hinged ventilated facade?
Why is it necessary to additionally insulate a wooden house?
Wood, along with ordinary solid ceramic bricks, is rightfully considered a general construction and universal material. It is difficult to find a house, even a stone one, where timber is not used. This is facilitated by the widespread availability and relative (depending on the region of residence) availability of wood.
But a person who decides to build a house from timber for permanent residence should prepare for the fact that it will have to be additionally insulated.
ZlojGenijFORUMHOUSE user
I built a timber house with a perimeter size of 8600x8600 mm. Sawn timber 150x150 mm was used on the walls. The house was built immediately for additional insulation and external cladding, because... Insulation is a necessary thing for Russia, and you want to live in comfortable conditions and also save on heating.
Let’s add that the user’s region of residence is Perm Krai. Construction of the house began back in 2009. In 2012 we moved to the 1st floor, and in 2015 - to the 2nd. Those. The situation is familiar to many independent developers who build in stages, depending on the receipt of funds.
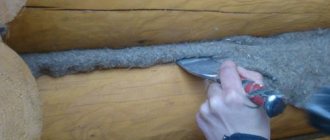
Over the years, the first floor had to be caulked twice, and the second floor once. According to ZlojGenij, he realized that it was no longer possible to put off insulating and decorating the house when, in a rainy autumn, drops of water began to flow down one of the internal walls of the house.
ZlojGenij
This was due to horizontal rain pouring into the wall for two days. Trouble can be avoided if, during the construction of the “box,” you remove the upper edge of the beam with a plane. Thus, from the outside, the upper beam will hang over the lower one, and water will not enter the house, flowing down the wall.
However, these are half measures. Therefore, in 2015, the user sat down to develop an insulation plan. The task was to bring the thermal resistance of the walls to a standardized value, and therefore to choose the optimal and economically sound insulation thickness.
Basic rules of work
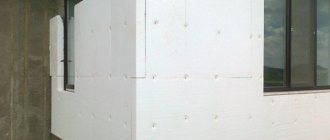
Mineral wool is mainly used to insulate exterior walls, attics and roofs. To insulate the foundation, it is better to use inexpensive, but at the same time high-quality polystyrene foam. It is more rigid and does not allow water to pass through.
Before use, it is necessary to treat the facade with an antiseptic. This will prevent rotting and extend the life of the material. Foam concrete or brick must be cleaned of old paint and plaster before installation. The best time to carry out work is summer.
Before installation, it is necessary to remove window casings and door jambs. After installation, you will have to purchase new window and door cladding, as the thickness of the walls will increase noticeably.
There are two main methods of insulation:
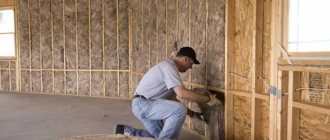
- Dry. It is used only with frames made of wood or steel (lathing). The insulation is installed in the cells of the frame.
- Wet. In this case, installation is carried out using glue and disc dowels.
Dry installation
A frame is used for installation. The slats are installed so that the gap between them is 2 cm less than the width of the wool. This allows you to achieve maximum packing density. All work starts from the corners and smoothly moves to the center. In order for the result to be of the highest quality and the installation to be even, it is necessary to use a level and a cord that is stretched between the corners of the wall.
If a roll is used during installation, then installation is done from top to bottom. The slabs are installed only from bottom to top. The canvas must be secured with construction tape. To fix the result, holes are drilled and dowels driven into them.
If it is necessary to make the insulating layer thicker, the slabs are laid in several layers. It all depends on the need and preferences of the owner.
Wet method
The principle of this installation is to install the insulation on an adhesive solution that attaches the mineral wool to the wall
It is important that the glue allows steam to pass through well, otherwise condensation may accumulate in the material.
A layer of adhesive solution is spread on the wall using a notched trowel. After this, the slab must be pressed as much as possible against the wall. Once the row is installed, it must be additionally secured with disc dowels.
The final stage: glue is again applied to the insulation layer and the reinforcing mesh is fixed. This further strengthens the mineral wool slabs. After this, you can plaster and perform decorative work.
Thermal calculation of the walls of a timber house
Looking ahead, let's say that ZlojGenij considered it sufficient to increase the heat transfer resistance coefficient of walls to a value of 3.4 (m²*°C)/W (for Perm, according to the new SNiP, the required heat transfer resistance of enclosing structures should be 3.64 (m²*°C)/W ). To do this, the user decided to insulate the 15 cm thick beam with 10 cm thick stone wool.
For clarity, we will make a simplified thermal calculation and find out what thickness of thermal insulation is required for a wooden house built from timber sawn from pine or spruce for the Moscow region.
So, let's set the initial values:
- The thickness of the timber walls is 150 mm.
- The thermal conductivity coefficient of pine or spruce across the fibers is 0.14 W/(m °C) (operating conditions A - “normal”).
- The required heat transfer resistance for the Moscow region is 3.28 (m²*°C)/W.
Important nuances: in the tables, the thermal conductivity coefficient for wood is indicated in two directions - along the fibers (along the length of the timber) and across the fibers. The thermal conductivity coefficient of pine/spruce along the fibers is almost 2 times higher than across them (0.29 W/(m °C), versus 0.14 W/(m °C)). This must be taken into account when calculating, because the lower the thermal conductivity coefficient of the material, the warmer the walls .
In addition, the thermal conductivity coefficient of a wooden wall is affected by the amount of moisture contained in the material. Wood has a natural moisture content due to its structure. Freshly sawn wood has a higher percentage of moisture than dried wood. Let us also remember that during the operation of a wooden house, the walls are constantly exposed to the negative effects of negative weather conditions - snow and rain. This means the thermal resistance of the walls decreases.
Moreover, fluctuations in the thermal conductivity coefficient of wood occur seasonally. For example, prolonged autumn rains will lead to additional moisture saturation of the unprotected walls of a timber house, which directly affects the thermal insulation properties of the enclosing structure.
Conclusion : additional insulation and protection of wooden walls from atmospheric factors is required. For comparison, we present the thermal conductivity coefficients of pine/spruce across the fibers for three states: (1) in dry, (2) normal operating conditions (we use them for calculations), (3) in a moisture-saturated state:
- 0.09 W/(m °C).
- 0.14 W/(m °C).
- 0.18 W/(m °C).
We perform thermal engineering calculations using the formula:
R= d/λ, where:
- d—material thickness;
- λ is the thermal conductivity coefficient of the material.
We find:
Rph = 0.15/0.14 = 1.071 (m²*°C)/W
Let us recall that the required heat transfer resistance for the Moscow region is 3.28 (m²*°C)/W.
Now we find the difference between the actual (Rph) and normalized (Rн) values of the thermal resistance of a timber house.
Rt = 3.28 - 1.071 = 2.209 (m²*°C)/W
Those. timber “cold” walls do not reach the norm by the value found above. There are two options for getting out of this situation: do nothing and simply pay more for heating, essentially throwing money out into the street, especially in the absence of mains gas. The second is to insulate the walls and install a hinged ventilated façade.
Installation of a ventilated facade, installation of lathing and insulation
We make a ventilation façade with our own hands
Step 1: installation of spacers
To install spacer strips, use bars with a cross section of 20/20 mm or an edged board with a thickness of 20-25 mm. To fasten wood, nails or wood screws are used. The optimal step is 60-80 cm.
Scheme of an insulated facade
Step 2: installation of vapor barrier membrane
Vapor barrier film is sold in rolls. Laying the canvases begins from the bottom of the wall and gradually moves upward. The vapor barrier is secured with a construction stapler with an overlap of 10-15 cm.
What material should be used to insulate a wooden house?
Before we calculate the required thickness of insulation, we will dwell on the features of insulating a wooden house.
Wood is a vapor-permeable material. Because of the difference between indoor and outdoor pressure, caused by the difference between the outside temperature of cold air and the temperature inside heated rooms (especially in winter), water vapor from the house will rush out through the walls.
This phenomenon should not be confused with the mythical “breathing” of wind-blown walls.
If the outside of a wooden house is insulated with a vapor-opaque material (for example, EPS, extruded polystyrene foam) or, as some “specialists” do, they wrap the outside of the house, before installing the siding, with foil insulation (foil is an excellent vapor barrier), the result is a whole bunch of problems. The main ones are: dampening wooden walls, because moisture cannot escape outside, resting against the outer vapor barrier layer, further rotting and destruction of the wood, the appearance of mold and mildew indoors.
Conclusion: a log house should be insulated with vapor-permeable insulation, for example, mineral wool.
Video description
What happens to the wall if the insulation is not properly insulated from the inside - in the video:
Insulation of walls from the outside: advantages and disadvantages of the method
Most often they resort to it, keeping in mind the obvious advantages compared to internal insulation:
- The usable area of the internal space is preserved;
- External work does not change the family's daily routine.
- The facade of the house is reliably protected from sudden temperature changes, which extends the life of the building.
- The correct selection of materials does not disturb the microclimate of the rooms (the house “breathes”).
- You can decorate the facade to your liking or improve the appearance if the wood has darkened over time.
- If the technology is followed, the wood will be additionally protected from damage.
- Ease of monitoring the work of the construction team.
The main disadvantage of external insulation is the need to carry it out in good weather; in cold and damp weather there is no point in doing this.
See also: Catalog of companies that specialize in insulating country houses.
House insulation with Izoplatom based on wood fiber
This thermal insulation material is natural because it is made from coniferous trees. Apart from these natural raw materials, no additives are used.
What are the advantages of Izoplata:
- long service life;
- ecologically pure;
- sealed;
- not afraid of exposure to rain, snow and wind;
- does not allow steam to pass through;
- has high sound insulation characteristics;
- it is easy to install.
Interesting ideas
Facade decoration is not the least important thing in modern construction conditions. It is necessary in order to hide existing defects and imperfections in construction work. Decor is also often used to update the appearance of a country house, restore it and achieve greater attractiveness. The structure can be given a Gothic, Scandinavian, Byzantine look. It all depends on desires and design imagination. An important argument in favor of decorating the facade are some practical aspects. For example, insulation.
Currently, he identifies several of the most popular preferences for decorating the facades of private houses.
Decor of curved and framed facades
As a result of recent years, there has been a noticeable increase in demand for various curved and framed facades, for the manufacture of which high-quality MDF is used. These materials can be used to decorate both the walls of a building and the corners of a country house. In addition, there are some developed technologies, following which you can install the facade of a house in accordance with any style and architectural direction that will emphasize individuality.
Provence
This style is most preferable for adherents of natural facing materials such as brick, ceramics, and stone. Predominantly the presence of light shades, in which the decor of the facade of the house is carried out. This finish is refreshed with some kind of colorful, eye-catching panel with a ceramic tile base. The façade can also be finished using decorative plaster, overlay elements or painting.
Scandinavian
The founders of this style are lovers of laconicism, the predominant absence of eye-catching decor and the presence of uniformity. Thus, the Scandinavian style of installation pursues the goal of visually increasing the space in size. This style is characterized by cladding materials such as wood, brick or stone masonry. The Scandinavian style is suitable for light and warm shades of colors and a lack of contrasts.
High tech
This style is characterized by modern origins and focuses on the use of various modern construction technologies that provide maximum convenience. The high-tech style is characterized by the extensive use of glazing in combination with different geometric shapes.
European style
The world's architectural art is dominated by a considerable number of very different design styles, including characteristic features from the Gothic and Byzantine movements. Both in Western countries and in Russia, Gothic styles and designs that came from the Middle Ages are especially popular and in demand. A popular trend is to combine the Gothic style with some other style. This style is characterized by difficulties in installing the facade.
In addition to the above styles, there are others, each of which has its own characteristic features and practical aspects, namely:
- avant-garde;
- country;
- colonial;
- classic;
- minimalism.
Very interesting and original design solutions can be obtained as a result of the correct combination of two or more styles of facade decoration. Today, there is an opinion among designers that the most original and unusual design can be obtained by combining a modern “chalet” with some additions to the classical style.
To learn how to cover a wooden house with siding, watch the video below.
Safety precautions
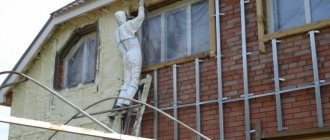
Even if you are not allergic, when working with mineral wool, be sure to protect your nose and mouth with a respirator, and your eyes with safety glasses. You will also need thick clothing with long sleeves and pants below the ankle and gloves. Otherwise, the smallest particles of mineral wool that get on the skin will cause irritation.
We put a barrier to the cold
Hired workers often insulate the facade from the outside with mineral wool, installing 100 mm thick insulation boards in one layer. However, cold air will still penetrate into the cracks between the mineral wool. It is more reliable to fasten 50 mm slabs in two layers, with a slight offset. If there are gaps and gaps left somewhere, they can be insulated with pieces of the same material. It is best to insulate the top layer with mineral wool of higher density.
The next stage is waterproofing the facade. For this purpose, a perforated diffusion membrane is used. It is mounted outside, between the mineral wool and the cladding, with the rough side facing the insulation. This technique will ensure the movement of water only from the inside to the outside. This means that your homemade insulation will be reliably protected from dampness.
What should I attach the cladding to?
The main highlight of the ventilated facade is the presence of a gap between the mineral wool and the facing material. And the constant movement of air quickly dries the water droplets.
For this purpose, slats 50 mm thick are mounted on the frame on top of the waterproofing. Exterior finishing will be attached to them - siding or facade panels, block house or wooden lining, etc. They are laid from bottom to top. If wooden cladding is used, the locking joints are oriented with the tenon up and the lock down. Then water will not get into the joints of the boards.
Air vents must be left at the bottom and top. But on the outside they are covered with a fine metal mesh to keep rodents out. And lastly: insulation will increase the thickness of timber walls by almost 20 cm. Do not leave the insulation open either from below or in the areas of window and door openings. Install sufficiently wide slopes, window sills and ebbs.
Siding installation
Siding installation begins immediately after installing the counter-lattice. A straight horizontal line is struck from below, indicating the lower edge of the siding .
- The starting bar is installed along this line.
- After this, all corners are drawn up - external, internal, window or door openings.
- The design of window or door openings can be done in different ways, based on the depth of the slopes. Ordinary trims, universal strips, or, if the depth exceeds 20 cm, a set of siding panels can be used.
- After all the corner elements are installed and the openings are formed, the installation of siding panels begins. The first row is mounted on the starting bar, snapped into the lock and secured at the top with self-tapping screws.
Important! Do not tighten the screws all the way! The material must have free movement for movement during thermal expansion.
- All subsequent rows of siding are installed in a similar way. The longitudinal joining of the panels is done either using H-panels, which must be installed together with the corner and window elements, or with an overlap of 2.5 cm .
- The canvas is completed using a finishing strip, which is mounted together with the last row of panels. They are simply slipped under the curl of the strip, which fixes them in place and prevents water from getting under the trim.
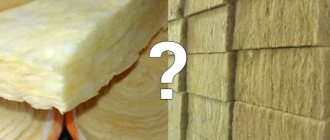
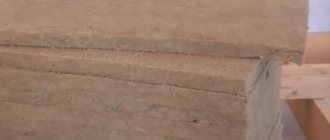
Properties of mineral wool
The fibers of the material are made from basalt, a particularly strong rock. The big advantages of mineral wool are its resistance to mold, fungi, insects, and the ability to withstand temperatures above 1000°C.
In addition, mineral wool fibers have good vapor permeability, which allows vapors to evaporate rather than accumulate in the walls. An important quality of mineral wool is the absence of toxic substances in its composition.
The thickness of the applied insulation slabs depends on the width of the walls of the house itself. For example, for a 150 mm beam it would be correct to use only 5 cm of mineral wool. Thinner slabs are mounted in two continuous layers. The joints must be covered to enhance the heat-saving effect.
Types of mineral wool
URSA mineral wool is a mixture of dolomite (mineral) with quartz sand. Its main advantages are high elasticity and flexibility (facilitate installation) and excellent thermal insulation characteristics (the thermal conductivity coefficient of such insulation is 0.032 W/mK).
For the walls of ventilated facades, the Ursa FACADE material is used in the form of semi-rigid fiberglass slabs, covered with black high-density fiberglass. Additionally, the boards are treated with water-repellent agents. Thanks to all these qualities, there is no need to install windproof films.
ROCKWOOL mineral wool is made from basalt rocks impregnated with a hydrophobic mixture - the chaotic arrangement of mineral fibers ensures high strength. Such material contains a minimal amount of binders. ROCKWOOL is not subject to deformation during operation. It is produced in a variety of forms - rolls, slabs, mats of various thicknesses and areas, which also differ in the degree of rigidity.
ISOVER mineral wool is made from glass fiber and is characterized by excellent heat saving properties, dimensional stability and durability. The upper surface of such plates is covered with fiberglass, so they do not require the use of diffuse membranes. When carrying out two-layer insulation, such material acts as the top layer.
Preparation
- Before carrying out insulation work, expand the foundation. This is required so that the insulating material does not creep down under the weight of its own weight. But remember that this expansion does not need to be made wider than 30 cm;
- Install the sheathing before you begin insulation work. Do not forget that it is necessary to leave some distance between the panels, otherwise they will begin to deform when expanding under the influence of high air temperatures in the summer.
Only competently carried out work will guarantee the high quality of the structure, as well as reliable protection of its facade from the influence of environmental factors.
Insulation of the facade of a timber house with sprayed polyurethane foam
Sprayed polyurethane foam has the following advantages: environmental friendliness, low thermal conductivity, excellent sound insulation characteristics. After spraying the material, a continuous layer of insulation is formed. It is used without the use of fasteners, since it adheres firmly to the surface.
Most professionals prefer spray polyurethane foam because it has many benefits. However, its cost is quite high. If you do not have experience in construction and renovation, you will not be able to use this insulation yourself. You will need to hire a team of professionals.