What should be considered during design and installation?
To ensure that the water inside the batteries and pipes does not stagnate, but circulates freely, pipes must be installed with a noticeable slope.
In the project, it is necessary to take into account that each linear meter should deviate from the plane by 1 to 2 degrees. Such a design trick will not be very noticeable, but it ensures the necessary gravity flow of the coolant. Another important detail is the boiler power. Its intense heat will cause the water to move quickly, which will increase the temperature in the radiators and pipes. Before selecting and purchasing equipment, you should make calculations and evaluate the future thermal efficiency of its operation.
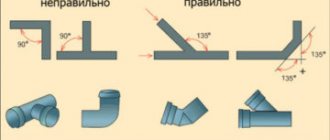
The performance of a gravity heating system in a house can be worsened by the location of the pipes. Their frequent bends and turns at right angles significantly reduce the natural pressure of water, slow down its flow, and the temperature in the house drops significantly.
One-pipe and two-pipe gravity systems
Diagram of a one-pipe system.
A gravity-flow heating network can be installed in a single-pipe or two-pipe design.
Single-pipe heating involves a sequential installation scheme of pipes and batteries. During its operation, water will flow through them sequentially. There are two ways to install the equipment:
- the coolant flow passes directly through the batteries;
- The movement of water through the system is carried out through the main pipe, to which radiators are attached using additional branches.
More uniform heating of the air is achieved with the second method.
A two-pipe heating scheme with natural circulation involves the arrangement of separate lines for water flow - the main and return supply. The coolant from the boiler (hot) sequentially enters the heating radiators, and after cooling, it returns cold to the boiler through the return pipes.
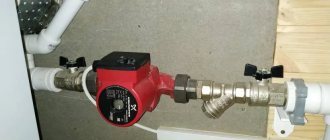
If you install a gravity heating system in a two-story house in a two-pipe design, in order to uniformly heat the rooms and maintain the required temperature in them, you will need to install an additional unit - a circulation pump. Such equipment will increase the water pressure inside the pipes and maintain optimal heat transfer from the heating system.
Step by step guide
Work on installing polypropylene heating begins with bringing the pipes inside the room to “acclimatize” them and eliminate the consequences of expansion or contraction in the heat or severe frost.
The main work when connecting pipes is welding polypropylene (solder). For these purposes, you should choose a soldering iron. The process itself does not take much time and is simple. The main thing is to quickly connect the heated ends of the elements, being careful not to overheat them. The duration of heating depends on the diameter of the pipe. The larger it is, the longer the heating should be. The cross-section of the soldering device nozzle must correspond to the diameter of the pipe.
Pipe soldering technology
Step-by-step instructions for assembling the heating pipeline are as follows
:
- a wiring diagram is drawn up;
- Markings are made on the walls for all areas, following which the elements of the heating system will be laid;
- fittings are selected;
- the time allocated for installation and welding work is determined;
- pipes are marked and cut into sections of a certain length, the cut is made at right angles to the axis;
- to degrease and remove dust microparticles, the ends are wiped with alcohol, the dust is removed with a dry, clean cloth;
- the soldering iron nozzle is degreased, placed in the working position and heated to +265 °C;
- a fitting and a pipe are placed in the nozzle, they are heated together and connected to each other;
- After waiting the necessary time for cooling, the connected section is attached to the wall using clips.
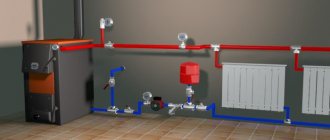
Do-it-yourself polypropylene heating also requires the installation of control equipment, a boiler, heating devices, an expansion tank, and a pump. Their installation is carried out according to the instructions and recommendations of the manufacturer.
Schemes of such heating systems
The design of the heating system, regardless of the method of circulation of the coolant, depends on several factors:
- method of connecting radiators to supply risers. Here there are one-pipe and two-pipe systems;
- places where the hot water supply line is laid. You need to choose between lower and upper wiring;
- main line laying schemes: dead-end system or associated movement of coolant in main lines;
- arrangement of risers, which can be either horizontal or vertical.
Single-pipe system: how to regulate the temperature?
A single-pipe heating system has only one wiring option - the top one. There is no return riser, so the coolant cooled in the batteries returns to the supply line. Fluid movement is ensured by the difference in fluid temperatures in the lower and upper radiators.
To ensure the same temperature conditions in rooms on different floors, the surface of heating devices on the first floor should be slightly larger than on the second and subsequent ones. A mixture of hot and cooled water in the upper heat exchangers enters the lower radiators.
In a single-pipe system, there can be two options for coolant movement. in the first, one part goes into the radiator, the other further along the riser to the lower devices.
With parallel single-pipe distribution, heat exchangers on the upper floors receive hot water, and the lowest ones receive cooled water. Therefore, the area of the latter must be increased in order to equalize the heating of all rooms
In the second case, the entire volume of water passes through each heat exchanger, starting from the top ones. The main feature of this layout is that the radiators on the first and basement floors receive only chilled water.
With a flow-through version of a single-pipe wiring, it is impossible to turn off or limit the flow of coolant into a separate radiator. Blocking one of them would lead to a stop in circulation in the entire system
And if in the first case the temperature in the rooms can be controlled using taps, then in the second they cannot be used, as this will lead to a decrease in the supply of liquid to all subsequent heat exchangers. In addition, completely shutting off the tap would mean stopping the circulation of water in the system.
When installing a single-pipe system, it is better to focus on the wiring, which makes it possible to regulate the water supply to each radiator. This will allow you to regulate the temperature in individual rooms and, naturally, makes the heating system more flexible, and therefore more efficient.
Since single-pipe wiring can only be at the top, its installation is possible only in buildings with an attic space. This is where the supply pipeline should be located. The main disadvantage is that heating can only be started throughout the entire building at once. The system, of course, also has advantages. The main ones are simple installation and lower cost. From an aesthetic point of view, the fewer pipes, the easier it is to hide them.
How should a two-pipe system be arranged?
This version of the heating scheme assumes the presence of a supply and exhaust line. Hot coolant circulates in the upper part of the system, and cooled coolant circulates in the lower part.
A two-pipe heating system is more flexible in terms of temperature control in individual rooms. However, it requires more materials than a single-pipe
A pipe extends from the boiler and is connected to the expansion tank. From the tank comes a pipe for the hot line of the circuit, which is then connected to the wiring. Depending on the size of the container and the volume of water in the system, an overflow pipe may extend from the tank. It drains excess water into the sewer.
The pipes leaving the bottom of the heat exchangers are combined into a return line. Through it, the cooled coolant again enters the boiler. The return must pass through the same rooms as the supply pipeline.
Horizontal or vertical riser in the wiring?
A heating system with a vertical riser involves connecting radiators to it from different floors. Its advantage: lower risk of “airing” the system, disadvantage – higher cost.
When heat exchangers from one floor are connected to a supply pipe, this is a system with a horizontal riser. This option will cost homeowners less, but will have to solve the problem of air locks. As a rule, it is enough to install air vents.
Multi-level floor
To zone the space, craftsmen install floors at different levels. They advise installing a podium to separate the kitchen and dining room. This option is considered one of the most practical because, among other things, the owners have additional free space where they can hide something.
It is convenient to use boxes or crates for this. Wicker baskets will look good. But such space can remain free.
However, such a design should not be made if there are small children in the family, since the podium can become an obstacle for him. In addition, various floor coverings can be used.
They will zone the space between the living room and the kitchen and protect the podium from damage. For example, tiles are laid in the kitchen area, and laminate flooring in the dining room. The main thing is to choose colors and textures and combine the finishes correctly.
Date: September 25, 2022
Symptoms and diagnosis
If a characteristic hum appears in the pipes, it is possible:
- a large amount of sediment has accumulated on the pipe walls, which has led to a narrowing of the lumen;
- there is a water leak from the system;
- The system contains devices with too small a diameter.
To determine the cause of the noise more accurately, you should inspect all elements of the heating system and find the location of the leak.
If the pipes look undamaged, no steam or streams of flowing water are visible, you need to pay attention to the connecting elements and shut-off valves, perhaps the leak is occurring here
Sometimes it is difficult to determine the location of the leak, since it is hidden by a layer of insulation. To accurately diagnose the problem, you should call a professional plumber.
If there are no leaks, but the pipes are humming, you need to find the source of the sound. Most likely, this is where the pipe clearance has become too small due to accumulated mineral deposits or debris that has entered the system. Eliminate the problem by flushing the heating system. This is described in detail in the video:
Usually, a good plumber can identify parts of the system that are not properly sized, causing the pipes to hum. This item may need to be replaced or modified. Of course, such work should be carried out as best as possible, in full accordance with technology, so that new reasons for unpleasant noise in pipes do not appear.
Clicking sounds and the characteristic sound of bubbling water can be caused by air trapped in the system. To fix the problem, it is enough to bleed excess air from the radiators, for example, using a Mayevsky tap. Clicking sounds may also indicate the presence of foreign objects or debris in the pipes. In this case, you should clean the system.
If air gets into the heating system, it can cause clicking and bubbling sounds. To bleed air from the system, use the Mayevsky valve
Intermittent crackling, knocking and clicking noises may appear if:
- there are small foreign particles in the pipes;
- system parts are worn out;
- the ventilation valve has broken;
- unstable operation of the system caused expansion of the metal.
To stop the crackling in heating pipes, sometimes it is enough to drain some of the water and debris. In other cases, you will need the help of a professional plumber to repair or replace damaged elements.
Sometimes the cause of noise in the heating system is a heating pipe overgrown with deposits and particles of rust. This pipe should be flushed or replaced.
The breakage of the ventilation valve is often caused by its incorrect installation, for example, when the valve is installed in the wrong direction. Such an error can lead to significant damage to the entire heating system.
The reason for the tapping may also be the condition of the brackets on which the pipes and heating radiators are mounted. A loose bracket moves under the influence of metal expansion and contraction processes, which causes knocking. To stop this unpleasant phenomenon, it is enough to strengthen the old brackets or replace them with new ones. Sometimes special gaskets are installed between the pipe and the bracket.
Prototype of thermosiphon solar collector
The list of spare parts includes recommended materials selected for the temperature conditions. It is necessary to use heat-resistant materials that can withstand prolonged exposure to 80ºC: cross-linked polyethylene, CPVC, polypropylene adapters, high-temperature hoses made of ethylene-propylene rubber (EPDM rubber). Let me remind you that this is the simplest and most affordable option.
Indicative list of materials for a thermosiphon solar system (dimensions converted from inches):
Collector frame
The frame for the thermosyphon system can be constructed in the form of an A-frame. Use beams and screws: set the front leg of each support at the desired angle to the manifold panel (your latitude angle is a good starting point), and attach the rear leg at the opposite angle for stability. Connect the two legs (front and back) of each side with a horizontal jumper.
Connect the two back legs with two beams. Place three beams across the supports and secure with screws.
Install the slate sheets onto the frame using screws. The top sheet should be overlapped. Paint the panel with thermal paint and let dry completely.
Installing a thermosiphon system hose
Lay out and mark the path of the pipe on the manifold panel, from bottom to top. Don't let it bend. The hose should be enough for 8 turns per 120 cm of panel height. Don't forget to leave a few meters for connecting to the tank.
Do not allow the hose to sag.
Drill holes in the slate and secure the pipe with plastic ties. The interval between the ties is about 30 cm. The hose must be in full contact with the panel for effective heat transfer.
Preparing a reservoir for a thermosiphon collector
Adapters must be inserted into the tank to ensure a tight connection with the hose. The adapters will accommodate brass taps.
Holes for fittings must be made in the tank. Drill the bottom drain as close to the bottom as possible, the top drain - about 1/3 from the tank lid. Wrap Teflon tape around the threads of the faucet and screw it into the adapter. Insert the adapter into the tank and tighten it with a nut from the inside.
Connecting the hose and installing the reservoir
Place the tank on a sturdy pedestal that allows the faucets to be higher than the hoses on the manifold. The manifold should be close to the tank. Shorten the pipe so that it does not sag. Connect the adapter and secure with a clamp. Connect the hoses to the taps, tighten the ties on the panels for better contact with the slate. Place a piece of thermal insulation on the part of the hot water pipe at the top from the tank to the collector.
Water heating with a thermosiphon solar collector
Open the taps and fill the tank, leaving 5 cm of free space for the expansion of water. Make sure there is no air in the manifold circuit. The water will begin to warm up with the first rays of the sun.
The principle of operation of a gravity heating system
The principle of heating operation looks simple: water moves through a pipeline, driven by hydrostatic pressure, which appears as a result of different masses of heated and cooled water. This design is also called gravity or gravity. Circulation is the movement of cooled and heavier liquid in the batteries under the pressure of its own mass down to the heating element, and the displacement of light heated water into the supply pipe. The system operates when the natural circulation boiler is located below the radiators.
In open-type circuits, it communicates directly with the external environment, and excess air escapes into the atmosphere. The volume of water that increased due to heating is eliminated, and the constant pressure is normalized.
Natural circulation is also possible in a closed heating system if it is equipped with an expansion tank with a membrane. Sometimes open-type structures are converted into closed ones. Closed circuits are more stable in operation, the coolant in them does not evaporate, but they are also independent of electricity. What affects circulation pressure
The circulation of water in the boiler depends on the difference in density of the hot and cold liquid and on the magnitude of the height difference between the boiler and the lowest radiator. These parameters are calculated before the installation of the heating circuit begins. Natural circulation occurs because The return temperature in the heating system is low. The coolant manages to cool down, moving through the radiators, becomes heavier and with its mass pushes the heated liquid out of the boiler, forcing it to move through the pipes.
Water circulation diagram in the boiler
The height of the battery level above the boiler increases the pressure, helping the water more easily overcome the resistance of the pipes. The higher the radiators are located in relation to the boiler, the greater the height of the cooled return column and the greater the pressure with which it pushes the heated water upward when it reaches the boiler.
Density also regulates pressure: the more the water warms up, the less its density becomes in comparison with the return. As a result, it is pushed out with more force and the pressure increases. For this reason, gravity heating structures are considered self-regulating, because if you change the heating temperature of the water, the pressure on the coolant will also change, and therefore its flow will change.
Varieties
Let's consider options for heating systems for private and apartment buildings:
• using forced circulation of coolant;
• natural circulation using gravity coolant.
Natural circulation systems have become widespread, mainly due to their strengths:
• functioning of the system with natural circulation, regardless of whether there is voltage in the network or not;
• high rates of system inertia, where external factors do not affect the spread of heat.
An article dedicated to installing a pump in a heating system is located here:
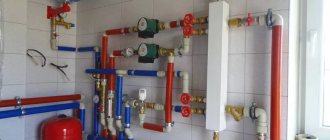
Pipe selection
Also, the choice of material is greatly influenced by the boiler, since in the case of solid fuel, preference should be given to steel, galvanized pipes or stainless steel products, due to the high temperature of the working fluid.
However, metal-plastic and reinforced pipes require the use of fittings, which significantly narrows the clearance; reinforced polypropylene pipes will be an ideal option at an operating temperature of 70C and a peak temperature of 95C.
Products made from special PPS plastic have an operating temperature of 95C, and a peak temperature of up to 110C, which allows use in an open system.
Design features
For a gravity system to work effectively, the following requirements must be met:
Note. Slopes perform 2 functions - they help the coolant flow in the desired direction, and the air rises through the pipelines and leaves through the open expansion tank. A caveat regarding the radiators used: if the system is built correctly, steel panels also heat well.
Gravity heating systems are made open and operated at atmospheric pressure. But will gravity flow work in a closed circuit with a membrane tank? We answer: yes, natural circulation will continue, but the speed of the coolant will decrease and efficiency will drop.
It is not difficult to substantiate the answer; it is enough to mention the change in the physical properties of liquids under excess pressure. With a pressure in the system of 1.5 Bar, the boiling point of water will shift to 110 °C, and its density will also increase. The circulation will slow down due to the small difference in the masses of the hot and cooled flow.
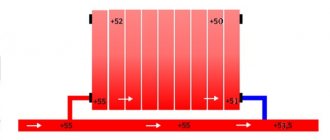
Simplified gravity flow diagrams with an open and membrane expansion tank
Natural circulation scheme
To understand the principle of operation of the gravity system, study the typical diagram used in two-story private houses. Combined wiring is implemented here: the supply and return of coolant occurs through two horizontal lines, connected by single-pipe vertical risers with radiators.
How gravity heating of a two-story house works:
- The specific gravity of the water heated by the boiler becomes smaller. The colder and heavier coolant begins to displace hot water upward and take its place in the heat exchanger.
- The heated coolant moves along a vertical collector and is distributed along horizontal lines laid with a slope towards the radiators. The current speed is low - about 0.1-0.2 m/s.
- Dividing through the risers, the water enters the radiators, where it successfully releases heat and cools. Under the influence of gravity, it returns to the boiler through a return manifold, which collects coolant from the remaining risers.
- The increase in water volume is compensated by an expansion tank installed at the highest point. Typically, the insulated container is located in the attic of the building.
Schematic diagram of gravity distribution with a circulation pump
In modern designs, gravity systems are equipped with pumps that accelerate circulation and heating of rooms. The pumping unit is placed on a bypass parallel to the supply line and operates when electricity is available. When the light is turned off, the pump is inactive, and the coolant circulates due to gravity.
Scope of application and disadvantages of gravity feeding
The purpose of the gravity circuit is to supply heat to homes without connection to electricity, which is important in remote regions with frequent power outages. The network of gravity pipelines and batteries can work together with any energy-independent boiler or stove (previously they said steam) heating.
Let's look at the negative aspects of using gravity:
- due to the low flow rate, it is necessary to increase the coolant flow by using large-diameter pipes, otherwise the radiators will not warm up;
- in order to “spur” natural circulation, horizontal sections are laid with a slope of 2-3 mm per 1 m of the highway;
- healthy pipes running under the ceiling of the second floor and above the floor of the first floor spoil the appearance of the rooms, which is noticeable in the photo;
- automatic control of air temperature is difficult - for batteries you need to buy only full-bore thermostatic valves that do not interfere with the convective circulation of the coolant;
- the scheme is unable to work with heated floors in a 3-story building;
- An increased volume of water in the heating network implies prolonged heating and high fuel consumption.
To fulfill requirement No. 1 (see the first section) in conditions of unreliable power supply, the owner of a two-story private house will have to bear the costs of materials - pipes of increased diameter and cladding for the manufacture of decorative boxes. The remaining disadvantages are not critical - slow heating is eliminated by installing a circulation pump, lack of efficiency - by installing special thermal heads on radiators and insulating pipes.
Watch this video on YouTube
Design Tips
If you have taken the development of a gravity heating scheme into your own hands, be sure to consider the following recommendations:
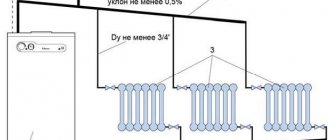
- The minimum diameter of the vertical section coming from the boiler is 50 mm (meaning the internal size of the nominal diameter of the pipe).
- The horizontal distributing and collecting manifold can be reduced to 40 mm, before the last batteries - to 32 mm.
- A slope of 2-3 mm per 1 linear line of the pipeline is made towards the radiators on the supply and the boiler on the return.
- The inlet pipe of the heat generator should be located below the radiators on the first floor, taking into account the slope of the return line. It may be necessary to make a small pit in the boiler room to install a heat source.
- On the connections to heating devices on the second floor, it is better to install a direct bypass of small diameter (15 mm).
- Try to place the upper distribution manifold in the attic so as not to run under the ceilings of the rooms.
- Use an open-type expansion tank with an overflow pipe leading outside and not into the sewer. This makes it easier to monitor when the container is overfilled. The system will not work with a membrane tank.
The calculation and design of gravity heating in a cottage with a complex layout should be entrusted to specialists. And lastly: lines Ø50 mm or more will have to be made of steel pipes, copper or cross-linked polyethylene. The maximum size of metal-plastic is 40 mm, and the diameter of polypropylene will be simply menacing due to the thickness of the walls.
Do-it-yourself installation recommendations
To lay the main natural circulation lines, it is better to use polypropylene or steel pipes. The reason is the large diameter, polyethylene Ø40 mm and more is too expensive. We make radiator hoses from any convenient material.
Advice. When assembling a gravity heating network made of metal-plastic, do not install compression fittings - they greatly reduce the internal passage.
How to make the layout correctly and withstand all the slopes:
- Start with markings. Mark the locations for installing batteries, connection points for connections, and routes for highways.
- Mark the routes on the walls with a pencil, starting from the distant batteries. Adjust the amount of inclination using a long building level.
- Move from the outer radiators to the boiler room. When you draw all the routes, you will understand at what level to install the heat generator. The inlet pipe of the unit (for cooled coolant) must be located at the same level or below the return line.
- If the firebox floor level is too high, try moving all the heaters up. Horizontal pipelines will rise next. As a last resort, make a recess under the boiler.
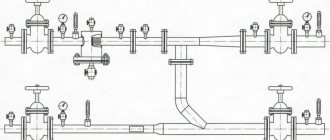
Laying a return line in a furnace room with a parallel connection to two boilers.
After marking, punch holes in the partitions and cut grooves for a hidden gasket. Then check the routes again, make adjustments and proceed with installation. Follow the same order: first secure the batteries, then lay the pipes towards the combustion chamber. Install an expansion tank with a drain pipe.
The gravity pipeline network is filled without problems; Mayevsky’s taps do not need to be touched. Just slowly pump water through the fill valve at the lowest point, all the air will go into the open tank. If any radiator remains cold after warming up, use a manual air vent.